版权声明:本文为博主原创文章,未经博主允许不得转载。 https://blog.csdn.net/pengtgimust/article/details/82857313
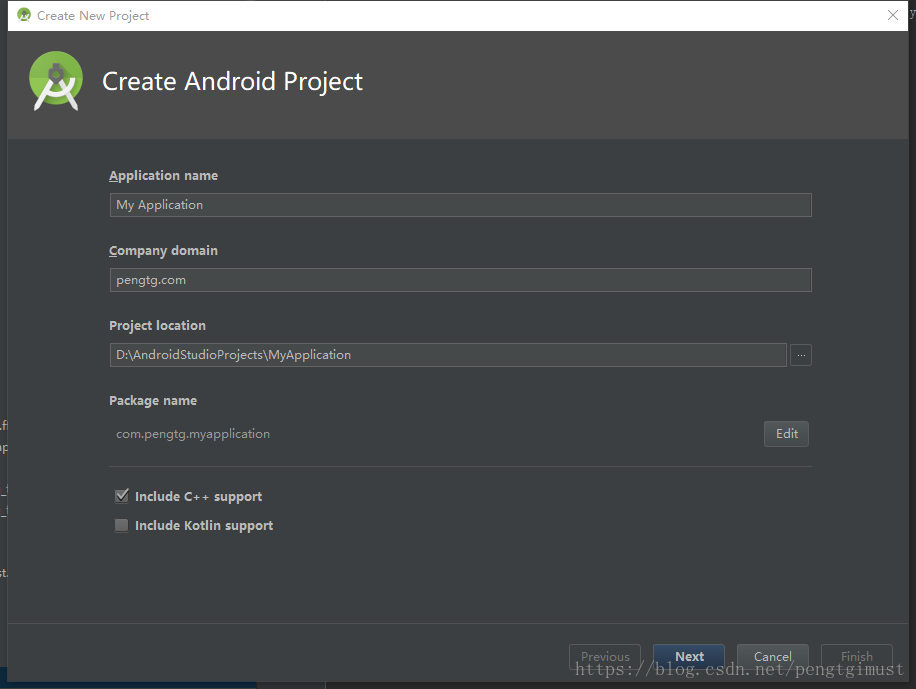
一、创建AndroiStudio工程FFmpegHellWorld
在创建工程的时,将Include C++ Support勾上。
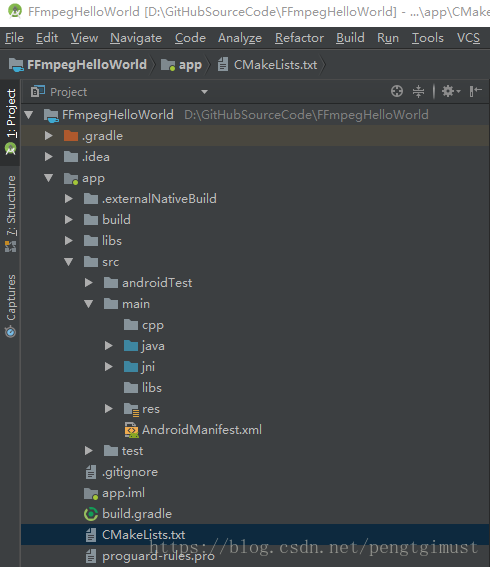
创建好的工程目录如下:
二、添加libffmpeg.so库及头文件,修改CMakeLists
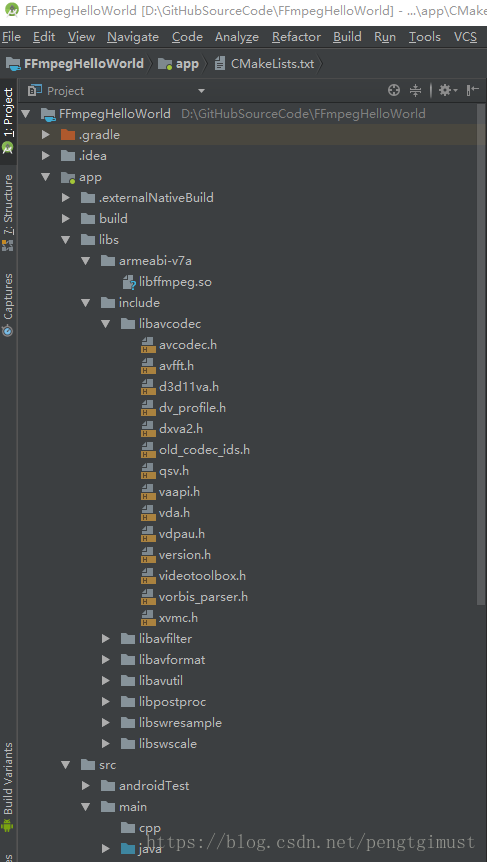
将我们编译好的libffmpeg.so及头文件放入libs目录,如下图所示
修改CMakeLists,添加FFmpeg库路径
set(distribution_DIR ../../../../libs)

add_library( ffmpeg
             SHARED
             IMPORTED)
set_target_properties( ffmpeg
                       PROPERTIES IMPORTED_LOCATION
                       ${distribution_DIR}/armeabi-v7a/libffmpeg.so)
指定链接库及依赖的FFmpeg头文件路径
include_directories(libs/include)

target_link_libraries( # Specifies the target library.
                       native-lib
                       ffmpeg
                       # Links the target library to the log library
                       # included in the NDK.
                       ${log-lib} )
三、编写JNI方法调用FFmpeg库
声明native方法stringFromJNI
package com.pengtg.ffmpeghelloworld;
import android.support.v7.app.AppCompatActivity;
import android.os.Bundle;
import android.widget.TextView;

public class HelloFFmpeg extends AppCompatActivity {
    // Used to load the 'native-lib' library on application startup.
    static {
        System.loadLibrary("ffmpeg");
        System.loadLibrary("native-lib");
    }
    @Override
    protected void onCreate(Bundle savedInstanceState) {
        super.onCreate(savedInstanceState);
        setContentView(R.layout.activity_hello_ffmpeg);

        // Example of a call to a native method
        TextView tv = (TextView) findViewById(R.id.sample_text);
        tv.setText(stringFromJNI());
    }
    /**
     * A native method that is implemented by the 'native-lib' native library,
     * which is packaged with this application.
     */
    public native String stringFromJNI();
}
通过命令javah -jni com.pengtg.ffmpeghelloworld.HelloFFmpeg 生成对应的jni文件
com_pengtg_ffmpeghelloworld_HelloFFmpeg.h
/* DO NOT EDIT THIS FILE - it is machine generated */
#include <jni.h>
/* Header for class com_pengtg_ffmpeghelloworld_HelloFFmpeg */

#ifndef _Included_com_pengtg_ffmpeghelloworld_HelloFFmpeg
#define _Included_com_pengtg_ffmpeghelloworld_HelloFFmpeg
#ifdef __cplusplus
extern "C" {
#endif
/*
 * Class:     com_pengtg_ffmpeghelloworld_HelloFFmpeg
 * Method:    stringFromJNI
 * Signature: ()Ljava/lang/String;
 */
JNIEXPORT jstring JNICALL Java_com_pengtg_ffmpeghelloworld_HelloFFmpeg_stringFromJNI
  (JNIEnv *, jobject);

#ifdef __cplusplus
}
#endif
#endif
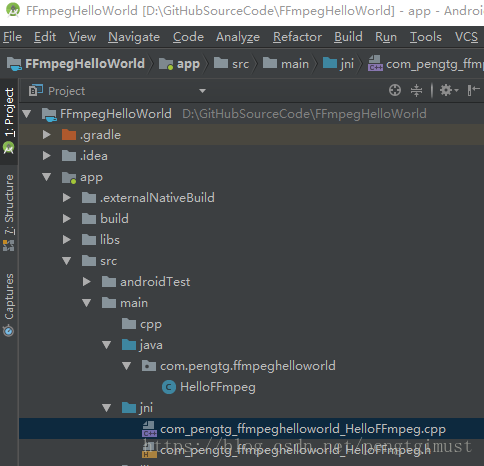
创建CPP文件com_pengtg_ffmpeghelloworld_HelloFFmpeg.cpp放置于jni目录下:
并实现JNI方法
/* DO NOT EDIT THIS FILE - it is machine generated */
#include <jni.h>
#include <stdio.h>


/* Header for class com_pengtg_ffmpeghelloworld_HelloFFmpeg */

#ifndef _Included_com_pengtg_ffmpeghelloworld_HelloFFmpeg
#define _Included_com_pengtg_ffmpeghelloworld_HelloFFmpeg
#ifdef __cplusplus
extern "C" {
#endif
#include "libavcodec/avcodec.h"
/*
 * Class:     com_pengtg_ffmpeghelloworld_HelloFFmpeg
 * Method:    stringFromJNI
 * Signature: ()Ljava/lang/String;
 */
JNIEXPORT jstring JNICALL Java_com_pengtg_ffmpeghelloworld_HelloFFmpeg_stringFromJNI
  (JNIEnv *env, jobject obj){
    char info[10000] = {0};
    sprintf(info, "%s\n", avcodec_configuration());
    return env->NewStringUTF(info);
}

#ifdef __cplusplus
}
#endif
#endif
修改CMakeLists,将cpp文件编译打包进native-lib
add_library( # Sets the name of the library.
             native-lib

             # Sets the library as a shared library.
             SHARED

             # Provides a relative path to your source file(s).
             src/main/jni/com_pengtg_ffmpeghelloworld_HelloFFmpeg.cpp)
修改同级的build.gradle,主要就是修改添加ndk abiFilters 和 sourceSets:
android {
    compileSdkVersion 27
    defaultConfig {
        applicationId "com.pengtg.ffmpeghelloworld"
        minSdkVersion 14
        targetSdkVersion 14
        versionCode 1
        versionName "1.0"
        testInstrumentationRunner "android.support.test.runner.AndroidJUnitRunner"

        ndk {
            abiFilters 'armeabi-v7a'
        }
        externalNativeBuild {
            cmake {
                cppFlags ""
            }
        }
    }

    sourceSets {
        main {
            java.srcDirs = ['src/main/java']
            jni.srcDirs = []
            jniLibs.srcDirs = ['libs']
        }
    }

    buildTypes {
        release {
            minifyEnabled false
            proguardFiles getDefaultProguardFile('proguard-android.txt'), 'proguard-rules.pro'
        }
    }
    externalNativeBuild {
        cmake {
            path "CMakeLists.txt"
        }
    }
}
运行结果如下图:
关于编译FFmpeg库,可以参考上一篇文章:FFMpeg编译打包libffmeg.so总结
关于JNI的学习使用,可参考另外一篇文章:Java和C++互相调用

最后附上工程源码:FFmpegHellWorld(最简单的使用FFMpeg库的工程实例)