二、自定义配置(初阶):
自定义的配置,就要修改一些默认配置的信息,从那开始入手呢?
一般不知从何入手,就看官方文档里是如何做的(https://docs.spring.io/spring-security/site/docs/current/reference/htmlsingle/#jc-oauth2login),或者通过Google 搜索 spring security,在结果中点击Spring Security Reference,点击进入页面,然后就可以看到关于Spring Security的文档;


1、第一步:创建Spring Security 的Java配置,改配置创建一个名为springSecurityFilterChain的servlet过滤器,它负责应用程序的安全(保护程序URL,验证提交的用户名密码,重定向到登录表单等)······
按照第一步,创建一个配置类并实现WebMvcConfigurer接口(User.withDefaultPasswordEncoder()方法以经不推荐使用了,但是文档还是用了这个方法):
@EnableWebSecurity
public class WebSecurityConfig implements WebMvcConfigurer {

    @Bean
    public UserDetailsService userDetailsService() throws Exception {
        InMemoryUserDetailsManager manager = new InMemoryUserDetailsManager();
        manager.createUser(User.withDefaultPasswordEncoder().username("user").password("password").roles("USER").build());
        return manager;
    }
}
然后我们在重新启动一下工程,在日志中已经没有打印密码的信息了,输入配置中设置的用户名和密码,登录成功了。

2、第二步:注册springSecurityFilterChain,这可以用Servlet 3.0 以后版本的Spring's WebApplicationInitializer support在Java 配置中实现。Spring Security 提供了一个基础类 AbstractSecurityWebApplicationInitializer,这个类能够帮你实现注册springSecurityFilterChain,使用这个基础类的方式取决于项目中是否使用Spring,这里按照使用了Spring的方式配置。
public class MvcWebApplicationInitializer extends
		AbstractAnnotationConfigDispatcherServletInitializer {

	@Override
	protected Class<?>[] getRootConfigClasses() {
        //这里的WebSecurityConfig.class 就是前面定义的配置类
		return new Class[] { WebSecurityConfig.class };
	}

	// ... other overrides ...
}
这样就实现了为工程中的每个URL实现通过springSecurityFilterChain拦截 ,那登录页面事怎么出来的呢?

继续看文档,在WebSecurityConfigurerAdapter 类中,有一个方法 configure(HttpSecurity http):
     /**
	 * Override this method to configure the {@link HttpSecurity}. Typically subclasses
	 * should not invoke this method by calling super as it may override their
	 * configuration. The default configuration is:
	 *
	 * <pre>
	 * http.authorizeRequests().anyRequest().authenticated().and().formLogin().and().httpBasic();
	 * </pre>
	 *
	 * @param http the {@link HttpSecurity} to modify
	 * @throws Exception if an error occurs
	 */
	// @formatter:off
	protected void configure(HttpSecurity http) throws Exception {
		logger.debug("Using default configure(HttpSecurity). If subclassed this will potentially override subclass configure(HttpSecurity).");

		http
			.authorizeRequests()
				.anyRequest().authenticated()
				.and()
			.formLogin().and()
			.httpBasic();
	}
这个方法拦截所有路径并跳转到基础登录页,就是默认的登录页。点击formLogin()方法,进入到HttpSecurity类中,会看到:

提示看FormLoginConfigurer中的loginPage()方法,但是这里并没有什么特别有用的东西,可以看到的是,这个方法返回一个FormLoginConfigurer类型的数据,进入FormLoginConfigurer类中,在这个类的描述有这样一段话:

可以看出,一个默认的login页在这里被创建,在这个类最后有一个方法:
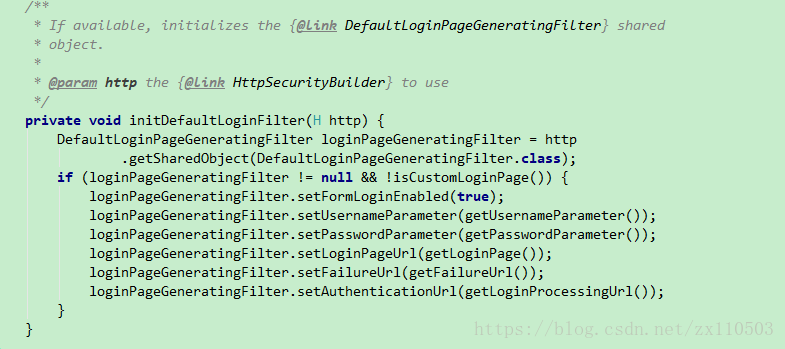
这个方法,初始化一个默认登录页的过滤器,可以看到第一句代码,默认的过滤器是DefaultLoginPageGeneratingFilter,下面是设置一些必要的参数,进入到这个过滤器中:

在描述中可以看到,如果没有配置login页,这个过滤器会被创建,然后看doFilter()方法:
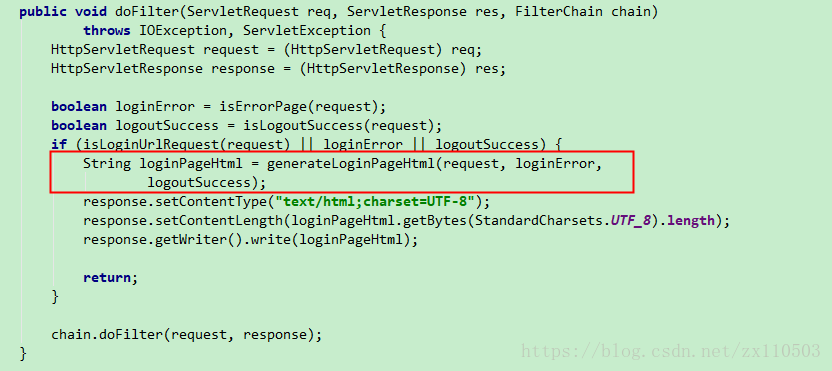
登录页面的配置是通过generateLoginPageHtml()方法创建的,再来看看这个方法内容:
private String generateLoginPageHtml(HttpServletRequest request, boolean loginError,
			boolean logoutSuccess) {
		String errorMsg = "none";

		if (loginError) {
			HttpSession session = request.getSession(false);

			if (session != null) {
				AuthenticationException ex = (AuthenticationException) session
						.getAttribute(WebAttributes.AUTHENTICATION_EXCEPTION);
				errorMsg = ex != null ? ex.getMessage() : "none";
			}
		}

		StringBuilder sb = new StringBuilder();

		sb.append("<html><head><title>Login Page</title></head>");

		if (formLoginEnabled) {
			sb.append("<body onload='document.f.").append(usernameParameter)
					.append(".focus();'>\n");
		}

		if (loginError) {
			sb.append("<p style='color:red;'>Your login attempt was not successful, try again.<br/><br/>Reason: ");
			sb.append(errorMsg);
			sb.append("</p>");
		}

		if (logoutSuccess) {
			sb.append("<p style='color:green;'>You have been logged out</p>");
		}

		if (formLoginEnabled) {
			sb.append("<h3>Login with Username and Password</h3>");
			sb.append("<form name='f' action='").append(request.getContextPath())
					.append(authenticationUrl).append("' method='POST'>\n");
			sb.append("<table>\n");
			sb.append("	<tr><td>User:</td><td><input type='text' name='");
			sb.append(usernameParameter).append("' value='").append("'></td></tr>\n");
			sb.append("	<tr><td>Password:</td><td><input type='password' name='")
					.append(passwordParameter).append("'/></td></tr>\n");

			if (rememberMeParameter != null) {
				sb.append("	<tr><td><input type='checkbox' name='")
						.append(rememberMeParameter)
						.append("'/></td><td>Remember me on this computer.</td></tr>\n");
			}

			sb.append("	<tr><td colspan='2'><input name=\"submit\" type=\"submit\" value=\"Login\"/></td></tr>\n");
			renderHiddenInputs(sb, request);
			sb.append("</table>\n");
			sb.append("</form>");
		}

		if (openIdEnabled) {
			sb.append("<h3>Login with OpenID Identity</h3>");
			sb.append("<form name='oidf' action='").append(request.getContextPath())
					.append(openIDauthenticationUrl).append("' method='POST'>\n");
			sb.append("<table>\n");
			sb.append("	<tr><td>Identity:</td><td><input type='text' size='30' name='");
			sb.append(openIDusernameParameter).append("'/></td></tr>\n");

			if (openIDrememberMeParameter != null) {
				sb.append("	<tr><td><input type='checkbox' name='")
						.append(openIDrememberMeParameter)
						.append("'></td><td>Remember me on this computer.</td></tr>\n");
			}

			sb.append("	<tr><td colspan='2'><input name=\"submit\" type=\"submit\" value=\"Login\"/></td></tr>\n");
			sb.append("</table>\n");
			renderHiddenInputs(sb, request);
			sb.append("</form>");
		}

		if (oauth2LoginEnabled) {
			sb.append("<h3>Login with OAuth 2.0</h3>");
			sb.append("<table>\n");
			for (Map.Entry<String, String> clientAuthenticationUrlToClientName : oauth2AuthenticationUrlToClientName.entrySet()) {
				sb.append(" <tr><td>");
				sb.append("<a href=\"").append(request.getContextPath()).append(clientAuthenticationUrlToClientName.getKey()).append("\">");
				sb.append(HtmlUtils.htmlEscape(clientAuthenticationUrlToClientName.getValue(), "UTF-8"));
				sb.append("</a>");
				sb.append("</td></tr>\n");
			}
			sb.append("</table>\n");
		}

		sb.append("</body></html>");

		return sb.toString();
	}
至此,默认登录页及配置,已经可以清楚了。