在MFC中我们经常需要定时读写数据,或者定时刷新界面,更新数据和状态,这就需要用到定时器,其实现函数为OnTimer,下面对其用法步骤(基于VS2010)进行简要说明:
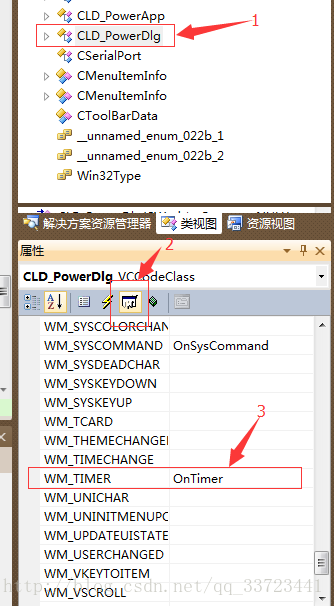
1、在类视图中点击需要使用定时器的对话框类,在属性窗口选择消息,在下面的消息函数中选中WM_TIMER,后面选择添加OnTimer函数,如下图所示:
2、编写OnTimer函数
void CLD_PowerDlg::OnTimer(UINT_PTR nIDEvent)           //定时读取数据
{
    switch (nIDEvent)
    {
        case 1:   //定时器1处理函数,定时发送数据进行更新
        {
            char *a=NULL;
            a = new char[12];
            a[0]=0x55;  a[1]=0xAA;  a[2]=0xdc;             //数据开头
            a[3]=0x06;
            a[4]=0x00;
            a[5]=0x03;
            a[6]=0x44;
            a[7]=0x44;
            a[8]=0xcc;  a[9]=0x33;  a[10]=0xc3; a[11]=0x3c;//数据结尾
            m_SerialPort.WriteData(a,12);
            a=NULL;
            delete a;
        break;
        }

        case 2:   //定时器2位为状态栏时间信息
        {
            CTime t1;
            t1=CTime::GetCurrentTime();//获取当前系统时间
            m_Statusbar.SetPaneText(2,t1.Format("%Y-%m-%d  %H:%M:%S")); //状态栏显示时间
        break;
        }
    }

    CDialogEx::OnTimer(nIDEvent);
}- 1
- 2
- 3
- 4
- 5
- 6
- 7
- 8
- 9
- 10
- 11
- 12
- 13
- 14
- 15
- 16
- 17
- 18
- 19
- 20
- 21
- 22
- 23
- 24
- 25
- 26
- 27
- 28
- 29
- 30
- 31
- 32
3、启动定时器
SetTimer(1,1000,NULL); //参数:定时器标号,定时时间(ms)。启动定时器1,每隔1s刷新一次- 1
4、关闭定时器
KillTimer(1); //关定时器1- 1