该实验详细的综合了OSPF的多个知识点
拓扑要求:
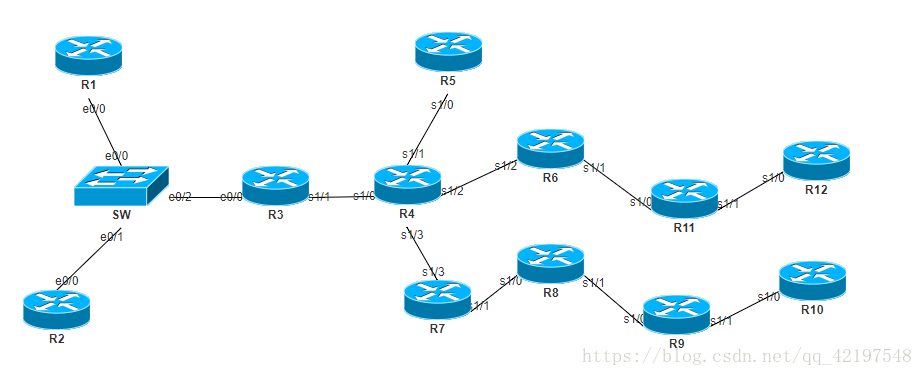
(1)R1/R2/R3与SW在area 1内;R3/R4/R5/R6/R7在area 0内;R6/R11R/12在area 2内;R12的两个环回在EIGRP内;R7/R8/R9在area 3内;R9/R10在area 4内
(2)R4为ISP;R4与直连设备间使用公网IPV4地址
(3)整个OSPF环境内使用的IPV4地址范围为172.16.0.0/16
(4)减少LSA更新量
(5)R3-R5/R6/R7为MGRE环境,R3为中心站点
(6)全网可达
由于IPV4地址范围有限,首先需要合理的规划IPV4地址给对应的节点:
172.16.0.0/24—area 0
172.16.0.0/26(链路地址)
172.16.0.64/26
172.16.0.128/26
172.16.0.192/26
172.16.1.0/24—area 1
172.16.1.0/26(链路地址)
172.16.1.64/26
172.16.1.128/26
172.16.1.192/26
172.16.2.0/24—area 2
172.16.2.0/26(链路地址)
172.16.2.64/26
172.16.2.128/26
172.16.2.192/26
172.16.3.0/24—area 3
172.16.3.0/26(链路地址)
172.16.3.64/26
172.16.3.128/26
172.16.3.192/26
172.16.4.0/24—area 4
172.16.4.0/26(链路地址)
172.16.4.64/26
172.16.4.128/26
172.16.4.192/26
公网地址(可随意配置):
R4的loopback 1的IPV4地址为:4.4.4.4/32
R3-R4的S1/1接口的IPV4地址为:10.1.34.1/24
R4-R3的S1/0接口的IPV4地址为:10.1.34.2/24
R4-R5的S1/1接口的IPV4地址为:10.1.45.1/24
R5-R4的S1/0接口的IPV4地址为:10.1.45.2/24
R4-R6的S1/2接口的IPV4地址为:10.1.46.1/24
R6-R4的S1/2接口的IPV4地址为:10.1.46.2/24
R4-R7的S1/3接口的IPV4地址为:10.1.47.1/24
R7-R4的S1/3接口的IPV4地址为:10.1.47.2/24
私网地址:
EIGRP:
R12的loopback 1的IPV4地址为:192.168.1.1/24
R12的loopback 2的IPV4地址为:192.168.2.1/24
area 0:
R3的tunnel 1接口的IPV4地址为:172.16.0.1/29
R5的tunnel 1接口的IPV4地址为:172.16.0.2/29
R6的tunnel 1接口的IPV4地址为:172.16.0.3/29
R7的tunnel 1接口的IPV4地址为:172.16.0.4/29
R5的loopback 1的IPV4地址为:172.16.0.65/26
R6的loopback 1的IPV4地址为:172.16.0.129/26
R7的loopback 1的IPV4地址为:172.16.0.193/26
area 1:
R1-SW的E0/0的接口IPV4地址为:172.16.1.1/29
R2-SW的E0/0的接口IPV4地址为:172.16.1.2/29
R3-SW的E0/0的接口IPV4地址为:172.16.1.3/29
R1的loopback 1的IPV4地址为:172.16.1.65/26
R2的loopback 1的IPV4地址为:172.16.1.129/26
R3的loopback 1的IPV4地址为:172.16.1.193/26
area 2:
R6-R11的S1/1的接口IPV4地址为:172.16.2.1/30
R11-R6的S1/0的接口IPV4地址为:172.16.2.2/30
R11的loopback 1的接口IPV4地址为:172.16.2.65/26
R11-R12的S1/1的接口IPV4地址为:172.16.2.5/30
R12-R11的S1/0的接口IPV4地址为:172.16.2.6/30
area 3:
R7-R8的S1/1的接口IPV4地址为:172.16.3.1/30
R8-R7的S1/0的接口IPV4地址为:172.16.3.2/30
R8的loopback 1的IPV4地址为:172.16.3.65/26
R8-R9的S1/1的接口IPV4地址为:172.16.3.5/30
R9-R8的S1/0的接口IPV4地址为:172.16.3.6/30
area 4:
R9-R10的S1/1的接口IPV4地址为:172.16.4.1/30
R10-R9的S1/0的接口IPV4地址为:172.16.4.2/30
R9的loopback 1的IPV4地址为:172.16.4.65/26
R9-R10的S1/1的接口IPV4地址为:172.16.4.5/30
R10-R9的S1/0的接口IPV4地址为:172.16.4.6/30
R10的loopback 1的IPV4地址为:172.16.4.129/26
IP地址规划完成之后,开启在area 0内配置MGRE环境:
R3(config)#ip route 0.0.0.0 0.0.0.0 10.1.34.2
R5(config)#ip route 0.0.0.0 0.0.0.0 10.1.45.1
R6(config)#ip route 0.0.0.0 0.0.0.0 10.1.46.1
R7(config)#ip route 0.0.0.0 0.0.0.0 10.1.47.1
R3/R5/R6/R7上配置tunnel 1:
R3(config)#int tunnel 1
R3(config-if)#ip address 172.16.0.1 255.255.255.248
R3(config-if)#tunnel source s1/1
R3(config-if)#tunnel mode gre multipoint
R3(config-if)#ip nhrp network-id 100
R3(config-if)#ip nhrp map multicast dynamic(R3为中心站点)
R5(config)#int tunnel 1
R5(config-if)#ip address 172.16.0.2 255.255.255.248
R5(config-if)#tunnel source s1/0
R5(config-if)#tunnel mode gre multipoint
R5(config-if)#ip nhrp network-id 100
R5(config-if)#ip nhrp nhs 172.16.0.1 nbma 10.1.34.1 multicast
R6(config)#int tunnel 1
R6(config-if)#ip address 172.16.0.3 255.255.255.248
R6(config-if)#tunnel source s1/2
R6(config-if)#tunnel mode gre multipoint
R6(config-if)#ip nhrp network-id 100
R6(config-if)#ip nhrp nhs 172.16.0.1 nbma 10.1.34.1 multicast
R7(config)#int tunnel 1
R7(config-if)#ip address 172.16.0.4 255.255.255.248
R7(config-if)#tunnel source s1/3
R7(config-if)#tunnel mode gre multipoint
R7(config-if)#ip nhrp network-id 100
R7(config-if)#ip nhrp nhs 172.16.0.1 nbma 10.1.34.1 multicast
配置完成后,可以进行验证:
R3(config)#do ping 172.16.0.2
Type escape sequence to abort.
Sending 5, 100-byte ICMP Echos to 172.16.0.2, timeout is 2 seconds:
!!!!!
Success rate is 100 percent (5/5), round-trip min/avg/max = 16/19/20 ms
R3(config)#do ping 172.16.0.3
Type escape sequence to abort.
Sending 5, 100-byte ICMP Echos to 172.16.0.3, timeout is 2 seconds:
!!!!!
Success rate is 100 percent (5/5), round-trip min/avg/max = 19/23/33 ms
R3(config)#do ping 172.16.0.4
Type escape sequence to abort.
Sending 5, 100-byte ICMP Echos to 172.16.0.4, timeout is 2 seconds:
!!!!!
Success rate is 100 percent (5/5), round-trip min/avg/max = 16/18/19 ms
配置OSPF环境:
(R1/R2类似)
R1(config)#router ospf 100
R1(config-router)#router-id 1.1.1.1 (router-id具有本地唯一性,可以随意配置)
R1(config-router)#network 172.16.1.0 0.0.0.255 area 1
R1(config-router)#exit
R3(config)#router ospf 100
R3(config-router)#router-id 3.3.3.3
R3(config-router)#network 172.16.0.0 0.0.0.255 area 0
R3(config-router)#network 172.16.1.0 0.0.0.255 area 1
R3(config-router)#exit
R5(config)#router ospf 100
R5(config-router)#router-id 5.5.5.5
R5(config-router)#network 172.16.0.0 0.0.0.255 area 0
R5(config-router)#exit
R6(config-if)#router ospf 100
R6(config-router)#router-id 6.6.6.6
R6(config-router)#network 172.16.0.0 0.0.0.255 area 0
R6(config-router)#network 172.16.2.0 0.0.0.255 area 2
R6(config-router)#exit
R7(config-if)#router ospf 100
R7(config-router)#router-id 7.7.7.7
R7(config-router)#network 172.16.0.0 0.0.0.255 area 0
R7(config-router)#network 172.16.3.0 0.0.0.255 area 3
R7(config-router)#exit
当R3/R5/R6/R7配置完成后,R3/R5/R6/R7会出现邻居翻滚现象
邻居翻滚原因:tunnel单播建立邻居,出现多个邻居时就会出现邻居翻滚现象
解决方法:
R5(config)#int tunnel 1
R5(config-if)#ip ospf network point-to-multipoint
在R3/R5/R6/R7上修改tunnel的接口类型为P-MP可以组播建立邻居,不选DR
配置完成后,查看邻居关系:
R3#show ip ospf neighbor
Neighbor ID Pri State Dead Time Address Interface
7.7.7.7 0 FULL/ - 00:01:55 172.16.0.4 Tunnel1
6.6.6.6 0 FULL/ - 00:01:34 172.16.0.3 Tunnel1
5.5.5.5 0 FULL/ - 00:01:38 172.16.0.2 Tunnel1
1.1.1.1 1 FULL/DR 00:00:38 172.16.1.1 Ethernet0/0
2.2.2.2 1 FULL/BDR 00:00:39 172.16.1.2 Ethernet0/0
(R11/R12类似)
R11(config)#router ospf 100
R11(config-router)#router-id 11.11.11.11
R11(config-router)#network 172.16.2.0 0.0.0.255 area 2
R11(config-router)#exit
R8(config)#router ospf 100
R8(config-router)#router-id 8.8.8.8
R8(config-router)#network 172.16.3.0 0.0.0.255 area 3
R8(config-router)#exit
R9(config)#router ospf 100
R9(config-router)#router-id 9.9.9.9
R9(config-router)#network 172.16.3.0 0.0.0.255 area 3
R9(config-router)#network 172.16.4.0 0.0.0.255 area 4
R9(config-router)#exit
R10(config)#router ospf 100
R10(config-router)#router-id 10.10.10.10
R10(config-router)#network 172.16.4.0 0.0.0.255 area 4
R10(config-router)#exit
当OSPF环境配置完成后,可以在R3查看路由表,此时R3上的路由表存在area 0,1,2,3的所有路由(由于area 4未连接骨干区域所以其路由并不能被其他OSPF区域所学习)
解决方法:
(1)虚链路
(2)双向重发布
(3)tunnel
此处我们采取双向重发布来解决:
R9(config)#router ospf 100
R9(config-router)#no network 172.16.4.0 0.0.0.255 area 4
R9(config)#router ospf 200
R9(config-router)#router-id 91.1.1.1
R9(config-router)#network 172.16.4.0 0.0.0.255 a
R9(config-router)#network 172.16.4.0 0.0.0.255 area 4
R9(config-router)#exit
R10(config)#no router ospf 100
R10(config)#router ospf 200
R10(config-router)#router-id 10.10.10.10
R10(config-router)#network 172.16.4.0 0.0.0.255 area 4
R10(config-router)#exit
R9(config)#router ospf 100
R9(config-router)#redistribute ospf 200 subnets
R9(config-router)#exit
R9(config)#router ospf 200
R9(config-router)#redistribute ospf 100 subnets
R9(config-router)#exit
配置完成后,在R3上查看路由表会额外出现OE 2类型的OSPF路由:
O E2 172.16.4.0/30 [110/64] via 172.16.3.2, 00:01:24, Serial1/1
O E2 172.16.4.64/26 [110/1] via 172.16.3.2, 00:01:24, Serial1/1
O E2 172.16.4.129/32 [110/65] via 172.16.3.2, 00:01:24, Serial1/1
在R12上配置EIGRP环境:
R12(config)#router eigrp 99
R12(config-router)#no auto-summary
R12(config-router)#network 192.168.1.0 0.0.0.255
R12(config-router)#network 192.168.2.0 0.0.0.255
R12(config-router)#exit
完成之后,在R12进行重发布使得OSPF可以学习EIGRP的路由:
R12(config)#router ospf 100
R12(config-router)#redistribute eigrp 99 subnets
R12(config-router)#exit
可在R3上查看路由表,此时会额外出现OE 2类型的OSPF路由:
O E2 192.168.1.0/24 [110/20] via 172.16.0.3, 00:00:08, Tunnel1
O E2 192.168.2.0/24 [110/20] via 172.16.0.3, 00:00:08, Tunnel1
由于OSPF可以设置 特殊区域 与 汇总路由 来减少LSA更新量
汇总:
R3(config-router)#area 1 range 172.16.1.0 255.255.255.0(area 1的汇总)
R6(config-router)#area 2 range 172.16.2.0 255.255.255.0(area 2的汇总)
R7(config-router)#area 3 range 172.16.3.0 255.255.255.0(area 3的汇总)
特殊区域:
【1】area 1区域可以设置为totally stub区域(过滤掉3,4,5类LSA,下发一条3类默认)
配置:
R3(config)#router ospf 100
R3(config-router)#area 1 stub no-summary
R1(config)#router ospf 100
R1(config-router)#area 1 stub
R2(config)#router os 100
R2(config-router)#area 1 stub
配置完成之后,在R1上查看路由表只能看到一条3类默认路由与本地路由:
R1#show ip route ospf
O*IA 0.0.0.0/0 [110/11] via 172.16.1.3, 00:00:37, Ethernet0/0
【2】area 2区域可以设置为totally nssa区域(过滤掉3,4,5类LSA,下发一条3类默认,并且产生7类LSA替代5类LSA)
R6(config)#router ospf 100
R6(config-router)#area 2 nssa no-summary
R11(config)#router ospf 100
R11(config-router)#area 2 nssa
R12(config)#router ospf 100
R12(config-router)#area 2 nssa
配置完成之后,在R11上查看路由表只能看到一条3类默认路由与ON 2类型的路由:
R11#show ip route ospf
O*IA 0.0.0.0/0 [110/65] via 172.16.2.1, 00:00:57, Serial1/0
O N2 192.168.1.0/24 [110/20] via 172.16.2.6, 00:00:57, Serial1/1
O N2 192.168.2.0/24 [110/20] via 172.16.2.6, 00:00:57, Serial1/1
【3】area 3区域可以设置为totally nssa区域
R7(config-router)#area 3 nssa no-summary
R8(config-router)#area 3 nssa
R9(config-router)#area 3 nssa
完成之后,在R9上查看路由表:
R9#show ip route ospf
O*IA 0.0.0.0/0 [110/129] via 172.16.3.5, 00:04:15, Serial1/0
所有配置完成之后,在R5上查看骨干区域的所有路由:
R5#show ip route ospf
172.16.0.0/16 is variably subnetted, 15 subnets, 5 masks
O 172.16.0.1/32 [110/1000] via 172.16.0.1, 01:30:47, Tunnel1
O 172.16.0.3/32 [110/2000] via 172.16.0.1, 01:30:21, Tunnel1
O 172.16.0.4/32 [110/2000] via 172.16.0.1, 01:30:11, Tunnel1
O 172.16.0.129/32 [110/2001] via 172.16.0.1, 00:50:31, Tunnel1
O 172.16.0.193/32 [110/2001] via 172.16.0.1, 00:50:31, Tunnel1
O IA 172.16.1.0/24 [110/1001] via 172.16.0.1, 00:09:39, Tunnel1
O IA 172.16.2.0/24 [110/2064] via 172.16.0.1, 00:00:31, Tunnel1
O IA 172.16.3.0/24 [110/2064] via 172.16.0.1, 00:00:11, Tunnel1
O E2 172.16.4.0/30 [110/64] via 172.16.0.1, 00:17:58, Tunnel1
O E2 172.16.4.64/26 [110/1] via 172.16.0.1, 00:17:58, Tunnel1
O E2 172.16.4.129/32 [110/65] via 172.16.0.1, 00:17:58, Tunnel1
O E2 192.168.1.0/24 [110/20] via 172.16.0.1, 00:20:28, Tunnel1
O E2 192.168.2.0/24 [110/20] via 172.16.0.1, 00:20:28, Tunnel1
此时,还应该满足全网可达,并且访问R4的环回4.4.4.4/24
area 1:
R3(config)#access-list 1 permit 172.16.1.0 0.0.0.255
R3(config)#ip nat inside source list 1 interface s1/1 overload
R3(config)#int s1/1
R3(config-if)#ip nat outside
R3(config)#int e0/0
R3(config-if)#ip nat inside
area 2:
R6(config)#access-list 1 permit 172.16.2.0 0.0.0.255
R6(config)#access-list 1 permit 192.168.0.0 0.0.255.255
R6(config)#ip nat inside source list 1 interface s1/2 overload
R6(config)#int s1/2
R6(config-if)#ip nat outside
R6(config)#int s1/1
R6(config-if)#ip nat inside
area 3:
R7(config)#access-list 1 permit 172.16.3.0 0.0.0.255
R7(config)#access-list 1 permit 172.16.4.0 0.0.0.255
R7(config)#ip nat inside source list 1 interface s1/3 overload
R7(config)#int s1/3
R7(config-if)#ip nat outside
R7(config)#int s1/1
R7(config-if)#ip nat inside
由于R10未拥有默认路由,所以应该在R9上的OSPF 200上下发默认缺省给R10:
R9(config)#router ospf 200
R9(config-router)#default-information originate always
在R10上查看路由表:
R10#show ip route
O*E2 0.0.0.0/0 [110/1] via 172.16.4.1, 00:00:04, Serial1/0
完成所有配置之后,此实验所有要求全部完成。
下面进行验证:
R1pingR4
R1#ping 4.4.4.4 source 172.16.1.65
Type escape sequence to abort.
Sending 5, 100-byte ICMP Echos to 4.4.4.4, timeout is 2 seconds:
!!!!!
Success rate is 100 percent (5/5), round-trip min/avg/max = 9/9/10 ms
R12pingR4
R12#ping 4.4.4.4 source 192.168.1.1
Type escape sequence to abort.
Sending 5, 100-byte ICMP Echos to 4.4.4.4, timeout is 2 seconds:
Packet sent with a source address of 192.168.1.1
!!!!!
Success rate is 100 percent (5/5), round-trip min/avg/max = 26/29/31 ms
R10pingR4
R10#ping 4.4.4.4 source 172.16.4.129
Type escape sequence to abort.
Sending 5, 100-byte ICMP Echos to 4.4.4.4, timeout is 2 seconds:
Packet sent with a source address of 172.16.4.129
!!!!!
Success rate is 100 percent (5/5), round-trip min/avg/max = 34/37/39 ms
香蕉味的安慕希酸奶°