ViewRoot是一个ViewRootImpl对象,它是连接WindowManager和DecorView的纽带,View绘制的三大流程都是通过ViewRoot来完成的。
绘制View的三个过程
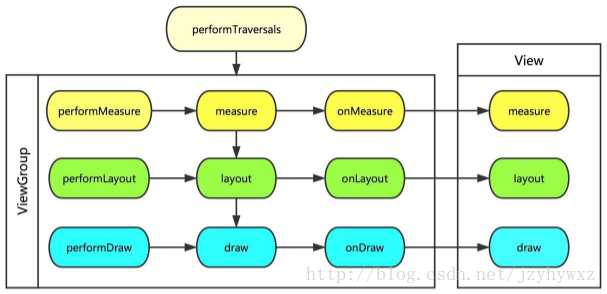
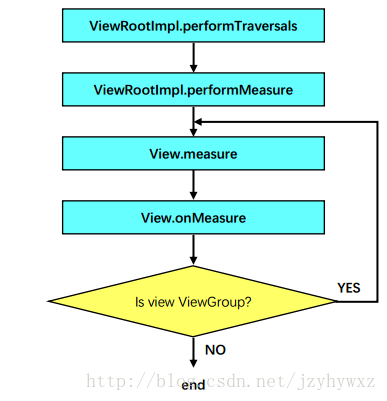
View的绘制是从ViewRootImpl的performTraversals方法开始的,并经过measure、layout和draw三个过程才能最终将一个View绘制出来。其中measure过程对View的宽高进行测量,layout过程会确定View在父容器中的放置位置,draw过程负责将View绘制到屏幕上,这三个过程可以用下图表示:
这一点也可以从源码看出:
/* ViewRootImpl.performTraversals */
private void performTraversals() {
    // ...
    performMeasure(childWidthMeasureSpec, childHeightMeasureSpec);
    // ...
    performLayout(lp, mWidth, mHeight);
    // ...
    performDraw();
    // ...
}performTraversals方法会依次调用performMeasure、performLayout和performDraw三个方法,这三个方法分别负责完成measure、layout和draw三个过程。拿measure过程来说,在performMeasure方法中会调用measure方法,在measure方法中又会调用onMeasure方法,在onMeasure方法中又会调用所有子View的measure方法,这时measure过程就从父View进入到了子View,接着子View会重复父View的measure过程,如此反复就遍历完了整个View树。layout过程和draw过程也与此类似。本文主要对measure过程进行分析。
measure基础:认识MeasureSpec
就像上面说的那样,measure过程实际上就是在View树上递归调用measure方法,其中,如果是ViewGroup,则会在measure方法中调用onMeasure方法,在onMeasure方法中又会调用所有子View的measure方法;如果是View(不是ViewGroup),则在onMeasure方法中结束递归。
在分析measure过程之前,我们还需要认识一下MeasureSpec,它对决定View的尺寸大小起到了很大的作用。
看源码就会发现,在View的measure过程中会频繁的出现MeasureSpec,那到底什么是MeasureSpec呢?从字面上看,MeasureSpec可以翻译成“测量规范”,从功能上看,MeasureSpec在很大程度上决定了一个View的尺寸大小。实际上,系统会根据父View的MeasureSpec和子View的LayoutParams共同决定子View的MeasureSpec,因此,理解MeasureSpec对我们分析View的measure过程十分重要。
/* View.MeasureSpec */
public static class MeasureSpec {
    private static final int MODE_SHIFT = 30;
    private static final int MODE_MASK  = 0x3 << MODE_SHIFT;
    public static final int UNSPECIFIED = 0 << MODE_SHIFT;
    public static final int EXACTLY     = 1 << MODE_SHIFT;
    public static final int AT_MOST     = 2 << MODE_SHIFT;

    public static int makeMeasureSpec(int size, int mode) {
        if (sUseBrokenMakeMeasureSpec) {
            return size + mode;
        } else {
            return (size & ~MODE_MASK) | (mode & MODE_MASK);
        }
    }

    public static int getMode(int measureSpec) {
        return (measureSpec & MODE_MASK);
    }

    public static int getSize(int measureSpec) {
        return (measureSpec & ~MODE_MASK);
    }
}
上面是MeasureSpec类的主要源码,MeasureSpec是View的一个静态内部类。可以看到,MeasureSpec实际上代表一个int值,高2位表示SpecMode,低30位表示SpecSize,其中SpecMode表示测量模式,SpecSize表示在某种测量模式下的尺寸大小。另外,MeasureSpec类还提供了几个组合和分解方法:
- makeMeasureSpec方法可以把SpecMode和SpecSize组合成一个MeasureSpec;
- getMode方法可以从一个MeasureSpec中提取出SpecMode;
- getSize方法可以从一个MeasureSpec中提取出SpecSize。
SpecMode有三种,分别是:
- UNSPECIFIED:父View不对子View加任何限制,子View要多大就给多大,这种情况一般用于系统内部;
- EXACTLY:父View已经确定了子View的精确尺寸,子View的最终大小就是SpecSize,这种情况用于LayoutParams中的match_parent和具体数值;
- AT_MOST:父View对子View限定一个大小,子View的最终大小不能超过这个值,这种情况用于LayoutParams中的wrap_content。
measure第一步:从DecorView开始
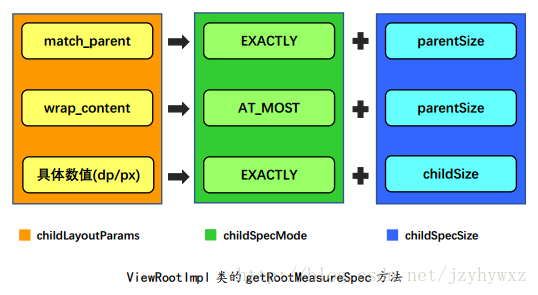
我们知道,DecorView作为顶级View,也就是View树的根,measure过程是从它开始的。在performTraversals方法中,首先会根据windowSize和layoutParams计算DecorView的MeasureSpec,然后将DecorView的MeasureSpec作为参数传递给performMeasure方法,这样就开始执行measure过程。
先来看看系统是如何计算DecorView的MeasureSpec的。在performTraversals方法中,有这样一段代码:
/* ViewRootImpl.performTraversals */
int childWidthMeasureSpec = getRootMeasureSpec(mWidth, lp.width);
int childHeightMeasureSpec = getRootMeasureSpec(mHeight, lp.height);
performMeasure(childWidthMeasureSpec, childHeightMeasureSpec);可以看到,在performTraversals方法内部是通过getRootMeasureSpec方法计算DecorView的MeasureSpec的。其中,mWidth和mHeight是当前窗口的大小,lp是DecorView的LayoutParams。getRootMeasureSpec方法会根据当前窗口的大小和DecorView的LayoutParams计算DecorView的MeasureSpec:
/* ViewRootImpl.getRootMeasureSpec */
private static int getRootMeasureSpec(int windowSize, int rootDimension) {
    int measureSpec;
    switch (rootDimension) {
    case ViewGroup.LayoutParams.MATCH_PARENT:
        // Window can't resize. Force root view to be windowSize.
        measureSpec = MeasureSpec.makeMeasureSpec(windowSize, MeasureSpec.EXACTLY);
        break;
    case ViewGroup.LayoutParams.WRAP_CONTENT:
        // Window can resize. Set max size for root view.
        measureSpec = MeasureSpec.makeMeasureSpec(windowSize, MeasureSpec.AT_MOST);
        break;
    default:
        // Window wants to be an exact size. Force root view to be that size.
        measureSpec = MeasureSpec.makeMeasureSpec(rootDimension, MeasureSpec.EXACTLY);
        break;
    }
    return measureSpec;
}下图是对getRootMeasureSpec方法计算DecorView的MeasureSpec的规则的总结:
在得到DecorView的MeasureSpec之后,会在performMeasure方法中开始measure过程:
/* ViewRootImpl.performMeasure */
private void performMeasure(int childWidthMeasureSpec, int childHeightMeasureSpec) {
    Trace.traceBegin(Trace.TRACE_TAG_VIEW, "measure");
    try {
        mView.measure(childWidthMeasureSpec, childHeightMeasureSpec);
    } finally {
        Trace.traceEnd(Trace.TRACE_TAG_VIEW);
    }
}在performMeasure方法中,调用了mView的measure方法,其实mView就是DecorView,这样顶级View就开始了measure过程。
measure第二步:从父View向子View传递
经过上面的分析,measure过程是从DecorView开始的,那么,measure过程是如何一步步遍历完整个View树的呢?换句话说,我们得弄清楚measure过程是如何从父View向子View传递的。
在上一节内容的最后,我们追踪到了DecorView的measure方法,实际上,DecorView的measure方法是从View继承过来的。因此,下面我们看看View的measure方法(省略了一些非必要代码):
/* View.measure */
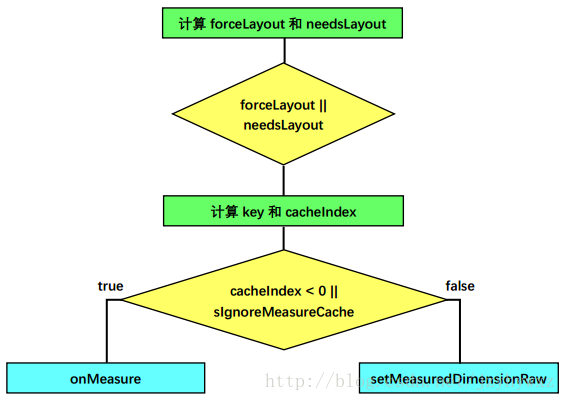
public final void measure(int widthMeasureSpec, int heightMeasureSpec) {
if (forceLayout || needsLayout) {
mPrivateFlags &= ~PFLAG_MEASURED_DIMENSION_SET;
int cacheIndex = forceLayout ? -1 : mMeasureCache.indexOfKey(key);
if (cacheIndex < 0 || sIgnoreMeasureCache) {
onMeasure(widthMeasureSpec, heightMeasureSpec);
mPrivateFlags3 &= ~PFLAG3_MEASURE_NEEDED_BEFORE_LAYOUT;
} else {
long value = mMeasureCache.valueAt(cacheIndex);
setMeasuredDimensionRaw((int) (value >> 32), (int) value);
mPrivateFlags3 |= PFLAG3_MEASURE_NEEDED_BEFORE_LAYOUT;
}
mPrivateFlags |= PFLAG_LAYOUT_REQUIRED;
}
mOldWidthMeasureSpec = widthMeasureSpec;
mOldHeightMeasureSpec = heightMeasureSpec;
mMeasureCache.put(key, ((long) mMeasuredWidth) << 32 |
(long) mMeasuredHeight & 0xffffffffL);
}在measure方法中,首先,判断是否需要进行layout,如果相应的标志位被置位或者当前View的大小发生改变时,则需要进行layout;接着,如果需要进行layout,再根据不同的条件进行相应的操作:如果是强制性的或者忽略了缓存,则执行onMeasure方法,否则执行setMeasuredDimensionRaw方法;最后,记录当前的MeasureSpec并将其加入缓存。整个过程可以用下图表示:
PS:PFLAG3_MEASURE_NEEDED_BEFORE_LAYOUT标志位会影响layout过程。
其实,在源码中还有这么一段对measure方法的注释:
The actual measurement work of a view is performed in onMeasure(int, int), called by this method. Therefore, only onMeasure(int, int) can and must be overridden by subclasses.
看到这我们也明白了:真正的测量工作是在onMeasure方法中执行的,因此在自定义View时不必重写measure方法,而要(也只能)重写onMeasure方法。
下面继续追踪onMeasure方法,这里有两种情况,一种是在ViewGroup中的情况,另一种是View中的情况。由于我们已经知道了measure过程会从父View传递到子View,因此我们先追踪第一种情况。
查看ViewGroup的源码,我们发现找不到onMeasure方法!!!别急,我们好好想一想,既然ViewGroup是View的一个子类,而在View中存在onMeasure方法,那么ViewGroup并不是没有onMeasure方法,而是没有重写onMeasure方法。说到这,你可能已经迫不及待地想去看View的onMeasure方法了。先别急,我们再想一想,平时我们写代码时用到的View容器有LinearLayout、RelativeLayout、FrameLayout等等,而从来没用过ViewGroup,实际上ViewGroup是一个抽象类,我们是不可能创建一个ViewGroup对象实例的。再结合上面提到的measure方法注释,原来每一个具体的View容器都有自己的onMeasure方法!
父View对自身的测量
经过上面的推理,我们选择一个View容器来看看它的onMeasure方法,这里我们选择FrameLayout,因为它的布局可以说是最简单的了,我们不想引入额外的不必要的逻辑。另外,由于FrameLayout是ViewGroup,因此它的onMeasure方法不仅需要对自身进行测量,也需要对所有子View进行测量。
先来看FrameLayout是如何对自身进行测量的:
/* FrameLayout.onMeasure */
int count = getChildCount();

final boolean measureMatchParentChildren =
        MeasureSpec.getMode(widthMeasureSpec) != MeasureSpec.EXACTLY ||
        MeasureSpec.getMode(heightMeasureSpec) != MeasureSpec.EXACTLY;
mMatchParentChildren.clear();

int maxHeight = 0;
int maxWidth = 0;
int childState = 0;

for (int i = 0; i < count; i++) {
    final View child = getChildAt(i);
    if (mMeasureAllChildren || child.getVisibility() != GONE) {
        measureChildWithMargins(child, widthMeasureSpec, 0, heightMeasureSpec, 0);
        final LayoutParams lp = (LayoutParams) child.getLayoutParams();
        maxWidth = Math.max(maxWidth,
                child.getMeasuredWidth() + lp.leftMargin + lp.rightMargin);
        maxHeight = Math.max(maxHeight,
                child.getMeasuredHeight() + lp.topMargin + lp.bottomMargin);
        childState = combineMeasuredStates(childState, child.getMeasuredState());
        if (measureMatchParentChildren) {
            if (lp.width == LayoutParams.MATCH_PARENT ||
                    lp.height == LayoutParams.MATCH_PARENT) {
                mMatchParentChildren.add(child);
            }
        }
    }
}

// Account for padding too
maxWidth += getPaddingLeftWithForeground() + getPaddingRightWithForeground();
maxHeight += getPaddingTopWithForeground() + getPaddingBottomWithForeground();

// Check against our minimum height and width
maxHeight = Math.max(maxHeight, getSuggestedMinimumHeight());
maxWidth = Math.max(maxWidth, getSuggestedMinimumWidth());

// Check against our foreground's minimum height and width
final Drawable drawable = getForeground();
if (drawable != null) {
    maxHeight = Math.max(maxHeight, drawable.getMinimumHeight());
    maxWidth = Math.max(maxWidth, drawable.getMinimumWidth());
}

setMeasuredDimension(resolveSizeAndState(maxWidth, widthMeasureSpec, childState),
        resolveSizeAndState(maxHeight, heightMeasureSpec,
                 childState << MEASURED_HEIGHT_STATE_SHIFT));
我们分步骤来解析这段代码:
1. 首先,判断FrameLayout的SpecMode是否是EXACTLY,如果是,则所有子View只需要measure一次,否则LayoutParams为match_parent的子View需要measure两次;
2. 接着,遍历所有的子View,计算其测量宽高,并记录maxWidth和maxHeight。另外,如果FrameLayout的SpecMode不是EXACTLY,则还要统计所有LayoutParams为match_parent的子View,这些子View会在后面进行第二次measure;
3. 然后,综合FrameLayout自身的、前景的和背景的最小宽高,调整maxWidth和maxHeight;
4. 最后,设置FrameLayout的测量宽高。
下面针对每一个步骤来分析FrameLayout自身的测量过程。
========== 第一步 ==========
这里我们先要有一个意识:父View对子View的大小进行约束,子View反过来影响父View的大小。什么意思呢?举个例子:在一个FrameLayout中放置一个TextView,如果FrameLayout和TextView的LayoutParams均为match_parent,则TextView的大小由FrameLayout决定;如果FrameLayout和TextView的LayoutParams均为wrap_content,则FrameLayout的大小由TextView决定。明白了这一点,我们就能很容易的理解第一步了。
第一种情况,如果FrameLayout的大小已经确定(SpecMode为EXACTLY),则子View只会受到父View的约束,而不会反过来影响父View的大小,因此,子View可以放心的测量自己的大小而不用担心在此过程中父View的大小会再发生变化。
第二种情况,如果FrameLayout的大小还未确定(SpecMode为AT_MOST),则LayoutParams为match_parent的子View在当下还无法确定自身的准确大小,因此需要在FrameLayout大小确定后进行第二次测量。
========== 第二步 ==========
在一个for循环中遍历所有占空间的View(即可见性不为GONE),通过measureChildWithMargins方法计算其测量大小,这个测量大小可以通过getMeasuredWidth和getMeasuredHeight方法得到。同时,记录子View中最大的宽度和高度,它们将影响FrameLayout的大小。另外,就像第一步中提到的,如果FrameLayout的SpecMode不为EXACTLY,并且它有LayoutParams为match_parent的子View,则需要把这些子View记录下来,并在FrameLayout确定自身大小后,对它们进行第二次测量。
========== 第三步 ==========
在得到子View中的最大宽高之后,还需要结合FrameLayout自身的、前景的和背景的最小大小调整最大宽高。
========== 第四步 ==========
经过上面三步后,我们已经得到了FrameLayout的理想宽高,之所以说是理想宽高而不是测量宽高,是因为当前的maxWidth和maxHeight还不一定符合FrameLayout的MeasureSpec。简单来说,经过第三步后,maxWidth为500,但是FrameLayout的SpecMode为AT_MOST并且SpecSize只有400,这种情况下是不能把FrameLayout的大小设置成500的。resolveSizeAndState方法就是为此存在的:
/* View.resolveSizeAndState */
public static int resolveSizeAndState(int size, int measureSpec,
        int childMeasuredState) {
    final int specMode = MeasureSpec.getMode(measureSpec);
    final int specSize = MeasureSpec.getSize(measureSpec);
    final int result;
    switch (specMode) {
    case MeasureSpec.AT_MOST:
        if (specSize < size) {
            result = specSize | MEASURED_STATE_TOO_SMALL;
        } else {
            result = size;
        }
        break;
    case MeasureSpec.EXACTLY:
        result = specSize;
        break;
    case MeasureSpec.UNSPECIFIED:
    default:
        result = size;
    }
    return result | (childMeasuredState & MEASURED_STATE_MASK);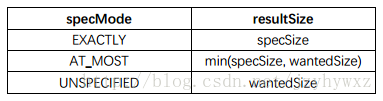
}由于resolveSizeAndState方法不是这里的重点,因此我们只给出下表展示SpecMode和resultSize的对应关系:
好了,现在终于到了设置FrameLayout自身的测量宽高的时刻了。通过setMeasuredDimension方法可以设置一个View的测量宽高,但实际上在其内部又调用了setMeasuredDimensionRaw方法,这里我们只看setMeasuredDimensionRaw方法的源码:
/* View. */
private void setMeasuredDimensionRaw(int measuredWidth, int measuredHeight) {
    mMeasuredWidth = measuredWidth;
    mMeasuredHeight = measuredHeight;

    mPrivateFlags |= PFLAG_MEASURED_DIMENSION_SET;
}可以看到,mMeasuredWidth和mMeasuredHeight两个View的成员变量用于保存测量宽高,另外,将PFLAG_MEASURED_DIMENSION_SET标志位置位后表明了测量完成,注意,如果没有设置此标志位,则在measure方法中会抛出IllegalStateException异常。
到此,FrameLayout对自身的测量就完成了,下面来看看FrameLayout是如何对子View进行测量的。
父View对子View的测量
在上一节中,我们知道了一个子View可能只测量一次,也可能要测量两次。至于原因,在上一节中已经说的很清楚了,这里不再赘述。下面我们将针对这两种情况展开讨论。
========== 一次测量 ==========
在FrameLayout的onMeasure方法中,子View的第一次测量是通过measureChildWithMargins方法进行的:
/* ViewGroup.measureChildWithMargins */
protected void measureChildWithMargins(View child,
        int parentWidthMeasureSpec, int widthUsed,
        int parentHeightMeasureSpec, int heightUsed) {
    final MarginLayoutParams lp = (MarginLayoutParams) child.getLayoutParams();

    final int childWidthMeasureSpec = getChildMeasureSpec(parentWidthMeasureSpec,
            mPaddingLeft + mPaddingRight + lp.leftMargin + lp.rightMargin
                    + widthUsed, lp.width);
    final int childHeightMeasureSpec = getChildMeasureSpec(parentHeightMeasureSpec,
            mPaddingTop + mPaddingBottom + lp.topMargin + lp.bottomMargin
                    + heightUsed, lp.height);

    child.measure(childWidthMeasureSpec, childHeightMeasureSpec);
}在measureChildWithMargins方法中,先通过getChildMeasureSpec方法计算得到子View的MeasureSpec,再通过调用子View的measure方法递归执行,实际上,这里就是measure过程从父View传递给子View的地方。
我们先来看getChildMeasureSpec方法是如何计算子View的MeasureSpec的:
/* ViewGroup.getChildMeasureSpec */
public static int getChildMeasureSpec(int spec, int padding, int childDimension) {
    int specMode = MeasureSpec.getMode(spec);
    int specSize = MeasureSpec.getSize(spec);

    int size = Math.max(0, specSize - padding);

    int resultSize = 0;
    int resultMode = 0;

    switch (specMode) {
    // Parent has imposed an exact size on us
    case MeasureSpec.EXACTLY:
        if (childDimension >= 0) {
            resultSize = childDimension;
            resultMode = MeasureSpec.EXACTLY;
        } else if (childDimension == LayoutParams.MATCH_PARENT) {
            resultSize = size;
            resultMode = MeasureSpec.EXACTLY;
        } else if (childDimension == LayoutParams.WRAP_CONTENT) {
            resultSize = size;
            resultMode = MeasureSpec.AT_MOST;
        }
        break;
    // other cases
    }
    return MeasureSpec.makeMeasureSpec(resultSize, resultMode);
}
这里省略了其它几种情况的代码,因为原理都是相同的,都是根据父View(这里是FrameLayout)的MeasureSpec和子View的LayoutParams共同决定子View的MeasureSpec,所有情况可以看下表:
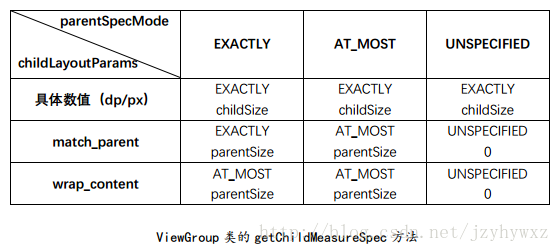
得到子View的MeasureSpec后,会调用子View的measure方法继续遍历下一层View树,直到到达叶子节点为止,终止情况会在后面说明。
========== 二次测量 ==========
第二次测量在FrameLayout的测量大小确定后进行,相关源码如下:
/* FrameLayout.onMeasure */
count = mMatchParentChildren.size();
if (count > 1) {
    for (int i = 0; i < count; i++) {
        final View child = mMatchParentChildren.get(i);
        final MarginLayoutParams lp = (MarginLayoutParams) child.getLayoutParams();

        final int childWidthMeasureSpec;
        if (lp.width == LayoutParams.MATCH_PARENT) {
            final int width = Math.max(0, getMeasuredWidth()
                    - getPaddingLeftWithForeground() - getPaddingRightWithForeground()
                    - lp.leftMargin - lp.rightMargin);
            childWidthMeasureSpec = MeasureSpec.makeMeasureSpec(
                    width, MeasureSpec.EXACTLY);
        } else {
            childWidthMeasureSpec = getChildMeasureSpec(widthMeasureSpec,
                    getPaddingLeftWithForeground() + getPaddingRightWithForeground() +
                    lp.leftMargin + lp.rightMargin,
                    lp.width);
        }

        final int childHeightMeasureSpec;
        // ...

        child.measure(childWidthMeasureSpec, childHeightMeasureSpec);
    }
}有了第一次测量的基础,再来看第二次测量就太简单了。这里只是改变了getChildMeasureSpec方法中子View的LayoutParams为match_parent的情况,其它情况都相同,我们同样用表格展示:
得到子View的MeasureSpec之后,同样需要调用子View的measure方法,这是因为如果此子View是一个ViewGroup的话,由于父View大小的变化会影响到子View,因此,一旦父View的大小改变后,就需要重新对子View进行测量。
measure第三步:在View处终止
measure过程从DecorView开始后,经过父View向子View的一轮轮传递后,最后会到达View树的叶子节点处,到了这里,整个measure过程就差不多快完成了。
在measure第二步中,我们分析了ViewGroup的onMeasure方法,搞清楚了measure过程是如何从父View传递到子View的。现在,我们需要明白measure过程是如何在View(不是ViewGroup)处终止的,先来看View的onMeasure方法:
/* View.onMeasure */
protected void onMeasure(int widthMeasureSpec, int heightMeasureSpec) {
    setMeasuredDimension(
            getDefaultSize(getSuggestedMinimumWidth(), widthMeasureSpec),
            getDefaultSize(getSuggestedMinimumHeight(), heightMeasureSpec));
}setMeasuredDimension方法我们已经在上面讨论过了,因此直接看getDefaultSize方法:
/* View.getDefaultSize */
public static int getDefaultSize(int size, int measureSpec) {
    int result = size;
    int specMode = MeasureSpec.getMode(measureSpec);
    int specSize = MeasureSpec.getSize(measureSpec);

    switch (specMode) {
    case MeasureSpec.UNSPECIFIED:
        result = size;
        break;
    case MeasureSpec.AT_MOST:
    case MeasureSpec.EXACTLY:
        result = specSize;
        break;
    }
    return result;
}getDefaultSize方法很简单,它会根据View自身的MeasureSpec决定自身的大小:当specMode为UNSPECIFIED时,大小为第一个参数size,否则为specSize。
另外还要注意一点,实际上像TextView、ImageView或者其它自定义View都会重写onMeasure方法,不过在onMeasure方法中基本上都要调用setMeasuredDimension方法,因此原理是一样的。
measure总结:回顾整个过程
讲到这里终于把整个measure过程讲完了,看完上面三个部分的内容,相信大家至少对整个measure过程有了一些体会,最后再给出一个measure过程的流程图:

每天进步一点点ヾ(๑╹◡╹)ノ”