measure - 测量
确定View的测量宽高
上面说到 performTraversals() 函数的时候,内部调用了 performMeasure()
private void performMeasure(int childWidthMeasureSpec, int childHeightMeasureSpec) {
        Trace.traceBegin(Trace.TRACE_TAG_VIEW, "measure");
        try {
            mView.measure(childWidthMeasureSpec, childHeightMeasureSpec);
        } finally {
            Trace.traceEnd(Trace.TRACE_TAG_VIEW);
        }
}- 1
- 2
- 3
- 4
- 5
- 6
- 7
- 8
又调用了View中的 measure() 函数!
public final void measure(int widthMeasureSpec, int heightMeasureSpec) {

        // 计算key值
        long key = (long) widthMeasureSpec << 32 | (long) heightMeasureSpec & 0xffffffffL;
        // 初始化mMeasureCache对象,用来缓存测量结果
        if (mMeasureCache == null) mMeasureCache = new LongSparseLongArray(2);

        final boolean forceLayout = (mPrivateFlags & PFLAG_FORCE_LAYOUT) == PFLAG_FORCE_LAYOUT;

        // ...

        if (forceLayout || needsLayout) {
            // ...
            // 尝试去查找缓存
            int cacheIndex = forceLayout ? -1 : mMeasureCache.indexOfKey(key);
            //没有读取到缓存或者忽略缓存时
            if (cacheIndex < 0 || sIgnoreMeasureCache) {
                // 测量自己
                onMeasure(widthMeasureSpec, heightMeasureSpec);
                mPrivateFlags3 &= ~PFLAG3_MEASURE_NEEDED_BEFORE_LAYOUT;
            } else { // 读取缓存
                long value = mMeasureCache.valueAt(cacheIndex);
                // Casting a long to int drops the high 32 bits, no mask needed
                setMeasuredDimensionRaw((int) (value >> 32), (int) value);
                mPrivateFlags3 |= PFLAG3_MEASURE_NEEDED_BEFORE_LAYOUT;
            }

           // ...

            mPrivateFlags |= PFLAG_LAYOUT_REQUIRED;
        }

        mOldWidthMeasureSpec = widthMeasureSpec;
        mOldHeightMeasureSpec = heightMeasureSpec;

        // 缓存
        mMeasureCache.put(key, ((long) mMeasuredWidth) << 32 |
                (long) mMeasuredHeight & 0xffffffffL); // suppress sign extension
}- 1
- 2
- 3
- 4
- 5
- 6
- 7
- 8
- 9
- 10
- 11
- 12
- 13
- 14
- 15
- 16
- 17
- 18
- 19
- 20
- 21
- 22
- 23
- 24
- 25
- 26
- 27
- 28
- 29
- 30
- 31
- 32
- 33
- 34
- 35
- 36
- 37
- 38
- 39
来看 onMeasure() 函数
protected void onMeasure(int widthMeasureSpec, int heightMeasureSpec) {
        setMeasuredDimension(getDefaultSize(getSuggestedMinimumWidth(), widthMeasureSpec), getDefaultSize(getSuggestedMinimumHeight(), heightMeasureSpec));
}- 1
- 2
- 3
setMeasureDimension() 函数倒是很简单!目的就是存储计算出来的测量宽高~
protected final void setMeasuredDimension(int measuredWidth, int measuredHeight) {
        boolean optical = isLayoutModeOptical(this);
        if (optical != isLayoutModeOptical(mParent)) {
            Insets insets = getOpticalInsets();
            int opticalWidth  = insets.left + insets.right;
            int opticalHeight = insets.top  + insets.bottom;

            measuredWidth  += optical ? opticalWidth  : -opticalWidth;
            measuredHeight += optical ? opticalHeight : -opticalHeight;
        }
        setMeasuredDimensionRaw(measuredWidth, measuredHeight);
    }

private void setMeasuredDimensionRaw(int measuredWidth, int measuredHeight) {
        mMeasuredWidth = measuredWidth;
        mMeasuredHeight = measuredHeight;

        mPrivateFlags |= PFLAG_MEASURED_DIMENSION_SET;
    }
- 1
- 2
- 3
- 4
- 5
- 6
- 7
- 8
- 9
- 10
- 11
- 12
- 13
- 14
- 15
- 16
- 17
- 18
- 19
- 20
- 21
现在来主要关注 getDefaultSize()
public static int getDefaultSize(int size, int measureSpec) {
        int result = size;
        int specMode = MeasureSpec.getMode(measureSpec);
        int specSize = MeasureSpec.getSize(measureSpec);

        switch (specMode) {
        case MeasureSpec.UNSPECIFIED:
            result = size;
            break;
        case MeasureSpec.AT_MOST:
        case MeasureSpec.EXACTLY:
            result = specSize;
            break;
        }
        return result;
}- 1
- 2
- 3
- 4
- 5
- 6
- 7
- 8
- 9
- 10
- 11
- 12
- 13
- 14
- 15
- 16
当specMode 是 UNSPECIFIED 的时候,View的宽/高为getDefaultSize()的第一个参数,也就是getSuggestedMinimumWidth() 或者 getSuggestedMinimumHeight()
protected int getSuggestedMinimumWidth() {
        return (mBackground == null) ? mMinWidth : max(mMinWidth, mBackground.getMinimumWidth());
}- 1
- 2
- 3
当View没有背景时,返回mMinWidth,该变量默认值是0,对应android:minWidth这个属性。所以,如果不指定该属性的话,就是0。
如果View有背景,则返回背景的原始宽度。
getSuggestedMinimumHeight()的内部逻辑与getSuggestedMinimumWidth()类似。
所以,当SpecMode是UNSPECIFIED的时候,View的测量宽/高 就是 getSuggestedMinimumWidth() 和 getSuggestedMinimumHeight() 两个方法的返回值!
当SpecMode是AT_MOST 或者 EXACTLY 时,View的测量 宽/高 就是 measureSpec 中的SpecSize ,也就是测量后的大小~
分析到这里,View的measure过程也就分析完了~
那么ViewGroup的measure是什么时候开始的呢???
还得从DecorView来说起!
在 Activity.attach() 函数中创建了PhoneWindow对象!
public PhoneWindow(Context context, Window preservedWindow) {
        this(context);
        // ...
        if (preservedWindow != null) {
            mDecor = (DecorView) preservedWindow.getDecorView();

            // ...
}- 1
- 2
- 3
- 4
- 5
- 6
- 7
- 8
在PhoneWindow的构造函数中,创建了DecorView对象!
public class DecorView extends FrameLayout implements RootViewSurfaceTaker, WindowCallbacks- 1
DecorView继承FrameLayout,所以它是一个ViewGroup!
所以整个window的绘制是从DecorView这个ViewGroup开始的!
mView.measure(childWidthMeasureSpec, childHeightMeasureSpec);- 1
这里的mView就是DecorView
其实ViewGroup 是一个抽象类,并没有重写onMeasure()函数!ViewGroup的子类们重写了onMeasure()函数!
既然DecorView继承了FrameLayout,那就拿FrameLayout来分析一下它的 measure过程。
FrameLayout的measure流程
从decorView的measure() 方法体内看出,内部调用了onMeasure()。
@Override
    protected void onMeasure(int widthMeasureSpec, int heightMeasureSpec) {
        // 1. 获取子View的个数
        int count = getChildCount();
        // 2. 如果宽/高的SpecMode有一个不是EXACTLY,则为true
        final boolean measureMatchParentChildren =
                MeasureSpec.getMode(widthMeasureSpec) != MeasureSpec.EXACTLY ||
                MeasureSpec.getMode(heightMeasureSpec) != MeasureSpec.EXACTLY;
        // 3. 清空集合
        mMatchParentChildren.clear();

        int maxHeight = 0;
        int maxWidth = 0;
        int childState = 0;

        // 4. 遍历子view
        for (int i = 0; i < count; i++) {
            final View child = getChildAt(i);
            // 5. GONE类型的view不测量
            if (mMeasureAllChildren || child.getVisibility() != GONE) {
                // 6. 测量子view的宽高
                measureChildWithMargins(child, widthMeasureSpec, 0, heightMeasureSpec, 0);
                final LayoutParams lp = (LayoutParams) child.getLayoutParams();
                // 7. 计算最大宽度
                maxWidth = Math.max(maxWidth,
                        child.getMeasuredWidth() + lp.leftMargin + lp.rightMargin);
                // 8. 计算最大高度
                maxHeight = Math.max(maxHeight,
                        child.getMeasuredHeight() + lp.topMargin + lp.bottomMargin);
                childState = combineMeasuredStates(childState, child.getMeasuredState());
                // 9. 如果measureMatchParentChildren 为true,并且子view设置的宽/高属性是match_parent,就把这个子view添加到集合中
                if (measureMatchParentChildren) {
                    if (lp.width == LayoutParams.MATCH_PARENT ||
                            lp.height == LayoutParams.MATCH_PARENT) {
                        mMatchParentChildren.add(child);
                    }
                }
            }
        }

        // 10. 补充计算最大宽度,最大高度
        maxWidth += getPaddingLeftWithForeground() + getPaddingRightWithForeground();
        maxHeight += getPaddingTopWithForeground() + getPaddingBottomWithForeground();

        // 11. 再次比较计算最大宽度,最大高度
        maxHeight = Math.max(maxHeight, getSuggestedMinimumHeight());
        maxWidth = Math.max(maxWidth, getSuggestedMinimumWidth());

        // 12. 如果有背景,则需要再次与背景图的宽高相比较得出最大宽高
        final Drawable drawable = getForeground();
        if (drawable != null) {
            maxHeight = Math.max(maxHeight, drawable.getMinimumHeight());
            maxWidth = Math.max(maxWidth, drawable.getMinimumWidth());
        }

        // 13. 设置当前ViewGroup的测量宽高
        setMeasuredDimension(resolveSizeAndState(maxWidth, widthMeasureSpec, childState), resolveSizeAndState(maxHeight, heightMeasureSpec, childState << MEASURED_HEIGHT_STATE_SHIFT));

        // 14. 遍历需要二次测量的子view
        count = mMatchParentChildren.size();
        if (count > 1) {
            for (int i = 0; i < count; i++) {
                final View child = mMatchParentChildren.get(i);
                final MarginLayoutParams lp = (MarginLayoutParams) child.getLayoutParams();

                final int childWidthMeasureSpec;
                if (lp.width == LayoutParams.MATCH_PARENT) { // 子view宽度设置的是MATCH_PARENT
                    final int width = Math.max(0, getMeasuredWidth()
                            - getPaddingLeftWithForeground() - getPaddingRightWithForeground()
                            - lp.leftMargin - lp.rightMargin);
                    childWidthMeasureSpec = MeasureSpec.makeMeasureSpec(
                            width, MeasureSpec.EXACTLY);
                } else { // 子view宽度设置的不是MATCH_PARENT
                    childWidthMeasureSpec = getChildMeasureSpec(widthMeasureSpec,
                            getPaddingLeftWithForeground() + getPaddingRightWithForeground() +
                            lp.leftMargin + lp.rightMargin,
                            lp.width);
                }

                final int childHeightMeasureSpec;
                if (lp.height == LayoutParams.MATCH_PARENT) { // 子view高度设置的是MATCH_PARENT
                    final int height = Math.max(0, getMeasuredHeight()
                            - getPaddingTopWithForeground() - getPaddingBottomWithForeground()
                            - lp.topMargin - lp.bottomMargin);
                    childHeightMeasureSpec = MeasureSpec.makeMeasureSpec(
                            height, MeasureSpec.EXACTLY);
                } else { // 子view高度设置不是MATCH_PARENT
                    childHeightMeasureSpec = getChildMeasureSpec(heightMeasureSpec,
                            getPaddingTopWithForeground() + getPaddingBottomWithForeground() +
                            lp.topMargin + lp.bottomMargin,
                            lp.height);
                }
                // 15. 测量子view
                child.measure(childWidthMeasureSpec, childHeightMeasureSpec);
            }
        }
    }
- 1
- 2
- 3
- 4
- 5
- 6
- 7
- 8
- 9
- 10
- 11
- 12
- 13
- 14
- 15
- 16
- 17
- 18
- 19
- 20
- 21
- 22
- 23
- 24
- 25
- 26
- 27
- 28
- 29
- 30
- 31
- 32
- 33
- 34
- 35
- 36
- 37
- 38
- 39
- 40
- 41
- 42
- 43
- 44
- 45
- 46
- 47
- 48
- 49
- 50
- 51
- 52
- 53
- 54
- 55
- 56
- 57
- 58
- 59
- 60
- 61
- 62
- 63
- 64
- 65
- 66
- 67
- 68
- 69
- 70
- 71
- 72
- 73
- 74
- 75
- 76
- 77
- 78
- 79
- 80
- 81
- 82
- 83
- 84
- 85
- 86
- 87
- 88
- 89
- 90
- 91
- 92
- 93
- 94
- 95
- 96
- 97
- 98
从上面FrameLayout的onMeasure()方法体可以看出来,对子view进行了两次测量,准确的来说不是所有的子view都进行了二次测量~
这是为什么呢?
来往下看~
mMatchParentChildren 是一个集合,是用来存储需要二次测量的子view的!
private final ArrayList<View> mMatchParentChildren = new ArrayList<>(1);- 1
那么都有哪些子view需要放到这个集合里面进行二次测量呢?
当 measureMatchParentChildren == true 的时候!
final boolean measureMatchParentChildren =
                MeasureSpec.getMode(widthMeasureSpec) != MeasureSpec.EXACTLY ||
MeasureSpec.getMode(heightMeasureSpec) != MeasureSpec.EXACTLY;- 1
- 2
- 3
那么什么情况下 FrameLayout这个ViewGroup 的宽或者高的SpecMode不为EXACTLY呢?
我在 View的绘制流程分析之一 已经进行了分析!
再来一张图(转载~):
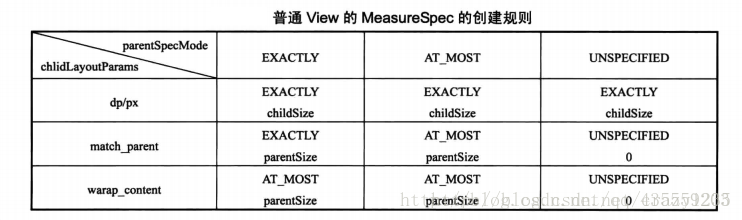
抛去UNSPECIFIED 这个mode不管,当前FrameLayout这个ViewGroup的测量模式不为EXACTLY有三种情况!
- FrameLayout的父容器的SpecMode为AT_MOST,并且这个FrameLayout的 宽 / 高 属性是match_parent
- FrameLayout的 宽 / 高 属性是wrap_content
总而言之,就是FrameLayout这个ViewGroup的宽或高不是一个固定的值,也就是不是EXACTLY模式!
这种情况下,再去判断子view(FrameLayout的子view)的宽高属性是否是match_parent,如果是则把这个子view添加到集合中去!
其实很容易理解!通过第一次遍历所有(不是GONE)的子view之后,就把父布局,也就是这个FrameLayout的宽高给测量出来了。
但是对于那些宽高设置为match_parent,它们的宽高依赖于父容器的大小,所以需要再次遍历它们设置它们的宽高~
measureChildWithMargins(child, widthMeasureSpec, 0, heightMeasureSpec, 0);
先来看看第一次遍历时,对子view的测量过程
直接调用的父类ViewGroup中的方法
protected void measureChildWithMargins(View child,
            int parentWidthMeasureSpec, int widthUsed,
            int parentHeightMeasureSpec, int heightUsed) {
        // 获取布局参数
        final MarginLayoutParams lp = (MarginLayoutParams) child.getLayoutParams();
        // 计算得出宽度测量规格
        final int childWidthMeasureSpec = getChildMeasureSpec(parentWidthMeasureSpec,
                mPaddingLeft + mPaddingRight + lp.leftMargin + lp.rightMargin
                        + widthUsed, lp.width);
        // 计算得出高度测量规格
        final int childHeightMeasureSpec = getChildMeasureSpec(parentHeightMeasureSpec,
                mPaddingTop + mPaddingBottom + lp.topMargin + lp.bottomMargin
                        + heightUsed, lp.height);
        // 调用子view的measure()函数进行测量
        child.measure(childWidthMeasureSpec, childHeightMeasureSpec);
}- 1
- 2
- 3
- 4
- 5
- 6
- 7
- 8
- 9
- 10
- 11
- 12
- 13
- 14
- 15
- 16
在计算子view的宽度或高度的测量规格时,把父容器的padding值,和子view的margin值 加了上去!
关于getChildMeasureSpec() 这个函数的分析,在上一篇blog已经说过了! getChildMeasureSpec()
那么得到了宽高的测量规格之后,就可以调用measure进行测量了!
child.measure() 调用了View中的measure() 函数,此函数是final类型!不允许子类重写!
其实也很容易理解, 所有的容器测量都要先遍历子view进行测量,然后在确定容器的大小,所以最终实际的任务大多在一个个子view的测量上,容器的大小只需要针对这些子view的测量大小加加减减而已 !
view的measure过程在本篇blog上面已经进行了分析!本质上还是调用onMeasure() 函数!
如果这个View是一个ViewGroup,则会回调具体的容器类的onMeasure() 函数,如果不是则调用View或者它的子类(如果重写了)的onMeasure() 函数!
此时回过头来再看FrameLayout.onMeasure() 方法体下面这一句
// 13. 设置当前ViewGroup的测量宽高
setMeasuredDimension(resolveSizeAndState(maxWidth, widthMeasureSpec, childState), resolveSizeAndState(maxHeight, heightMeasureSpec, childState << MEASURED_HEIGHT_STATE_SHIFT));
- 1
- 2
- 3
当对所有的子view测量完毕之后,调用这个函数把计算得来的父容器的测量结果进行保存!
重点在 resolveSizeAndState() 函数!
public static int resolveSizeAndState(int size, int measureSpec, int childMeasuredState) {
        final int specMode = MeasureSpec.getMode(measureSpec);
        final int specSize = MeasureSpec.getSize(measureSpec);
        final int result;
        switch (specMode) {
            case MeasureSpec.AT_MOST:
                if (specSize < size) { // 父容器给的尺寸小于测量出来的尺寸,改变result值!
                    result = specSize | MEASURED_STATE_TOO_SMALL;
                } else {
                    result = size;
                }
                break;
            case MeasureSpec.EXACTLY: // 精确模式下,结果就是测量的值
                result = specSize;
                break;
            case MeasureSpec.UNSPECIFIED:
            default:
                result = size;
        }
        return result | (childMeasuredState & MEASURED_STATE_MASK);
}- 1
- 2
- 3
- 4
- 5
- 6
- 7
- 8
- 9
- 10
- 11
- 12
- 13
- 14
- 15
- 16
- 17
- 18
- 19
- 20
- 21
计算出来size之后,就通过 setMeasuredDimension() 函数保存测量宽高!
这样从ViewGroup到一个个子View的测量,保存每个view/viewGroup的测量宽高!
分析到这里,performTraversals() 函数里面 performMeasure() 也就执行完毕了!