原文地址:
http://blog.csdn.net/qq_24889075/article/details/51974204
http://www.jianshu.com/p/a1b8707e3e08
本文纯属个人观点,如有错误请指点
这里我们主要看一下生成的项目中都有什么。源码中都有什么,如何去自定义
我们先只导入一张全景图,不做任何设置 然后导出项目。(为了方便,我将其项目地址和 生成的html地址都设置在一起)
我们看看都有什么
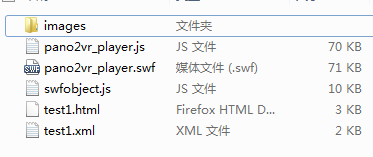
文件夹images:软件切好的图片存放目录
pano2vr_player.js :Pano2VR自动生成的JavaScript脚本,是整个项目的核心
test1.xml : 里面主要有一些项目的设置信息,比如热点 图片之类的
test1.html : 这个就是我一直所说的 自动生成的demo
至于其他两个,应该是播放flash用的,也的确是这样的。(我们生成的h5为什么会有flash参与进来呢?下面会说的)
pano2vr_player.swf : 是一个flash文件
swfobject.js : 根据命名来看应该是flash的对象的JavaScript脚本
其实看了demo代码就知道这两个文件什么意思了,当没有CSS3 3D和WebGL的支持时,会选择播放这个Flash(9以上,包括9)。如果三者都不支持 那么对不起,播放不了了~
所以我们主要看上面的四个
images
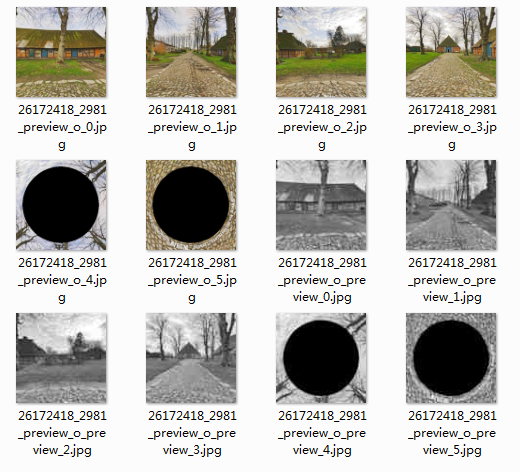
这里就是软件切好的图片存放目录。
一共12张图片,前6个是彩色 后6个是灰色的。
为什么会有灰色的呢,生成h5的项目 是用网络加载才能显示出来,加载过程中就可能网络不理想,这些灰色就是在加载时候显示的。
test1.html
这里就是生成给我们的demo,以后我们会根据这个demo进行不断更改,从而做出想要的效果。这里简单翻译下
<!DOCTYPE html>
<html>
    <head>
        <meta http-equiv="Content-Type" content="text/html;charset=UTF-8">
        <meta http-equiv="X-UA-Compatible" content="IE=edge" />
        <title></title>
        <meta name="viewport" content="width=device-width, initial-scale=1.0, minimum-scale=1.0, maximum-scale=1.0, minimal-ui" />
        <meta name="apple-mobile-web-app-capable" content="yes" />
        <meta name="apple-mobile-web-app-status-bar-style" content="black" />

        <script type="text/javascript" src="swfobject.js">
        </script>
        <script type="text/javascript">

            function hideUrlBar() {//--隐藏iPhone地址栏,方法貌似要自己写
            }

        </script>
        <!--设置样式-->
        <style type="text/css" title="Default">
            body, div, h1, h2, h3, span, p {
                font-family: Verdana,Arial,Helvetica,sans-serif;
                color: #000000;
            }
            body {
              font-size: 10pt;
              background : #ffffff;
            }
            table,tr,td {
                font-size: 10pt;
                border-color : #777777;
                background : #dddddd;
                color: #000000;
                border-style : solid;
                border-width : 2px;
                padding: 5px;
                border-collapse:collapse;
            }
            h1 {
                font-size: 18pt;
            }
            h2 {
                font-size: 14pt;
            }
            .warning {
                font-weight: bold;
            }
            /*修正在WebKit和Mac OS X Lion滚动条  */
            ::-webkit-scrollbar {
                background-color: rgba(0,0,0,0.5);
                width: 0.75em;
            }
            ::-webkit-scrollbar-thumb {
                background-color:  rgba(255,255,255,0.5);
            }
        </style>
    </head>
    <body>
        <h1></h1>
        <br>
        <!--加载核心Js-->
        <script type="text/javascript" src="pano2vr_player.js">
        </script>
        <div id="container" style="width:640px;height:480px;"><!--这里就是全景图的容器-->
        This content requires HTML5/CSS3, WebGL, or Adobe Flash Player Version 9 or higher.
        </div>
        <script type="text/javascript">

        // 检查 是否支持CSS33D效果变换 和 WebGL
        if (ggHasHtml5Css3D() || ggHasWebGL()) {//如果支持,使用H5 展示全景
            pano=new pano2vrPlayer("container");//创建panorama player对象,构造函数中的参数是 全景图的容器
            pano.readConfigUrl("test1.xml");//加载参数
            // 在iPhone中隐藏地址栏
            setTimeout(function() { hideUrlBar(); }, 10);
        } else if (swfobject.hasFlashPlayerVersion("10.0.0")) {//不支持,则使用Flash 播放全景(我们不主要分析这里)
            var flashvars = {};
            var params = {};
            // enable javascript interface
            flashvars.externalinterface="1";
            params.quality = "high";
            params.bgcolor = "#ffffff";
            params.allowscriptaccess = "sameDomain";
            params.allowfullscreen = "true";
            var attributes = {};
            attributes.id = "pano";
            attributes.name = "pano";
            attributes.align = "middle";
            flashvars.panoxml="test1.xml";
            params.base=".";
            swfobject.embedSWF(
                "pano2vr_player.swf", //这里是我们前面说的那个flash文件
                "container", //控件容器
                "640", "480",//控件尺寸
                "9.0.0", "",
                flashvars, params, attributes);

        }
        </script>
        <noscript>
            <p><b>Please enable Javascript!</b></p>
        </noscript>
    </body>
</html>
test1.xml
这个xml文件就是我们要用h5显示的时候所需要的 ‘配置文件’,然而官方并没有给出这些表情的介绍,所以只能靠猜了
<?xml version="1.0" encoding="UTF-8" ?>
<!-- 全景图标签-->
<panorama id="">
    <!--控件  fovmode:视场模式;pannorth:显示正北;-->
    <view fovmode="0" pannorth="0">
        <!--显示参数
        pan:平移;
        fov:视场;
        tilt:俯仰;
        -->
        <start pan="0" fov="70" tilt="0" />
        <!--最小视角-->
        <min pan="-180" fov="5" tilt="-48.9271" />
        <!--最大视角-->
        <max pan="180" fov="120" tilt="48.9271" />
    </view>
    <!--用户数据 在在这里我把翻译写到内容中了-->
    <userdata title="标题"
    datetime="日期"
    description="描述"
    copyright="版权"
    tags="标签"
    author="作者"
    source="来源"
    comment="评论"
    info="信息"
    longitude="经度"
    latitude="维度" />
    <!--热点-->
    <hotspots width="180" height="20" wordwrap="1">
        <!--热点标签 相关参数挺简单的  这里不介绍了,自己翻译吧-->
        <label width="180"
        backgroundalpha="1"
        enabled="1"
        height="20"
        backgroundcolor="0xffffff"
        bordercolor="0x000000"
        border="1"
        textcolor="0x000000"
        background="1"
        borderalpha="1"
        borderradius="1"
        wordwrap="1"
        textalpha="1" />
        <!--柱式-->
        <polystyle
        mode="1"
        backgroundalpha="0.2509803921568627"
        backgroundcolor="0x0000ff"
        bordercolor="0x0000ff"
        borderalpha="100" />
    </hotspots>
    <!--多媒体  我们没有添加,所以其内容就是空-->
    <media/>
    <!--图片资源
    prev*url:预览图;
    tile*url:真正预览的图片;
    tilesize:图片大小;
    tilescale:图片缩放级别-->
    <input
    prev5url="images/26172418_2981_preview_o_preview_5.jpg"
    prev4url="images/26172418_2981_preview_o_preview_4.jpg"
    prev3url="images/26172418_2981_preview_o_preview_3.jpg"
    prev2url="images/26172418_2981_preview_o_preview_2.jpg"
    prev1url="images/26172418_2981_preview_o_preview_1.jpg"
    prev0url="images/26172418_2981_preview_o_preview_0.jpg"
    tile5url="images/26172418_2981_preview_o_5.jpg"
    tile4url="images/26172418_2981_preview_o_4.jpg"
    tile3url="images/26172418_2981_preview_o_3.jpg"
    tile2url="images/26172418_2981_preview_o_2.jpg"
    tile1url="images/26172418_2981_preview_o_1.jpg"
    tile0url="images/26172418_2981_preview_o_0.jpg"
    tilesize="374"
    tilescale="1.026738">
        <!--预览图背景颜色-->
        <preview color="0x808080" />
    </input>

    <!--控制台
    0是假1是真(1就是开关中的开启,0就是关闭)
    simulatemass:模拟质量(在这里只是指惯性);
    lockedmouse:锁定鼠标;
    lockedkeyboard:锁定键盘;
    dblclickfullscreen:双击全屏;
    invertwheel:翻转鼠标滑轮;
    lockedwheel:锁定鼠标滑轮;
    invertcontrol:;锁定控制台
    speedwheel:鼠标滑轮放大缩小(需要将invertcontrol设置为0);
    sensitivity:敏感度(需要将invertcontrol设置为0)
    -->
    <control
    simulatemass="1"
    lockedmouse="0"
    lockedkeyboard="1"
    dblclickfullscreen="1"
    invertwheel="1"
    lockedwheel="0"
    invertcontrol="0"
    speedwheel="10"
    sensitivity="8"
    />
</panorama>
好了,经过测试 我们猜的也是八九不离十~ 如果设置一些旋转什么的 都会增加相应的标签。
只要记住这个xml文件是记录你配置信息的就好,如果你真的掌握了,就会省下不少麻烦。
比如 现在项目要求 开启自动旋转 ! 原来没有的功能,按理来说是要重新生成一个,但是如果你掌握了这里的标签,只需要改一个数就可以了~
分析:使用H5模式播放全景图的话,其实就是绘制一个3D的模型(有可能是球,有可能是正方体 具体是什么 以后有机会的话继续分析Js源码),然后将全景图切分成6份,将起’贴在模型上’ (可以把这个叫做蒙皮) 。在模型的内部的正中央有一个相机,根据鼠标或者键盘的事件,进行相应的处理 从而达到了我们眼中的3D效果
好了,这篇的源码分析就到这里吧,如果有机会会继续分析Js核心代码 到时候我们将不用pano2vr这个工具,可以自己写核心代码 撸出来一个全景图(属于题外话了,如果有精力的话会尝试一下)
本片文章全部代表个人观点,如果有错误请谅解 欢迎指正
原文地址:
http://blog.csdn.net/qq_24889075/article/details/51974204
http://www.jianshu.com/p/a1b8707e3e08