目录
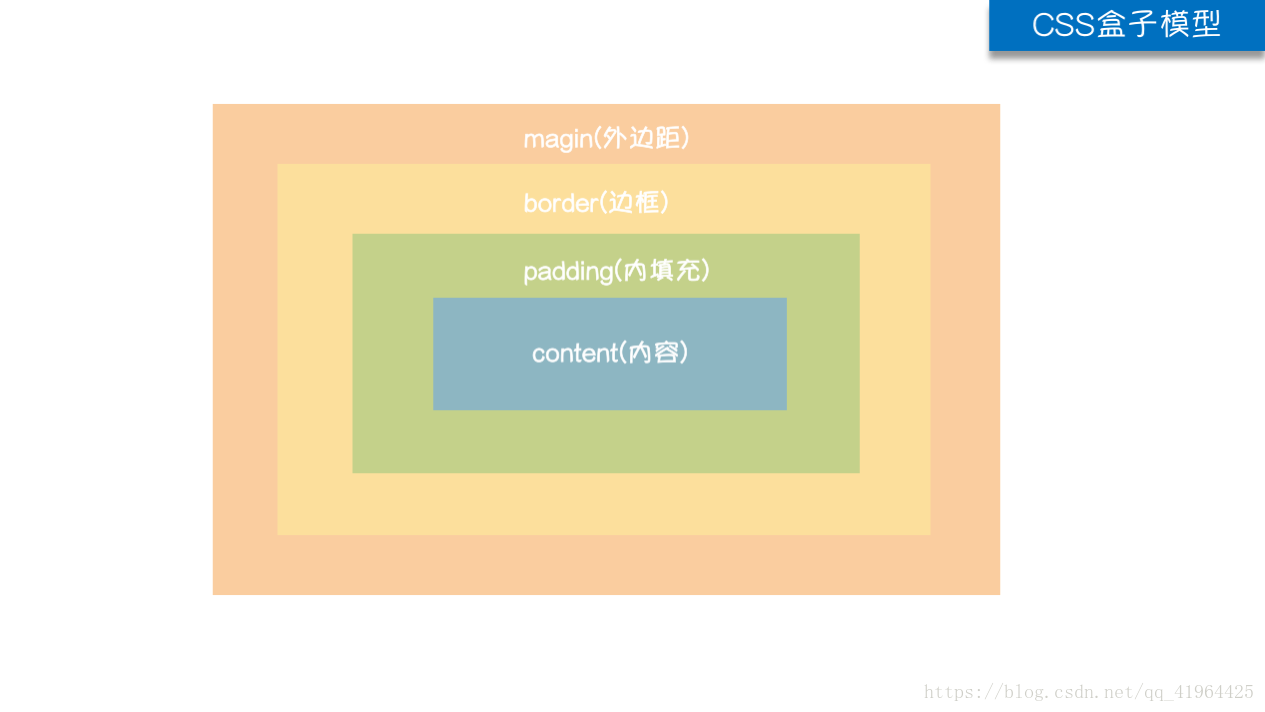
一、盒子模型
- margin:用于控制元素与元素之间的距离;最基本的用途就是控制元素周围空间的间隔,从视觉上达到相互隔开的目的
- padding:用于控制内容与边距之间的距离
- Border:边框,围绕在内边距和内容外的边框
- Content:盒子的内容,显示文本和图像
二、外边距 margin
| 属性 | 描述 |
| margin-top | 上方外边距 |
| margin-right | 右方外边距 |
| margin-bottom | 下方外边距 |
| margin-left | 左方外边距 |
简写:

常见居中:

<!DOCTYPE html>
<html lang="zh-CN">
<head>
    <meta http-equiv="content-Type" charset="UTF-8">
    <meta http-equiv="x-ua-compatible" content="IE=edge">
    <meta http-equiv="refresh" content="60; URL=https://blog.csdn.net/qq_41964425">
    <title>margin 外边距</title>
    <style>
        #tag1 {
            /**/
            background-color: black;
            color: white;
            /**/
            margin-top: 20px; /*上*/
            margin-right: 49%; /*右*/
            margin-bottom: 100px; /*下*/
            margin-left: 48%; /*左*/
        }
        #tag2 {
            margin: 0 40% 0 40%; /*简写,顺序:上右下左(逆时针)*/
        }
        p {
            margin: 0 auto; /*居中*/
        }
    </style>
</head>
<body>
<div>
    <p id="tag1">取腰间明珠弹山雀</p>
    <p id="tag2">立枇杷于庭前</p>
    <p>入巷间吃汤面</p>
</div>
</body>
</html>
三、内填充 padding
| 属性 | 描述 |
| padding-top | 上方内填充 |
| padding-right | 右方内填充 |
| padding-bottom | 下方内填充 |
| padding-left | 左方内填充 |
简写:


<!DOCTYPE html>
<html lang="zh-CN">
<head>
    <meta http-equiv="content-Type" charset="UTF-8">
    <meta http-equiv="x-ua-compatible" content="IE=edge">
    <meta http-equiv="refresh" content="60; URL=https://blog.csdn.net/qq_41964425">
    <title>padding 内填充</title>
    <style>
        * {
            color: white;
        }
        #tag1 {
            background-color: dodgerblue;
            padding-top: 5px; /*上方*/
            padding-right:41%; /*右方*/
            padding-bottom: 1px; /*下方*/
            padding-left: 44%; /*左方*/
        }
        #tag2 {
            background-color: cornflowerblue;
            padding: 1px 41% 5px 44%; /*简写,顺序:上右下左(逆时针)*/
        }
        #tag3 {
            background-color: gray;
            padding: 1px 40%; /*简写,值1用于上下,值2用于左右*/
        }
        #tag4 {
            background-color: blueviolet;
            padding: 1px 42% 5px; /*简写,值1用于上,值2用于左右,值3用于下*/
        }
        p {
            background-color: darkslateblue;
            font-size: 200%;
            padding: 35%; /*简写,一个值用于四边*/
        }
    </style>
</head>
<body>
<div>
    <span id="tag1">入巷间吃汤面</span>
    <span id="tag2">笑看窗边飞雪</span>
    <span id="tag3">取腰间明珠弹山雀</span>
    <span id="tag4">立枇杷于庭前</span>
    <p>劫过九重城关</p>
</div>
</body>
</html>
四、浮动 float
在CSS中,任何元素都可以浮动.
浮动元素会生成一个块级框,而不论它本身是何种元素.
浮动的两大特性:
- 浮动的框可以向左或向右移动,直到它的外边缘碰到包含框或另一个浮动框的边框为止.
- 由于浮动框不在文档的普通流中,所以文档的普通流中的块框表现得就像浮动框不纯在一样.
| 值: | left | right | none |
| 描述: | 向左浮动 | 向右浮动 | 不浮动,默认值 |
<!DOCTYPE html>
<html lang="zh-CN">
<head>
    <meta http-equiv="content-Type" charset="UTF-8">
    <meta http-equiv="x-ua-compatible" content="IE=edge">
    <meta http-equiv="refresh" content="60; URL=https://blog.csdn.net/qq_41964425">
    <title>float 浮动</title>
    <style>
        * {
            margin: 0;
            color: aqua;
            height: 200px;
        }
        p {
            background-color: gray;
            width: 30%;
            float: left; /*向左浮动*/
        }
        #tag {
            background-color: darkgray;
            width: 30%;
            float: right; /*向右浮动*/
        }
    </style>
</head>
<body>
<div>
    <p>我座下马正酣</p>
    <p id="tag">看那轻飘飘的衣摆</p>
</div>
</body>
</html>关于浮动的详细说明:W3school
五、清除浮动 clear
clear属性规定元素的那一侧不允许其它浮动元素.
clear属性只会对自身起作用,而不会影响其它元素.
| 值 | 描述 |
| left | 在左侧不允许浮动元素 |
| right | 在右侧不允许有浮动元素 |
| both | 在左右两侧均不允许浮动元素 |
| none | 允许浮动元素出现在两侧,默认值 |
| inherit | 规定应该从父元素继承clear属性的值 |
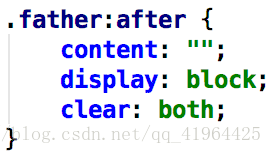
父标签塌陷问题:
<!DOCTYPE html>
<html lang="zh-CN">
<head>
    <meta http-equiv="content-Type" charset="UTF-8">
    <meta http-equiv="x-ua-compatible" content="IE=edge">
    <meta http-equiv="refresh" content="60; URL=https://blog.csdn.net/qq_41964425">
    <title>clear 清除浮动</title>
    <style>
        .sign1 {
            width: 100px;
            height: 100px;
            background-color: hotpink;
            float: left; /*左浮动*/
        }
        .sign2 {
            width: 100px;
            height: 100px;
            background-color: aqua;
            float: left; /*左浮动*/
        }
        /*父标签塌陷问题 .1*/
        .father:after {
            content: "";
            display: block;
            clear: both; /*不允许左右两端有浮动快*/
        }
        .sign3 {
            width: 100px;
            height: 100px;
            background-color: blue;
            color: white;
            /*clear: both; 实测,此写法与1处写法在网页显示上并无差异*/
        }
    </style>
</head>
<body>
<div class="father">
    <div class="sign1">趁擦肩把裙掀</div>
    <div class="sign2">踏遍三江六岸</div>
</div>
<div class="sign3">借刀光做船帆</div>
</body>
</html>
六、溢出 overflow
| 属性 | 描述 |
| overflow | 水平和垂直均设置 |
| overflow-x | 设置水平方向 |
| overflow-y | 设置垂直方向 |
| 值 | 描述 |
| visible | 超出的内容不会被修剪,会呈现在元素框之外,默认值 |
| hidden | 超出的内容会被修剪,并且超出的内容不可见 |
| scroll | 超出的内容会被修剪,但是浏览器会显示滚动条以便查看超出的内容 |
| auto | 如果内容超出元素框,则会显示滚动条 |
| inherit | 规定应该从父元素继承overflow属性的值 |
<!DOCTYPE html>
<html lang="zh-CN">
<head>
    <meta http-equiv="content-Type" charset="UTF-8">
    <meta http-equiv="x-ua-compatible" content="IE=edge">
    <meta http-equiv="refresh" content="60; URL=https://blog.csdn.net/qq_41964425">
    <title>overflow 溢出属性</title>
    <style>
        .sign1 {
            width: 180px;
            height: 180px;
            border: 2px solid darkgray; /*边框简写法*/
            float: right;
            overflow: auto; /*内容超出元素框时会显示滚动条*/
        }
        /*圆形头像示例*/
        .sign2 {
            width: 150px;
            height: 150px;
            border: 1px solid darkslategrey;
            border-radius: 50%;
            overflow: hidden;
        }
    </style>
</head>
<body>
<div>
    <div class="sign1">
        任露水浸透了短衫, 大盗睥睨四野, 枕风宿雪多年, 我与虎谋早餐, 拎着钓叟的鱼弦,
        问卧龙几两钱, 蜀中大雨连绵, 关外横尸遍野, 你的笑像一条恶犬, 撞乱了我心弦,
        谈花饮月赋闲, 这春宵艳阳天, 待到梦醒时分睁眼, 铁甲寒意凛冽,
    </div>
    <div class="sign2">
        <img src="https://avatar.csdn.net/5/C/8/1_qq_41964425.jpg?1535957160"
             alt="https://avatar.csdn.net/5/C/8/1_qq_41964425.jpg?1535957160">
    </div>
</div>
</body>
</html>
七、定位 position
1. 无定位 static
默认值,不能作为绝对定位的参照物,并且设置标签对象的left、top等值是不起作用的.
2. 相对定位 relative
相对定位是相对于该元素在文档流中的原始位置,即以自己原始位置为参照物。有趣的是:即使设定了元素的相对定位以及偏移量,元素仍会占有着原来的位置,即占据文档流空间。对象遵循正常的文档流,但将依据top、right、bottom、left等属性在正常文档流中偏移位置,而且层叠通过z-index属性定义.
注意:相对定位的主要用法是为方便绝对定位元素找到参照物.
<!DOCTYPE html>
<html lang="zh-CN">
<head>
    <meta http-equiv="content-Type" charset="UTF-8">
    <meta http-equiv="x-ua-compatible" content="IE=edge">
    <meta http-equiv="refresh" content="60; URL=https://blog.csdn.net/qq_41964425">
    <title>relative 相对定位</title>
    <style>
        div>div {
            width: 150px;
            text-align: center;
            margin: 5px 5px 5px 5px;
            position: relative; /*相对定位*/
        }
        .sign1 {
            background-color: #74d3d2;
            left: 200px; /*向右移*/
            top: 100px; /*再向下移*/
        }
        .sign2 {
            background-color: #808b74;
            left: 220px;
            top: 90px;
        }
    </style>
</head>
<body>
<div>
    <div class="sign1">夙愿只隔一箭</div>
    <div class="sign2">故乡近似天边</div>
</div>
</body>
</html>
3. 绝对定位 absolute
定义:设置为绝对定位的元素框从文档流完全删除,并相对于最近的已定位祖先元素定位,如果元素没有已定位的祖先元素,那么它的位置将相对于最初的包含快(即body元素)。元素定位后生成一个块级框,而不论原来他在正常流中生成何种类型的框.
重点:如果父级设置了position属性,例如position: relative;,那么子元素就会以父级的左上角为原始点进行定位。这样就能很好的解决自适应网站的标签偏离问题,即父级为自适应的,那么子元素就设置为绝对定位;父元素设置相对定位,然后通过top、right、bottom、left用百分比宽度表示.
另外,对象脱离正常文档流,使用top、right、bottom、left、等属性进行绝对定位,而起层叠通过z-index属性定义.
<!DOCTYPE html>
<html lang="zh-CN">
<head>
    <meta http-equiv="content-Type" charset="UTF-8">
    <meta http-equiv="x-ua-compatible" content="IE=edge">
    <meta http-equiv="refresh" content="60; URL=https://blog.csdn.net/qq_41964425">
    <title>absolute 绝对定位</title>
    <style>
        * {
            margin: 0;
        }
        div>div {
            width: 150px;
            text-align: center;
            position: absolute; /*绝对定位*/
        }
        .sign1 {
            background-color: #b5c8d3;
            bottom: 50px;
            left: 50px;
        }
        .sign2 {
            background-color: #b5c8d3;
            bottom: 50px;
            right: 50px;
        }
    </style>
</head>
<body>
<div>
    <div class="sign1">不知何人浅唱弄弦</div>
    <div class="sign2">我彷徨不可前</div>
</div>
</body>
</html>
4. 固定 fixed
设置为固定的对象脱离正常文档流,使用top、right、bottom、left、等属性以窗口为参考点进行定位,当出现滚动条时,对象不会随着滚动,而起层叠通过z-index属性定义.
注意:如果一个元素设置了position: absolute | fixed;,则这个元素就不能设置float。这是一个常识性的知识点,因为这是两个不同的流:一个是浮动流;另一个是“定位流”。但是呢,relative却可以,因为它原本所占的空间仍然会占据文档流.
理论上被设置为fixed的元素会被定位于浏览器窗口的一个指定坐标,不论窗口是否滚动,他都会固定在这个位置.
<!DOCTYPE html>
<html lang="zh-CN">
<head>
    <meta http-equiv="content-Type" charset="UTF-8">
    <meta http-equiv="x-ua-compatible" content="IE=edge">
    <meta http-equiv="refresh" content="60; URL=https://blog.csdn.net/qq_41964425">
    <title>fixed 固定</title>
    <style>
        .sign {
            height: 1000px;
            background-color: yellow;
        }
        .sign>div {
            width: 120px;
            background-color: #a495ed;
            color: white;
            text-align: center;
        }
        .sign1 {
            position: fixed; /*固定*/
            left: 75%;
            top: 95%;
        }
        .sign1>a {
            text-decoration: none; /*去掉超链接自带的下划线*/
        }
    </style>
</head>
<body>
<div class="sign">
    <div>
        <a name="tag">枕风宿雪多年</a>
    </div>
    <div class="sign1">
        <a href="#tag">我与虎谋早餐</a>
    </div>
</div>
</body>
</html>
八、 层叠顺序 z-index
定义对象的层叠顺序,仅能在定位元素上奏效,数字大的会覆盖在数值小的标签之上.
<!DOCTYPE html>
<html lang="zh-CN">
<head>
    <meta http-equiv="content-Type" charset="UTF-8">
    <meta http-equiv="x-ua-compatible" content="IE=edge">
    <meta http-equiv="refresh" content="60; URL=https://blog.csdn.net/qq_41964425">
    <title>z-index 层叠顺序</title>
    <style>
        div>div {
            width: 150px;
            color: white;
            text-align: center;
            position: fixed;
        }
        .sign1 {
            background-color: rgba(0, 0, 0, 0.33);
            z-index: 10000;
        }
        .sign2 {
            background-color: rgb(188, 211, 188);
            left: 120px;
            z-index: 9999;
        }
    </style>
</head>
<body>
<div>
    <div class="sign1">拎着钓叟的鱼弦</div>
    <div class="sign2">问卧龙几两钱</div>
</div>
</body>
</html>
九、透明度 opacit
定义元素的透明度,取值范围:0~1,0是完全透明,1是完全不透明.
注意:opacit是将对象的一切都透明,而background-color: rgba(0, 0, 0, 0.33);只是将对象的背景变透明.
<!DOCTYPE html>
<html lang="zh-CN">
<head>
    <meta http-equiv="content-Type" charset="UTF-8">
    <meta http-equiv="x-ua-compatible" content="IE=edge">
    <meta http-equiv="refresh" content="60; URL=https://blog.csdn.net/qq_41964425">
    <title>opacticy 透明度</title>
    <style>
        div>div {
            color: black;
            width: 150px;
            background-color: gray;
            margin: 10px;
            text-align: center;
        }
        .sign1,
        .sign2 {
            opacity: 0.33; /*全透明*/
        }
        .sign3,
        .sign4 {
            background-color: rgba(124, 126, 139, 0.33); /*仅背景透明*/
        }
    </style>
</head>
<body>
<div>
    <div class="sign1">蜀中大雨连绵</div>
    <div class="sign2">关外横尸遍野</div>
    <div class="sign3">你的笑像一条恶犬</div>
    <div class="sign4">撞乱我心弦</div>
</div>
</body>
</html>