安装elasticsearch
1.1 下载并解压Elasticsearch 5.3.0
wget https://artifacts.elastic.co/downloads/elasticsearch/elasticsearch-5.3.0.tar.gz
tar -zxvf elasticsearch-5.3.0.tar.gz
1.2 下载ES-hadoop jar包,安装unzip并解压,将ES-spark jar拷贝到spark/jars目录
若机器上scala版本为2.11,则需要配套拷贝elasticsearch-spark-20_2.11-5.3.0.jar; 若机器上scala版本为2.10,则需要配套拷贝elasticsearch-spark-20_2.10-5.3.0.jar;可以同时拷贝到spark/jars文件夹,但是缺少对应的jar,会影响对spark中ES的使用,比如无法show spark dataframe
wget http://download.elastic.co/hadoop/elasticsearch-hadoop-5.3.0.zip
apt-get install unzip
unzip elasticsearch-hadoop-5.3.0.zip
cd elasticsearch-hadoop-5.3.0/dist
cp elasticsearch-spark-20_2.11-5.3.0.jar SPARK_HOME/jars/
cp elasticsearch-spark-20_2.10-5.3.0.jar SPARK_HOME/jars/
1.3 创建普通用户es,启动ES(默认不能用root启动)

给用户组es操作elasticsaerch目录的权限.切换到用户es,使用-d 永久启动elasticsaerch.查看启动状态
groupadd es
useradd es -g es -p es
passwd es
sudo chown -R es:es elasticsearch-5.3.0
chmod 777 root
su es
cd elasticsearch-5.3.0/bin
./elasticsearch -d
ps -ef | grep elastic
1.4 查看ES状态
1 浏览器直接输入网址
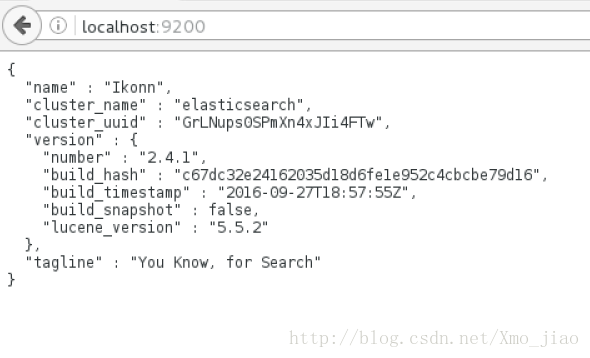
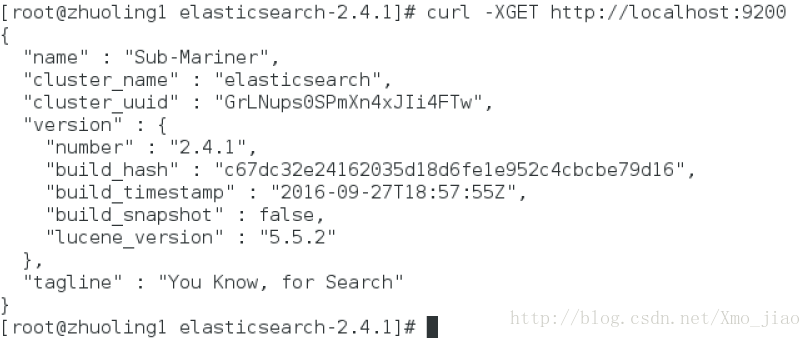
2 curl命令行查询
curl -XGET http://localhost:9200
3 ES启动状态查询
ps -ef|grep elastic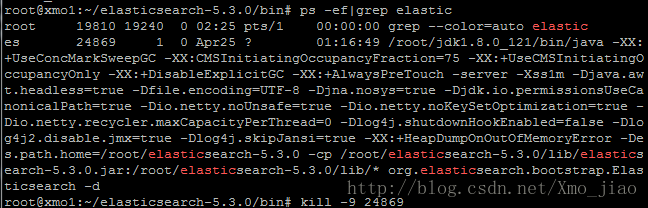

如果未启动,可查看es日志
cd ../logs
vim elasticsearch.log
1.5 ES常用命令操作
1>.检查集群健康,我们将使用_cat API。需要事先记住的是,我们的节点HTTP的端口是9200:
curl 'localhost:9200/_cat/health?v'2>节集群中的节点列表:
curl 'localhost:9200/_cat/nodes?v'3> 创建一个叫做“customer”的索引,然后再列出所有的索引:
curl -XPUT 'localhost:9200/customer?pretty'
curl 'localhost:9200/_cat/indices?v'
4>删除刚刚创建的索引,并再次列出所有的索引:
curl -XDELETE 'localhost:9200/customer?pretty'
curl 'localhost:9200/_cat/indices?v'
1.6 ES可能遇到的问题
- java版本问题,使用Elasticsearch5.0 必须安装jdk1.8
[elsearch@vm-mysteel-dc-search01 bin]$ java -version
java version "1.8.0_112"
Java(TM) SE Runtime Environment (build 1.8.0_112-b15)
Java HotSpot(TM) 64-Bit Server VM (build 25.112-b15, mixed mode)
[elsearch@vm-mysteel-dc-search01 bin]$
运行es,会提示错误,类似一些version error的错误。JDK版本若不是8,可能会出现ES启动不起来的问题。linux 自带的opensdk7 也最好不要使用。
Elasticsearch依赖Java 8,在你安装Elasticsearch之前,你可以通过以下命令来检查你的Java版本(如果有需要,安装或者升级): java –version
2.不能使用root用户启动,can not run elasticsearch as root
切换到非root用户
因为安全问题elasticsearch 不让用root用户直接运行,所以要创建新用户
[2017-01-17T21:54:48,798][WARN ][o.e.b.ElasticsearchUncaughtExceptionHandler] [] uncaught exception in thread [main]
org.elasticsearch.bootstrap.StartupException: java.lang.RuntimeException: can not run elasticsearch as root
        at org.elasticsearch.bootstrap.Elasticsearch.init(Elasticsearch. ~[elasticsearch-5.1.2.jar:5.1.2]
        at org.elasticsearch.bootstrap.Elasticsearch.execute(Elasticsearch. ~[elasticsearch-5.1.2.jar:5.1.2]
        at org.elasticsearch.cli.SettingCommand.execute(SettingCommand. ~[elasticsearch-5.1.2.jar:5.1.2]
        at org.elasticsearch.cli.Command.mainWithoutErrorHandling(Command. ~[elasticsearch-5.1.2.jar:5.1.2]
        at org.elasticsearch.cli.Command.main(Command. ~[elasticsearch-5.1.2.jar:5.1.2]
        at org.elasticsearch.bootstrap.Elasticsearch.main(Elasticsearch. ~[elasticsearch-5.1.2.jar:5.1.2]
        at org.elasticsearch.bootstrap.Elasticsearch.main(Elasticsearch. ~[elasticsearch-5.1.2.jar:5.1.2]
Caused by: java.lang.RuntimeException: can not run elasticsearch as root
        at org.elasticsearch.bootstrap.Bootstrap.initializeNatives(Bootstrap. ~[elasticsearch-5.1.2.jar:5.1.2]
        at org.elasticsearch.bootstrap.Bootstrap.setup(Bootstrap. ~[elasticsearch-5.1.2.jar:5.1.2]
        at org.elasticsearch.bootstrap.Bootstrap.init(Bootstrap. ~[elasticsearch-5.1.2.jar:5.1.2]
        at org.elasticsearch.bootstrap.Elasticsearch.init(Elasticsearch. ~[elasticsearch-5.1.2.jar:5.1.2]
        ... 6 more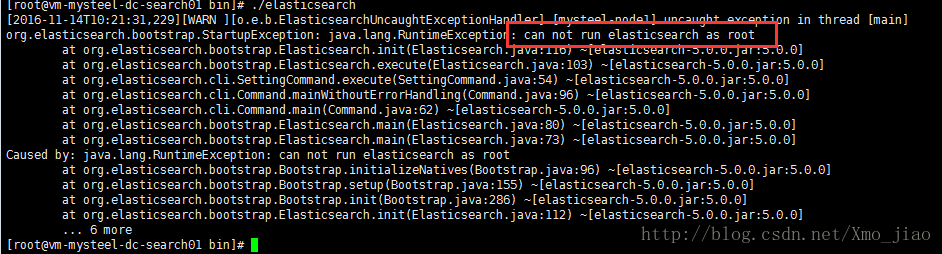
3.ES启动错误
[2017-01-12T15:55:55,433][INFO ][o.e.b.BootstrapCheck ] [SfD5sIh] bound or publishing to a non-loopback or non-link-local address, enforcing bootstrap checks
ERROR: bootstrap checks failed
max virtual memory areas vm.max_map_count [65530] is too low, increase to at least [262144]
● 临时提高vm.max_map_count的大小,此操作需要root权限:
sudo sysctl -w vm.max_map_count=262144
sysctl -a|grep vm.max_map_count
● 永久修改vm.max_map_count:
解决:切换到root用户修改配置sysctl.conf
vi /etc/sysctl.conf
添加下面配置:
vm.max_map_count=655360
并执行命令:
sysctl -p
然后,重新启动elasticsearch,即可启动成功。
4.ES启动报错
2017-01-12T16:12:22,404][INFO ][o.e.b.BootstrapCheck ] [SfD5sIh] bound or publishing to a non-loopback or non-link-local address, enforcing bootstrap checks
ERROR: bootstrap checks failed
initial heap size [536870912] not equal to maximum heap size [1073741824]; this can cause resize pauses and prevents mlockall from locking the entire heap
解决方法:
vi config/jvm.options
//-Xms 和 -Xmx需要配置的相等,不然无法启动成功。
-Xms1024m
-Xmx1024m
1.7 ES重启,kill
使用命令kill杀掉服务器的ES进程即可
1.查找ES进程
ps -ef | grep elastic
2.杀掉ES进程
kill -9 2382(2382为进PID进程号)
3.重启ES
sh elasticsearch -d
4.交互命令

pyspark 和elasticsaerch交互的一个应用
具体操作请上一篇博客链接:基于pyspark 和scala spark的jupyter notebook 安装
2.1 安装基于jupyter notebook的spark,即安装kernel 为pyspark的notebook
1.安装并启动spark
2.安装anaconda2,则jupyter notebook和python2.7安装成功
3.设置bashrc文件,使启动spark/bin目录下pyspark,自动启动jupyter.即可以通过启动 pyspark 来启动jupyter Notebook ,就可以在jupyter Notebook 中使用 pyspark
vim ~/.bashrc
#添加export
export PYSPARK_DRIVER_PYTHON=jupyter
export PYSPARK_DRIVER_PYTHON_OPTS="notebook"
source ~/.bashrc
4.启动pyspark (链接jupyter,需要设置.bashrc)
./pyspark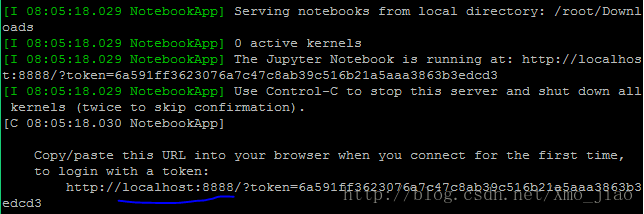
Note: notebook 后台持续启动
把启动命令放到日志中
nohup jupyter notebook > notebook.log &
Note: 其他方式启动连接 ES-spark
./pyspark --driver-memory 4g --driver-class-path ../jars/elasticsearch-spark-20_2.11-5.3.0.jar
./spark-shell --driver-memory 2g --driver-class-path ../jars/elasticsearch-spark-20_2.11-5.3.0.jar
2.2 设置spark和elasticsearch,使spark连接外部elasticsearch
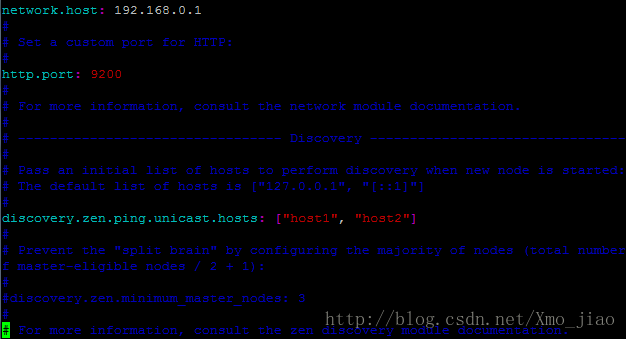
spark 默认连接localhost的和elasticsearch,如果需要非本机的spark集群连接elasticsearch,需要设置ES config文件的默认localhost为本机的外部访问ip,同样也需要设置spark的config文件,使之默认连接固定IP的ES
cd /root/elasticsearch-5.3.0/config/
vim elasticsearch.yml
//在elasticsearch.yml中添加以下内容
network.host: 9.30.166.20
http.port: 9200

cd /root/spark/conf/
cp spark-defaults.conf.template spark-defaults.conf
vim spark-defaults.conf
//在spark-defaults.conf中添加以下内容
spark.es.nodes 9.30.166.20
spark.es.port 9200
2.3 测试:通过spark-shell命令行操作,对目前的spark和elasticsearch进行交互测试
目前已经启动spark和elasticsearch,安装好有相应kernel的jypyter,也已经把需要的ES-spark包放入spark安装目录下的jars文件夹
1.启动spark-shell
cd /root/spark/bin
./spark-shell2.复制以下代码到spark-shell中
import org.apache.spark.SparkConf
import org.apache.spark.SparkContext
import org.apache.spark.SparkContext._
import org.elasticsearch.spark._
    val conf =new      SparkConf().setAppName("Recommand").setMaster("spark://zhuoling1.fyre.ibm.com:7077")
    //val conf = spark.conf
    conf.set("es.index.auto.create","true")
    conf.set("es.nodes","127.0.0.1")

    val numbers=Map("one"->1,"two"->2)
    val airports=Map("OPT"->"Otopeni","SFO"->"San Hran")
    //al sc=new SparkContext(conf)
    val aa=sc.makeRDD(Seq(numbers,airports))
aa.saveToEs("spark/docs")3.查询es节点 spark/docs上是否有上述代码save的文档,查看ES节点上的索引
curl 'localhost:9200/_cat/nodes?v'
2.4 安装tmdb 和elasticsearch 的python API,安装python names包
pip install elasticsearch2.5 基于spark和elasticsearcha交互的yelp推荐系统
基于美国yelp APP的商户推荐
数据开源,来源为yelp官网

#Add libraries
from pyspark.ml.feature import StringIndexer, VectorAssembler
from pyspark.ml import Pipeline
from pyspark.ml.tuning import CrossValidator, ParamGridBuilder
from pyspark.ml.evaluation import BinaryClassificationEvaluator
from pyspark.ml.recommendation import ALS
from pyspark.sql.functions import col
from pyspark.sql.types import *
from elasticsearch import Elasticsearch
es = Elasticsearch()
esIndex = "yelpindex"
esDocType = "yelp"
#Create data schema in ES.This step only need execute one time for a data set because it is used to initial data schema in ES.
def initIndex():
    create_index = {
        "settings": {
            "analysis": {
                "analyzer": {
                    "payload_analyzer": {
                        "type": "custom",
                        "tokenizer":"whitespace",
                        "filter":"delimited_payload_filter"
                    }
                }
            }
        },
        "mappings": {
            "yelp": {
                "properties": {
                    "text": {
                        "type": "text"
                    },
                     "userId": {
                        "type": "integer",
                        "index": "not_analyzed"
                    },
                    "itemId": {
                        "type": "integer",
                        "index": "not_analyzed"
                    },
                    "stars": {
                        "type": "double"
                    },
                    "is_open": {
                        "type": "double"
                    },
                    "@model": {
                        "properties": {
                            "factor": {
                                "type": "text",
                                "term_vector": "with_positions_offsets_payloads",
                                "analyzer" : "payload_analyzer"
                            },
                            "version": {
                                "type": "keyword"
                            }
                        }
                    }
                }
            }
        }
    }
    # create index with the settings & mappings above
    es.indices.create(index=esIndex, body=create_index)
    print "ES index(%s) create success" % esIndex
# Prepare data and indexed in ES server.3.1 Load original data from files
#This step only used for initial dataset in ES, it only need execute one time.
yelp_review = spark.read.json("/root/yelp/yelp_academic_dataset_review.json")\
    .select("business_id","stars","user_id","text")
yelp_business = spark.read.json("/root/yelp/yelp_academic_dataset_business.json")\
    .select("business_id","name","address","city","categories","is_open")
yelp_review.show(5)
yelp_business.show(5)
#Join the review and business data so that we can get all the rates for each business

#We use the business which is open in Las Vegas. The dataset include so many data and the python can not deal such dataset once. So we only use business in Las Vegas to reduce the effort of data prepare.
yelp_data = yelp_review.join(yelp_business, yelp_review.business_id == yelp_business.business_id)\
    .select(yelp_review.business_id, yelp_review.stars, yelp_review.user_id, yelp_review.text,\
    yelp_business.name,yelp_business.address,yelp_business.city,yelp_business.categories,yelp_business.is_open)\
    .filter(yelp_business.city == 'Las Vegas').filter( yelp_business.is_open == 1)
num_yelp = yelp_data.count()
yelp_data.show(5)
print yelp_data.count()
print yelp_business.count()
#3.3 Split dataset to training data and bacup data
yelp_test, yelp_backup = yelp_data.randomSplit([0.1,0.9])
num_test=yelp_test.count()
print "The number of training data is ",num_test

#3.4 Create integer id for business and user

#The original business id and user id is a string but ES need integer business id and user id to improve performance. So we use pipeline transformer to create a seqence for business id and user id.
businessIndexer = StringIndexer(inputCol="business_id",outputCol="itemId")
userIndexer = StringIndexer(inputCol="user_id",outputCol="userId")
pipeline = Pipeline(stages=[businessIndexer, userIndexer])
review_df=pipeline.fit(yelp_test).transform(yelp_test).select("text","name","address","city","categories","is_open",col("userId").cast(IntegerType()), col("itemId").cast(IntegerType()),col("stars").cast(DoubleType()))
review_df.show(5)
review_df.printSchema()
#3.5 Insert and index data into ES
data = review_df.collect()
i = 0
for row in data:
    yelp = {
        "itemId": row.itemId,
        "id": row.itemId,
        "name": row.name,
        "address": row.address,
        "city":row.city,
        "categories": row.categories,
        "userId":row.userId,
        "text": row.text,
        "stars": row.stars,
        "is_open": row.is_open
    }
    es.index(esIndex, esDocType, id=yelp['itemId'], body=yelp)
    i += 1
    if i % 5000 == 0: print "Indexed %s items of %s" % (i, num_test)

#Create model and save model into ES
#4.1 Load data from es used to create model
yelp_df = spark.read.format("es").option("es.read.field.as.array.include", "categories").load(esIndex+"/"+esDocType)
yelp_df.printSchema()
yelp_df.show(5)
#4.2 Train ALS model
als = ALS(userCol="userId", itemCol="itemId", ratingCol="stars", regParam=0.1, rank=10, seed=42)
model = als.fit(yelp_df)
model.userFactors.show(10)
model.itemFactors.show(10)
#4.3 Convert model data inorder to save it into ES.
from pyspark.sql.types import *
from pyspark.sql.functions import udf, lit
def convert_vector(x):
    '''Convert a list or numpy array to delimited token filter format'''
    return " ".join(["%s|%s" % (i, v) for i, v in enumerate(x)])
def reverse_convert(s):
    '''Convert a delimited token filter format string back to list format'''
    return  [float(f.split("|")[1]) for f in s.split(" ")]
def vector_to_struct(x, version):
    '''Convert a vector to a SparkSQL Struct with string-format vector and version fields'''
    return (convert_vector(x), version)
vector_struct = udf(vector_to_struct, \
                    StructType([StructField("factor", StringType(), True), \
                                StructField("version", StringType(), True)]))
#Show model data formate
# test out the vector conversion function
test_vec = model.itemFactors.select("features").first().features
print test_vec
print
print convert_vector(test_vec)
#4.4 Save model into ES
ver = model.uid
item_vectors = model.itemFactors.select("id", vector_struct("features", lit(ver)).alias("@model"))

# write data to ES, use:
# - "id" as the column to map to ES yelp id
# - "update" write mode for ES
# - "append" write mode for Spark
item_vectors.write.format("es") \
    .option("es.mapping.id", "id") \
    .option("es.write.operation", "update") \
    .save(esIndex+"/"+esDocType, mode="append")
#Search one data to check if model save success
es.search(index=esIndex, doc_type=esDocType, q="Target", size=1)
#5. Search similar business from ES
#5.1 Search similar business from ES using cosine
def fn_query(query_vec, q="*", cosine=False):
    return {
    "query": {
        "function_score": {
            "query" : {
                "query_string": {
                    "query": q
                }
            },
            "script_score": {
                "script": {
                        "inline": "payload_vector_score",
                        "lang": "native",
                        "params": {
                            "field": "@model.factor",
                            "vector": query_vec,
                            "cosine" : cosine
                        }
                    }
            },
            "boost_mode": "replace"
        }
    }
}

def get_similar(the_id, q="*", num=10, index=esIndex, dt=esDocType):
    response = es.get(index=index, doc_type=dt, id=the_id)
    src = response['_source']
    if '@model' in src and 'factor' in src['@model']:
        raw_vec = src['@model']['factor']
        # our script actually uses the list form for the query vector and handles conversion internally
        query_vec = reverse_convert(raw_vec)
        q = fn_query(query_vec, q=q, cosine=True)
        results = es.search(index, dt, body=q)
        hits = results['hits']['hits']
        return src, hits[1:num+1]

def yelp_similar(the_id, q="*", num=10, index=esIndex, dt=esDocType):
    bussiness, recs = get_similar(the_id, q, num, index, dt)
    # display query
    print  "Business: ",bussiness['id']
    print  "Business Name: ",bussiness['name']
    print  "Address: ",bussiness['address']
    print  "Category: ",bussiness['categories']
    print  "***************************"
    print  "Similar Business List:"
    i = 0
    for rec in recs:
        i+=1
        r_score = rec['_score']
        r_source=rec['_source']
        business_id = r_source['id']
        city=r_source['city']
        name=r_source['name']
        text=r_source['text']
        userId=r_source['userId']
        stars=rec['_source']['stars']
        address=rec['_source']['address']
        categories=rec['_source']['categories']
        print "==================================="
        print "No %s:"%i
        print "Score: ", r_score
        print "Business ID: %s"%business_id#r_im_url)
        print "City: ", city
        print "Name: ", name
        print "Address:  ", address
        print "Category: ", categories
        print "UserId: ", userId
        print "Stars: ", stars
        print "User Comment: "
        print "----------"
        print text
#5.2 Search similar business from ES.

#We can find the top 10 similar business from ES for a business ID. User also can use other App to get the result by ES for the model have been saved.
yelp_similar(188)
yelp_similar(2391)
参考网址:
1.官方资料地址:
● 如何安装执行elasticsearch:
https://www.elastic.co/guide/en/elasticsearch/reference/current/zip-targz.html
● 如何配置elasticsearch:
https://www.elastic.co/guide/en/elasticsearch/reference/current/settings.html
2.相关内容全的博客:
http://blog.sina.com.cn/s/blog_c90ce4e001032f7w.html
http://blog.csdn.net/jklfjsdj79hiofo/article/details/72355167