本教程利用StreamSet搭建一个简单的数据管道,具体为:从本地目录中读取文件,并在分支中处理读取的文件数据,最后将处理的数据写入到本地目录。将通过数据预览来配置数据管道,并添加数据报警功能。
由于是初次尝试,难免存在错误,不足之处还请大神不吝赐教!!!
目录
8 利用Expression Evaluator添加相应字段
0 数据准备
-
下载样本数据:https://www.streamsets.com/documentation/datacollector/sample_data/tutorial/nyc_taxi_data.csv
-
创建数据收集器的本地目录,将样本数据放入origin目录下
/<base directory>/tutorial/origin
/<base directory>/tutorial/destination
/<base directory>/tutorial/error
备注:本教程中的<base directory>为StreamSet的安装目录,当然你也可以将数据放在其它位置,只要保证启动StreamSet的用户对相应目录有读写权限
1 配置管道属性
置管道属性,主要是对异常数据的处理
-
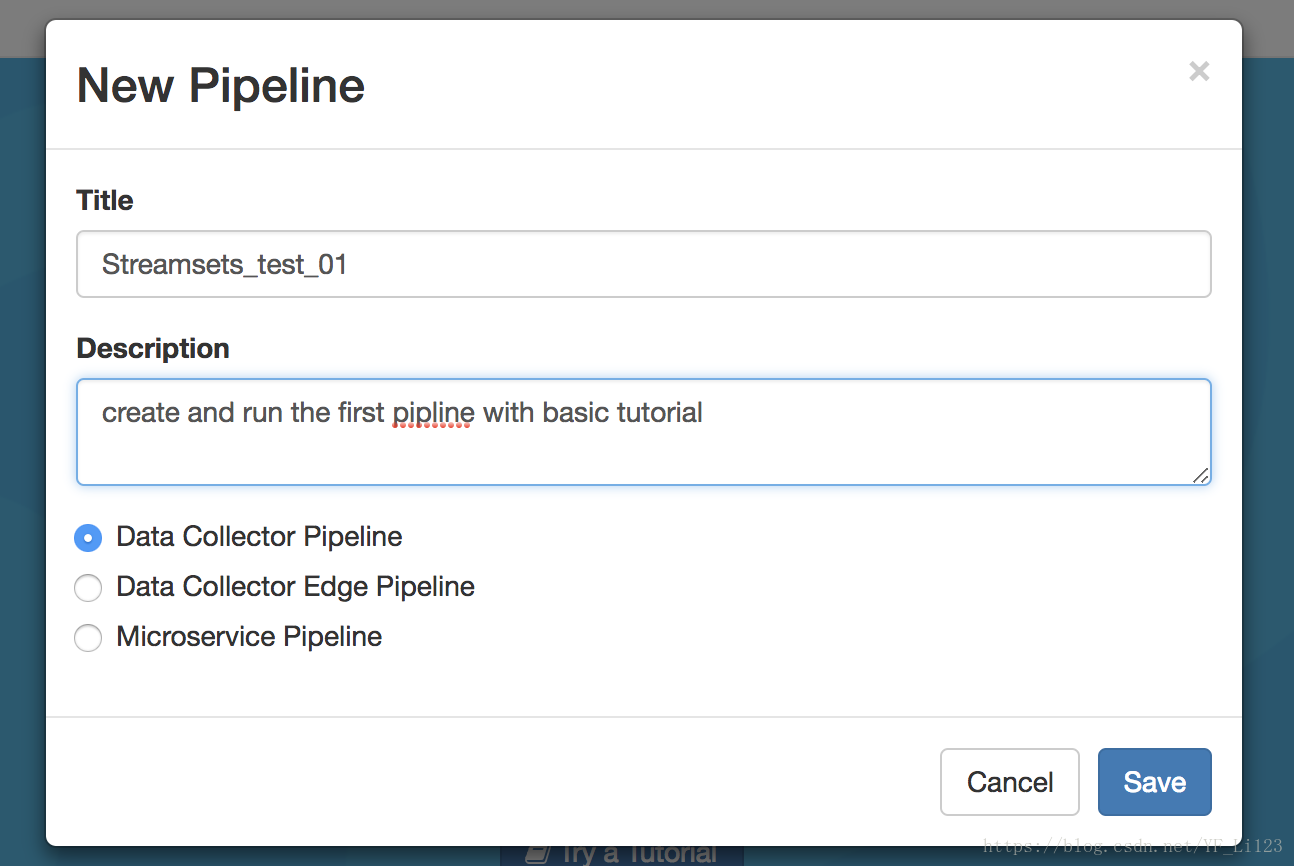
在主界面点机 Create New Pipline;

-
在弹出的对话框中输入 Pipline title 和 optional description,并选择run the pipeline on Data Collector,点击save进行保存;
-
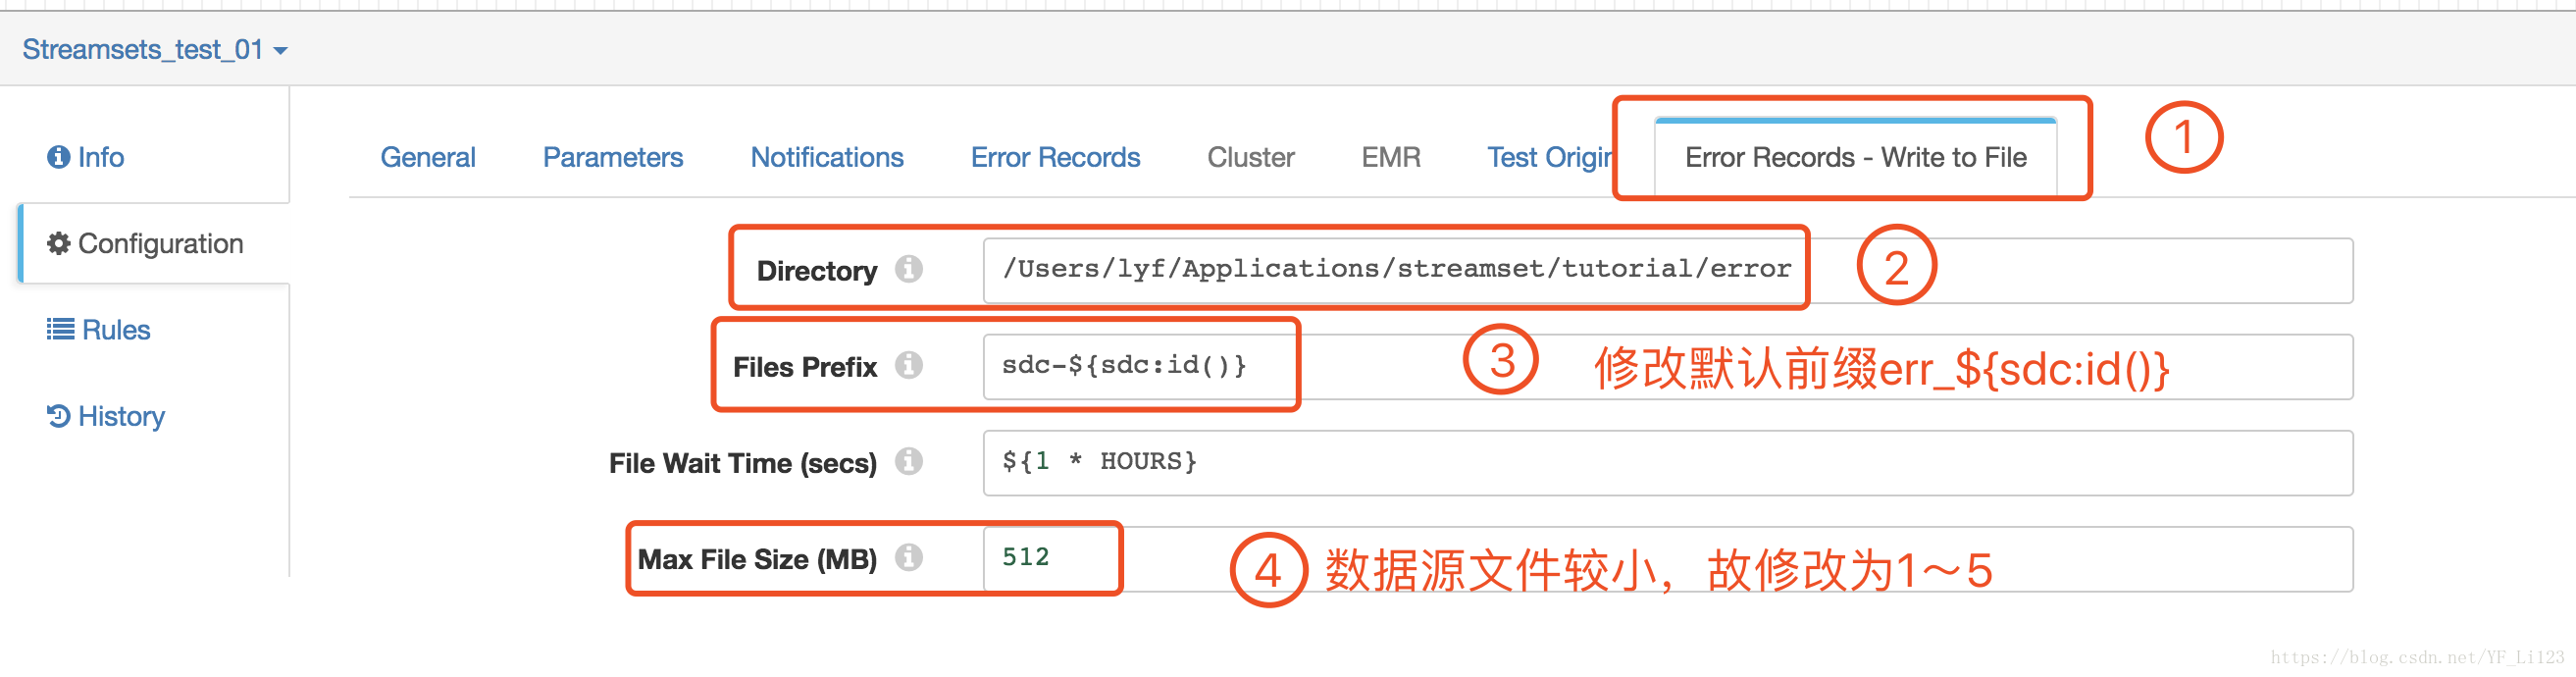
在下面的属性面板中,选择Error Records选项,配置Error Records属性为Write to File(将异常数据保存到文件中,这样就可以在不停止pipeline的情况下处理异常数据)

- Write to File的属性配置如下(没有的保持默认即可):
| Write to File Property |
Description |
| Directory |
Directory for error record files. Enter the directory that you set up for the tutorial. We recommended: /<base directory>/tutorial/error Note: To prevent validation errors, the directory must already exist. |
| Files Prefix |
This defines a prefix for error record files. By default, the files are prefixed with "SDC" and an expression that returns the Data Collector ID, but that's more than we need here. Delete the default and enter the following prefix: err_ |
| Max File Size |
For the tutorial, reduce the files size to something more manageable, such as 5 or 1 MB. |
2 配置数据源(源点)
数据源是整个管道的入口,在配置数据源的时候需要定义连接源点方式、要处理的数据类型以及其它的特殊属性等
-
选择 Select origin -> Directory 或者在最右侧的阶段库(Stage Library panel)中选择Directory origin:
.
-
在下面的属性面板中选择File,并配置相关属性如下(没有的保持默认即可):
| Directory Property |
Value |
| Files Directory |
Directory where you saved the sample file. Enter an absolute path. We recommended: /<base directory>/tutorial/origin. |
| File Name Pattern |
The Directory origin processes only the files in the directory that match the file name pattern. The tutorial sample file name is nyc_taxi_data.csv. Since the file is the only file in the directory, you can use something generic, like the asterisk wild card (*) or *.csv. If you had other .csv files in the directory that you didn't want to process, you might be more specific, like this: nyc_taxi*.csv. Or if you want to process files with prefixes for other cities, you might use *taxi*.csv. |
| Read Order |
This determines the read order when the directory includes multiple files. You can read based on the last-modified timestamp or file name. Because it's simpler, let's use Last Modified Timestamp. |
-
选择Data Format配置数据格式属性如下
| Delimited Property |
Description |
| Data Format |
The data in the sample file is delimited, so select Delimited. |
| Delimiter Format Type |
Since the sample file is a standard CSV file, use the default: Default CSV (ignores empty lines). |
| Header Line |
The sample file includes a header, so select With Header Line. |
| Root Field Type |
This property determines how the Data Collector processes delimited data. Use the default List-Map. This allows you to use standard functions to process delimited data. With the List root field type, you need to use delimited data functions. |
- 最后界面看起来像这样

3 数据预览
- 点击预览图标(Preview icon)
,按照如下进行预览配置

| Data Preview Property |
Description |
| Preview Source |
Use the default Configured Source to use the sample source data. |
| Write to Destinations and Executors |
By default, this property is not selected. In general, you should keep this property clear to avoid writing data to destination systems or triggering tasks in destination systems. |
| Show Field Type |
By default, this property is selected. Keep it selected to see the data type of fields in the record. |
| Remember the Configuration |
Select to use these properties each time you run data preview. When you select this option, the UI enters data preview without showing this dialog box again. |


注:如果无法预览数据,请检查前面步骤是否正确,解决除Validation_0011问题以外的其它问题。Validation_0011表示数据没有任何连接,不影响数据预览。
4 通过流选择器路由数据
-
流选择器是基于用户定义的条件规则进行数据过滤,不符合条件的记录将会被路由到默认的流管道中
-
选择Select Processor to Connect > Stream Selector或者在Stage Library panel中选择 Stream Selectorprocessor (
),然后连接源数据
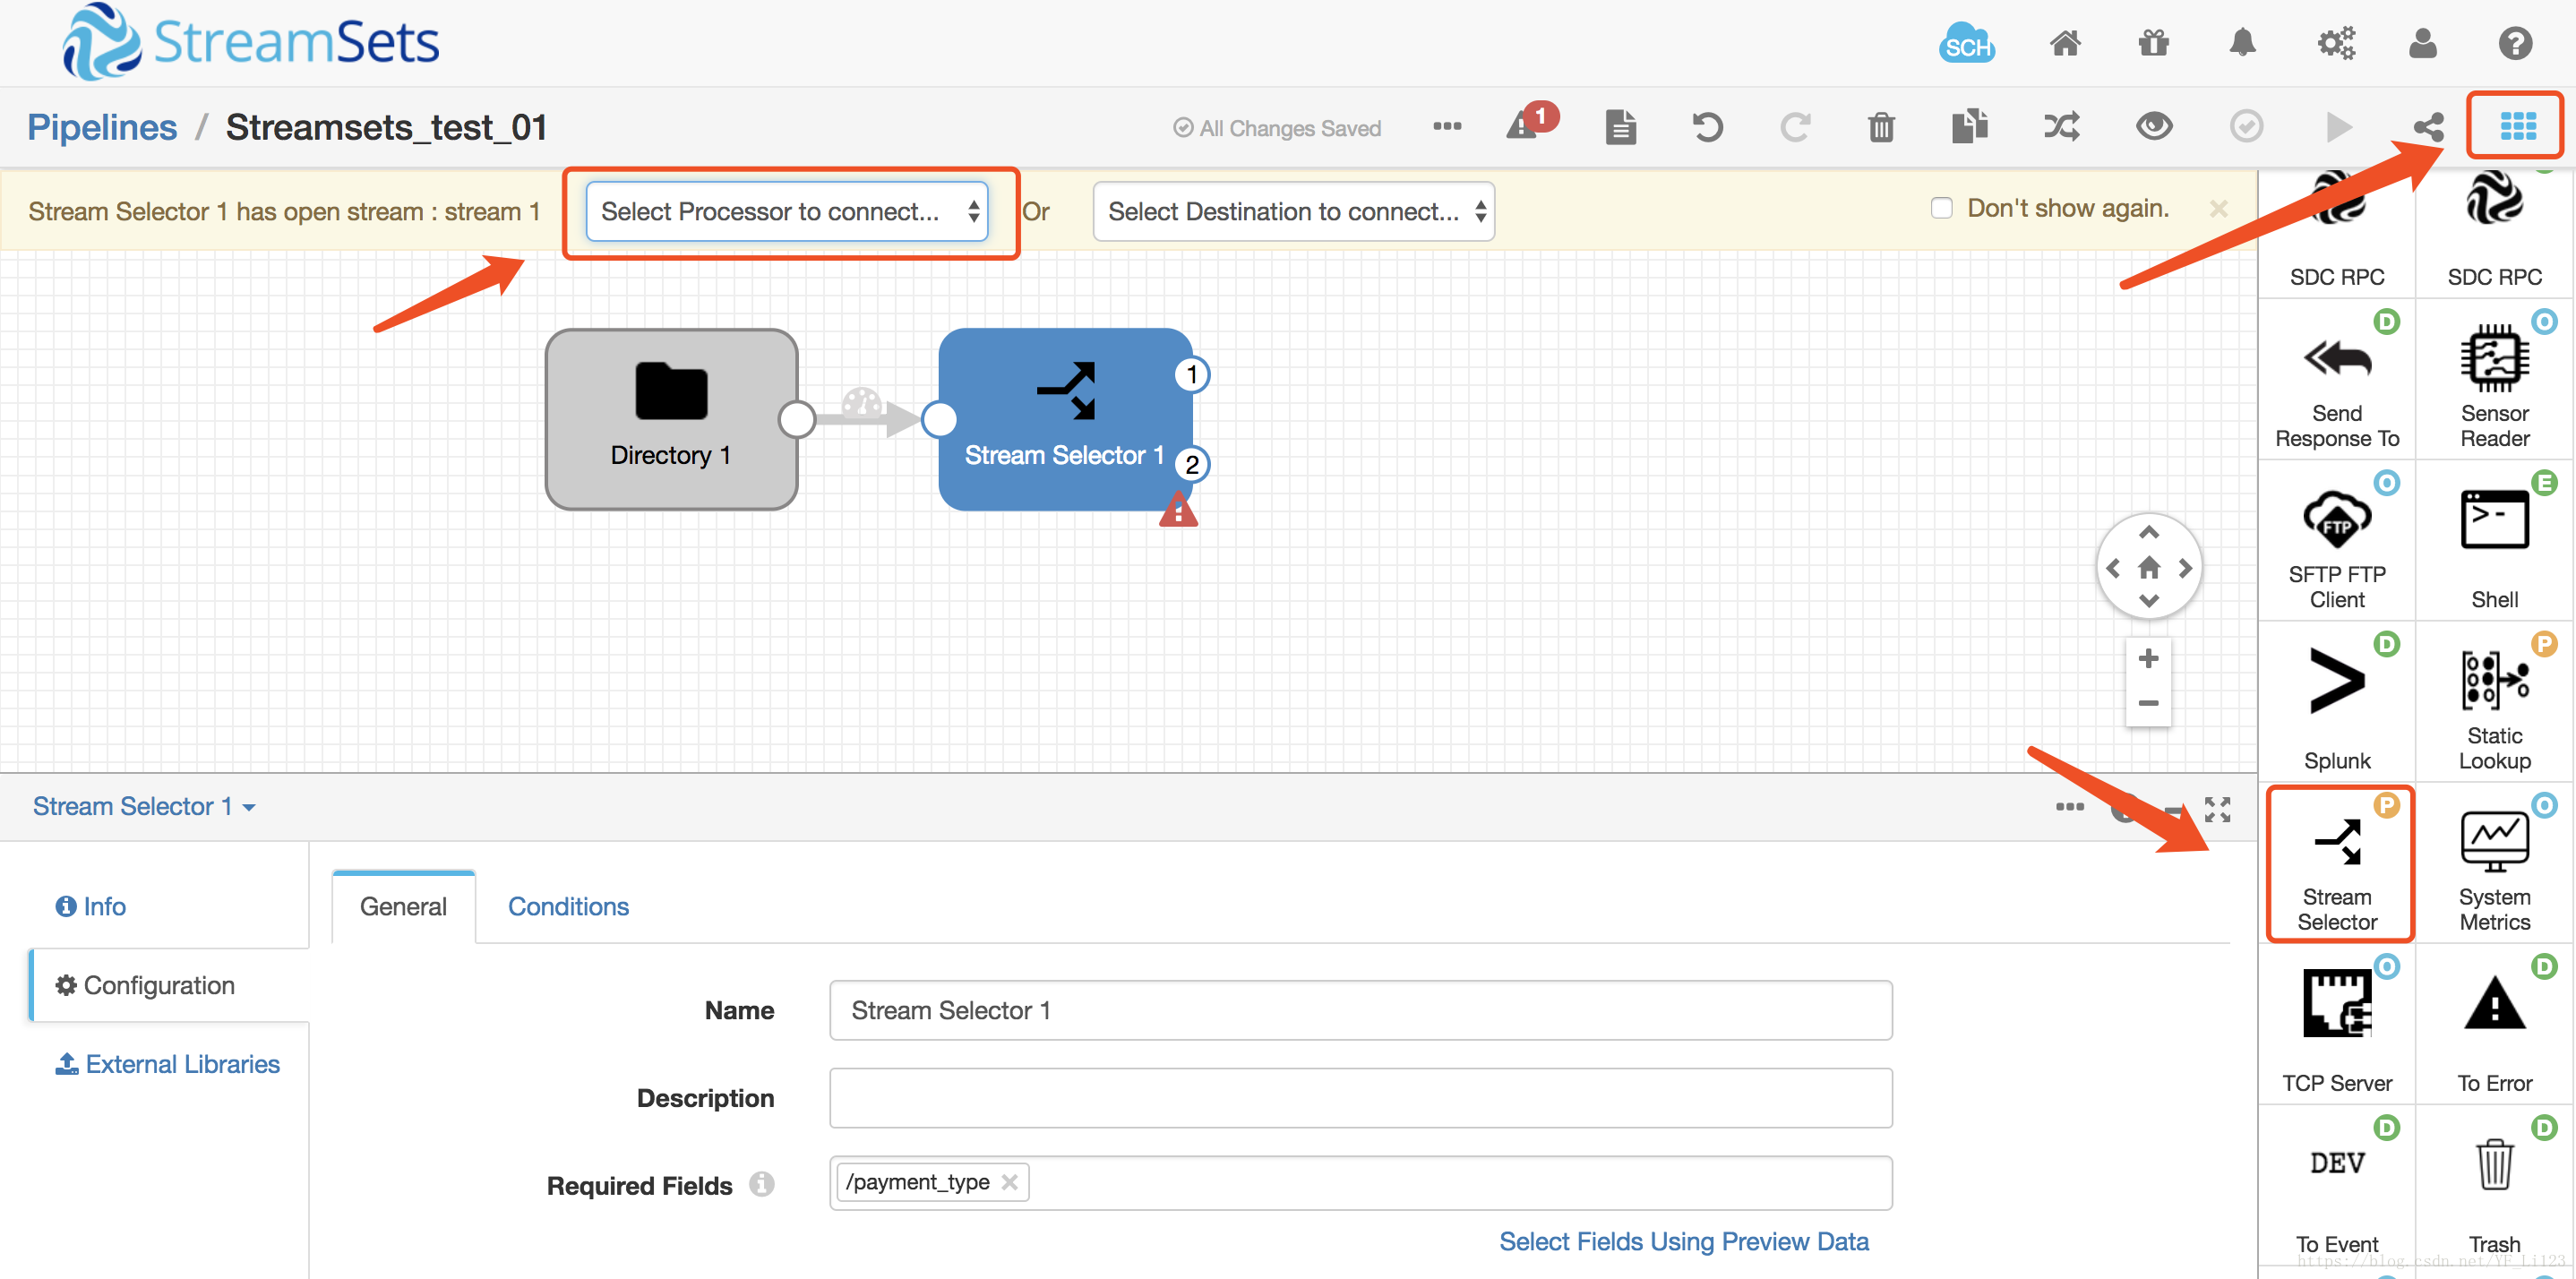
-
点击General面板,选择Required Fields属性值为/payment_type,如果之前预览数据没有问题,则会自动显示字段,如果没有,可以手动输入
-
点击condition面板,配置过滤条件,通过点击➕号增加新的条件,满足过滤条件的将会被分流到管道1,其他的分流到管道2


5 使用Jython处理信用卡类型
-
通过点击package manage 来 添加Jython Evaluator Processor,点击install即可开始安装,安装完成后点击重启数据收集器

-
重启之后就可以选择Jython Evaluator,将其连接到管道1
-
点击Jython属性面板,使用默认的批处理方式处理数据
-
在Script的文本框中删除所有注释,然后添加如下代码
try:
  for record in records:
    cc = record.value['credit_card']
    if cc == '':
      error.write(record, "Payment type was CRD, but credit card was null")
      continue

    cc_type = ''
    if cc.startswith('4'):
      cc_type = 'Visa'
    elif cc.startswith(('51','52','53','54','55')):
      cc_type = 'MasterCard'
    elif cc.startswith(('34','37')):
      cc_type = 'AMEX'
    elif cc.startswith(('300','301','302','303','304','305','36','38')):
      cc_type = 'Diners Club'
    elif cc.startswith(('6011','65')):
      cc_type = 'Discover'
    elif cc.startswith(('2131','1800','35')):
      cc_type = 'JCB'
    else:
      cc_type = 'Other'

    record.value['credit_card_type'] = cc_type
    output.write(record)
except Exception as e:
  error.write(record, e.message)
注:粘贴代码的时候可能由于格式问题(缩进等)会出错,请自行调整
-
出现以下问题又可能安装Jython的时候没有安装成功,缺少了某些库,建议卸载后重新安装

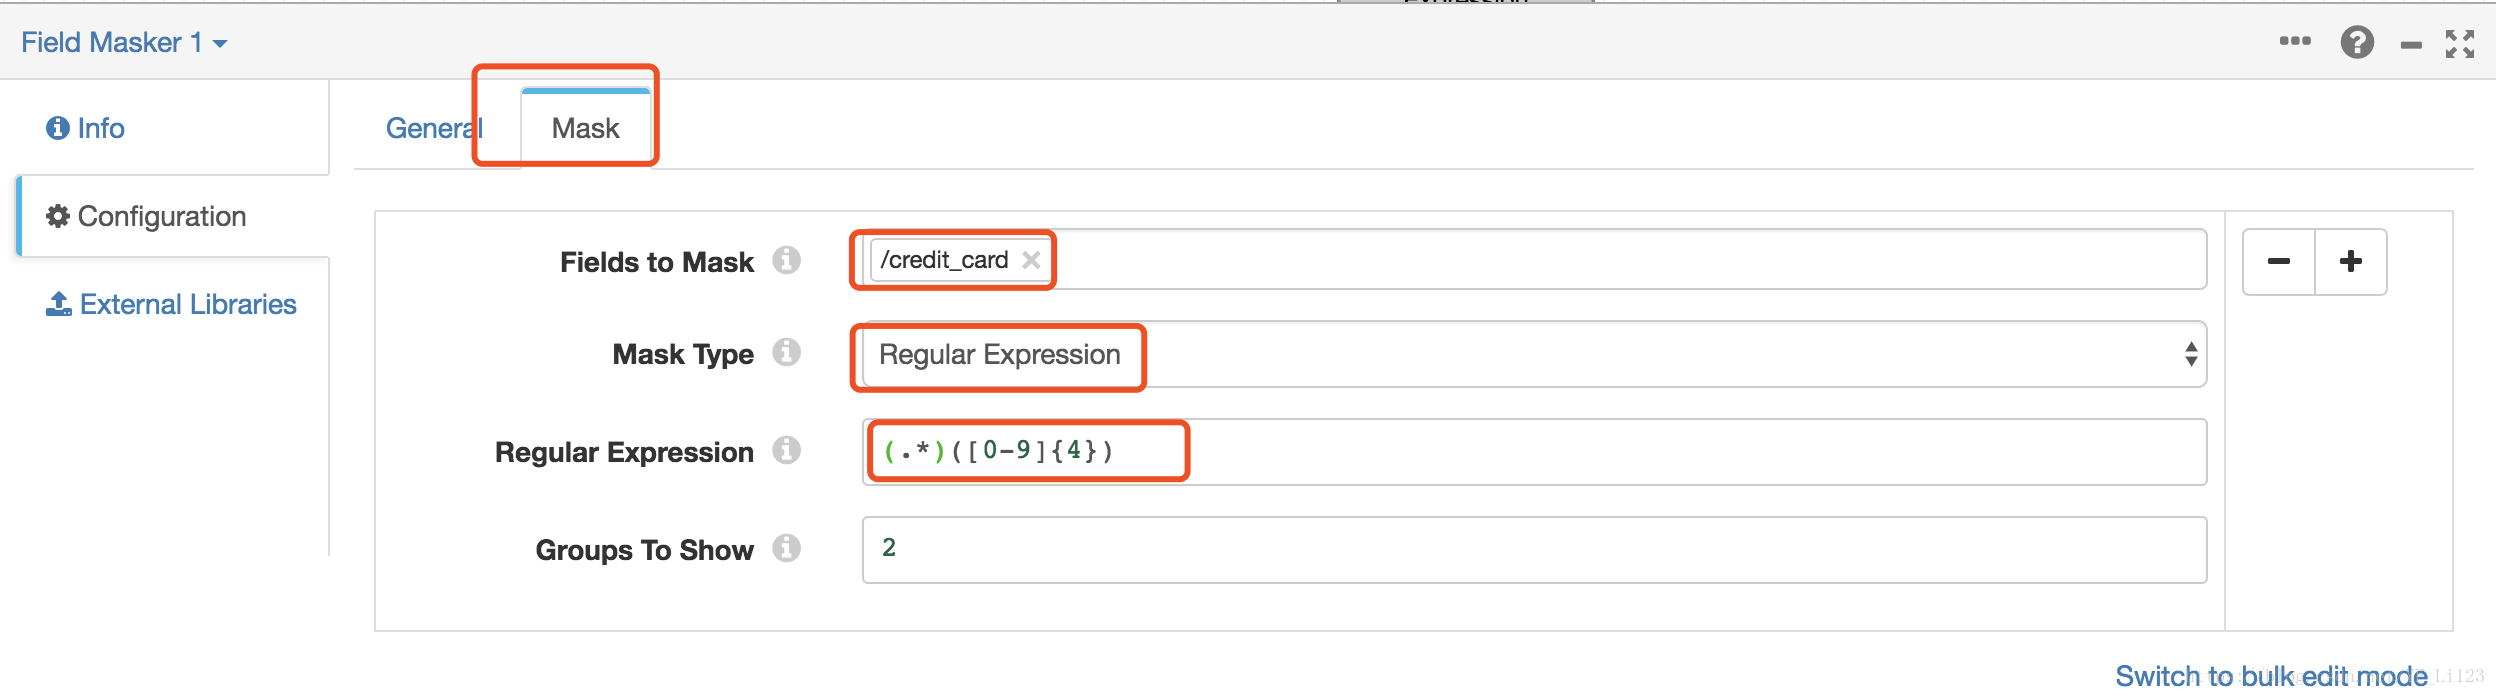
6 屏蔽信用卡号码
为了防止信用卡号码等敏感信息暴露出来,我们使用字段掩码来屏蔽信用卡号码
-
在Jython Evaluator之后增加一个Field Mask处理器
-
然后点击属性面板中的Mask table,配置如下属性
| Field Masker Property |
Configuration |
| Mask Type |
Regular Expression |
| Regular Expression |
(.*)([0-9]{4}) |
| Groups to Show |
2 |
注:正则表达式(.*)([0-9]{4})可以屏蔽除最后四位数字以外的所有数字
7 将数据写入到目标
在此,我们将数据写入到本地文件中
-
在Field Mask之后连接一个Local FS
-
点击Output Files 并配置如下属性值
| Local FS Property |
Configuration |
| Files Prefix |
Defines a prefix for output file names. By default, the files are prefixed with "SDC" and an expression that returns the Data Collector ID, but that's more than we need here. Let's simplify and use "out_" instead. |
| Directory Template |
By default, the directory template includes datetime variables to create a directory structure for output files. This is intended for writing large volumes of data. Since we only have the sample file to process, we don't need the datetime variables. Go ahead and delete the default and enter the directory where you want the files to be written. We suggested: /<base directory>/tutorial/destination. |
| Max File Size (MB) |
For the tutorial, let's lower the file size to something manageable, like 5 or 1. |

-
点击Data Format,配置如下:
| DELIMITED PROPERTY |
CONFIGURATION |
| Data Format |
Delimited |
| Header Line |
With Header Line |

8 利用Expression Evaluator添加相应字段
Jython Evaluator脚本在信用支付分支中添加了一个新字段。 为了确保所有记录具有相同的结构,我们将使用Expression Evaluator将相同的字段添加到非信用分支。这可确保所有记录在写入目标时具有相同的格式。为此,我们使用数据预览来验证Jython Evaluator如何将信用卡类型添加到记录中
-
点击Preview图标进行数据预览,如果此时报错,请检查错误原因
-
点击Jython Evaluator即可显示数据经过Jython Evaluator时的输入输出信息,可以发信output data多了一个字段credit_card_type.

-
关闭Preview,增加一个Expression Evaluator连接Stream Selector的第2个管道
-
点击Expressions并配置如下属性:
| OUTPUT FIELD |
EXPRESSION |
| /credit_card_type |
n/a |

-
连接Expression Evaluator到FS destination
9 创建数据规则并报警
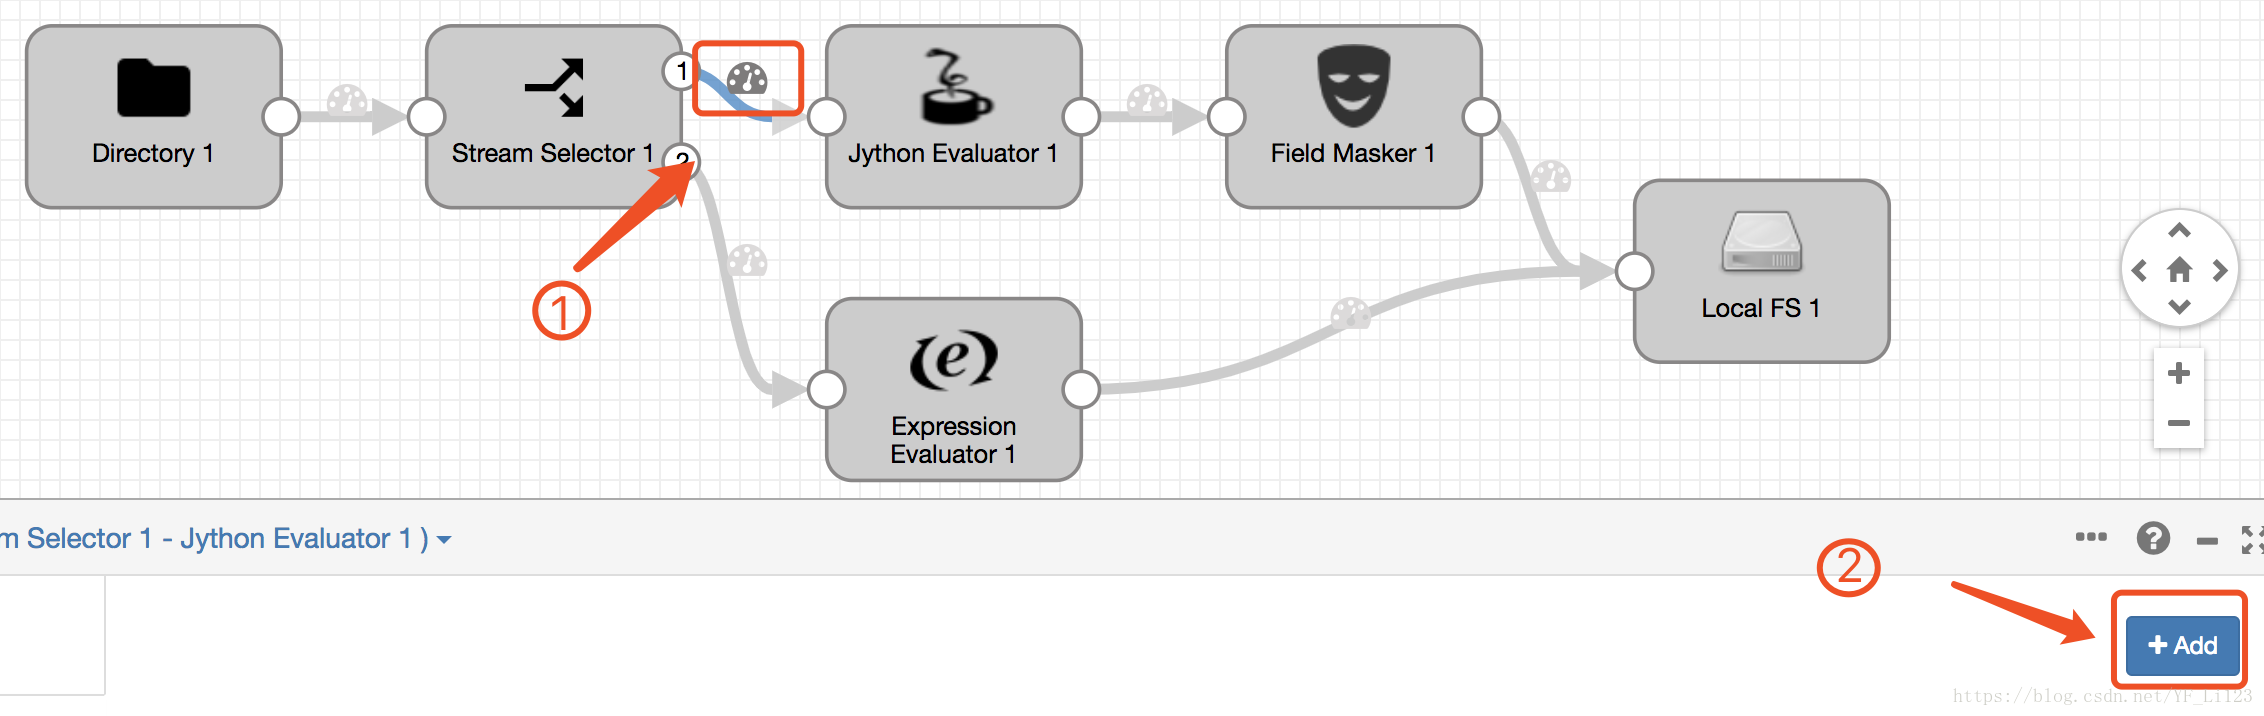
现在,在运行基本管道之前,让我们添加一个数据规则和警报。数据规则是用户定义的规则,用于检查在两个阶段之间移动的数据。它们是寻找异常值和异常数据的有力方法。数据规则和警报需要对通过管道的数据进行详细的理解。对于更一般的管道监测信息,可以使用度量规则和警报。
-
在Stream Selector 和 Jython Evaluator, 点击图标
.然后在下面点击Add
-
在数据规则对话框中配置如下信息:
| DATA RULE PROPERTY |
DESCRIPTION |
| Label |
Missing Card Numbers |
| Condition |
${record:value("/credit_card") == ""} |
| Sampling Percentage |
35 |
| Alert Text |
At least 10 missing credit card numbers! |
| Threshold Value |
10 |
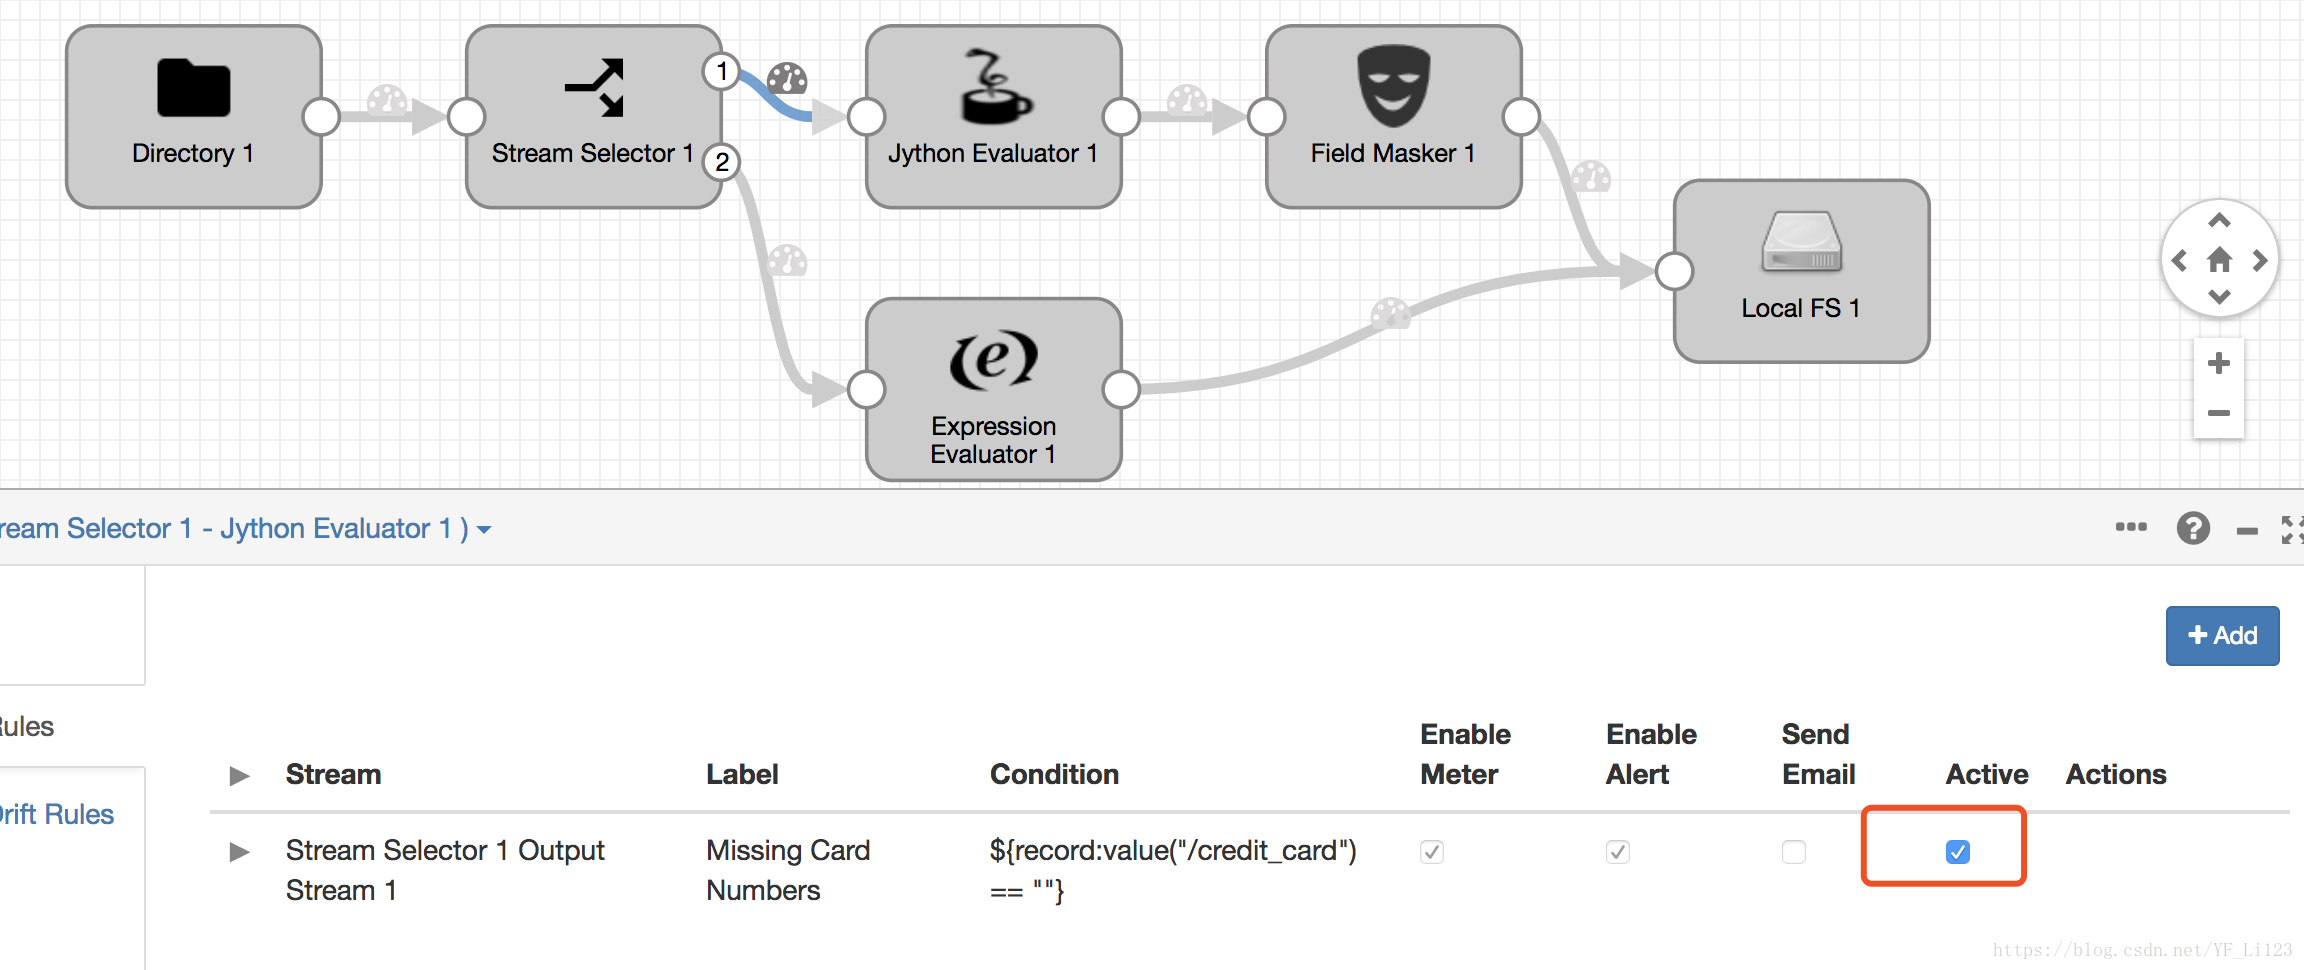
-
点击Save并勾选Active
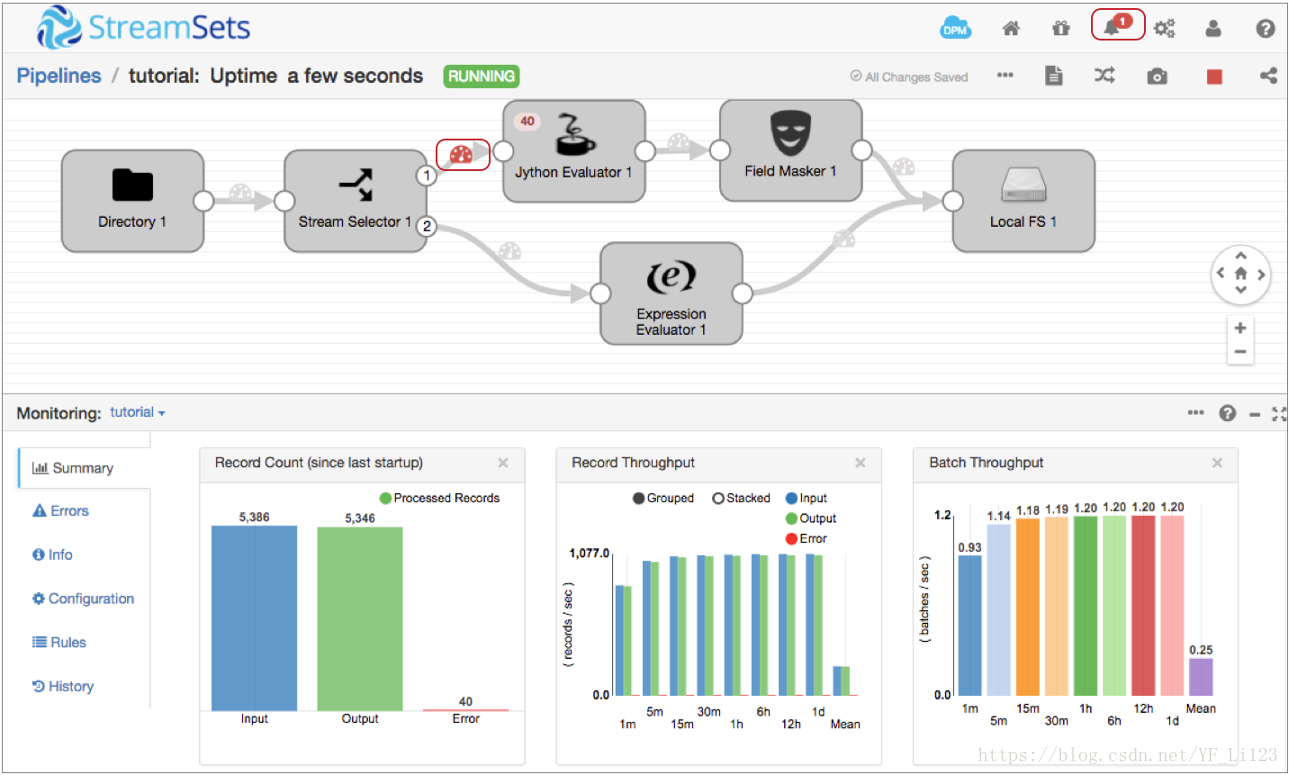
10 运行
点击开始按钮即可开启运行

参考: