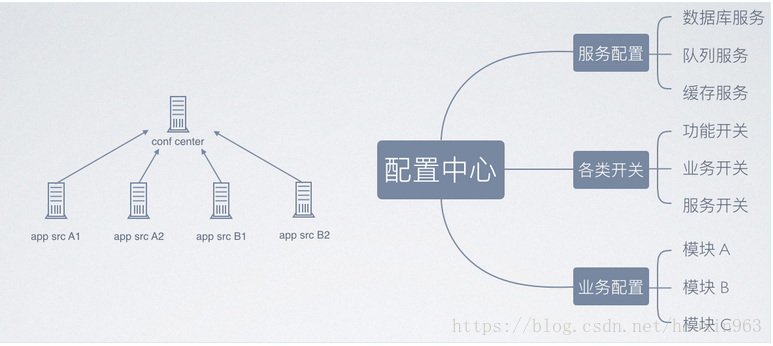
1.为什么要配置中心?
一个应用中不只是代码,还需要连接资源和其它应用,经常有很多需要外部设置的项去调整应用行为,如切换不同的数据库,设置功能开关等。
随着系统微服务的不断增加,首要考虑的是系统的可伸缩、可扩展性好,随之就是一个配置管理的问题。各自管各自的开发时没什么问题,到了线上之后管理就会很头疼,到了要大规模更新就更烦了。配置中心就是一个比较好的解决方案,下图就是一个配置中心的解决方案:
常见的配置中心的实现方法有:
a.硬编码(缺点:需要修改代码,风险大)
b.放在xml等配置文件中,和应用一起打包(缺点:需要重新打包和重启)
c.文件系统中(缺点:依赖操作系统等)
d.环境变量(缺点:有大量的配置需要人工设置到环境变量中,不便于管理,且依赖平台)
e.云端存储(缺点:与其他应用耦合)
2.什么是spring cloud config?
在分布式系统中,spring cloud config 提供一个服务端和客户端去提供可扩展的配置服务。我们可用用配置服务中心区集中的管理所有的服务的各种环境配置文件。配置服务中心采用Git的方式存储配置文件,因此我们很容易部署修改,有助于对环境配置进行版本管理。
Spring Cloud Config就是云端存储配置信息的,它具有中心化,版本控制,支持动态更新,平台独立,语言独立等特性。其特点是:
a.提供服务端和客户端支持(spring cloud config server和spring cloud config client)
b.集中式管理分布式环境下的应用配置
c.基于Spring环境,无缝与Spring应用集成
d.可用于任何语言开发的程序
e.默认实现基于git仓库,可以进行版本管理
f.可替换自定义实现
3.spring cloud config的结构是什么?
spring cloud config包括两部分:
-
spring cloud config server 作为配置中心的服务端
- 拉取配置时更新git仓库副本,保证是最新结果
- 支持数据结构丰富,yml, json, properties 等
- 配合 eureke 可实现服务发现,配合 cloud bus 可实现配置推送更新
- 配置存储基于 git 仓库,可进行版本管理
- 简单可靠,有丰富的配套方案
-
Spring Cloud Config Client 客户端
- Spring Boot项目不需要改动任何代码,加入一个启动配置文件指明使用ConfigServer上哪个配置文件即可
Spring Cloud Config的原理如图所示:
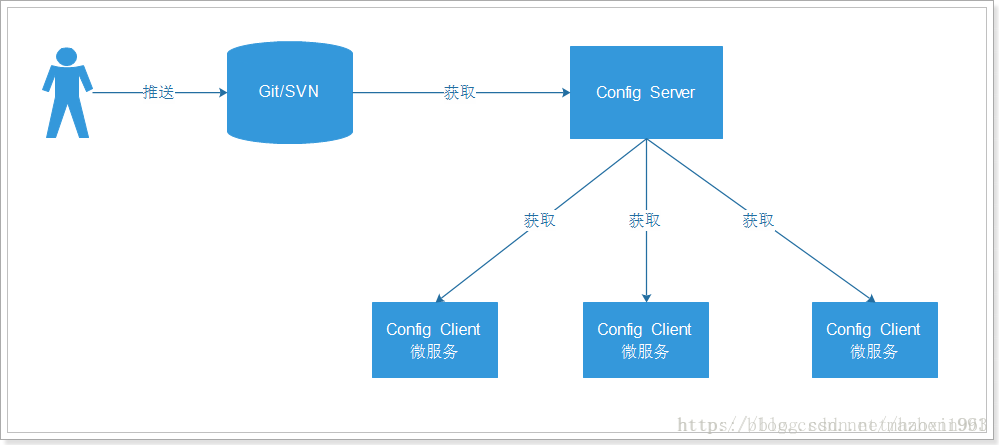
Spring Cloud Config 是一个解决分布式系统的配置管理方案。它包含了 Client 和 Server 两个部分,Server 提供配置文件的存储、以接口的形式将配置文件的内容提供出去,Client 通过接口获取数据、并依据此数据初始化自己的应用。
其实就是 Server 端将所有的配置文件服务化,需要配置文件的服务实例去 Config Server 获取对应的数据。将所有的配置文件统一整理,避免了配置文件碎片化。
如果服务运行期间改变配置文件,服务是不会得到最新的配置信息,需要解决这个问题就需要引入 Refresh。可以在服务的运行期间重新加载配置文件。
当所有的配置文件都存储在配置中心的时候,配置中心就成为了一个非常重要的组件。如果配置中心出现问题将会导致灾难性的后果,因此在生产中建议对配置中心做集群,来支持配置中心高可用性。
4.如何使用spring cloud config
首先在github上面创建了一个文件夹config-repo用来存放配置文件,为了模拟生产环境,我们创建以下三个配置文件:
// 开发环境
neo-config-dev.properties
// 测试环境
neo-config-test.properties
// 生产环境
neo-config-pro.properties
每个配置文件中都写一个属性neo.hello,属性值分别是 hello im dev/test/pro 。下面我们开始配置server端
server 端
1、添加依赖
<dependencies>
	<dependency>
		<groupId>org.springframework.cloud</groupId>
		<artifactId>spring-cloud-config-server</artifactId>
	</dependency>
</dependencies>
只需要加入spring-cloud-config-server包引用既可。
2、配置文件
server:
  port: 8001
spring:
  application:
    name: spring-cloud-config-server
  cloud:
    config:
      server:
        git:
          uri: https://github.com/ityouknow/spring-cloud-starter/     # 配置git仓库的地址
          search-paths: config-repo                             # git仓库地址下的相对地址,可以配置多个,用,分割。
          username:                                             # git仓库的账号
          password:                                             # git仓库的密码
Spring Cloud Config也提供本地存储配置的方式。我们只需要设置属性spring.profiles.active=native,Config Server会默认从应用的src/main/resource目录下检索配置文件。也可以通过spring.cloud.config.server.native.searchLocations=file:E:/properties/属性来指定配置文件的位置。虽然Spring Cloud Config提供了这样的功能,但是为了支持更好的管理内容和版本控制的功能,还是推荐使用git的方式。
3、启动类
启动类添加@EnableConfigServer,激活对配置中心的支持
@EnableConfigServer
@SpringBootApplication
public class ConfigServerApplication {

	public static void main(String[] args) {
		SpringApplication.run(ConfigServerApplication.class, args);
	}
}
到此server端相关配置已经完成
4、测试
首先我们先要测试server端是否可以读取到github上面的配置信息,直接访问:http://localhost:8001/neo-config/dev
返回信息如下:
{
    "name": "neo-config",
    "profiles": [
        "dev"
    ],
    "label": null,
    "version": null,
    "state": null,
    "propertySources": [
        {
            "name": "https://github.com/ityouknow/spring-cloud-starter/config-repo/neo-config-dev.properties",
            "source": {
                "neo.hello": "hello im dev"
            }
        }
    ]
}
上述的返回的信息包含了配置文件的位置、版本、配置文件的名称以及配置文件中的具体内容,说明server端已经成功获取了git仓库的配置信息。
如果直接查看配置文件中的配置信息可访问:http://localhost:8001/neo-config-dev.properties,返回:neo.hello: hello im dev
修改配置文件neo-config-dev.properties中配置信息为:neo.hello=hello im dev update,再次在浏览器访问http://localhost:8001/neo-config-dev.properties,返回:neo.hello: hello im dev update。说明server端会自动读取最新提交的内容
仓库中的配置文件会被转换成web接口,访问可以参照以下的规则:
- /{application}/{profile}[/{label}]
- /{application}-{profile}.yml
- /{label}/{application}-{profile}.yml
- /{application}-{profile}.properties
- /{label}/{application}-{profile}.properties
以neo-config-dev.properties为例子,它的application是neo-config,profile是dev。client会根据填写的参数来选择读取对应的配置。
client 端
主要展示如何在业务项目中去获取server端的配置信息
1、添加依赖
<dependencies>
	<dependency>
		<groupId>org.springframework.cloud</groupId>
		<artifactId>spring-cloud-starter-config</artifactId>
	</dependency>
	<dependency>
		<groupId>org.springframework.boot</groupId>
		<artifactId>spring-boot-starter-web</artifactId>
	</dependency>
	<dependency>
		<groupId>org.springframework.boot</groupId>
		<artifactId>spring-boot-starter-test</artifactId>
		<scope>test</scope>
	</dependency>
</dependencies>
引入spring-boot-starter-web包方便web测试
2、配置文件
需要配置两个配置文件,application.properties和bootstrap.properties
application.properties如下:
spring.application.name=spring-cloud-config-client
server.port=8002
bootstrap.properties如下:
spring.cloud.config.name=neo-config
spring.cloud.config.profile=dev
spring.cloud.config.uri=http://localhost:8001/
spring.cloud.config.label=master
- spring.application.name:对应{application}部分
- spring.cloud.config.profile:对应{profile}部分
- spring.cloud.config.label:对应git的分支。如果配置中心使用的是本地存储,则该参数无用
- spring.cloud.config.uri:配置中心的具体地址
- spring.cloud.config.discovery.service-id:指定配置中心的service-id,便于扩展为高可用配置集群。
特别注意:上面这些与spring-cloud相关的属性必须配置在bootstrap.properties中,config部分内容才能被正确加载。因为config的相关配置会先于application.properties,而bootstrap.properties的加载也是先于application.properties。
3、启动类
启动类添加@EnableConfigServer,激活对配置中心的支持
@SpringBootApplication
public class ConfigClientApplication {

	public static void main(String[] args) {
		SpringApplication.run(ConfigClientApplication.class, args);
	}
}
启动类只需要@SpringBootApplication注解就可以
4、web测试
使用@Value注解来获取server端参数的值
@RestController
class HelloController {
    @Value("${neo.hello}")
    private String hello;

    @RequestMapping("/hello")
    public String from() {
        return this.hello;
    }
}
启动项目后访问:http://localhost:8002/hello,返回:hello im dev update说明已经正确的从server端获取到了参数。到此一个完整的服务端提供配置服务,客户端获取配置参数的例子就完成了。
我们在进行一些小实验,手动修改neo-config-dev.properties中配置信息为:neo.hello=hello im dev update1提交到github,再次在浏览器访问http://localhost:8002/hello,返回:neo.hello: hello im dev update,说明获取的信息还是旧的参数,这是为什么呢?因为springboot项目只有在启动的时候才会获取配置文件的值,修改github信息后,client端并没有在次去获取,所以导致这个问题。
高可用改造
客户端都是直接调用配置中心的server端来获取配置文件信息。这样就存在了一个问题,客户端和服务端的耦合性太高,如果server端要做集群,客户端只能通过原始的方式来路由,server端改变IP地址的时候,客户端也需要修改配置,不符合springcloud服务治理的理念。springcloud提供了这样的解决方案,我们只需要将server端当做一个服务注册到eureka中,client端去eureka中去获取配置中心server端的服务既可。
server端改造
1、添加依赖
<dependencies>
	<dependency>
		<groupId>org.springframework.cloud</groupId>
		<artifactId>spring-cloud-config-server</artifactId>
	</dependency>
	<dependency>
		<groupId>org.springframework.cloud</groupId>
		<artifactId>spring-cloud-starter-eureka</artifactId>
	</dependency>
</dependencies>
需要多引入spring-cloud-starter-eureka包,来添加对eureka的支持。
2、配置文件
server:
server:
  port: 8001
spring:
  application:
    name: spring-cloud-config-server
  cloud:
    config:
      server:
        git:
          uri: https://github.com/ityouknow/spring-cloud-starter/     # 配置git仓库的地址
          search-paths: config-repo                             # git仓库地址下的相对地址,可以配置多个,用,分割。
          username: username                                        # git仓库的账号
          password: password                                    # git仓库的密码
eureka:
  client:
    serviceUrl:
      defaultZone: http://localhost:8000/eureka/   ## 注册中心eurka地址
增加了eureka注册中心的配置
3、启动类
启动类添加@EnableDiscoveryClient激活对配置中心的支持
@EnableDiscoveryClient
@EnableConfigServer
@SpringBootApplication
public class ConfigServerApplication {

	public static void main(String[] args) {
		SpringApplication.run(ConfigServerApplication.class, args);
	}
}
这样server端的改造就完成了。先启动eureka注册中心,在启动server端,在浏览器中访问:http://localhost:8000/就会看到server端已经注册了到注册中心了。

按照上篇的测试步骤对server端进行测试服务正常。
客户端改造
1、添加依赖
<dependencies>
	<dependency>
		<groupId>org.springframework.cloud</groupId>
		<artifactId>spring-cloud-starter-config</artifactId>
	</dependency>
	<dependency>
		<groupId>org.springframework.boot</groupId>
		<artifactId>spring-boot-starter-web</artifactId>
	</dependency>
	<dependency>
		<groupId>org.springframework.cloud</groupId>
		<artifactId>spring-cloud-starter-eureka</artifactId>
	</dependency>
	<dependency>
		<groupId>org.springframework.boot</groupId>
		<artifactId>spring-boot-starter-test</artifactId>
		<scope>test</scope>
	</dependency>
</dependencies>
需要多引入spring-cloud-starter-eureka包,来添加对eureka的支持。
2、配置文件
spring.application.name=spring-cloud-config-client
server.port=8002

spring.cloud.config.name=neo-config
spring.cloud.config.profile=dev
spring.cloud.config.label=master
spring.cloud.config.discovery.enabled=true
spring.cloud.config.discovery.serviceId=spring-cloud-config-server

eureka.client.serviceUrl.defaultZone=http://localhost:8000/eureka/
主要是去掉了spring.cloud.config.uri直接指向server端地址的配置,增加了最后的三个配置:
spring.cloud.config.discovery.enabled:开启Config服务发现支持spring.cloud.config.discovery.serviceId:指定server端的name,也就是server端spring.application.name的值eureka.client.serviceUrl.defaultZone:指向配置中心的地址
这三个配置文件都需要放到bootstrap.properties的配置中
3、启动类
启动类添加@EnableDiscoveryClient激活对配置中心的支持
@EnableDiscoveryClient
@SpringBootApplication
public class ConfigClientApplication {

	public static void main(String[] args) {
		SpringApplication.run(ConfigClientApplication.class, args);
	}
}
启动client端,在浏览器中访问:http://localhost:8000/ 就会看到server端和client端都已经注册了到注册中心了。

高可用
为了模拟生产集群环境,我们改动server端的端口为8003,再启动一个server端来做服务的负载,提供高可用的server端支持。

如上图就可发现会有两个server端同时提供配置中心的服务,防止某一台down掉之后影响整个系统的使用。
我们先单独测试服务端,分别访问:http://localhost:8001/neo-config/dev、http://localhost:8003/neo-config/dev返回信息:
{
    "name": "neo-config",
    "profiles": [
        "dev"
    ],
    "label": null,
    "version": null,
    "state": null,
    "propertySources": [
        {
            "name": "https://github.com/ityouknow/spring-cloud-starter/config-repo/neo-config-dev.properties",
            "source": {
                "neo.hello": "hello im dev"
            }
        }
    ]
}
说明两个server端都正常读取到了配置信息。
再次访问:http://localhost:8002/hello,返回:hello im dev update。说明客户端已经读取到了server端的内容,我们随机停掉一台server端的服务,再次访问http://localhost:8002/hello,返回:hello im dev update,说明达到了高可用的目的。