Android自定义View通常需要经过measure、layout和draw过程,如果你没有了解过measure过程,可以先看看这篇文章。
一、Layout的作用:计算视图的位置,即Left、Top、Right、Bottom四点的位置
二、layout过程:跟measure类似,layout也会根据View的类型分成两种情况进行处理。
| View类型 | layout过程 |
| 单一View | 只计算View本身的位置 |
| ViewGroup | 确定View本身及子View在父容器中的位置 |
接下来我们对这两种情况分别进行分析。
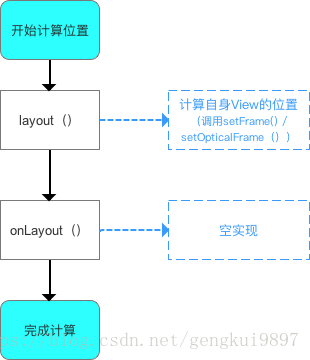
(1)单一View的layout过程
具体流程:layout()→onLayout()
相关源码分析如下:
/**
  * 源码分析:layout()
  * 作用:确定View本身的位置,即设置View本身的四个顶点位置
  */
  public void layout(int l, int t, int r, int b) {

    // 当前视图的四个顶点
    int oldL = mLeft;
    int oldT = mTop;
    int oldB = mBottom;
    int oldR = mRight;

    // 1. 确定View的位置:setFrame() / setOpticalFrame()
    // 即初始化四个顶点的值、判断当前View大小和位置是否发生了变化 & 返回
    // ->>分析1、分析2
    boolean changed = isLayoutModeOptical(mParent) ?
            setOpticalFrame(l, t, r, b) : setFrame(l, t, r, b);

    // 2. 若视图的大小 & 位置发生变化
    // 会重新确定该View所有的子View在父容器的位置:onLayout()
    if (changed || (mPrivateFlags & PFLAG_LAYOUT_REQUIRED) == PFLAG_LAYOUT_REQUIRED) {

        onLayout(changed, l, t, r, b);
        // 对于单一View的laytou过程:由于单一View是没有子View的,故onLayout()是一个空实现->>分析3
        // 对于ViewGroup的laytou过程:由于确定位置与具体布局有关,所以onLayout()在ViewGroup为1个抽象方法,需重写实现(后面会详细说)
  ...

}

/**
  * 分析1:setFrame()
  * 作用:根据传入的4个位置值,设置View本身的四个顶点位置
  * 即:最终确定View本身的位置
  */
  protected boolean setFrame(int left, int top, int right, int bottom) {
        ...
    // 通过以下赋值语句记录下了视图的位置信息,即确定View的四个顶点
    // 从而确定了视图的位置
    mLeft = left;
    mTop = top;
    mRight = right;
    mBottom = bottom;

    mRenderNode.setLeftTopRightBottom(mLeft, mTop, mRight, mBottom);

    }

/**
  * 分析2:setOpticalFrame()
  * 作用:根据传入的4个位置值,设置View本身的四个顶点位置
  * 即:最终确定View本身的位置
  */
  private boolean setOpticalFrame(int left, int top, int right, int bottom) {

        Insets parentInsets = mParent instanceof View ?
                ((View) mParent).getOpticalInsets() : Insets.NONE;

        Insets childInsets = getOpticalInsets();

        // 内部实际上是调用setFrame()
        return setFrame(
                left   + parentInsets.left - childInsets.left,
                top    + parentInsets.top  - childInsets.top,
                right  + parentInsets.left + childInsets.right,
                bottom + parentInsets.top  + childInsets.bottom);
    }
    // 回到调用原处

/**
  * 分析3:onLayout()
  * 注:对于单一View的laytou过程
  *    a. 由于单一View是没有子View的,故onLayout()是一个空实现
  *    b. 由于在layout()中已经对自身View进行了位置计算,所以单一View的layout过程在layout()后就已完成了
  */
 protected void onLayout(boolean changed, int left, int top, int right, int bottom) {

   // 参数说明
   // changed 当前View的大小和位置改变了
   // left 左部位置
   // top 顶部位置
   // right 右部位置
   // bottom 底部位置

}
我们对单一View的layout过程总结一下:
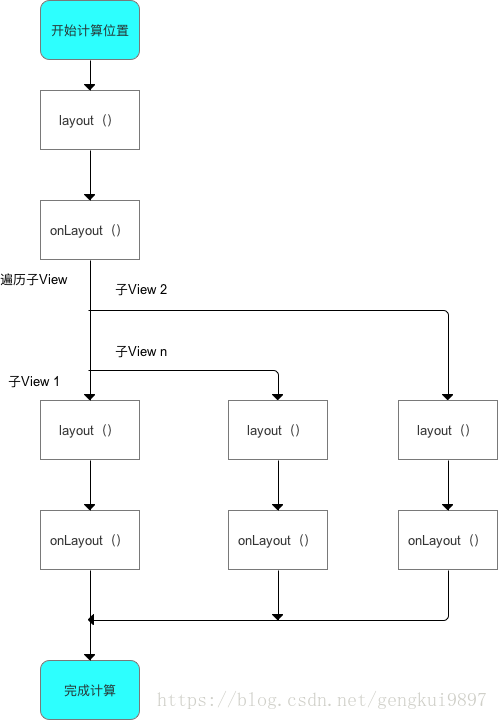
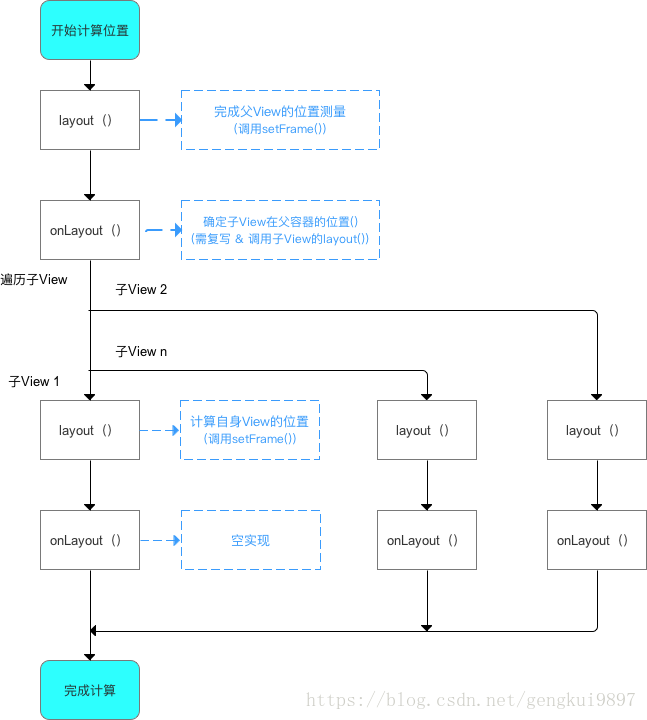
(2)ViewGroup的layout分析
流程:
扫描二维码关注公众号,回复:
3300873 查看本文章

相关源码分析如下:
/**
  * 源码分析:layout()
  * 作用:确定View本身的位置,即设置View本身的四个顶点位置
  * 注:与单一View的layout()源码一致
  */
  public void layout(int l, int t, int r, int b) {

    // 当前视图的四个顶点
    int oldL = mLeft;
    int oldT = mTop;
    int oldB = mBottom;
    int oldR = mRight;

    // 1. 确定View的位置:setFrame() / setOpticalFrame()
    // 即初始化四个顶点的值、判断当前View大小和位置是否发生了变化 & 返回
    // ->>分析1、分析2
    boolean changed = isLayoutModeOptical(mParent) ?
            setOpticalFrame(l, t, r, b) : setFrame(l, t, r, b);

    // 2. 若视图的大小 & 位置发生变化
    // 会重新确定该View所有的子View在父容器的位置:onLayout()
    if (changed || (mPrivateFlags & PFLAG_LAYOUT_REQUIRED) == PFLAG_LAYOUT_REQUIRED) {

        onLayout(changed, l, t, r, b);
        // 对于单一View的laytou过程:由于单一View是没有子View的,故onLayout()是一个空实现(上面已分析完毕)
        // 对于ViewGroup的laytou过程:由于确定位置与具体布局有关,所以onLayout()在ViewGroup为1个抽象方法,需重写实现 ->>分析3
  ...

}

/**
  * 分析1:setFrame()
  * 作用:确定View本身的位置,即设置View本身的四个顶点位置
  */
  protected boolean setFrame(int left, int top, int right, int bottom) {
        ...
    // 通过以下赋值语句记录下了视图的位置信息,即确定View的四个顶点
    // 从而确定了视图的位置
    mLeft = left;
    mTop = top;
    mRight = right;
    mBottom = bottom;

    mRenderNode.setLeftTopRightBottom(mLeft, mTop, mRight, mBottom);

    }

/**
  * 分析2:setOpticalFrame()
  * 作用:确定View本身的位置,即设置View本身的四个顶点位置
  */
  private boolean setOpticalFrame(int left, int top, int right, int bottom) {

        Insets parentInsets = mParent instanceof View ?
                ((View) mParent).getOpticalInsets() : Insets.NONE;

        Insets childInsets = getOpticalInsets();

        // 内部实际上是调用setFrame()
        return setFrame(
                left   + parentInsets.left - childInsets.left,
                top    + parentInsets.top  - childInsets.top,
                right  + parentInsets.left + childInsets.right,
                bottom + parentInsets.top  + childInsets.bottom);
    }
    // 回到调用原处

/**
  * 分析3:onLayout()
  * 作用:计算该ViewGroup包含所有的子View在父容器的位置()
  * 注:
  *      a. 定义为抽象方法,需重写,因:子View的确定位置与具体布局有关,所以onLayout()在ViewGroup没有实现
  *      b. 在自定义ViewGroup时必须复写onLayout()!!!!!
  *      c. 复写原理:遍历子View 、计算当前子View的四个位置值 & 确定自身子View的位置(调用子View layout())
  */
  protected void onLayout(boolean changed, int left, int top, int right, int bottom) {

     // 参数说明
     // changed 当前View的大小和位置改变了
     // left 左部位置
     // top 顶部位置
     // right 右部位置
     // bottom 底部位置

     // 1. 遍历子View:循环所有子View
          for (int i=0; i<getChildCount(); i++) {
              View child = getChildAt(i);

              // 2. 计算当前子View的四个位置值
                // 2.1 位置的计算逻辑
                ...// 需自己实现,也是自定义View的关键

                // 2.2 对计算后的位置值进行赋值
                int mLeft  = Left
                int mTop  = Top
                int mRight = Right
                int mBottom = Bottom

              // 3. 根据上述4个位置的计算值,设置子View的4个顶点:调用子view的layout() & 传递计算过的参数
              // 即确定了子View在父容器的位置
              child.layout(mLeft, mTop, mRight, mBottom);
              // 该过程类似于单一View的layout过程中的layout()和onLayout(),此处不作过多描述
          }
      }
  }
对于ViewGroup的layout过程总结如下:
最后,说一个比较重要的问题:getWidth()、getHeight()与getMeasureWidth()、getMeasureHeight()获取的宽高的区别是什么?
首先,我们先看下两者的定义,
getWidth()/getHeight():获取View最终的宽高
getMeasureWidth()/getMeasureHeight():获取View测量的宽高
然后,再看一下二者的源码:
// 获得View测量的宽 / 高
  public final int getMeasuredWidth() {
      return mMeasuredWidth & MEASURED_SIZE_MASK;
      // measure过程中返回的mMeasuredWidth
  }

  public final int getMeasuredHeight() {
      return mMeasuredHeight & MEASURED_SIZE_MASK;
      // measure过程中返回的mMeasuredHeight
  }


// 获得View最终的宽 / 高
  public final int getWidth() {
      return mRight - mLeft;
      // View最终的宽 = 子View的右边界 - 子view的左边界。
  }

  public final int getHeight() {
      return mBottom - mTop;
     // View最终的高 = 子View的下边界 - 子view的上边界。
  }
最后,我们看看它们的区别:

这里需要注意一下,在非一般情况下,也就是通过人为设置,重写View的layout()强行设置,这种情况下,测量的值与最终的值是不一样的。