实现2-3树的插入有两种方式,一种就是在普通的2-3树上的操作,情况挺复杂的,尤其是在对父节点是3-节点的3-节点进行插入的时候,还要用到临时的4-节点,还有一种就是借用红黑树来实现。
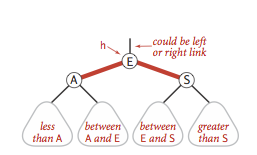
与2-3树一一对应的红黑树
如果红黑树的右节点必须是黑色,而左节点不做要求的话:
1.左节点是黑色,那么此节点对应的就是一个2-节点
2.左节点为红色,那么它与此节点同层,对应3-节点,如图可以很清晰的看出节点之间的对应关系


这样就将一棵2-3树与红黑树相对应起来,就可以借用红黑树的操作了
正儿八经2-3树的插入过程
在进行插入操作时,要时时刻刻维持树的平衡,比如出现这种狗样子的树:


这三种情况是明显不符合2-3树的气质的,要进行相应的旋转变色操作变成下面这三种:


正儿八经2-3树的代码
两部分,这部分是2-3树的插入的实现,第二部分为相应的测试代码
package algorithm;

/*********************************************
 * A4.java
 * Author: jkbao
 * Created on: 2018年4月18日
 ********************************************/
import java.util.LinkedList;
import java.util.Queue;

public class A4 {

	private Node root;

	private static final boolean RED = true;
	private static final boolean BLACK = false;

	private class Node {
		Object val;
		Node left, right;
		// int N;
		boolean color;

		Node(Object val, boolean color) {
			this.val = val;
			// this.N = N;
			this.color = color;
		}
	}

	private boolean isRed(Node x) {
		if (x == null)
			return false;
		return x.color == RED;
	}

	private Node rotateLeft(Node h) {
		Node x = h.right;
		h.right = x.left;
		x.left = h;
		x.color = h.color;
		h.color = RED;
		return x;
	}

	private Node rotateRight(Node h) {
		Node x = h.left;
		h.left = x.right;
		x.right = h;
		x.color = h.color;
		h.color = RED;
		return x;
	}

	private void filpColors(Node h) {
		h.color = RED;
		h.left.color = BLACK;
		h.right.color = BLACK;
	}

	public void put(Object val) {
		root = put(root, val);
		root.color = BLACK;
	}

	private Node put(Node h, Object val) {

		if (h == null)
			return new Node(val, RED);

		if ((int) val < (int) h.val) {
			h.left = put(h.left, val);
			// System.out.println((int)h.val);
			// System.out.println((int)h.left.val);
		} else if ((int) val > (int) h.val)
			h.right = put(h.right, val);

		if (isRed(h.right) && !isRed(h.left))
			h = rotateLeft(h);
		if (isRed(h.left) && isRed(h.left.left))
			h = rotateRight(h);
		if (isRed(h.left) && isRed(h.right))
			filpColors(h);

		return h;
	}
第一部分到这里结束,关键的就是put方法的实现,其实在二叉平衡树里面这个方法的实现都差不多,不同的是在递归调用put方法之后的相应的旋转变色操作。
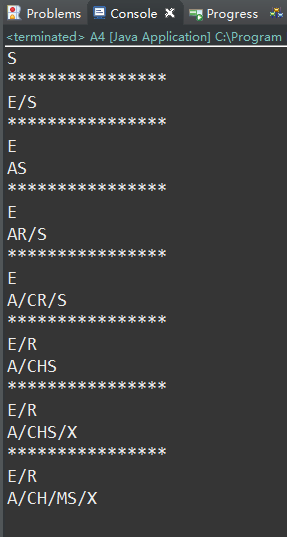
第二部分,以序列 { 'S', 'E', 'A', 'R', 'C', 'H', 'X', 'M' } 为例,一步步打印出二叉树节点的插入过程,打印的实现用了广度优先遍历算法,分层打印的实现也用到了一个小技巧。
正儿八经测试的代码
public static void main(String args[]) {
		char arr[] = { 'S', 'E', 'A', 'R', 'C', 'H', 'X', 'M' };
		A4 a = new A4();
		a.put((int) arr[0]);
		for (int i = 1; i < arr.length; i++) {
			//System.out.println(a.level(a.root));
			a.bfs(a.root);
			System.out.println("****************");
			a.put((int) arr[i]);
		}

		// System.out.println(a.level(a.root));
		a.bfs(a.root);

	}

	public int level(Node no) {

		if (no == null) {
			return 0;
		}
		if (no.color == BLACK)
			return 1 + level(no.right);
		return level(no.right);
	}

	public void bfs(Node rootNode) {

		Queue<Node> queue = new LinkedList<>();
		if (rootNode == null)
			return;
		if (root.left != null && root.left.color == RED)
			queue.offer(root.left);
		queue.offer(rootNode);

		//这个队列用于分层打印的实现
		Queue<Node> tempQue = new LinkedList<>();
		while (!queue.isEmpty()) {
			Node node = queue.poll();
			System.out.print((char) (int) node.val);
			if (node.color == RED)
				System.out.print("/");
			if (node.color == RED) {
				if (node.left != null && node.left.left != null && node.left.left.color == RED)
					tempQue.offer(node.left.left);
				if (node.left != null)
					tempQue.offer(node.left);
				if (node.right != null && node.right.left != null && node.right.left.color == RED)
					tempQue.offer(node.right.left);
				if (node.right != null)
					tempQue.offer(node.right);
			} else {
				if (node.left != null && node.left.color == BLACK) {
					if (node.left.left != null && node.left.left.color == RED) {
						tempQue.offer(node.left.left);
					}
					tempQue.offer(node.left);
				}
				if (node.right != null && node.right.left != null && node.right.left.color == RED)
					tempQue.offer(node.right.left);
				if (node.right != null)
					tempQue.offer(node.right);
			}
			//队列为空说明这一层打印完了
			if (queue.isEmpty()) {
				System.out.println();
				queue = tempQue;
				tempQue = new LinkedList<>();
			}
		}
	}

}
正儿八经的测试结果比对
插入过程图 vs 测试结果图(E/ 为红色(节点后面有个斜杠就是红色),S为黑色(没有斜杠))