第二部分仅仅是从控制器到页面的跳转,但是没数据库的整合是不行的。
进入正题:
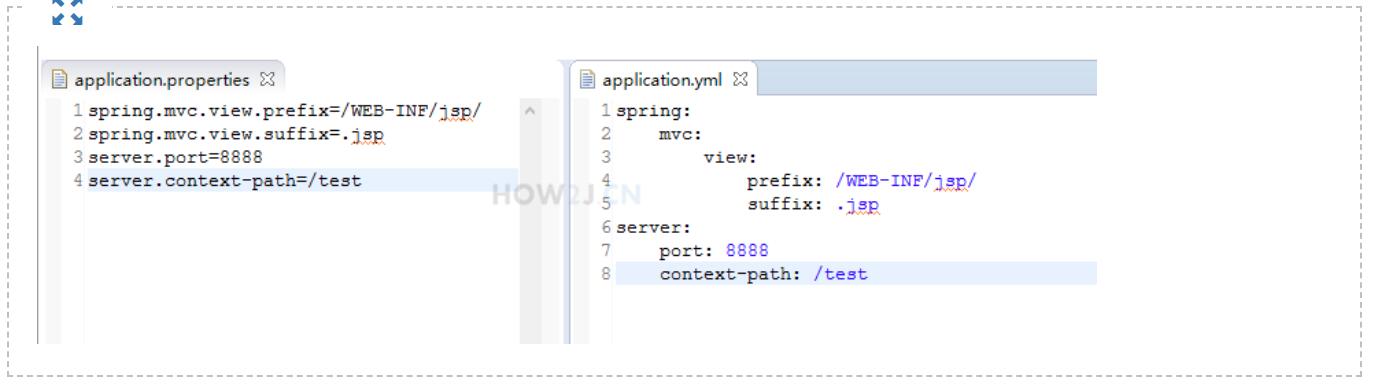
springboot启动是要默认加载数据源的,之前是从application.properties,现在开始在 src/main/resources下新建application.yml。
这两个配置文件达到的效果其实都是相同的,只是格式有差别。
如下图
 yml格式是树状结构,一目了然。但是呢,在书写时注意:
1.不同等级的用“冒号”隔开
2.次等级的前面是空格,不能是(tab)
3.冒号后面如果有值,值和冒号之前至少有一个空格。不能紧贴着。
所以 我们试验一下用yml访问一个实体。建一个本地数据库。加一个user的表,有name,id字段。
控制器
package springboot4.web;
import org.springframework.web.bind.annotation.RequestMapping;


 import org.springframework.boot.autoconfigure.EnableAutoConfiguration;
 import org.springframework.web.bind.annotation.RestController;

import springboot4.entity.User;

@RestController
@EnableAutoConfiguration
@RequestMapping("/test")
public class HelloController {
    @RequestMapping("getuser")
    public User getUser() {
        User user = new User();
        user.setName("test");
        user.setId(1);
        return user;
    }
}
application.yml
#默认使用配置
spring:
  profiles:
    active: dev

#公共配置与profiles选择无关
mybatis:
  typeAliasesPackage: com.xdd.entity
  mapperLocations: classpath:mapper/*.xml


---

#开发配置
spring:
  profiles: dev

  datasource:
    url: jdbc:mysql://localhost:3306/test
    username: root
    password: 123456
    driver-class-name: com.mysql.jdbc.Driver
web包同级建一个entity包,放实体类
package springboot4.entity;

public class User {
      private String name;

        public String getName() {
            return name;
        }

        public void setName(String name) {
            this.name = name;
        }
        private int id;

        public int getId() {
            return id;
        }

        public void setId(int id) {
            this.id = id;
        }
}
可以先把pom.xml里的 加载数据源的jar包先注释掉也可以。
/*<dependency>
   <groupId>org.mybatis.spring.boot</groupId>
   <artifactId>mybatis-spring-boot-starter</artifactId>
   <version>1.3.0</version>
</dependency>*/
贴一下pom.xml配置
<?xml version="1.0" encoding="UTF-8"?>
<project xmlns="http://maven.apache.org/POM/4.0.0" xmlns:xsi="http://www.w3.org/2001/XMLSchema-instance"
    xsi:schemaLocation="http://maven.apache.org/POM/4.0.0 http://maven.apache.org/xsd/maven-4.0.0.xsd">
    <modelVersion>4.0.0</modelVersion>

  <groupId>com.how2java</groupId>
  <artifactId>springboot</artifactId>
  <version>0.0.1-SNAPSHOT</version>
  <name>springboot</name>
  <description>springboot</description>
  <packaging>war</packaging>

    <parent>
        <groupId>org.springframework.boot</groupId>
        <artifactId>spring-boot-starter-parent</artifactId>
        <version>1.5.9.RELEASE</version>
    </parent>

    <dependencies>
        <dependency>
            <groupId>org.springframework.boot</groupId>
            <artifactId>spring-boot-starter-web</artifactId>
        </dependency>
        <dependency>
            <groupId>org.springframework.boot</groupId>
            <artifactId>spring-boot-starter-tomcat</artifactId>

        </dependency>
        <dependency>
              <groupId>junit</groupId>
              <artifactId>junit</artifactId>
              <version>3.8.1</version>
              <scope>test</scope>
        </dependency>

            <dependency>
               <groupId>org.springframework.boot</groupId>
               <artifactId>spring-boot-starter-thymeleaf</artifactId>
            </dependency>
      <dependency>
            <groupId>org.springframework.boot</groupId>
            <artifactId>spring-boot-starter-web</artifactId>
        </dependency>

        <!-- 测试 -->
        <dependency>
            <groupId>org.springframework.boot</groupId>
            <artifactId>spring-boot-starter-test</artifactId>
            <!-- 只在test测试里面运行 -->
            <scope>test</scope>
        </dependency>

        <dependency>
            <groupId>org.springframework.boot</groupId>
            <artifactId>spring-boot-starter-tomcat</artifactId>
            <scope>provided</scope>
        </dependency>

        <dependency>
            <groupId>org.springframework.boot</groupId>
            <artifactId>spring-boot-devtools</artifactId>
            <optional>true</optional> <!-- 这个需要为 true 热部署才有效 -->
        </dependency>

 <!-- 在pom中可以直接配置依赖的数据库 generatorConfig.xml就不需要再配置数据库的jar了 -->
                   <!--  <dependency>
                        <groupId>mysql</groupId>
                        <artifactId>mysql-connector-java</artifactId>
                        <version>5.1.25</version>
                    </dependency>   -->
    </dependencies>

    <properties>
        <java.version>1.8</java.version>
    </properties>

    <build>
        <plugins>
           <!--  <plugin>
                <groupId>org.springframework.boot</groupId>
                <artifactId>spring-boot-maven-plugin</artifactId>
            </plugin> -->
             <groupId>org.mybatis.generator</groupId>
                <artifactId>mybatis-generator-maven-plugin</artifactId>
                <version>1.3.5</version>
                <configuration>
                    <!--允许移动生成的文件-->
                    <verbose>true</verbose>
                    <!--允许覆盖生成的文件-->
                    <overwrite>true</overwrite>
                </configuration>

        </plugins>
    </build>

</project>
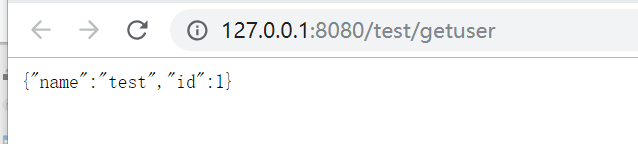
访问 地址 http://127.0.0.1:8080/test/getuser
就能得到如下
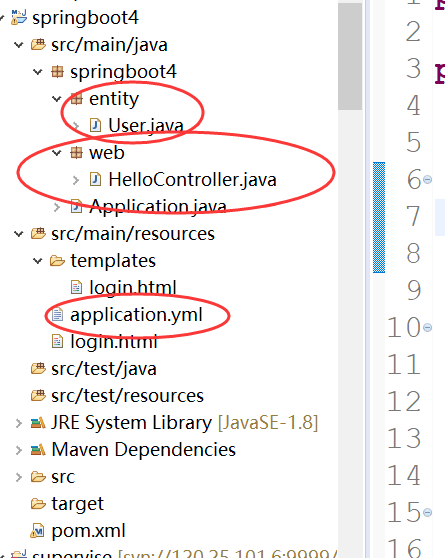
项目结构如图