版权声明:本文为博主原创文章,未经博主允许不得转载。 https://blog.csdn.net/weixin_36279318/article/details/82776632
目录
2.使用AutoCrud插件生成dao、model、sql映射文件
3.在application.yml配置数据库连接、配置sql映射文件
4.在Spring Boot启动类上使用@MapperScan(basePackages = {"xxx.dao","xxx.dao"...}
2.在application.yml中配置DruidDataSource相关属性值。。
三、Spring Boot中PageHelper分页插件的使用
一、SpringBoot整合Mybatis的步骤如下:
- 创建Spring Boot项目导入相关依赖Jar包
- 在IDEA中安装AutoCrud插件用于生成dao层、model层、Mapper映射文件
- 在application.yml配置数据库连接、配置Mapper映射文件
- 在Spring Boot启动类上使用@MapperScan(basePackages = {"xxx.dao"}
- 测试
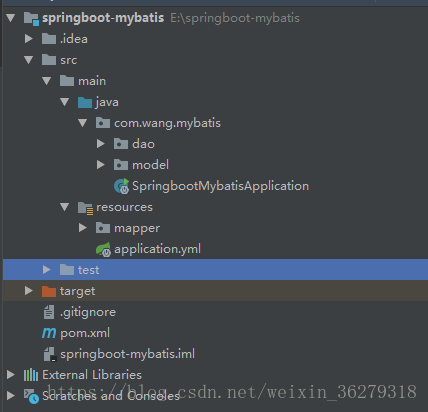
项目结构示意图:
1.导入相关依赖Jar包
<?xml version="1.0" encoding="UTF-8"?>
<project xmlns="http://maven.apache.org/POM/4.0.0" xmlns:xsi="http://www.w3.org/2001/XMLSchema-instance"
         xsi:schemaLocation="http://maven.apache.org/POM/4.0.0 http://maven.apache.org/xsd/maven-4.0.0.xsd">
    <modelVersion>4.0.0</modelVersion>

    <groupId>com.wang</groupId>
    <artifactId>springboot-mybatis</artifactId>
    <version>0.0.1-SNAPSHOT</version>
    <packaging>jar</packaging>

    <name>springboot-mybatis</name>
    <description>Demo project for Spring Boot</description>
   <!--Spring Boot项目依赖的父项目-->
    <parent>
        <groupId>org.springframework.boot</groupId>
        <artifactId>spring-boot-starter-parent</artifactId>
        <version>2.0.5.RELEASE</version>
        <relativePath/> <!-- lookup parent from repository -->
    </parent>
    <!--项目编码和java版本号-->
    <properties>
        <project.build.sourceEncoding>UTF-8</project.build.sourceEncoding>
        <project.reporting.outputEncoding>UTF-8</project.reporting.outputEncoding>
        <java.version>1.8</java.version>
    </properties>

    <dependencies>
        <dependency>
            <groupId>org.springframework.boot</groupId>
            <artifactId>spring-boot-starter-jdbc</artifactId>
        </dependency>
        <!--SpringBoot相关jar包-->
        <dependency>
            <groupId>org.springframework.boot</groupId>
            <artifactId>spring-boot-starter-web</artifactId>
        </dependency>
        <dependency>
            <groupId>org.springframework.boot</groupId>
            <artifactId>spring-boot-starter-test</artifactId>
            <scope>test</scope>
        </dependency>

        <!--mybatis依赖Jar包-->
        <dependency>
            <groupId>org.mybatis.spring.boot</groupId>
            <artifactId>mybatis-spring-boot-starter</artifactId>
            <version>1.3.2</version>
        </dependency>
       <!--mysql驱动-->
        <dependency>
            <groupId>mysql</groupId>
            <artifactId>mysql-connector-java</artifactId>
            <scope>runtime</scope>
        </dependency>
        <!--添加以下依赖在yml文件中编写字段有提示功能-->
        <dependency>
            <groupId>org.springframework.boot</groupId>
            <artifactId>spring-boot-configuration-processor</artifactId>
            <optional>true</optional>
        </dependency>
    </dependencies>
   <!--打包SpringBoot项目的插件-->
    <build>
        <plugins>
            <plugin>
                <groupId>org.springframework.boot</groupId>
                <artifactId>spring-boot-maven-plugin</artifactId>
            </plugin>
        </plugins>
    </build>
</project>
2.使用AutoCrud插件生成dao、model、sql映射文件
方法二: Mybatis逆向工程
案例演示:Mabatis逆向工程生成POJO和Mapper.xml文件
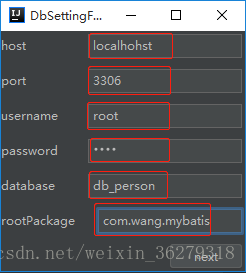
- 安装AutoCrud插件
- 点击Window-->选择AutoCurd,弹出以下窗口,填写好字段值,点击下一3.3步-3->选择要生成的数据表-->点解确定即可!
弹出窗口如下:
01.生成的dao层代码如下:
@Repository
public interface TbPersonDao {

    int insert(TbPersonPO po);

    int batchInsert(List<TbPersonPO> list);

    int update(TbPersonPO po);

    int delete(TbPersonPO po);

    List<TbPersonPO> query(TbPersonQuery query);

    long count(TbPersonQuery query);

}
02.生成model层代码如下:
生成com.wang.mybatis.model.po.TbPersonPO类
public class TbPersonPO {
	private Integer id;
	private String name;
	private Integer age;
   //省略getter和人setter方法

    @Override
    public String toString() {
        return "TbPersonPO{" +
                "id=" + id +
                ", name='" + name + '\'' +
                ", age=" + age +
                '}';
    }
}
生成com.wang.mybatis.model.query.TbPersonQuery类
public class TbPersonQuery {
	private Integer id;
	private String name;
	private Integer age;
	private Long offset;
	private Integer limit;
        //省略setter和getter方法
}
03.生成sql映射文件:mapper/tbPerson.xml
<?xml version="1.0" encoding="UTF-8"?>
<!DOCTYPE mapper PUBLIC "-//mybatis.org//DTD Mapper 3.0//EN" "http://mybatis.org/dtd/mybatis-3-mapper.dtd">
<mapper namespace="com.wang.mybatis.dao.TbPersonDao">

    <resultMap id="BaseResultMap" type="com.wang.mybatis.model.po.TbPersonPO">
		<id column="id" property="id" jdbcType="BIGINT"/>
		<result column="name" property="name" jdbcType="VARCHAR"/>
		<result column="age" property="age" jdbcType="INTEGER"/>
    </resultMap>

    <insert id="insert">
        INSERT INTO tb_person(id,name,age)
        VALUES(null,#{name},#{age})
    </insert>
    <insert id="batchInsert" parameterType="list">
        INSERT INTO tb_person(id,name,age)
        VALUES
        <foreach collection="list" item="item" index="index" separator=",">
            (null,#{item.name},#{item.age})
        </foreach>
        ON DUPLICATE KEY UPDATE
        id=VALUES(id),name=VALUES(name),age=VALUES(age)
    </insert>
    <update id="update">
        UPDATE tb_person
        <trim prefix="SET" suffixOverrides=",">
			<if test="name!=null">
                name=#{name},
            </if>
			<if test="age!=null">
                age=#{age},
            </if>
        </trim>
        WHERE id=#{id}
    </update>

    <sql id="SELECT_FIELD">
        id,name,age
    </sql>

    <sql id="QUERY_SQL">
        from tb_person
        <where>
			<if test="id!=null and id!=-1">
               AND id=#{id}
            </if>
			<if test="name!=null">
               AND name=#{name}
            </if>
			<if test="age!=null and age!=-1">
               AND age=#{age}
            </if>

        </where>
    </sql>

    <select id="query" resultMap="BaseResultMap">
        select <include refid="SELECT_FIELD"/>
        <include refid="QUERY_SQL"/>
        <if test="limit!=null and limit!=-1 ">
            <if test="offset!=null and offset!=-1">
                limit #{offset},#{limit}
            </if>
        </if>
    </select>

    <select id="count" resultType="long">
        select count(*)
        <include refid="QUERY_SQL"/>
    </select>
   <delete id="delete">
       delete from tb_person where id=#{id}
   </delete>
</mapper>
3.在application.yml配置数据库连接、配置sql映射文件
# 配置数据库连接的账号、密码、url、数据库驱动
spring:
    datasource:
        username: root
        password: root
        driver-class-name: com.mysql.jdbc.Driver
        url: jdbc:mysql://localhost:3306/db_person

# 使用mybatis操作数据库配置以下内容
mybatis:
    #type-aliases-package: com.wang.mybatis.dao  #可以添加此属性
    mapper-locations: classpath:mapper/*xml # 指定配置mapper文件的位置
4.在Spring Boot启动类上使用@MapperScan(basePackages = {"xxx.dao","xxx.dao"...}
/*@MapperScan: 指定扫描的具体包
* */
@MapperScan(basePackages = {"com.wang.mybatis.dao"})
@SpringBootApplication
public class SpringbootMybatisApplication {

    public static void main(String[] args) {
        SpringApplication.run(SpringbootMybatisApplication.class, args);
    }
}
5.测试
@RunWith(SpringRunner.class)
@SpringBootTest
public class SpringbootMybatisApplicationTests {
    private Logger logger = LoggerFactory.getLogger(this.getClass());
    @Autowired
    TbPersonDao tbPersonDao;
    TbPersonPO tbPersonPO=new TbPersonPO();
    TbPersonQuery tbPersonQuery=new TbPersonQuery();
    /* 1. 添加数据*/
    @Test
    public void insert() {
        tbPersonPO.setAge(23);
        tbPersonPO.setName("曹操");
        tbPersonDao.insert(tbPersonPO);
        logger.info("数据添加成功!");
    }
    /* 2. 修改数据*/
    @Test
    public void update() {
        tbPersonPO.setId(6); /* 指定具体要修改对象的id*/
        tbPersonPO.setAge(22);
        tbPersonPO.setName("刘华");
        tbPersonDao.update(tbPersonPO);
        logger.info("数据修改成功!");
    }
    /* 3.查询数据*/
    @Test
    public void query(){
        /* 起始位置*/
        tbPersonQuery.setOffset(1L);
        /* 限制查询条数用于分页使用*/
        tbPersonQuery.setLimit(3);
        List<TbPersonPO> list=tbPersonDao.query(tbPersonQuery);
       for(TbPersonPO tbPersonPO:list){
           System.out.println(tbPersonPO);
       }
    }
    /* 4. 删除数据*/
    @Test
    public void delete(){
        tbPersonPO.setId(8);
        int data=tbPersonDao.delete(tbPersonPO);
        if(data>0){
            System.out.println("数据删除成功");
        }
    }

    /* 4.统计数据*/
    @Test
    public void count(){
        long count=tbPersonDao.count(tbPersonQuery);
        System.out.println(count);
    }

    /* 5. 批量操作*/
    @Test
    public void batchInsert(){
        List<TbPersonPO> list=new ArrayList();
        TbPersonPO tbPersonPO1=new TbPersonPO();
        tbPersonPO1.setName("王杰");
        tbPersonPO1.setAge(16);
        list.add(tbPersonPO1);

        TbPersonPO tbPersonPO2=new TbPersonPO();
        tbPersonPO2.setName("张杰伦");
        tbPersonPO2.setAge(36);
        list.add(tbPersonPO2);

        tbPersonDao.batchInsert(list);
    }

}
二、Spring Boot整合Druid数据源
默认是用org.apache.tomcat.jdbc.pool.DataSource作为数据源,现在我们要把Druid作为数据源操作步骤如下:
1.引入依赖
 <!--引入druid-->
        <!-- https://mvnrepository.com/artifact/com.alibaba/druid -->
        <dependency>
            <groupId>com.alibaba</groupId>
            <artifactId>druid</artifactId>
            <version>1.1.8</version>
        </dependency>
        <!--必须引入以下类,否则定义的数据无法绑定到DruidDataSource-->
        <dependency>
            <groupId>log4j</groupId>
            <artifactId>log4j</artifactId>
            <version >1.2.17</version>
        </dependency>
    </dependencies>
2.在application.yml中配置DruidDataSource相关属性值。。
# 配置数据库连接的账号、密码、url、数据库驱动
spring:
    datasource:
        #   数据源基本配置
        username: root
        password: root
        driver-class-name: com.mysql.jdbc.Driver
        url: jdbc:mysql://localhost:3306/db_person
        type: com.alibaba.druid.pool.DruidDataSource
        #   数据源其他配置
        initialSize: 5
        minIdle: 5
        maxActive: 20
        maxWait: 60000
        timeBetweenEvictionRunsMillis: 60000
        minEvictableIdleTimeMillis: 300000
        validationQuery: SELECT 1 FROM DUAL
        testWhileIdle: true
        testOnBorrow: false
        testOnReturn: false
        poolPreparedStatements: true
        #   配置监控统计拦截的filters,去掉后监控界面sql无法统计,'wall'用于防火墙
        filters: stat,wall,log4j
        maxPoolPreparedStatementPerConnectionSize: 20
        useGlobalDataSourceStat: true
        connectionProperties: druid.stat.mergeSql=true;druid.stat.slowSqlMillis=500

# 使用mybatis操作数据库配置以下内容
mybatis:
    #type-aliases-package: com.wang.mybatis.dao  #可以添加此属性
    # 指定全局配置文件位置
    #config-location: classpath:mapper/mybatis-config.xml
    mapper-locations: classpath:mapper/*xml # 指定配置sql文件的位置
3.创建DruidConfig配置类
com.wang.mybatis.config.DruidConfig类的作用:给组件绑定数据、并把组件添加到容器中!
@Configuration
public class DruidConfig {

    @ConfigurationProperties(prefix = "spring.datasource")
    @Bean
    public DataSource druid() {
        return new DruidDataSource();
    }

    //配置Druid的监控
    //1、配置一个管理后台的Servlet
    @Bean
    public ServletRegistrationBean statViewServlet() {
        ServletRegistrationBean bean = new ServletRegistrationBean(new StatViewServlet(), "/druid/*");
        Map<String, String> initParams = new HashMap<>();

        initParams.put("loginUsername", "admin");
        initParams.put("loginPassword", "123456");
        initParams.put("allow", "");//默认就是允许所有访问
        initParams.put("deny", "192.168.15.21");

        bean.setInitParameters(initParams);
        return bean;
    }


    //2、配置一个web监控的filter
    @Bean
    public FilterRegistrationBean webStatFilter() {
        FilterRegistrationBean bean = new FilterRegistrationBean();
        bean.setFilter(new WebStatFilter());

        Map<String, String> initParams = new HashMap<>();
        initParams.put("exclusions", "*.js,*.css,/druid/*");

        bean.setInitParameters(initParams);

        bean.setUrlPatterns(Arrays.asList("/*"));

        return bean;
    }
}
4.测试类
@RunWith(SpringRunner.class)
@SpringBootTest
public class SpringbootMybatisApplicationTests {
private Logger logger = LoggerFactory.getLogger(this.getClass());
@Autowired
DataSource dataSource;
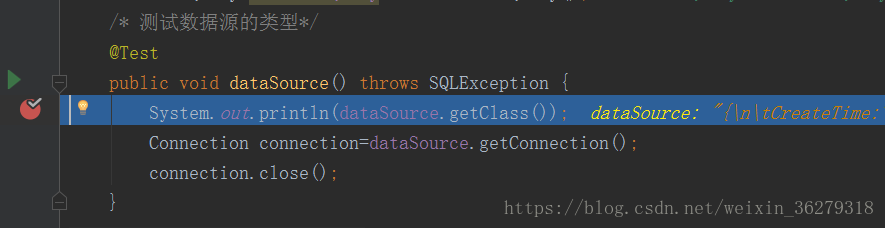
/* 测试数据源的类型*/
@Test
public void dataSource() throws SQLException {
System.out.println(dataSource.getClass());
Connection connection=dataSource.getConnection();
connection.close();
}
}
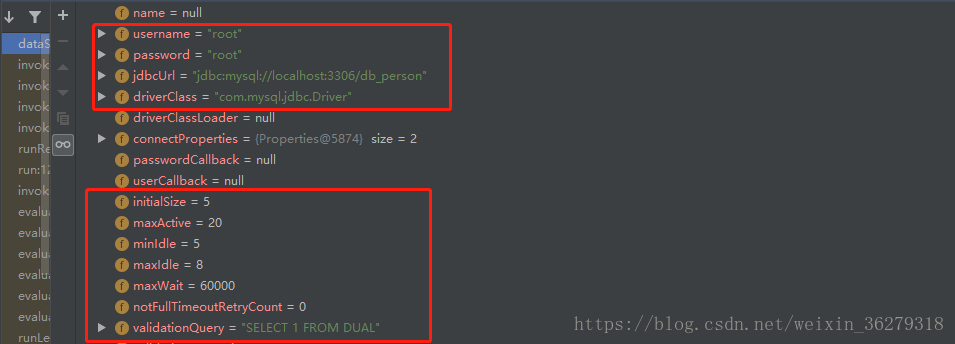
设置断点测试数据是否绑定
5.Druid的作用
如图所示:

使用Druid monitor的具体步骤:
- 启动主程序
- 访问:http://localhost:8080/druid/login.html (端口号为启动的tomcat端口号)
- 使用程序中设置的账号密码登陆

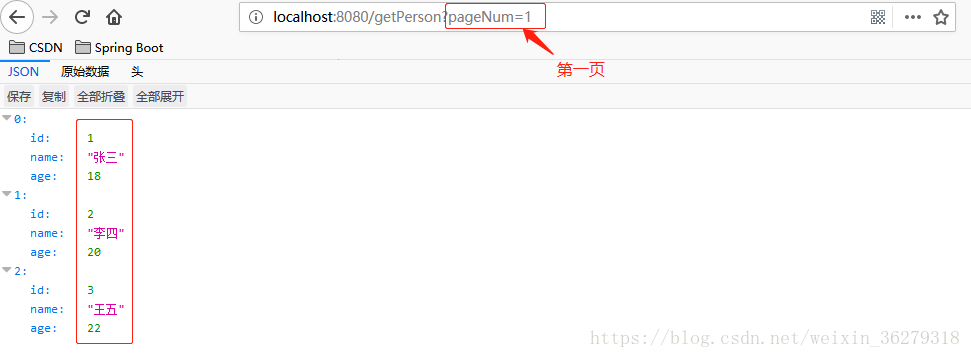
三、Spring Boot中PageHelper分页插件的使用
1.引入依赖
 <!--导入pagehelper相关依赖-->
  <dependency>
      <groupId>com.github.pagehelper</groupId>
      <artifactId>pagehelper</artifactId>
      <version>5.1.2</version>
  </dependency>
  <dependency>
       <groupId>com.github.pagehelper</groupId>
       <artifactId>pagehelper-spring-boot-autoconfigure</artifactId>
       <version>1.2.3</version>
   </dependency>
   <dependency>
        <groupId>com.github.pagehelper</groupId>
        <artifactId>pagehelper-spring-boot-starter</artifactId>
        <version>1.2.3</version>
    </dependency>
2.配置PageHelper相关属性
方法一:在application.yml文件中配置
# 配置pagehelper参数
pagehelper:
    helperDialect: mysql
    reasonable: true
    supportMethodsArguments: true
    params: count=countSql
方法二:创建一个配置类配置 PageHelper
@Configuration
public class PageHelperConfig {
    @Bean
    public PageHelper getPageHelper(){
        PageHelper pageHelper=new PageHelper();
        Properties properties=new Properties();
        properties.setProperty("helperDialect","mysql");
        properties.setProperty("reasonable","true");
        properties.setProperty("supportMethodsArguments","true");
        properties.setProperty("params","count=countSql");
        pageHelper.setProperties(properties);
        return pageHelper;
    }
}
3.PageInfo类源码的属性如下:
public class PageInfo<T> implements Serializable {
    private static final long serialVersionUID = 1L;
    private int pageNum;
    private int pageSize;
    private int size;
    private int startRow;
    private int endRow;
    private long total;
    private int pages;
    private List<T> list;
    private int prePage;
    private int nextPage;
    private boolean isFirstPage;
    private boolean isLastPage;
    private boolean hasPreviousPage;
    private boolean hasNextPage;
    private int navigatePages;
    private int[] navigatepageNums;
    private int navigateFirstPage;
    private int navigateLastPage;


}
4.前段请求接口方法
 @RequestMapping(value = "/getPerson")
    public List<TbPersonPO> getSomePerson(@RequestParam(value = "pageNum",defaultValue="1") int pageNum ){
        //pageNum:表示第几页  pageSize:表示一页展示的数据
        PageHelper.startPage(pageNum,3);
        List<TbPersonPO> list=tbPersonDao.queryPerosn();
        //将查询到的数据封装到PageInfo对象
        PageInfo<TbPersonPO> pageInfo=new PageInfo(list,3);
        //分割数据成功
        return list;
    }
5.测试分页插件配置是否成功配置