一起分享,一起进步。finddreams:http://blog.csdn.net/finddreams/article/details/50849385
众所周知,手机APP的核心就在于调用后台接口,展示相关信息,方便我们在手机上就能和外界交互。所以APP中网络框架的搭建一直是我们开发者所关心的问题,在Android中关于如何搭建网络框架分为两种:一种是不想重复造轮子使用第三方开源的网络框架;第二种就是喜欢造轮子的封装自己的网络框架。
自己封装实现网络框架这种行为固然不错,但是这需要自身具备比较高的能力,而很多时候我们没有那样的能力把它封装的足够好。这时我们使用开源的网络框架也未尝不是一件好事,github上面知名的网络框架已经经过了很多app的验证,在一定意义上是非常符合我们在实际的项目开发所需要的。
Android开发中几个知名的开源的网络框架有android-async-http,Volley,OkHttp等,国人 开发的xUtils快速开发框架也比较流行。android-async-http是个很老牌的网络框架,非常的经典。Volley官方推荐的,自不必说。OkHttp可以说是后起之秀,现在非常流行,Android系统底层api都有用到,所以是非常niubility.
我们很多开发者大都在小型公司,不了解大公司是怎么做Android网络框架的,也想知道那些用户量过千万的APP到底用了些什么技术,下面有两张图片,让我们一起来了解一下Android版的美团和Uber到底用了些什么技术。
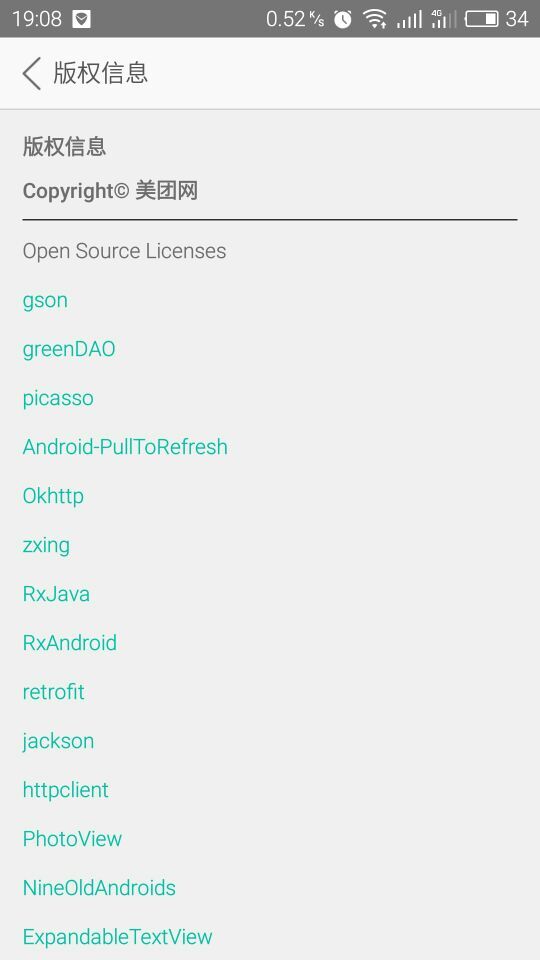
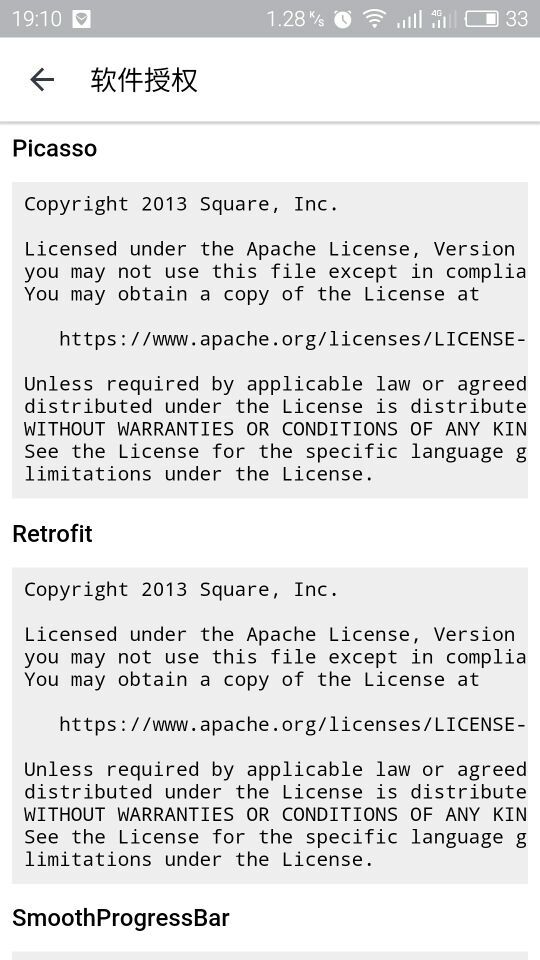
美团 Uber
看完你会发现其实这些用户量过亿的APP也使用了很多的开源框架,而且这些开源框架中大多数其实都是我们平常在开发中所常用到的,并不陌生。可能大多数人对Retrofit,Rxjava这些还不太熟悉,那话不多说,今天我们就来讲讲怎么用Retrofit2.0+RxJava+Dragger2来实现Android网络构架搭建,给大家提供一种思路,供大家参考参考。
Retrofit2.0 GitHub:https://github.com/square/retrofit
Square开发的类型安全的REST安卓客户端请求库,网络请求默认使用的是OkHttp,具体介绍请看相关教程。
RxJava +RxAndroid GitHub地址: https://github.com/ReactiveX/RxJava
RxJava是一种响应式编程框架,采用观察者设计模式。最核心的是Observables(被观察者,事件源)和Subscribers(观察者)这两个东西,RxAndroid是Rxjava在Android上的实现。
Dragger2
是一种依赖注入框架,可以大大节省我们的代码量,便于维护。
在这里我就不费过多笔墨来介绍着三个东西了,今天的主题是提供一种如何搭建一个不一样的网络框架的思路。如果读者对这三个框架不是很了解的话,可以自行的Google脑补一下。
首先,就是开始把这些框架引入到咱们的项目中来作为依赖库,在app/build.gradle文件中添加
apply plugin: 'com.android.application'
apply plugin: 'com.neenbedankt.android-apt'

android {
    compileSdkVersion 23
    buildToolsVersion "23.0.2"

    defaultConfig {
        applicationId "com.finddreams.retrofit"
        minSdkVersion 15
        targetSdkVersion 23
        versionCode 1
        versionName "1.0"
    }
    buildTypes {
        release {
            minifyEnabled false
            proguardFiles getDefaultProguardFile('proguard-android.txt'), 'proguard-rules.pro'
        }
    }
}

dependencies {
    compile fileTree(include: ['*.jar'], dir: 'libs')
    testCompile 'junit:junit:4.12'
    compile 'com.android.support:appcompat-v7:23.1.1'
    //retrofit
    compile 'com.squareup.retrofit2:retrofit:2.0.0-beta4'
    //gson解析
    compile 'com.squareup.retrofit2:converter-gson:2.0.0-beta4'
    //rxjava
    compile 'io.reactivex:rxandroid:1.1.0'
    compile 'com.squareup.retrofit2:adapter-rxjava:2.0.0-beta4'
    //dragger2
    provided 'org.glassfish:javax.annotation:10.0-b28'
    apt 'com.google.dagger:dagger-compiler:2.0.2'
    compile 'com.google.dagger:dagger:2.0.2'
}
因为Dragger2是基于注解的,它会预先生成一些类文件,所以需要在整个项目的/build.gradle文件中加上apt工具:
buildscript {
    repositories {
        jcenter()
    }
    dependencies {
        classpath 'com.android.tools.build:gradle:2.0.0-beta6'
        classpath 'com.neenbedankt.gradle.plugins:android-apt:1.8'

        // NOTE: Do not place your application dependencies here; they belong
        // in the individual module build.gradle files
    }
}

allprojects {
    repositories {
        jcenter()
    }
}

task clean(type: Delete) {
    delete rootProject.buildDir
}
接着开始写一个提供Retrofit的单例类:
/**
 * Retrofit的实体类
 */
public class RestApiAdapter {
    private static Retrofit retrofit = null;

    public static Retrofit getInstance() {
        if (retrofit == null) {
            GsonConverterFactory gsonConverterFactory = GsonConverterFactory.create();
            OkHttpClient okHttpClient = new OkHttpClient();
            OkHttpClient.Builder builder = okHttpClient.newBuilder();
            builder.retryOnConnectionFailure(true);
            retrofit = new Retrofit.Builder().client(okHttpClient)
                    .baseUrl(ConstantApi.BaiduUrl)
                    .addConverterFactory(gsonConverterFactory)
                    .addCallAdapterFactory(RxJavaCallAdapterFactory.create())
                    .build();
        }
        return retrofit;
    }
}
addCallAdapterFactory(RxJavaCallAdapterFactory.create()) 这个方法就是RxJava和Retrofit结合的关键。
接着我们为Retrofit 提供一个service接口,声明api接口地址和所需要的参数,这里我们使用百度API提供的天气接口,实现根据城市名称查询天气的功能,接口地址:http://apistore.baidu.com/apiworks/servicedetail/112.html 代码如下:
/**
 * 天气接口Api
 */
public interface WeatherApiService {
    /**
     * 查询天气
     */
    @GET("apistore/weatherservice/cityname")
    Observable<WeatherResultBean> queryWeather(@Header("apikey") String apikey, @Query("cityname") String cityname);
}
返回一个Observable被观察者/事件源的意思是交给RxJava来处理。
然后我们写一个BaseSubsribe观察者来管理网络请求开始结束,成功与失败:
/**
 * 观察者
 *
 * @author finddreams
 * @address http://blog.csdn.net/finddreams
 */
public abstract class BaseSubsribe<T> extends Subscriber<T> {
    private static final String TAG = "BaseSubsribe";


    @Override
    public void onStart() {
        super.onStart();
        Log.i(TAG, "onStart");

    }

    @Override
    public void onNext(T t) {
        Log.i(TAG, "response" + t.toString());

        onSuccess(t);
    }

    @Override
    public void onCompleted() {
        Log.i(TAG, "onCompleted");

    }

    public abstract void onSuccess(T result);

    @Override
    public void onError(Throwable e) {
        e.printStackTrace();
        Log.i(TAG, "onError" + e.getMessage());

    }

}
接着我们写一个WeatherInteractor接口连接service类:
/**
 * 获取天气信息接口
 *
 * @author finddreams
 * @address http://blog.csdn.net/finddreams
 */
public interface WeatherInteractor {
    Subscription queryWeather(String apikey, String cityname, BaseSubsribe<WeatherResultBean> subsribe);
}
然后是这个接口的实现类:
/**
 * 获取天气信息实现类
 */
public class WeatherInteractorImpl implements WeatherInteractor {
    private final WeatherApiService api;

    @Inject
    public WeatherInteractorImpl(WeatherApiService myApi) {
        this.api = myApi;
    }


    @Override
    public Subscription queryWeather(String apikey, String cityname, BaseSubsribe<WeatherResultBean> subsribe) {
        Observable<WeatherResultBean> observable = api.queryWeather(apikey, cityname);
        Subscription subscribe = observable.subscribeOn(Schedulers.io()).observeOn(AndroidSchedulers.mainThread()).subscribe(subsribe);
        return subscribe;
    }
}
接下来是如何使用Dragger2的时候,知道Dragger2的都知道有几个概念,一个是Module:主要提供依赖对象比如context, rest api …; 一个是@inject:注解,用在需要依赖对象的地方;另一个是Componet:用来连接Module和@inject
首先定义一个Module类,提供需要注入依赖的对象:
/**
 * Module类
 * 提供需要注入的类
 *
 * @author finddreams
 * @address http://blog.csdn.net/finddreams
 */
@Module
public class InteractorModule {
    @Provides
    public Retrofit provideRestAdapter() {
        return RestApiAdapter.getInstance();
    }

    @Provides
    public WeatherApiService provideHomeApi(Retrofit restAdapter) {
        return restAdapter.create(WeatherApiService.class);
    }

    @Provides
    public WeatherInteractor provideHomeInteractor(WeatherApiService myApi) {
        return new WeatherInteractorImpl(myApi);
    }
}
接着是写一个Componet类:
/**
 * 声明AppComponent组件
 *
 * @author finddreams
 * @address http://blog.csdn.net/finddreams
 */
@Singleton
@Component(
        modules = {
                InteractorModule.class,
        }
)
public interface AppComponent {
    void inject(App app);

    WeatherInteractor getWeatherInteractor();
}
然后我们在Application中初始化这个AppComponent:
/**
 * Application类
 *
 * @author finddreams
 * @address http://blog.csdn.net/finddreams
 */
public class App extends Application {
    private AppComponent component;

    @Override
    public void onCreate() {
        super.onCreate();

        setDraggerConfig();
    }

    public AppComponent component() {
        return component;
    }

    public static App get(Context context) {
        return (App) context.getApplicationContext();
    }

    /**
     * 初始化Dragger,DaggerAppComponent是自动生成,需要Rebuild
     */
    private void setDraggerConfig() {
        component = DaggerAppComponent.builder().interactorModule(new InteractorModule())
                .build();
        component.inject(this);
    }
}
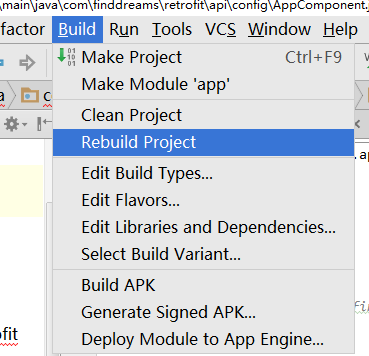
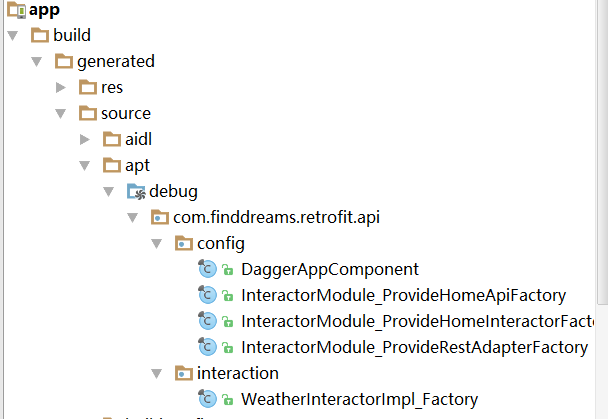
这里需要注意的是,由于Dagger2是预编译生成一个类,所以我们需要Rebuild项目,才会生成DaggerAppComponent这个类。如果开发中出现
import com.finddreams.retrofit.api.config.DaggerAppComponent;
找不到这个类的错误
这时就需要重新的Rebuild项目
这是Rebuild项目之后生成的class文件,如图:
最后我们就可以在Activity中开始使用了:
/**
 * 主页
 *
 * @author finddreams
 * @address http://blog.csdn.net/finddreams
 */
public class MainActivity extends AppCompatActivity {


    private AppComponent component;
    private WeatherInteractor weatherInteractor;
    private EditText city;
    private TextView queryresult;

    @Override
    protected void onCreate(Bundle savedInstanceState) {
        super.onCreate(savedInstanceState);
        setContentView(R.layout.activity_main);
        city = (EditText) findViewById(R.id.city);
        queryresult = (TextView) findViewById(R.id.queryresult);
        //获取到AppComponent组件
        component = App.get(this).component();
        //通过AppComponent拿到WeatherInteractor
        weatherInteractor = component.getWeatherInteractor();
        findViewById(R.id.query).setOnClickListener(new View.OnClickListener() {
            @Override
            public void onClick(View v) {
                queryWeatherData();

            }

        });


    }

    public void queryWeatherData() {
        String content = city.getText().toString();
        //调用查询天气接口的方法
        Subscription subscription = weatherInteractor.queryWeather(ConstantApi.baiduKey, content, new BaseSubsribe<WeatherResultBean>() {
                    @Override
                    public void onSuccess(WeatherResultBean result) {

                        WeatherResultBean.RetDataEntity retData = result.getRetData();
                        queryresult.setText(retData.getCity() + ":" + retData.getWeather() + ":" + retData.getDate());
                    }

                    @Override
                    public void onError(Throwable e) {
                        super.onError(e);
                        queryresult.setText("查询失败");

                    }
                }
        );
        //取消请求
//        subscription.unsubscribe();
    }
}
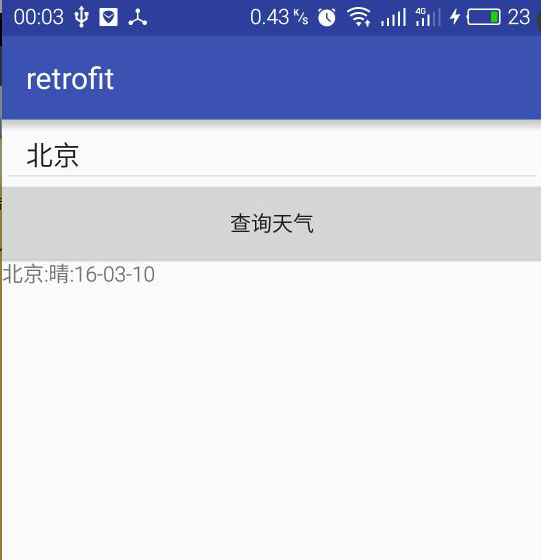
我们看下项目运行的结果图:
附上源码给有需要的朋友参考一下,比较结合源码才能理解的更透彻,GitHub: https://github.com/finddreams/Retrofit2_Rxjava_Dagger2
