扯淡也需要积累点资料
这里先备注下需要哪些准备。
- 开发工具:Intellij idea(用惯了AS用这个绝对顺手)
- Java环境:JDK1.8(高了的没用过,反正对于Android来说1.8够用了)。
- 数据库:Mysql(下个压缩包的就行,感觉解压版的很是好配,也很省时间)。
- Maven:自己部个本地的也行,用Intellij idea自带的也行,反正别忘了配置下镜像,要不下东西特别慢,要不就是下不下来。
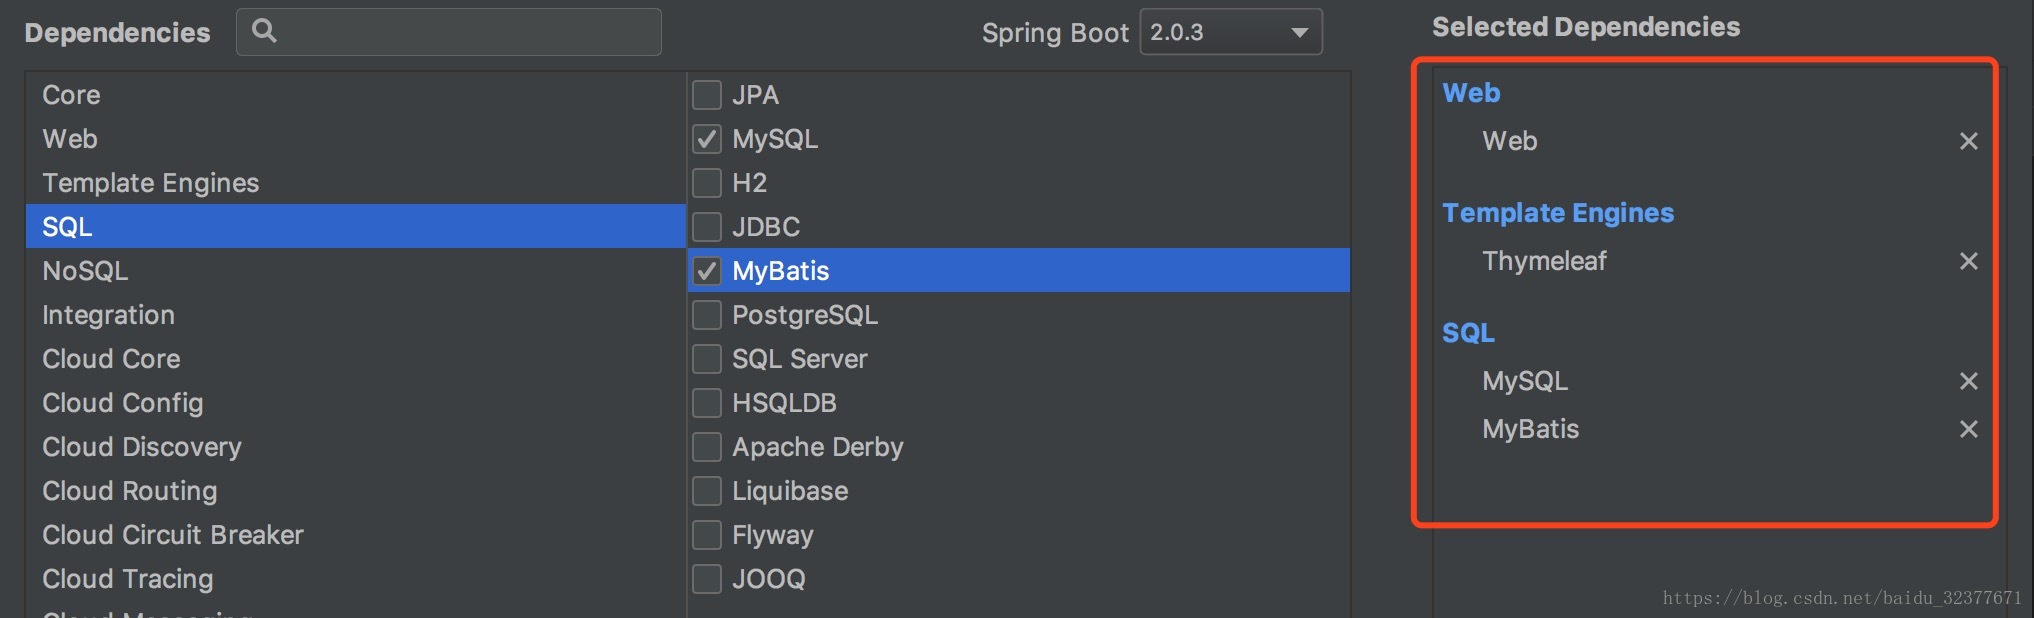
一、创建项目
创建项目看下面这张图就行了,这里把用到的模块截了出来。pom.xml就不用贴了,只要之前的准备都完事,那么这么创建绝对没问题。
二、添加Kotlin支持
添加Kotlin支持,很是简单啊。其实说简单倒不如说是方便。
1.创建Kotlin文件:
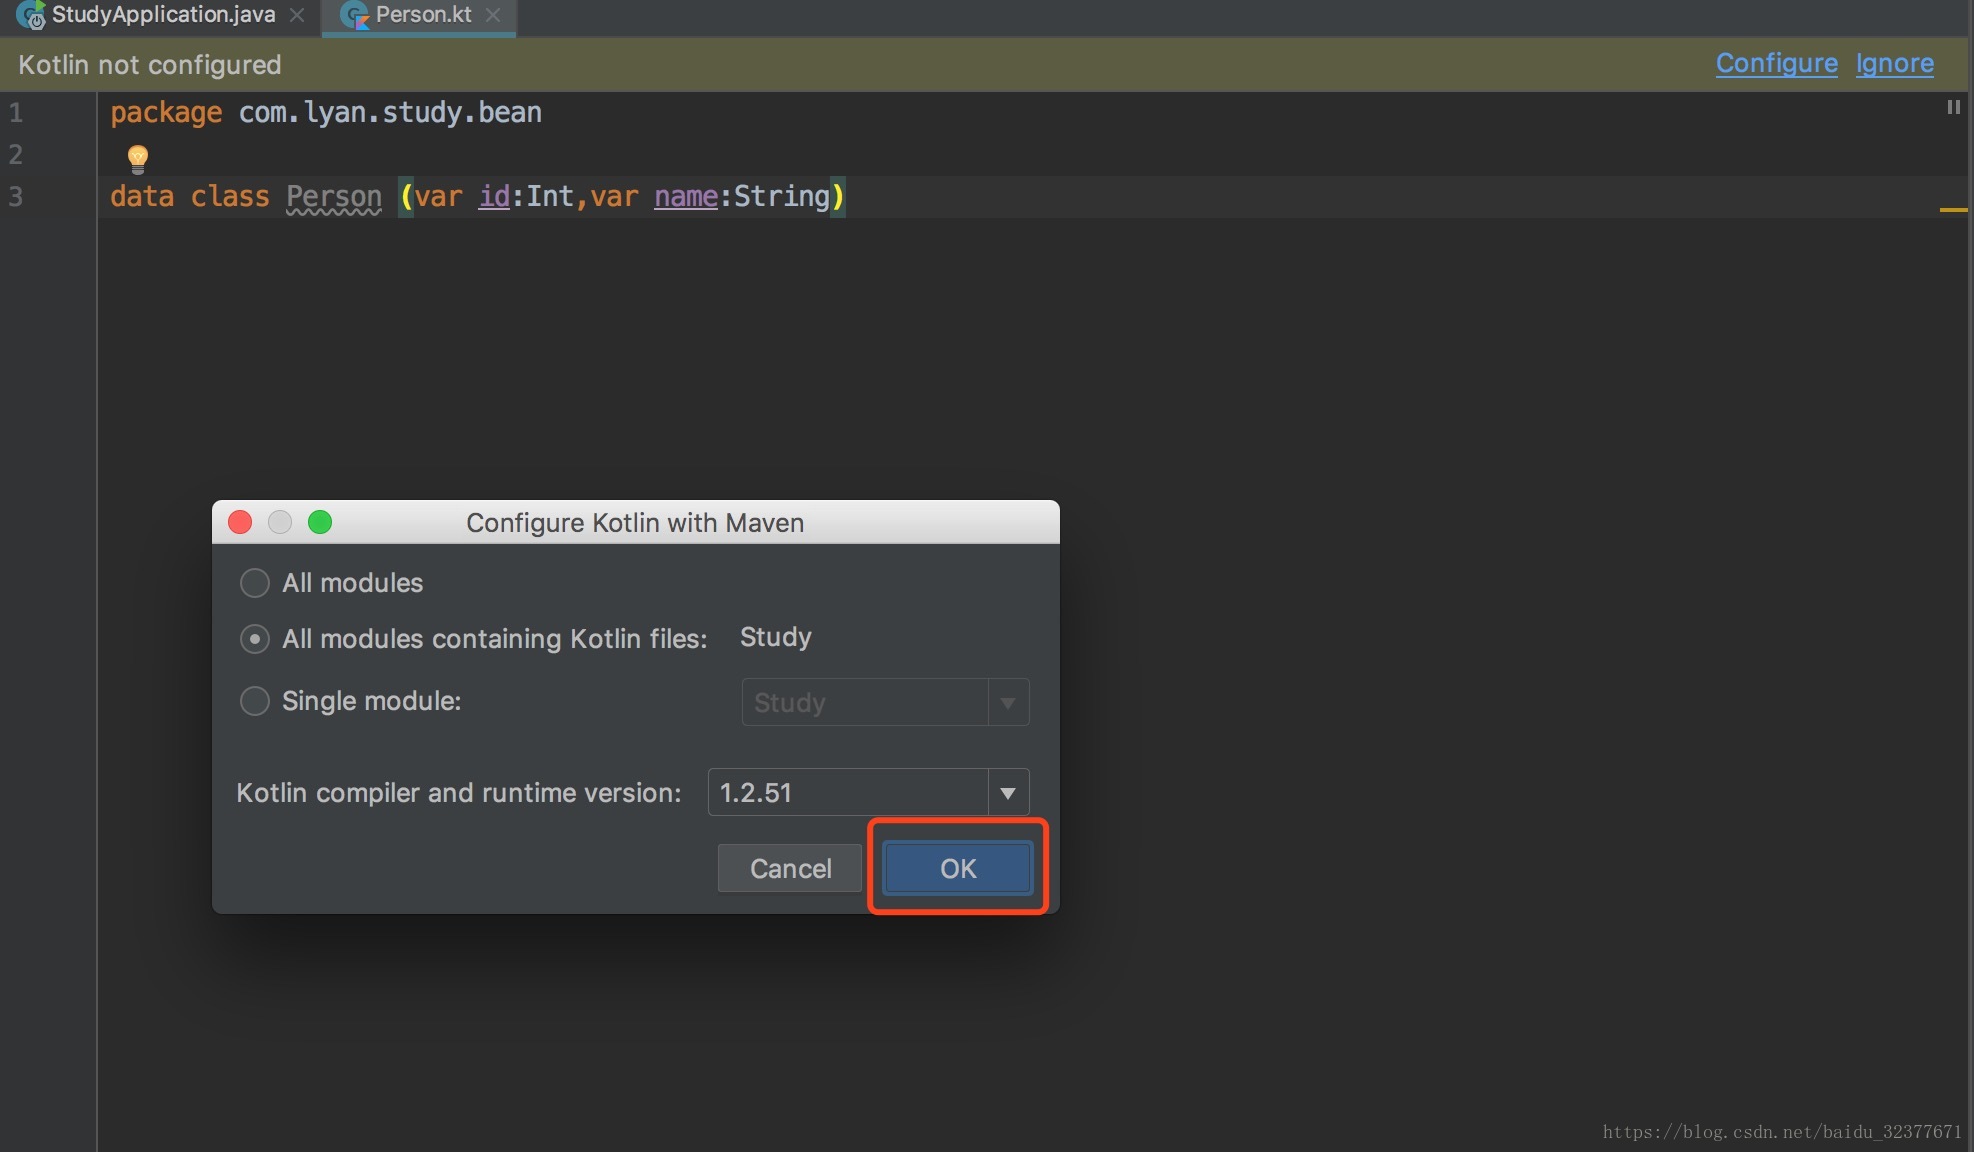
这里我创建了一个person类,效果如下:
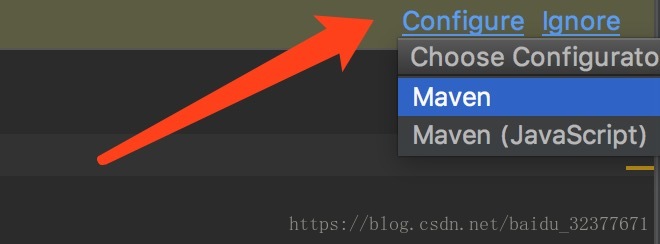
要的的就是上面图中提示的部分,接下来单击Configure,然后在弹出的弹窗中,单击Maven选项。
然后在弹窗中点击确定,添加Kotlin就完事了。如果没有自动导入,记得点开Event log,看着提示选一下导入的方式。
这里贴一下Kotlin文件的启动类写法:

package com.lyan.study

import org.springframework.boot.SpringApplication
import org.springframework.boot.autoconfigure.SpringBootApplication

@SpringBootApplication
open class StudyApplication

fun main(args: Array<String>) {
    SpringApplication.run(StudyApplication::class.java, *args)
}
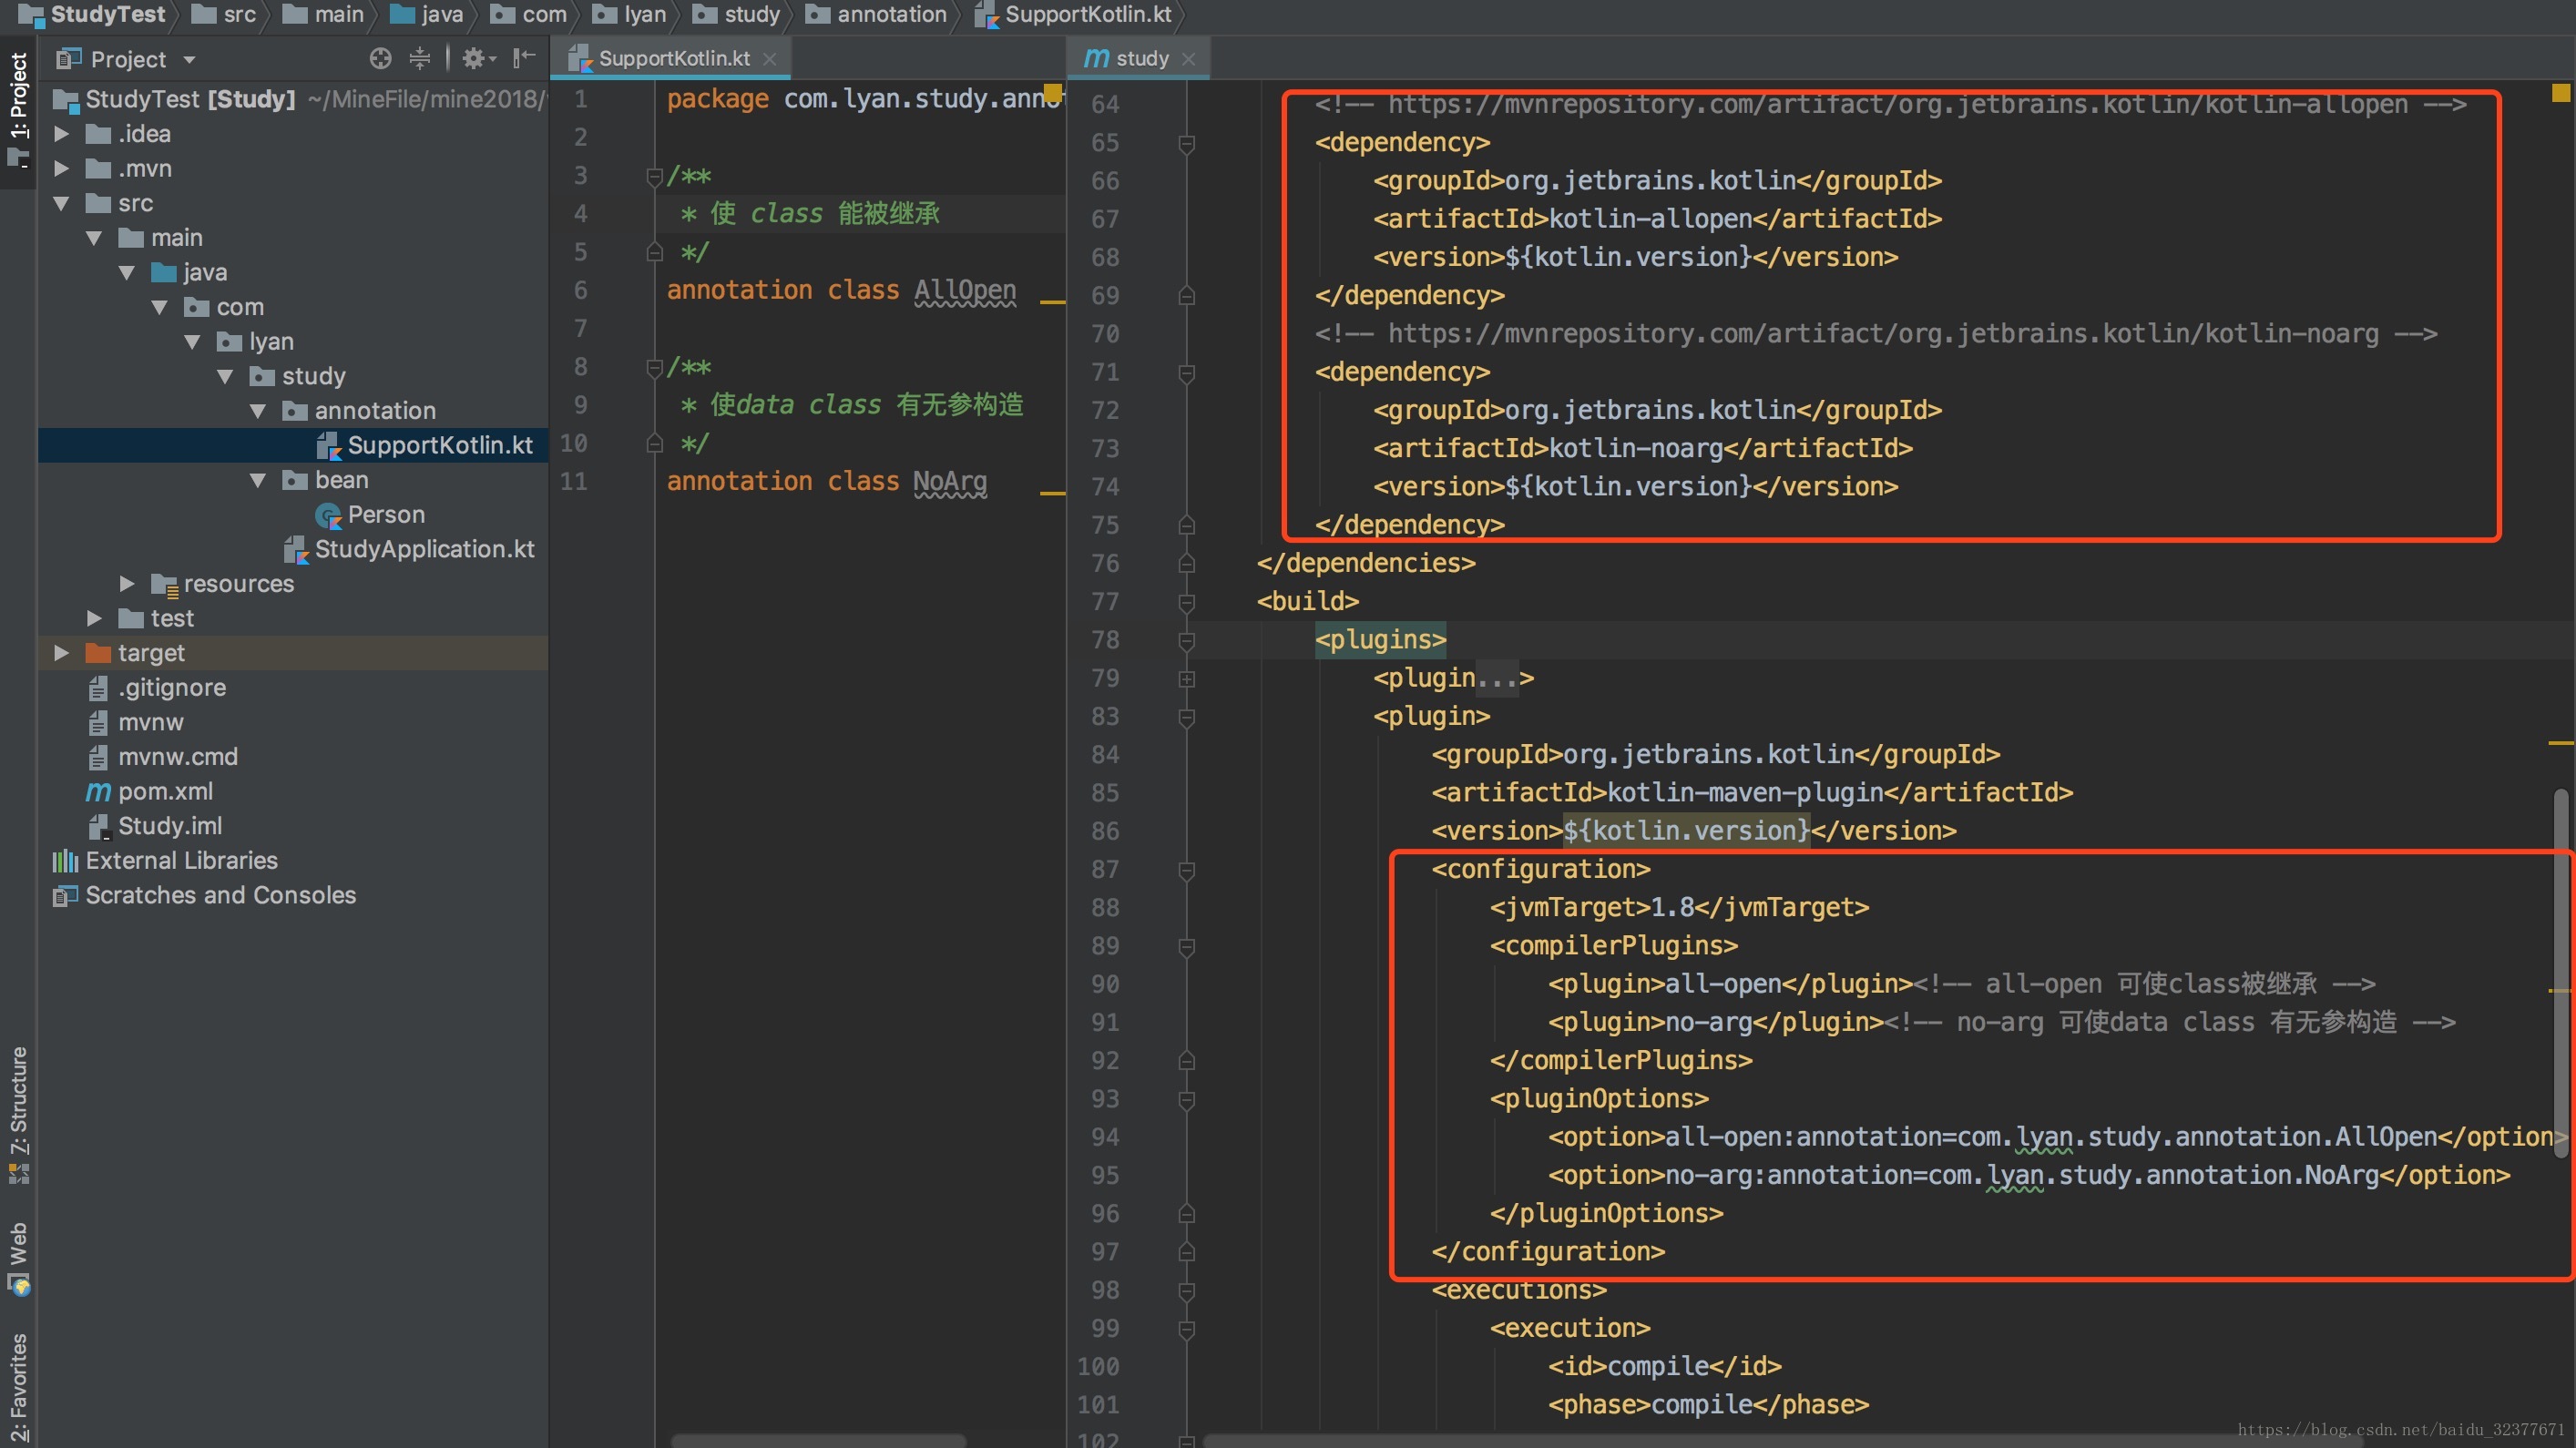
2.添加NoArg插件和AllOpen插件:
具体的作用我就不啰嗦了。配置示意图如下:
配置内容如下,注解类,AllOpen和NoArg与pom.xml中的配置是对应的,pom.xml中设置的就是AllOpen和NoArg类的包名+类名:
package com.lyan.study.annotation

/**
 * 使 class 能被继承
 */
annotation class AllOpen

/**
 * 使data class 有无参构造
 */
annotation class NoArg
插件的依赖:
<!-- https://mvnrepository.com/artifact/org.jetbrains.kotlin/kotlin-allopen -->
<dependency>
    <groupId>org.jetbrains.kotlin</groupId>
    <artifactId>kotlin-allopen</artifactId>
    <version>${kotlin.version}</version>
</dependency>
<!-- https://mvnrepository.com/artifact/org.jetbrains.kotlin/kotlin-noarg -->
<dependency>
    <groupId>org.jetbrains.kotlin</groupId>
    <artifactId>kotlin-noarg</artifactId>
    <version>${kotlin.version}</version>
</dependency>
插件的配置,这里我对原有的配置改变了下位置,这里注意一下就行。
<configuration>
    <jvmTarget>1.8</jvmTarget>
        <compilerPlugins>
            <plugin>all-open</plugin><!-- all-open 可使class被继承 -->
            <plugin>no-arg</plugin><!-- no-arg 可使data class 有无参构造 -->
        </compilerPlugins>
    <pluginOptions>
        <option>all-open:annotation=com.lyan.study.annotation.AllOpen</option>
        <option>no-arg:annotation=com.lyan.study.annotation.NoArg</option>
    </pluginOptions>
</configuration>
使用示例
AllOpen
package com.lyan.study

import com.lyan.study.annotation.AllOpen
import org.springframework.boot.SpringApplication
import org.springframework.boot.autoconfigure.SpringBootApplication

@SpringBootApplication
@AllOpen
class StudyApplication

fun main(args: Array<String>) {
    SpringApplication.run(StudyApplication::class.java, *args)
}
NoArg
package com.lyan.study.bean

import com.lyan.study.annotation.NoArg

@NoArg
data class Person(var id: Int, var name: String)
三、配置Mybatis和连接数据库
1.配置application配置文件:
直接配置application.yml。把原来的那个配置文件删了创建一个yml就行。配置如图所示,配了个数据源,配了个mapper文件的映射路径,Mybatis配置这快,我拿到代码里设置没用xml(其实mapper映射路径,我都想拿到代码里设置,只是没百度到):

spring:
  datasource:
    driver-class-name: com.mysql.jdbc.Driver
    url: jdbc:mysql://localhost:3306/test?useUnicode=true&characterEncoding=utf8&useSSL=false
    username: root
    password: 123456

server:
  port: 8080
mybatis:
  #配置文件位置
  #config-location: classpath:mapper/config/mybatis-config.xml
  #映射文件的位置
  mapper-locations: classpath:mapper/*.xml
2.配置Mybatis的先关设置:
这样设置完就不需要在程序的入口设置@MapperScan了。这里我故意不用open class和open fun。就是为了验证AllOpen的作用。
package com.lyan.study

import com.lyan.study.annotation.AllOpen
import org.mybatis.spring.boot.autoconfigure.ConfigurationCustomizer
import org.springframework.context.annotation.Bean
import org.springframework.context.annotation.Configuration

@Configuration
@AllOpen
class MyConfig {
    @Bean
    fun configurationCustomizer(): ConfigurationCustomizer {
        return ConfigurationCustomizer {
            it.isMapUnderscoreToCamelCase = true
            it.typeAliasRegistry.registerAliases("com.lyan.study.bean")
            it.addMappers("com.lyan.study.mapper")
        }
    }
}
3.连接数据库测试
创建映射文件:
package com.lyan.study.mapper

import com.lyan.study.bean.Person

@Mapper
@Component
interface PersonMapper {
    //查询人员列表
    fun getPersons():MutableList<Person>
}
<?xml version="1.0" encoding="UTF-8" ?>
<!DOCTYPE mapper
        PUBLIC "-//mybatis.org//DTD Mapper 3.0//EN"
        "http://mybatis.org/dtd/mybatis-3-mapper.dtd">
<!--suppress ALL -->
<mapper namespace="com.lyan.study.mapper.PersonMapper">
    <select id="getPersons" resultType="person">
        SELECT * FROM PERSON
    </select>
</mapper>
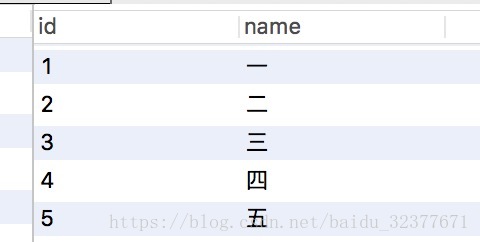
这里附上数据的图片,一共五条:
查询该表中所有的数据并打印出来,测试代码如下:

package com.lyan.study;

import com.lyan.study.mapper.PersonMapper;
import org.junit.Test;
import org.junit.runner.RunWith;
import org.springframework.boot.test.context.SpringBootTest;
import org.springframework.test.context.junit4.SpringRunner;

import javax.annotation.Resource;

@RunWith(SpringRunner.class)
@SpringBootTest
public class StudyApplicationTests {

    @Resource
    private PersonMapper personMapper;

    @Test
    public void contextLoads()  {
        personMapper.getPersons().forEach(System.out::println);
    }

}
接下来运行测试代码,如果报错了那么恭喜你中奖了,因为我之前都没遇到过,就在写这篇笔记的时候无意间踩到了这个地雷。部分错误日志如下(如果没报错直接忽略这处就行):
这里我参考了这个链接Spring Boot and Kotlin。我冒蒙的添加了kotlin-reflect这个依赖,没想到还真好使了。将下面的依赖配置放到pom.xml中就行了。

<dependency>
    <groupId>org.jetbrains.kotlin</groupId>
    <artifactId>kotlin-reflect</artifactId>
    <version>${kotlin.version}</version>
</dependency>
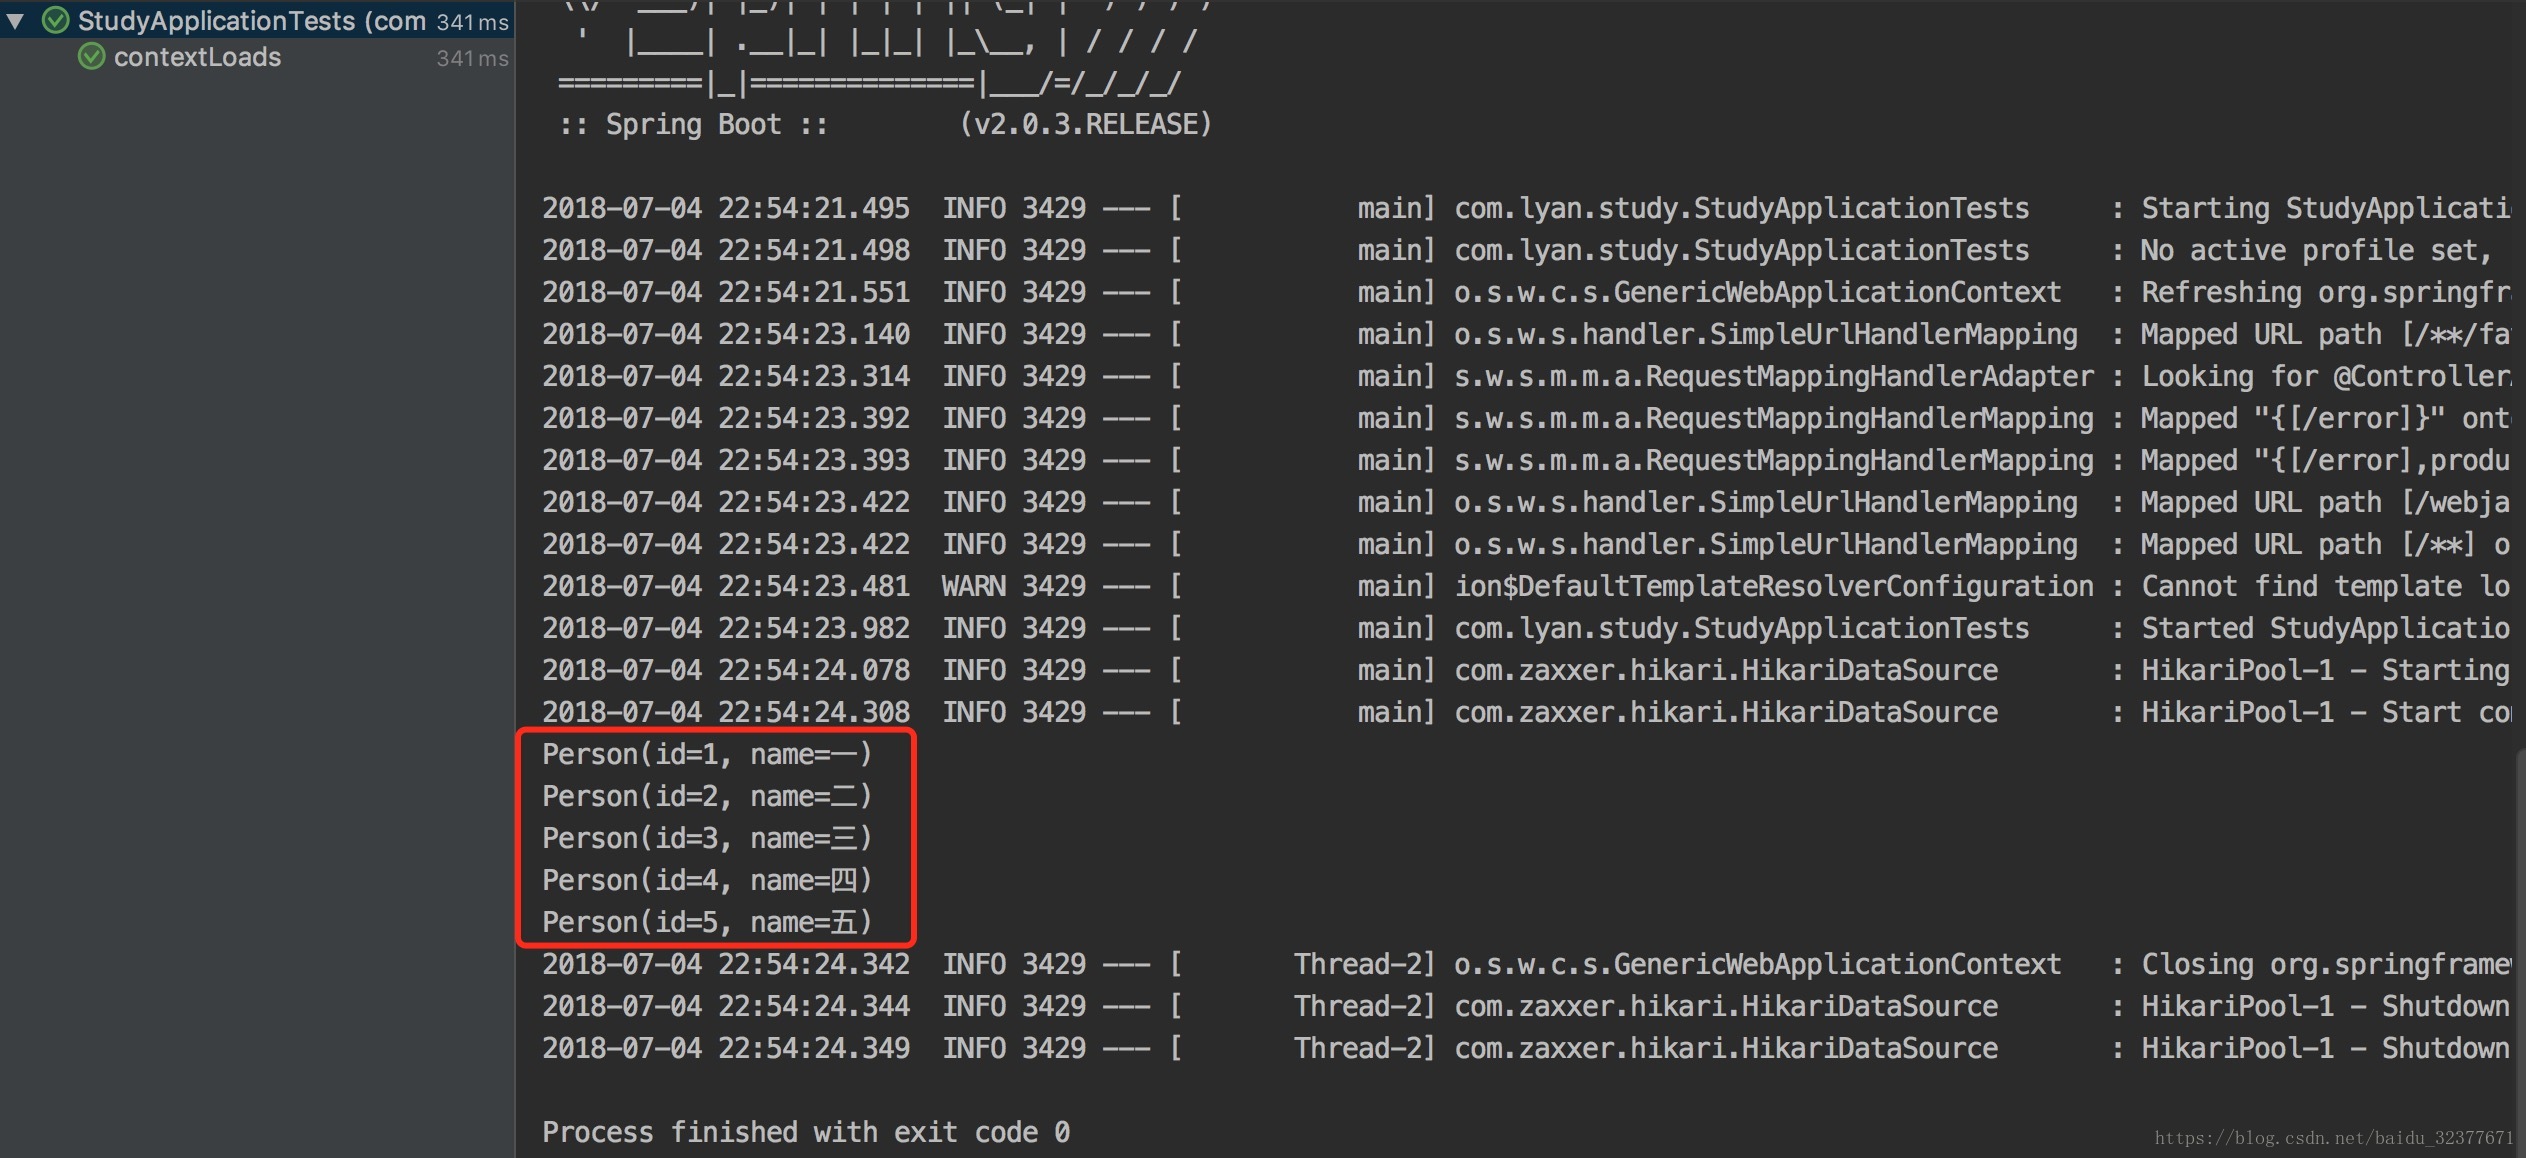
最后来看下测试代码运行的结果(效果还算是复合预期):
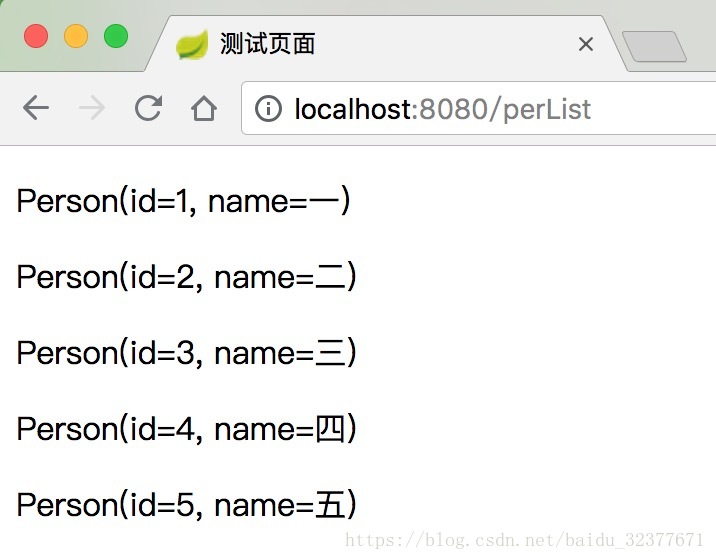
四、Thymeleaf(来个页面意思一下)
1、创建个Controller代码如下:
package com.lyan.study.controller

import com.lyan.study.mapper.PersonMapper
import org.springframework.beans.factory.annotation.Autowired
import org.springframework.stereotype.Controller
import org.springframework.web.bind.annotation.GetMapping
import org.springframework.web.servlet.ModelAndView

@Controller
class TestController {

    @Autowired
    lateinit var personMapper: PersonMapper

    /**
     * 将数组传到页面中
     */
    @GetMapping("/perList")
    fun perList() : ModelAndView = ModelAndView("test","pers",personMapper.getPersons())

}
2、Html中的功能还是遍历数组展示出来,内容如下:
<!DOCTYPE html>
<!--suppress ThymeleafVariablesResolveInspection -->
<html xmlns:th="http://www.thymeleaf.org">
<head>
    <meta charset="UTF-8">
    <title>测试页面</title>
</head>
<body>
    <th:block th:each="person : ${pers}">
        <p th:text="${person}"></p>
    </th:block>
</body>
</html>
效果跟之前测试打印数据的效果差不多,只不过这次展示到了网页中。效果如下:
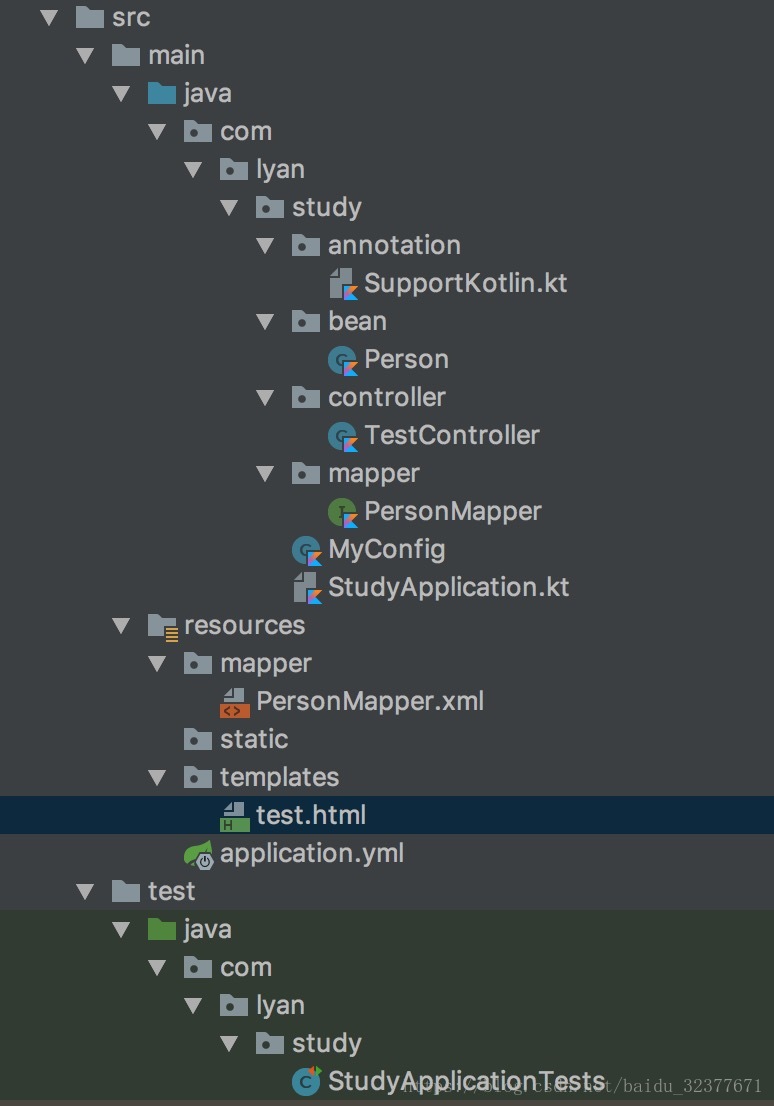
最后再来张目录结构,大功告成: