MacOS Sierra 10.12.1
Python 2.7
selenium 3.4.3
phantomjs 忘了
前言
发现自己有时候比挖掘别人来的更加有意义,自己到底喜欢谁的歌,自己真的知道么?习惯不会骗你
搭建爬虫环境
1.安装selenium
pip install selenium
# anaconda环境的可用conda install selenium
# 网速不好的可用到https://pypi.python.org/pypi/selenium下载压缩包,解压后使用python setup.py install
2.安装Phantomjs
Mac版本
步骤一下载包:去这里下载对应版本http://phantomjs.org/download.html
步骤二解压:双击就行,用unzip这都无所谓
步骤三切入路径:cd ~/Downloads/phantomjs-2.1.1-macosx/bin  # 我下的路径的路径是download,版本不一,注意修改
步骤四:chmod +x phantomjs
步骤五: 配置环境,因为我装的的zsh,所以文件需要修改的是~/.zshrc这个文件,加上这句话export PATH="/Users/mrlevo/Downloads/phantomjs-2.1.1-macosx/bin/:$PATH",然后source ~/.zshrc 即可生效(没用zsh的同学,直接修改的文件时~/.bash_profile,添加内容和上述一致)
查看是否生效:phantomjs -v # 有信息如 2.1.1 则生效mac若遇到问题请参考PhantomJS 安装
Win版本
官网http://phantomjs.org/下载PhantomJS解压后如下图所示: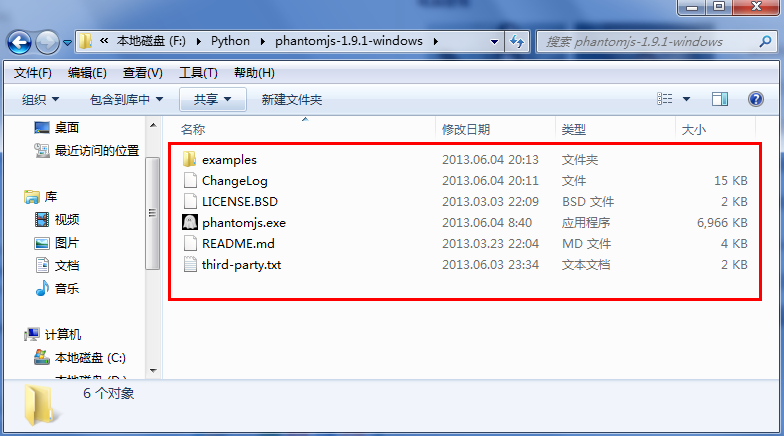
调用时可能会报错“Unable to start phantomjs with ghostdriver”如图:
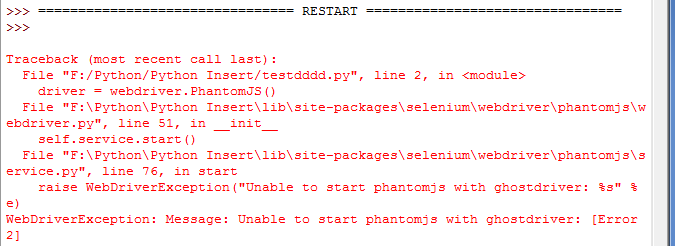
此时可以设置下Phantomjs的路径,同时如果你配置了Scripts目录环境变量,可以解压Phantomjs到该文件夹下。可参考Selenium with GhostDriver in Python on Windows - stackoverflow,整个win安装过程可参考在Windows下安装PIP+Phantomjs+Selenium],Mac和Linux/Ubuntu 下可参考[解决:Ubuntu(MacOS)+phantomjs+python的部署问题
测试安装是否成功
# 进入python环境后执行如下操作

# win下操作
>>> from selenium import webdriver  # pip install selenium
>>> driver_detail = webdriver.PhantomJS(executable_path="F:\Python\phantomjs-1.9.1-windows\phantomjs.exe")
>>> driver_detail.get('https://www.baidu.com')
>>> news = driver_detail.find_element_by_xpath("//div[@id='u1']/a")
>>> print news.text
新闻
>>> driver_detail.quit() # 记得关闭,不然耗费内存

------------------------------------------------------------------------

# mac下操作
>>> from selenium import webdriver  # pip install selenium
>>> driver_detail = webdriver.PhantomJS()
>>> driver_detail.get('https://www.baidu.com')
>>> news = driver_detail.find_element_by_xpath("//div[@id='u1']/a")
>>> print news.text
新闻
>>> driver_detail.quit() # 记得关闭,不然耗费内存
爬取动态数据
获取自己的id号,这个可以自己登陆自己的网易云音乐后获得,就是id=后面那个值
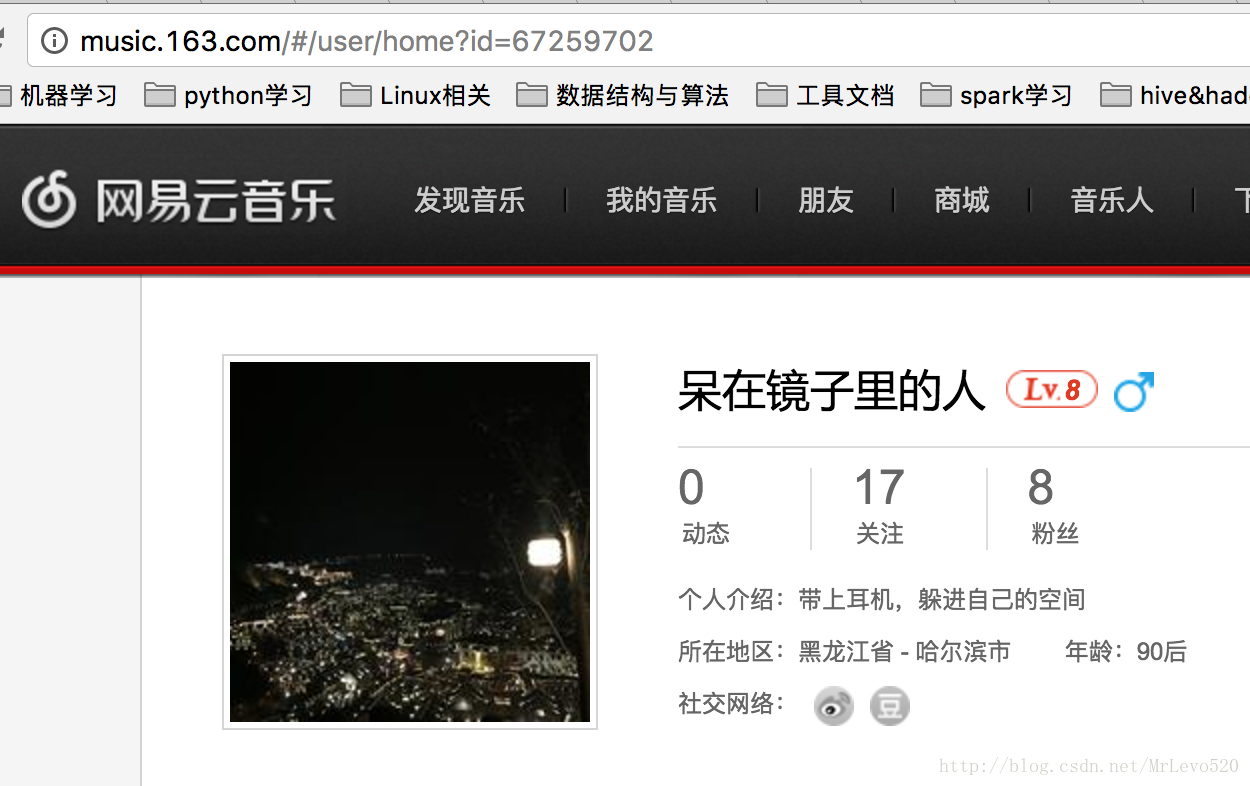
构造爬取的id,因为我发现,每个人的id只要被获取到,他的歌单都是公开的!!!这就节省了自动登录的一步,而且,我还有个大胆的想法,哈哈哈,我还要搞个大新闻!这次先不说~
墙裂推荐先阅读该博客掌握获取元素方法:Python爬虫 Selenium实现自动登录163邮箱和Locating Elements介绍
# -*- coding: utf-8 -*-
# Author:哈士奇说喵
# Create:20170707

import traceback
from selenium import webdriver
import selenium.webdriver.support.ui as ui
from selenium.webdriver.common.desired_capabilities import DesiredCapabilities
import time
import random


# 存储为文本的子函数
def write2txt(data,path):
    f = open(path,"a")
    f.write(data)
    f.write("\n")
    f.close()


# 获取该id喜欢音乐的列表
def catchSongs(url_id,url):

    user = url_id.split('=')[-1].strip()
    print 'excute user:',user

    driver = webdriver.PhantomJS()#,executable_path='/Users/mrlevo/phantomjs-2.1.1-macosx/bin/phantomjs')  # 注意填上路径
    driver.get(url)

    driver.switch_to_frame('g_iframe')  # 网易云的音乐元素都放在框架内!!!!先切换框架

    try:
        wait = ui.WebDriverWait(driver,15)
        wait.until(lambda driver: driver.find_element_by_xpath('//*[@class="j-flag"]/table/tbody'))  # 等待元素渲染出来
        try:
            song_key = 1
            wrong_time = 0
            while wrong_time < 5:  # 不断获取歌信息,假定5次获取不到值,就判无值可获取,跳出循环
                try:
                    songs = driver.find_elements_by_xpath('//*[@class="j-flag"]/table/tbody/tr[%s]'%song_key)
                    info_ = songs[0].text.strip().split("\n")
                    if len(info_) == 5:
                        info_.insert(2,'None') # 没有MV选项的进行插入None
                    new_line = '%s|'%user+'|'.join(info_)
                    song_key +=1
                    #new_line = "%s|%s|%s|%s|%s|%s|%s"%(user,info_[0],info_[1],info_[2],info_[3],info_[4],info_[5])

                    print new_line

                    write2txt(new_line.encode('utf-8'),user)  # mac写入文件需要改变字符,以id命名的文件,存储在执行脚本的当前路径下,在win下请去掉编.endcode('utf-8')


                except Exception as ex:
                    wrong_time +=1
                    # print ex
        except Exception as ex:
            pass

    except Exception as ex:
        traceback.print_exc()
    finally:
        driver.quit()


# 获取id所喜爱的音乐的url
def catchPlaylist(url):


    driver = webdriver.PhantomJS()#,executable_path='/Users/mrlevo/phantomjs-2.1.1-macosx/bin/phantomjs')  # 注意填上路径
    driver.get(url)

    driver.switch_to_frame('g_iframe')  # 网易云的音乐元素都放在框架内!!!!先切换框架

    try:
        wait = ui.WebDriverWait(driver,15)
        wait.until(lambda driver: driver.find_element_by_xpath('//*[@class="m-cvrlst f-cb"]/li[1]/div/a'))  # 根据xpath获取元素

        urls = driver.find_elements_by_xpath('//*[@class="m-cvrlst f-cb"]/li[1]/div/a')
        favourite_url = urls[0].get_attribute("href")

    except Exception as ex:
        traceback.print_exc()
    finally:
        driver.quit()
    # print favourite_url
    return favourite_url


if __name__ == '__main__':

    for url in ['http://music.163.com/user/home?id=67259702']:  # 这里把自己的id替换掉,想爬谁的歌单都可以,只要你有他的id
        time.sleep(random.randint(2, 4)) # 随机休眠时间2~4秒
        url_playlist = catchPlaylist(url)
        time.sleep(random.randint(1, 2))
        catchSongs(url,url_playlist)
不出意外的话,你的执行脚本的目录下会产生一个以你的id命名的文件,里面打开应该是这样的
67259702|2|因为了解|None|04:08|汪苏泷|慢慢懂
67259702|3|潮鳴り|None|02:37|折戸伸治|CLANNAD ORIGINAL SOUNDTRACK
67259702|4|每个人都会|None|02:58|方大同|橙月 Orange Moon
67259702|5|Don't Cry (Original)|MV|04:44|Guns N' Roses|Greatest Hits
67259702|6|妖孽(Cover:蒋蒋)|None|02:58|醉影An|醉声梦影
67259702|7|好好说再见(Cover 陶喆 / 关诗敏)|None|04:06|锦零/疯疯|zero
67259702|8|好好说再见(cover陶喆)|None|03:34|AllenRock|WarmCovers ·早

# 这边分别爬取的数据结构是: id|歌次序|歌名|是否有MV|时长|歌手|专辑
Show数据-ROUND1
接下来就是处理自己下好的自己的歌单了,为了方便起见,我在构造爬取代码的时候,已经构造的比较好了,这也就帮助大家减少了数据预处理的时间了,一般来说,数据不会那么干净的。
我只是做了最简单的歌手词云的例子,数据比较丰富的情况下,自己处理吧,想做什么统计都可以,或许以后我会补上可视化相关的一些例子
自定义遮罩层版本
# -*- coding: utf-8 -*-
# 如果还不清楚词云怎么搞,请参考这里https://mp.weixin.qq.com/s/0Bw8QUo1YfWZR_Boeaxu_Q,或者自行百度,很简单的一个包

import numpy as np
import PIL.Image as Image
from wordcloud import WordCloud, ImageColorGenerator
import matplotlib.pyplot as plt

# 统计词频
# win的用户,把解码去掉即可,因为当时mac写入的文件有编码,所以读出来需要解码
def statistics(lst):
    dic = {}
    for k in lst:
        if not k.decode('utf-8') in dic:dic[k.decode('utf-8')] = 0
        dic[k.decode('utf-8')] +=1
    return dic


path = '67259702'  # 自己路径自己搞定
list_ = []
with open(path,'r') as f:
    for line in f:
        list_.append(line.strip().split('|')[-2].strip())

dict_ = statistics(list_)


# the font from github: https://github.com/adobe-fonts
font = r'SimHei.ttf'
coloring = np.array(Image.open("screenshot.png"))  # 遮罩层自己定义,可选自己的图片
wc = WordCloud(background_color="white",
               collocations=False,
               font_path=font,
               width=1400,
               height=1400,
               margin=2,
               mask=np.array(Image.open("screenshot.png"))).generate_from_frequencies(dict_)

# 这里采用了generate_from_frequencies(dict_)的方法,里面传入的值是{‘歌手1’:5,‘歌手2’:8,},分别是歌手及出现次数,其实和jieba分词
# 之后使用generate(text)是一个效果,只是这里的text已经被jieba封装成字典了

image_colors = ImageColorGenerator(np.array(Image.open("screenshot.png")))
plt.imshow(wc.recolor(color_func=image_colors))
plt.imshow(wc)
plt.axis("off")
plt.show()

wc.to_file('mymusic2.png')  # 把词云保存下来

方块版本
# -*- coding: utf-8 -*-
# 稍微修改下参数,就是另一幅图,这是没有遮罩层的
import numpy as np
import PIL.Image as Image
from wordcloud import WordCloud, ImageColorGenerator
import matplotlib.pyplot as plt

# 统计词频
def statistics(lst):
    dic = {}
    for k in lst:
        if not k.decode('utf-8') in dic:dic[k.decode('utf-8')] = 0
        dic[k.decode('utf-8')] +=1
    return dic


path = '67259702'  # 自己路径自己搞定
list_ = []
with open(path,'r') as f:
    for line in f:
        list_.append(line.strip().split('|')[-2].strip())

dict_ = statistics(list_)


# the font from github: https://github.com/adobe-fonts
font = r'SimHei.ttf'
coloring = np.array(Image.open("screenshot.png"))
wc = WordCloud(
               collocations=False,
               font_path=font,
               width=1400,
               height=1400,
               margin=2,
               ).generate_from_frequencies(dict_)

# 这里采用了generate_from_frequencies(dict_)的方法,里面传入的值是{‘歌手1’:5,‘歌手2’:8,},分别是歌手及出现次数,其实和jieba分词
# 之后使用generate(text)是一个效果,只是这里的text已经被jieba封装成字典了

image_colors = ImageColorGenerator(np.array(Image.open("screenshot.png")))

plt.imshow(wc)
plt.axis("off")
plt.show()

wc.to_file('mymusic2.png')  # 把词云保存下来

SHOW数据-ROUND2
刚看到个好玩的,迫不及待的试了下,这是关于语种翻译的API接口,阿里云买的,0.01=1000条,买买买,买来玩玩试试自己歌曲语种
# -*- coding:utf-8 -*-
# 调用的阿里云的API接口实现语种翻译
# API官网:https://market.aliyun.com/products/57124001/cmapi010395.html?spm=5176.730005.0.0.UrR9bO#sku=yuncode439500000
import urllib, urllib2, sys
import ssl
def Lang2Country(text):
host = 'https://dm-12.data.aliyun.com'
path = '/rest/160601/mt/detect.json'
method = 'POST'
appcode = 'xxxxx' # 购买后提供的appcode码
querys = ''
bodys = {}
url = host + path
bodys['q'] = text
post_data = urllib.urlencode(bodys)
request = urllib2.Request(url, post_data)
request.add_header('Authorization', 'APPCODE ' + appcode)
# 根据API的要求,定义相对应的Content-Type
request.add_header('Content-Type', 'application/x-www-form-urlencoded; charset=UTF-8')
ctx = ssl.create_default_context()
ctx.check_hostname = False
ctx.verify_mode = ssl.CERT_NONE
response = urllib2.urlopen(request, context=ctx)
content = response.read()
if (content):
# print(content)
return content
else:
return None
#
# 67259702|1|Claux - 水之畔(8lope Remix) (feat. 陶心瑶)|None|02:44|8lope|水之畔(feat. 陶心瑶) (8lope Remix)
list_songs = []
list_songwithsinger = []
with open('67259702') as f: # 文件名写上次爬下来的
for line in f:
line_split = line.split('|')
list_songs.append(line_split[2])
list_songwithsinger.append(line_split[2]+line_split[5])
# 调用接口进行语种识别
dict_lang = {}
for i in range(537):
try:
content = Lang2Country(list_songwithsinger[i])
lag_ = json.loads(content)['data']['language']
if lag_ not in dict_lang:
dict_lang[lag_]=0
dict_lang[lag_] +=1
except:
pass
print dict_lang
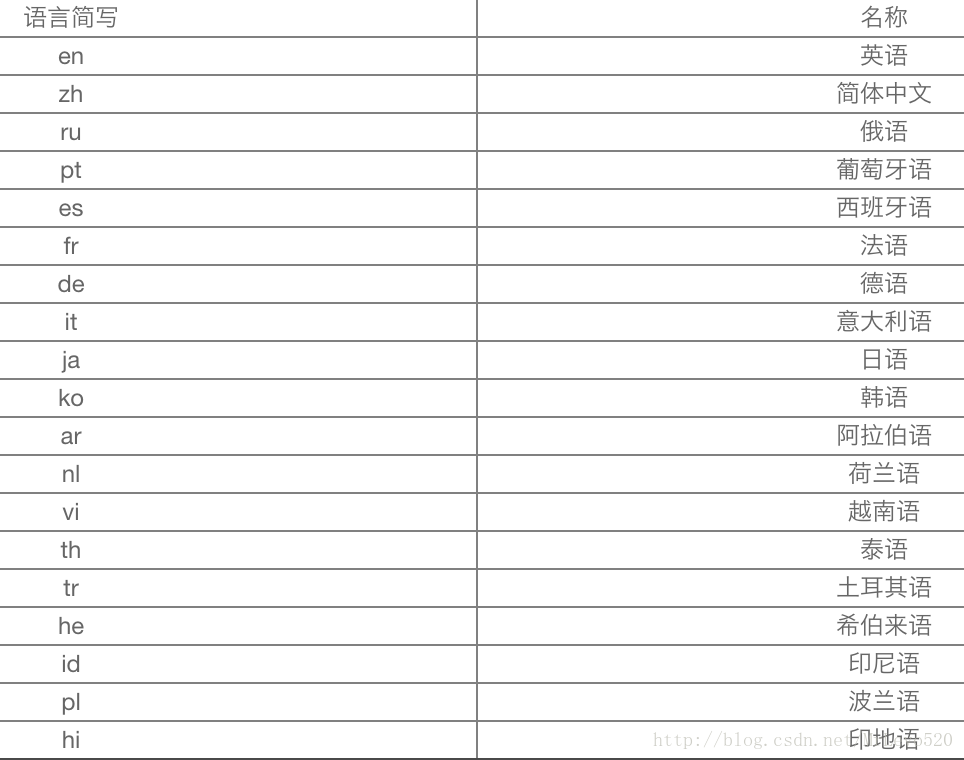
# {u'ru': 1, u'fr': 9, u'en': 111, u'zh': 259, u'pt': 21, u'ko': 8, u'de': 7, u'tr': 15, u'it': 47, u'id': 2, u'pl': 7, u'th': 1, u'nl': 10, u'ja': 17, u'es': 20}
ok,数据准备好了,接下来可视化就好了!这次我用Echarts,换个口味的就不用云词了,来个统计效果好看点的!不会Echarts?看这里→_→@Mrlevo520–Echarts入门(零基础小白教程)
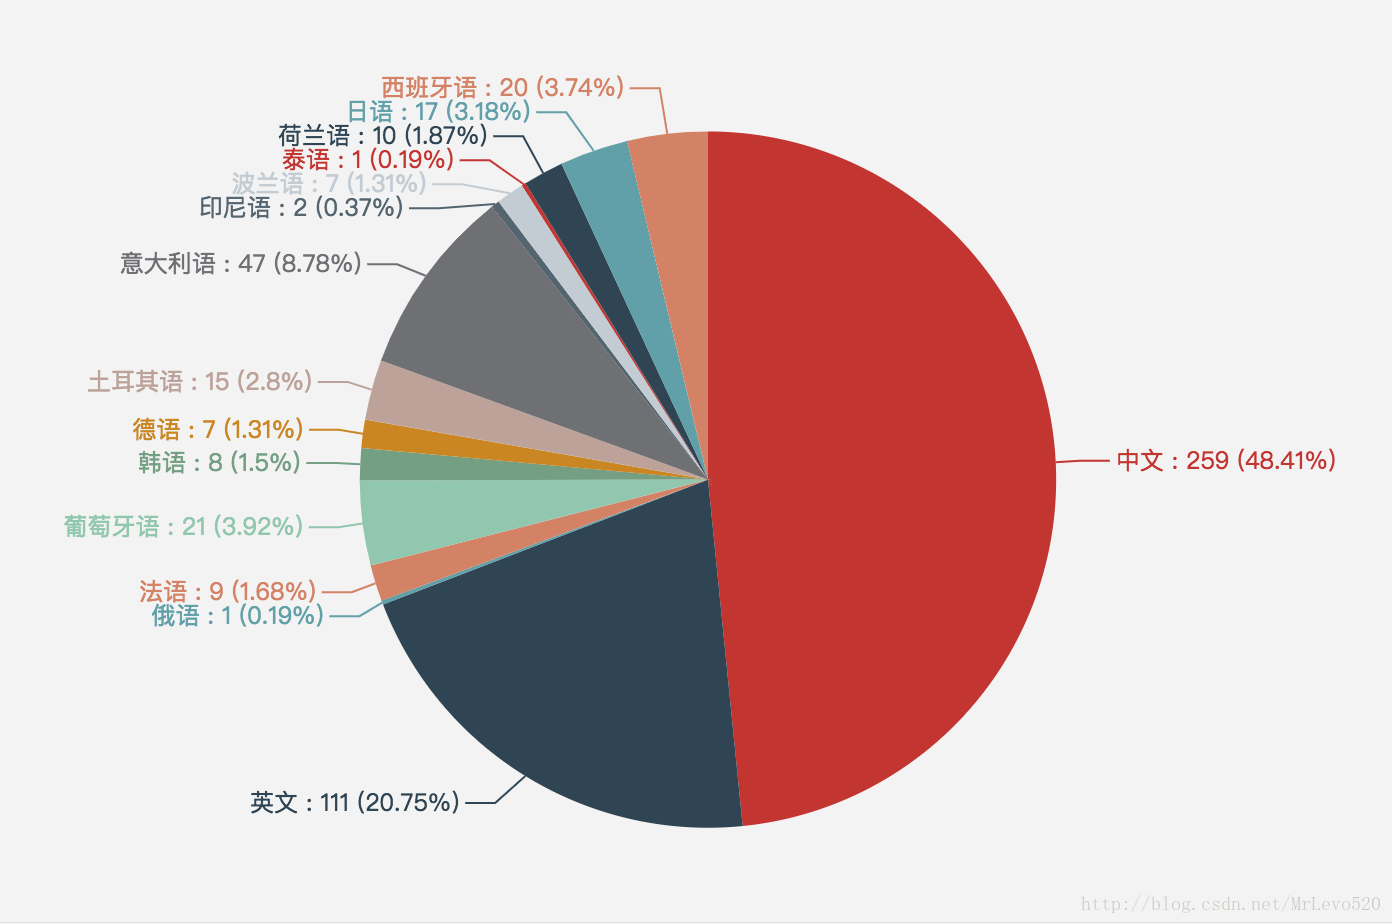
# 进入该网页:http://echarts.baidu.com/demo.html#pie-simple
# 然后把里面的内容替换掉就行
option = {
    title : {
        text: '哈士奇说喵喜欢的音乐',
        x:'center'
    },
    tooltip : {
        trigger: 'item',
        formatter:'{b} : {c} ({d}%)'
    },
    legend: {
        orient: 'vertical',
        left: 'left',
        data:['中文','英文','俄语','法语','葡萄牙语','韩语','德语','土耳其语','意大利语']
    },
    series : [
        {
            name: '访问来源',
            type: 'pie',
            radius : '55%',
            center: ['50%', '60%'],
            itemStyle: {
              normal: {label:{
                show:true,
                formatter:'{b} : {c} ({d}%)'
            },
              }},
            data:[
                {value:259, name:'中文'},
                {value:111,name:'英文'},
                {value:1, name:'俄语'},
                {value:9, name:'法语'},
                {value:21, name:'葡萄牙语'},
                {value:8, name:'韩语'},
                {value:7, name:'德语'},
                {value:15, name:'土耳其语'},
                {value:47, name:'意大利语'},
                {value:2, name:'印尼语'},
                {value:7, name:'波兰语'},
                {value:1, name:'泰语'},
                {value:10, name:'荷兰语'},
                {value:17, name:'日语'},
                {value:20, name:'西班牙语'},

            ],

        }
    ]
};
Pay Attention
这里遇到的最大问题,就是网易云的网页竟然还iframe框来做!!!不切入那个内联框架连phantomjs都无能为力!!这是最值得注意的一点,即使你找对了元素,也可能获取不到值!
如果是win的计算机,在 driver = webdriver.PhantomJS()里面填上phantomjs.exe的路径,上面抓取数据的代码里面有两个需要引擎需要填写路径
- 如果有打印出字段,但是记录的数据为0KB,那么是文件没有写进去,对于win的用户,把代码写入的部门,编码方式去掉即可
- 有些win的小伙伴反应路径都加载对了,但是还是找不到exe,那么请在路径前面加r比如
executable_path=r"F:\Python\phantomjs-1.9.1-windows\phantomjs.exe"
结论
果然一下子就看出是上个世纪九十年代的人(:,还有就是,音乐不分国界,就是动感~
最后
关于phantomjs和selenium的做过很多,大家可以自己参考我以前的几篇博客:用python做些有趣的事情,这次也只是我要搞的大事情里面的其中一件,抽离出来,要是专栏能申请下来,我会为网易云音乐专门分析一波,毕竟网易云音乐做的的确不错
致谢
@爱搞事情的自己
@Eastmoun–在Windows下安装PIP+Phantomjs+Selenium
@mrlevo520–Python+Selenium+PIL+Tesseract真正自动识别验证码进行一键登录
@Alfred–一件有趣的事:用Python 爬了爬自己的微信朋友
@Eastmount–Python爬虫 Selenium实现自动登录163邮箱和Locating Elements介绍
附录
对照表