在项目中,难免会遇到这种需求,在程序运行时需要动态根据条件来决定显示哪个View或某个布局,最通常的想法就是把需要动态显示的View都先写在布局中,然后把它们的可见性设为View.GONE,最后在代码中通过控制View.VISIABLE动态的更改它的可见性。这样的做法的优点是逻辑简单而且控制起来比较灵活。但是它的缺点就是,耗费资源,虽然把View的初始可见View.GONE但是在Inflate布局的时候View仍然会被Inflate,也就是说仍然会创建对象,会被实例化,会被设置属性。也就是说,会耗费内存等资源。
推荐的做法是使用android.view.ViewStub,ViewStub是一个轻量级的View,使用非常简单:
mViewStub = (ViewStub) this.findViewById(R.id.viewstub);
mViewStub.inflate();
它一个不可见的,不占布局位置,占用资源非常小的控件,相当于一个“占位控件”。使用时可以为ViewStub指定一个布局,在Inflate布局的时候,只有ViewStub会被初始化,然后当ViewStub被设置为可见的时或调用了ViewStub.inflate()的时候,ViewStub所指向的布局就会被inflate实例化,且此布局文件直接将当前ViewStub替换掉,然后ViewStub的布局属性(layout_margin***、layout_width等)都会传给它所指向的布局。这样,就可以使用ViewStub在运行时动态显示布局,节约内存资源。
下面我们从ViewStub源码来看下inflate()方法的实现原理:
- public View inflate() {
- final ViewParent viewParent = getParent();
-
- if (viewParent != null && viewParent instanceof ViewGroup) {
- if (mLayoutResource != 0) {
- final ViewGroup parent = (ViewGroup) viewParent;
- final LayoutInflater factory;
- if (mInflater != null) {
- factory = mInflater;
- } else {
- factory = LayoutInflater.from(mContext);
- }
- final View view = factory.inflate(mLayoutResource, parent,
- false);
-
- if (mInflatedId != NO_ID) {
- view.setId(mInflatedId);
- }
-
- final int index = parent.indexOfChild(this);
- parent.removeViewInLayout(this);
-
- final ViewGroup.LayoutParams layoutParams = getLayoutParams();
- if (layoutParams != null) {
- parent.addView(view, index, layoutParams);
- } else {
- parent.addView(view, index);
- }
-
- mInflatedViewRef = new WeakReference<View>(view);
-
- if (mInflateListener != null) {
- mInflateListener.onInflate(this, view);
- }
-
- return view;
- } else {
- throw new IllegalArgumentException("ViewStub must have a valid layoutResource");
- }
- } else {
- throw new IllegalStateException("ViewStub must have a non-null ViewGroup viewParent");
- }
- }
我们先从方法的入口开始看:
1、在第2行,首先是得到ViewStub它的父视图对象。
2、然后在第4行一开始肯定是能进入判断的,mLayoutResource就是需要inflate的布局资源,然后在第13行填充这个布局资源。
3、然后在第21行,重要的来了,parent.removeViewInLayout(this);这段代码是什么意思呢?看方法名字就知道了,this是代表ViewStub对象,意思就是把当前ViewStub对象从父视图中移除了。
4、然后第23~28行,就是得到ViewStub的LayoutParams布局参数对象,如果存在就把它赋给被inflate的布局对象,然后把inflate的布局对象添加到父视图中。
5、最后返回inflate的布局对象。
好了,源码解析完毕!!!
从上述可知,当我们第二次调用ViewStub.inflate()方法的时候,因为已经移除了ViewStub对象,在第2、4行,得到的viewParent就为null,此时判断时候就会走else抛出一个IllegalStateException异常:ViewStub must have a non-null ViewGroup viewParent。
需要注意的几点:
1.ViewStub之所以常称之为“延迟化加载”,是因为在教多数情况下,程序无需显示ViewStub所指向的布局文件,只有在特定的某些较少条件下,此时ViewStub所指向的布局文件才需要被inflate,且此布局文件直接将当前ViewStub替换掉,具体是通过viewStub.infalte()或viewStub.setVisibility(View.VISIBLE)来完成。
2.正确把握住ViewStub的应用场景非常重要,因为使用ViewStub可以优化布局,一般应用在当前布局或控件在用户使用较少情况下,这样可以提高性能,节约内存,加快界面渲染。
3.对ViewStub的inflate操作只能进行一次,因为inflate的时候是将它指向的布局实例化并替换掉当前ViewStub本身(由此体现出了ViewStub“占位”性质),一旦替换后,此时原来的布局文件中就没有ViewStub控件了,因此,如果多次对ViewStub进行infalte,会出现错误信息:ViewStub must have a non-null ViewGroup viewParent。
4.3中所讲到的ViewStub指向的布局文件解析inflate并替换掉当前ViewStub本身,并不是完全意义上的替换(与include标签不太一样),替换时,布局文件的layout params是以ViewStub为准,其他布局属性是以布局文件自身为准。
5.
ViewStub本身是不可见的,对ViewStub.setVisibility(int visibility)与其他View控件不一样,我们可以从源码角度来看一下ViewStub.setVisibility()方法的作用:
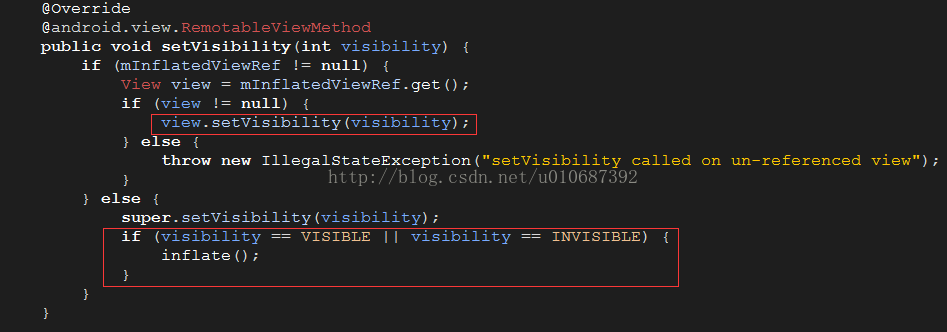
这个方法意思就是ViewStub的setVisibility()设置成View.VISIBLE或INVISIBLE如果是首次使用,都会自动inflate其指向的布局文件,并替换ViewStub本身,再次使用则是相当于对其指向的布局文件设置可见性。
好了,原理讲了那么多,来看看代码怎么实现吧:
首先看看效果图:
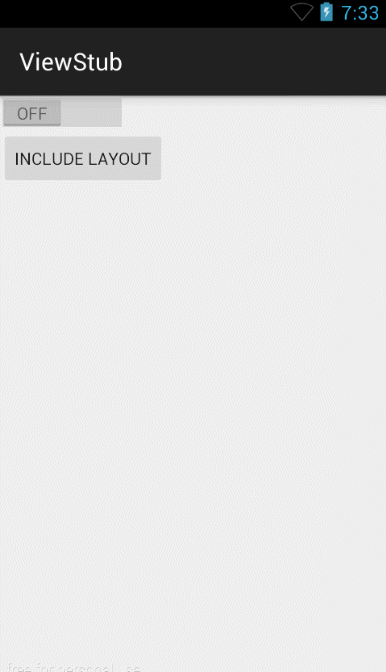
使用了ViewStub的activity_main.xml:
- <LinearLayout xmlns:android="http://schemas.android.com/apk/res/android"
- xmlns:tools="http://schemas.android.com/tools"
- android:layout_width="match_parent"
- android:layout_height="match_parent"
- android:orientation="vertical"
- tools:context="com.example.viewstub.MainActivity" >
-
- <Switch
- android:id="@+id/switch1"
- android:layout_width="wrap_content"
- android:layout_height="wrap_content" />
-
- <ViewStub
- android:id="@+id/viewstub"
- android:layout_width="match_parent"
- android:layout_height="match_parent"
- android:layout_marginBottom="10dp"
- android:layout_marginLeft="10dp"
- android:layout_marginRight="10dp"
- android:layout_marginTop="10dp"
- android:layout="@layout/hide_layout" />
-
- </LinearLayout>
hide_layout.xml
- <?xml version="1.0" encoding="utf-8"?>
- <LinearLayout xmlns:android="http://schemas.android.com/apk/res/android"
- android:layout_width="match_parent"
- android:layout_height="match_parent"
- android:background="#00ffff"
- android:orientation="vertical" >
- <Button
- android:id="@+id/hide_layout_btn"
- android:layout_width="wrap_content"
- android:layout_height="wrap_content"
- android:layout_gravity="center"
- android:text="Click me" />
- </LinearLayout>
代码文件:
- public class MainActivity extends ActionBarActivity {
- private ViewStub mViewStub;
- private Switch mSwitch;
- private boolean flag = false;
- @Override
- protected void onCreate(Bundle savedInstanceState) {
- super.onCreate(savedInstanceState);
- setContentView(R.layout.activity_main);
- mViewStub = (ViewStub) this.findViewById(R.id.viewstub);
- mSwitch = (Switch) findViewById(R.id.switch1);
- mSwitch.setOnCheckedChangeListener(new OnCheckedChangeListener() {
- @Override
- public void onCheckedChanged(CompoundButton buttonView,
- boolean isChecked) {
- if (isChecked) {
- if(!flag){
- mViewStub.inflate();
-
- flag = true;
- }else{
- mViewStub.setVisibility(View.VISIBLE);
- }
- Button mBtn = (Button) findViewById(R.id.hide_layout_btn);
- mBtn.setOnClickListener(new OnClickListener() {
- @Override
- public void onClick(View v) {
- Toast.makeText(getApplicationContext(), "Click me!",
- Toast.LENGTH_SHORT).show();
- }
- });
- } else {
- mViewStub.setVisibility(View.GONE);
- }
- }
- });
- }
- }
注:使用ViewStub被替换的布局中的控件,直接findViewById即可。
最后扩展一下在布局优化时候常用的其它几个标签:
1、布局重用<include />可以通过这个标签直接加载外部的xml到当前结构中,是复用UI资源的常用标签
<include />标签能够重用布局文件,简单的使用如下:
- <LinearLayout xmlns:android="http://schemas.android.com/apk/res/android"
- xmlns:tools="http://schemas.android.com/tools"
- android:layout_width="match_parent"
- android:layout_height="match_parent"
- android:orientation="vertical"
- tools:context="com.example.viewstub.MainActivity" >
- <Switch
- android:id="@+id/switch1"
- android:layout_width="wrap_content"
- android:layout_height="wrap_content" />
-
- <include layout="@layout/include_layout" />
-
- </LinearLayout>
使用include标签中布局文件中的控件,直接findViewById即可。
2、减少视图层级<merge />
<merge />标签在UI的结构优化中起着非常重要的作用,它可以删减多余的层级,优化UI。<merge />多用于替换FrameLayout(因为所有的Activity视图的根结点都是FrameLayout,如果当前的布局根结点是Framelayout,那么可以用merge替代,减少多余的层级)或者当一个布局包含另一个时,<merge />标签消除视图层次结构中多余的视图组。例如你的主布局文件是垂直布局,又include引入了一个垂直布局,这是如果include布局使用的LinearLayout就没意义了,使用的话反而减慢你的UI渲染。这时可以使用<merge />标签进行优化。
- <merge xmlns:android="http://schemas.android.com/apk/res/android">
- <Button
- android:layout_width="wrap_content"
- android:layout_height="wrap_content"
- android:text=""/>
- <TextView
- android:layout_width="wrap_content"
- android:layout_height="wrap_content"
- android:text=""/>
- </merge>
转自:http://blog.csdn.net/u010687392