mybatis整合Redis
Redis是一个开源的使用ANSI C语言编写、支持网络、可基于内存亦可持久化的日志型、Key-Value数据库,并提供多种语言的API。
不使用分布式缓存,缓存数据在各自的服务器中存储,不方便系统开发,所以要使用分布式缓存对缓存数据进行集中式管理。
mybatis本身无法实现分布式缓存,需要和其他的分布式缓存进行整合。整合方法:mybatis提供了一个Cache接口,如果要实现自己的缓存逻辑,只需要实现Cache接口即可。
Mybatis默认缓存机制
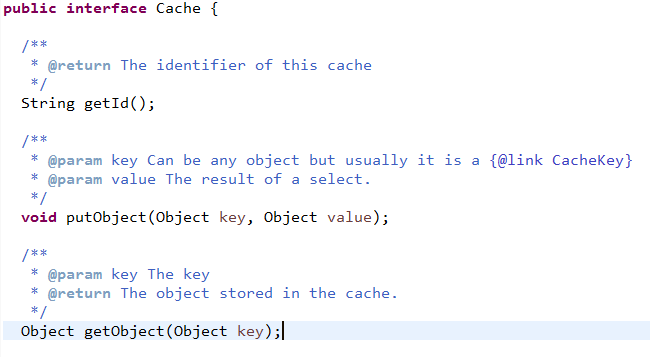
mybatis提供二级缓存Cache接口,如下:
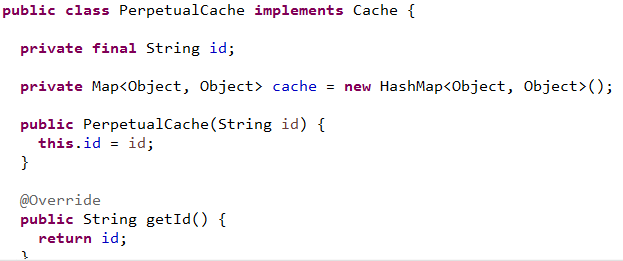
它的默认实现类:
通过实现Cache接口可以实现mybatis缓存数据通过其它缓存数据库整合,mybatis的特长是sql操作,缓存数据的管理不是mybatis的特长,为了提高缓存的性能可以将mybatis和第三方的缓存数据库整合,比如ehcache、memcache、redis等。
Mybatis与Redis的整合
首先需要配置好SSM的开发环境,然后:
1、引入jar包
2、在Mybatis的配置文件中开启缓存设置
<settings>
     <!-- 全局映射器启用缓存 *主要将此属性设置完成即可 -->
     <setting name="cacheEnabled" value="true" />

    <!-- 查询时,关闭关联对象即时加载以提高性能 -->
    <setting name="lazyLoadingEnabled" value="false" />

    <!-- 对于未知的SQL查询,允许返回不同的结果集以达到通用的效果 -->
    <setting name="multipleResultSetsEnabled" value="true" />

    <!-- 设置关联对象加载的形态,此处为按需加载字段(加载字段由SQL指 定),不会加载关联表的所有字段,以提高性能 -->
    <setting name="aggressiveLazyLoading" value="true" />
</settings>
3、redis.properties
# Redis settings
redis.host=127.0.0.1
redis.port=6379
redis.pass=

redis.maxIdle=300
redis.maxActive=600
redis.maxWait=1000
redis.testOnBorrow=true
4、applicationContext-redis.xml
<!-- 加载redis.properties文件中的内容,redis.properties文件中key命名要有一定的特殊规则 -->
<context:property-placeholder location="classpath:db/redis.properties" ignore-unresolvable="true"/>

<!-- redis数据源 -->
<bean id="poolConfig" class="redis.clients.jedis.JedisPoolConfig">
<property name="maxIdle" value="${redis.maxIdle}" />
    	<property name="maxTotal" value="${redis.maxActive}" />
        <property name="maxWaitMillis" value="${redis.maxWait}" />
        <property name="testOnBorrow" value="${redis.testOnBorrow}" />
</bean>

<!-- Spring-redis连接池管理工厂 -->
<bean id="jedisConnectionFactory" class="org.springframework.data.redis.connection.jedis.JedisConnectionFactory">
    <property name="hostName" value="${redis.host}" />
    <property name="port" value="${redis.port}" />
    <property name="password" value="${redis.pass}" />
    <property name="poolConfig" ref="poolConfig" />
</bean>

<!-- 使用中间类解决RedisCache.jedisConnectionFactory的静态注入,从而使MyBatis实现第三方缓存 -->
<!-- <bean id="redisCacheTransfer" class="com.redis.RedisCacheTransfer">
    <property name="jedisConnectionFactory" ref="jedisConnectionFactory" />
</bean> -->
5、第三方内存数据库Redis,定义一个RedisCache实现org.apache.ibatis.cache.Cache接口。
package com.redis;

import java.util.concurrent.locks.ReadWriteLock;
import java.util.concurrent.locks.ReentrantReadWriteLock;

import org.apache.ibatis.cache.Cache;
import org.springframework.data.redis.connection.RedisConnection;
import org.springframework.data.redis.connection.jedis.JedisConnectionFactory;
import org.springframework.data.redis.serializer.JdkSerializationRedisSerializer;
import org.springframework.data.redis.serializer.RedisSerializer;

import redis.clients.jedis.exceptions.JedisConnectionException;

/**
 *
 * @ClassName:RedisCache.java
 *
 * @Description:使用第三方内存数据库Redis作为二级缓存
 *
 * @author zxt
 *
 * @Date:2018年3月29日 上午9:45:41
 *
 */
public class RedisCache implements Cache {
	/**
	 * 静态成员变量无法直接使用spring注解注入
	 */
	private static JedisConnectionFactory jedisConnectionFactory;

	private final String id;

	/**
	 * The {@code ReadWriteLock}.
	 */
	private final ReadWriteLock readWriteLock = new ReentrantReadWriteLock();

	public RedisCache(final String id) {
		if (id == null) {
			throw new IllegalArgumentException("Cache instances require an ID");
		}
		this.id = id;
	}

	public static void setJedisConnectionFactory(JedisConnectionFactory jedisConnectionFactory) {
		RedisCache.jedisConnectionFactory = jedisConnectionFactory;
	}

	@Override
	public void clear() {
		RedisConnection connection = null;
		try {
			connection = jedisConnectionFactory.getConnection();
			connection.flushDb();
			connection.flushAll();

		} catch (JedisConnectionException e) {
			e.printStackTrace();

		} finally {
			if (connection != null) {
				connection.close();
			}
		}
	}

	@Override
	public String getId() {
		return this.id;
	}

	@Override
	public Object getObject(Object key) {
		Object result = null;
		RedisConnection connection = null;

		try {
			connection = jedisConnectionFactory.getConnection();
			RedisSerializer<Object> serializer = new JdkSerializationRedisSerializer();
			result = serializer.deserialize(connection.get(serializer.serialize(key)));

		} catch (JedisConnectionException e) {
			e.printStackTrace();

		} finally {
			if (connection != null) {
				connection.close();
			}
		}

		return result;
	}

	@Override
	public void putObject(Object key, Object value) {
		RedisConnection connection = null;
		try {
			connection = jedisConnectionFactory.getConnection();
			RedisSerializer<Object> serializer = new JdkSerializationRedisSerializer();
			connection.set(serializer.serialize(key), serializer.serialize(value));
		} catch (JedisConnectionException e) {
			e.printStackTrace();
		} finally {
			if (connection != null) {
				connection.close();
			}
		}
	}

	@Override
	public Object removeObject(Object key) {
		RedisConnection connection = null;
		Object result = null;
		try {
			connection = jedisConnectionFactory.getConnection();
			RedisSerializer<Object> serializer = new JdkSerializationRedisSerializer();
			result = connection.expire(serializer.serialize(key), 0);
		} catch (JedisConnectionException e) {
			e.printStackTrace();
		} finally {
			if (connection != null) {
				connection.close();
			}
		}
		return result;
	}

	@Override
	public ReadWriteLock getReadWriteLock() {
		// TODO Auto-generated method stub
		return this.readWriteLock;
	}

	@Override
	public int getSize() {
		int result = 0;
		RedisConnection connection = null;

		try {
			connection = jedisConnectionFactory.getConnection();
			result = Integer.valueOf(connection.dbSize().toString());

		} catch (JedisConnectionException e) {
			e.printStackTrace();

		} finally {
			if (connection != null) {
				connection.close();
			}
		}
		return result;
	}
}
6、由于Spring无法注入静态成员变量,所以定义一个静态注入中间类
package com.redis;

import org.springframework.beans.factory.annotation.Autowired;
import org.springframework.data.redis.connection.jedis.JedisConnectionFactory;
import org.springframework.stereotype.Component;

/**
 *
 * @ClassName:RedisCacheTransfer.java
 *
 * @Description:静态注入中间类
 *
 * @author zxt
 *
 * @Date:2018年3月29日 上午10:14:35
 *
 */
@Component
public class RedisCacheTransfer {

	@Autowired
	public void setJedisConnectionFactory(JedisConnectionFactory jedisConnectionFactory) {
		RedisCache.setJedisConnectionFactory(jedisConnectionFactory);
	}
}
7、UserMapper.xml
<!-- Mapper.xml文件中的namespace与mapper接口的类路径相同。 -->
<mapper namespace="com.redis.mapper.UserMapper">
	<!-- 开启本mapper的namespace的缓存 -->
	<!-- type:指定Cache接口的实现类 -->
	<cache eviction="LRU" type="com.redis.RedisCache" />

	<!-- 注册用户 -->
	<insert id="registerUser" parameterType="com.redis.po.User">
		insert into user(username, password, tel) values(#{username}, #{password}, #{tel});
	</insert>

	<!-- 根据电话号码或者用户名查询用户 -->
	<select id="checkUserUnique" parameterType="String" resultType="com.redis.po.User">
		select * from user where ( tel = #{value} or username = #{value} )
	</select>

	<!-- 根据用户名(或者电话)和密码查找用户 -->
	<select id="checkUser" parameterType="Map" resultType="com.redis.po.User">
		select * from user where (tel = #{username} or username = #{username})  and password = #{password}
	</select>

</mapper>其中最重要的就是:<cache eviction="LRU"type="com.redis.RedisCache" />
8、UserController.java
@Controller
@RequestMapping("/user")
public class UserController {
	@Autowired
	private UserService userService;

	@RequestMapping("/checkUser/{username}")
	public @ResponseBody User checkUser(@PathVariable("username") String username) throws Exception {
		return userService.checkUserUnique(username);
	}
}
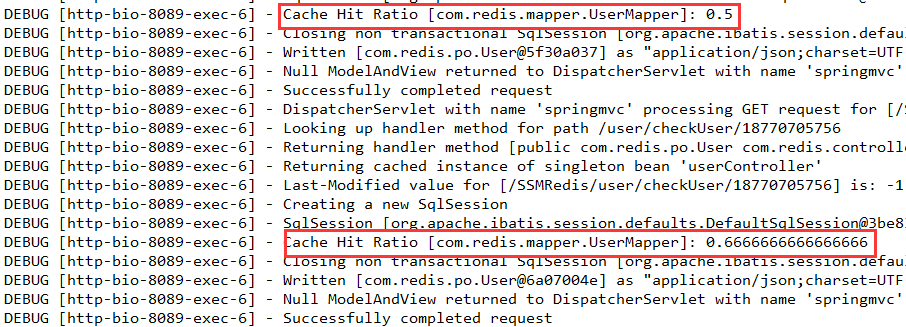
第一次执行,从数据库查询数据,缓存命中率为0。
后续以相同的参数访问,则从缓存中取数据。

Could not resolve placeholder异常
那么出现异常信息的可能性有三种:
1、location中的属性文件配置错误;
2、location中定义的配置文件里面没有对应的placeholder值;
3、第三种就比较麻烦点,可能是Spring容器的配置问题。
Spring容器采用反射扫描的发现机制,在探测到Spring容器中有一个org.springframework.beans.factory.config.PropertyPlaceholderConfigurer的Bean就会停止对剩余PropertyPlaceholderConfigurer的扫描(Spring 3.1已经使用PropertySourcesPlaceholderConfigurer替代PropertyPlaceholderConfigurer了)。
而这个基于命名空间的配置,其实内部就是创建一个PropertyPlaceholderConfigurer Bean而已。换句话说,即Spring容器仅允许最多定义一个PropertyPlaceholderConfigurer,其余的会被Spring忽略掉。
所以除去properites文件路径错误、拼写错误外,出现"Couldnot resolve placeholder"很有可能是使用了多个PropertyPlaceholderConfigurer或者多个<context:property-placeholder>的原因。
比如我有一个dao.xml读取db.properties,还有一个redis.xml读取redis.properties,然后web.xml统一load这两个xml文件,如果这两个xml文件中分别有:
<context:property-placeholder location="classpath:db/db.properties" />
<context:property-placeholder location="classpath:db/redis.properties" />那么,一定会出"Could not resolveplaceholder"。
一定要记住,不管是在一个Spring文件还是在多个Spring文件被统一load的情况下,直接写:
<context:property-placeholder location="" />
<context:property-placeholder location="" />
是不允许的。
解决方案:在Spring 3.0中,可以写:
<context:property-placeholder location="classpath:db/db.properties" ignore-unresolvable="true"/>
<context:property-placeholder location="classpath:db/redis.properties" ignore-unresolvable="true"/>注意两个都要加上ignore-unresolvable="true",一个加另一个不加也是不行的。


