首先,需要导入依赖,在SSM的基础上还需引入redis的依赖
      <!-- redis cache related.....start -->
      <dependency>
          <groupId>org.springframework.data</groupId>
          <artifactId>spring-data-redis</artifactId>
          <version>1.6.0.RELEASE</version>
      </dependency>
      <dependency>
          <groupId>redis.clients</groupId>
          <artifactId>jedis</artifactId>
          <version>2.7.3</version>
      </dependency>
      <!-- redis cache related.....end -->
将redis交给spring管理,在applicationContext.xml中引入Bean
    <!-- 配置RedisCacheConfig,命令规则以及自定义缓存设定 -->
    <bean id="redisCacheConfig" class="com.cod4man.fakenews.util.RedisCacheConfig">
        <constructor-arg ref="jedisConnectionFactory" />
        <constructor-arg ref="redisTemplate" />
        <constructor-arg ref="redisCacheManager" />
    </bean>
    <!-- redis config end -->
其中RedisCacheConfig为自定义类,代码如下:(需要继承CachingConfigurerSupport ,可以重写KeyGenerator来自定义键名称)
package com.cod4man.fakenews.util;

/**
 * Created with IntelliJ IDEA.
 *
 * @author 张鸿杰
 * Date:2019-04-16
 * Time:11:53
 */

import org.springframework.cache.annotation.CachingConfigurerSupport;
import org.springframework.cache.annotation.EnableCaching;
import org.springframework.cache.interceptor.KeyGenerator;
import org.springframework.context.annotation.Bean;
import org.springframework.context.annotation.Configuration;
import org.springframework.data.redis.cache.RedisCacheManager;
import org.springframework.data.redis.connection.jedis.JedisConnectionFactory;
import org.springframework.data.redis.core.RedisTemplate;

import java.lang.reflect.Method;

/**
 * 通过spring管理redis缓存配置
 *
 * @author Administrator
 *
 */
@Configuration
@EnableCaching //开启spring缓存注解
public class RedisCacheConfig extends CachingConfigurerSupport {
    private volatile JedisConnectionFactory jedisConnectionFactory;
    private volatile RedisTemplate<String, String> redisTemplate;
    private volatile RedisCacheManager redisCacheManager;

    public RedisCacheConfig() {
        super();
    }
    /**
     * 带参数的构造方法 初始化所有的成员变量
     *
     * @param jedisConnectionFactory
     * @param redisTemplate
     * @param redisCacheManager
     */
    public RedisCacheConfig(JedisConnectionFactory jedisConnectionFactory, RedisTemplate<String, String> redisTemplate,
                            RedisCacheManager redisCacheManager) {
        this.jedisConnectionFactory = jedisConnectionFactory;
        this.redisTemplate = redisTemplate;
        this.redisCacheManager = redisCacheManager;
    }

    public JedisConnectionFactory getJedisConnecionFactory() {
        return jedisConnectionFactory;
    }

    public RedisTemplate<String, String> getRedisTemplate() {
        return redisTemplate;
    }

    public RedisCacheManager getRedisCacheManager() {
        return redisCacheManager;
    }

    @Bean //重写了key的命令规则
    public KeyGenerator customKeyGenerator() {
        return new KeyGenerator() {
            @Override
            public Object generate(Object target, Method method, Object... objects) {
                StringBuilder sb = new StringBuilder();
                sb.append(target.getClass().getName());
                sb.append(method.getName());
                for (Object obj : objects) {
                    sb.append(obj.toString());
                }
                return sb.toString();
            }
        };
    }
}
RedisCacheConfig 该类中,需要三个参数
- JedisConnectionFactory:redis连接工厂,用来初始化一个redis连接参数以及创建RedisTemplate
- RedisTemplate<String, String> :redis模板,可以用来获取一些redis的操作方法,以及定义redis缓存序列化器,创建缓存管理器
- RedisCacheManager:redis缓存管理器,定义一些缓存设置(如缓存过期时间)等
配置RedisCacheManager:
    <!-- 配置RedisCacheManager -->
    <bean id="redisCacheManager" class="org.springframework.data.redis.cache.RedisCacheManager">
        <constructor-arg name="redisOperations" ref="redisTemplate" />
        <!--缓存过期时间-->
        <property name="defaultExpiration" value="${redis.expiration}" />
    </bean>
配置RedisTemplate(重写了默认序列化器为fastjson):
    <!-- 配置RedisTemplate -->
    <bean id="redisTemplate" class="org.springframework.data.redis.core.RedisTemplate">
        <property name="defaultSerializer" ref="newsCommentFastJsonRedisSerializer"/>
        <property name="connectionFactory" ref="jedisConnectionFactory"/>
    </bean>
    <!--配置fastjsonSerializalizer-->
    <bean id="newsCommentFastJsonRedisSerializer" class="com.cod4man.fakenews.util.FastJsonRedisSerializer">
        <constructor-arg name="chartset" value="UTF-8"/>
    </bean>
FastjsonSerializalizer序列化器:
package com.cod4man.fakenews.util;

import com.alibaba.fastjson.JSON;
import com.alibaba.fastjson.parser.ParserConfig;
import com.alibaba.fastjson.serializer.SerializerFeature;
import org.springframework.data.redis.serializer.RedisSerializer;
import org.springframework.data.redis.serializer.SerializationException;

import java.nio.charset.Charset;

/**
 * Created with IntelliJ IDEA.
 *
 * @author 张鸿杰
 * Date:2019-04-15
 * Time:20:24
 */

public class FastJsonRedisSerializer<T> implements RedisSerializer<T> {
    private Charset DEFAULT_CHARSET ;

    public FastJsonRedisSerializer() {
        DEFAULT_CHARSET = Charset.forName("UTF-8");
    }
    /**
     * 可自定义反序列化编码,默认为UTF-8
     * @param chartset 字符编码
     * @return
     * @author zhj
     * @creed: Talk is cheap,show me the code
     * @date 2019/4/16
     */
    public FastJsonRedisSerializer(String chartset) {
        DEFAULT_CHARSET = Charset.forName(chartset);
    }

    static {
         //开启AutoType
        ParserConfig.getGlobalInstance().setAutoTypeSupport(true);
//      ParserConfig.getGlobalInstance().addAccept("com.codeman");
    }
    @Override
    public byte[] serialize(T t) throws SerializationException {
        if (t == null) {
            return new byte[0];
        }
        try {
            return JSON.toJSONBytes(t, SerializerFeature.WriteClassName);
        } catch (Exception ex) {
            throw new SerializationException("Could not write JSON: " + ex.getMessage(), ex);
        }
    }

    @Override
    public T deserialize(byte[] bytes) throws SerializationException {
        String data = new String(bytes, DEFAULT_CHARSET);
        T result = (T) JSON.parse(data);
        return result;

    }
}
配置JedisConnectionFactory:
    <!-- 配置JedisPoolConfig实例 -->
    <bean id="poolConfig" class="redis.clients.jedis.JedisPoolConfig">
        <property name="maxIdle" value="${redis.maxIdle}" />
        <property name="maxTotal" value="${redis.maxActive}" />
        <property name="maxWaitMillis" value="${redis.maxWait}" />
        <property name="testOnBorrow" value="${redis.testOnBorrow}" />
    </bean>

    <!-- 配置JedisConnectionFactory -->
    <bean id="jedisConnectionFactory"
          class="org.springframework.data.redis.connection.jedis.JedisConnectionFactory">
        <property name="hostName" value="${redis.host}" />
        <property name="port" value="${redis.port}" />
        <!-- <property name="password" value="${redis.pass}" /> -->
        <property name="database" value="${redis.dbIndex}" />
        <property name="poolConfig" ref="poolConfig" />
    </bean>
Service使用注解@cachable()
    @Cacheable(cacheNames = "NewsComment")
    @Override
    public List<NewsComment> findCommentsByNewsId(long newsId) {
        System.out.println("查看什么");
        return newsCommentMapper.findCommentsByNewsId(newsId);
    }
http://localhost:8080/news.do/commentView/7 //查询7号新闻评论
控制台:
查看什么//只有首次查询显示
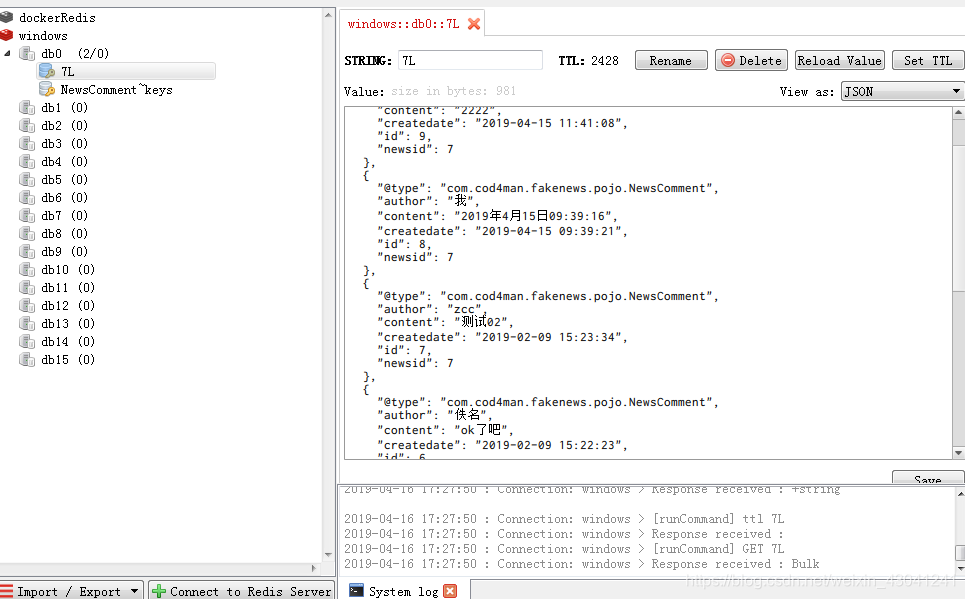
Redis仓库:显示为json格式数据

虽然使用Spring注解来指定缓存非常方便,但是想要进行非常详细、系统的设计缓存数据结构,仅仅使用自带注解还是完全不够的。我的下一篇博客,将会使用自定义注解来详细的定制缓存数据结构:
https://blog.csdn.net/weixin_43041241/article/details/89345139
·
·
·
·
·
·
·
···
·
··
·
参考: https://blog.csdn.net/moshowgame/article/details/83246363
http://www.cnblogs.com/hello-daocaoren/p/7891907.html