自定义属性
application.properties提供自定义属性的支持,这样我们就可以把一些常量配置在这里:
#自定义属性
com.waiting.custom.one=自定义属性ONE
com.waiting.custom.two=自定义属性TWO
com.waiting.custom.three=3然后直接在要使用的地方通过注解@Value(value="${config.name}")取出:
@RestController
public class HelloController {

    public final static Logger logger = LoggerFactory.getLogger(HelloController.class);

    @Value("${com.waiting.custom.one}")
    private String stringOne;
    @Value("${com.waiting.custom.two}")
    private String stringTwo;
    @Value("${com.waiting.custom.three}")
    private Integer integerThree;

    @RequestMapping(value = "/",name = "Hello")
    public String testHello(){
        logger.info("logback-ok");
        return "Hello Spring-boot!"+stringOne+stringTwo+integerThree;
    }
 }
使用随机数及自定义配置类
有时候我们需要我们的参数不是一个固定值,而是一个随机数(比如密钥)。Spring Boot的属性配置文件中可以通过${random}来产生int值、long值或者String字符串,来支持属性的随机值。
#随机字符串
com.waiting.random.str=${random.value}
#随机int
com.waiting.random.number=${random.int}
#随机long
com.waiting.random.bigNumber=${random.long}
#10以内的随机数
com.waiting.random.test1=${random.int(10)}
#10-20的随机数
com.waiting.random.test2=${random.int[10,20]}在这边配置中我们发现有一个特点,所有配置都是以"com.waiting.random"开头的,而且有时候属性太多了,一个个绑定到属性字段上太累,官方提倡绑定一个对象的bean,这里我们建一个RandomProperties .java类,顶部需要使用注解@ConfigurationProperties(prefix = "com.waiting.random")来进行声明:
//@Configuration
//@Component
@ConfigurationProperties(prefix = "com.waiting.random")
public class RandomProperties {

    private String str;
    private Integer number;
    private Long bigNumber;
    private Integer test1;
    private Integer test2;

    // getter/setter方法省略

 }
此时配置完还需要在spring Boot入口类加上@EnableConfigurationProperties并指明要加载哪个bean,如果不写RandomProperties.class,在bean类那边添加@Configuration或者@Component
@SpringBootApplication
@EnableConfigurationProperties({RandomProperties.class})
public class SpringbootdemoApplication {

    public static void main(String[] args) {
        SpringApplication.run(SpringbootdemoApplication.class, args);
    }
}
把所有的自定义配置都放在application.properties里面会显得臃肿,这时候我们可以另外定义一个配置文件,这里我明取名为random.properties,路径放在src/main/resources/waiting下面。
这里只需要在之前的bean RandomProperties上添加@PropertySource("classpath:waiting/random.properties") 和@Configuration这个注解就可以了。
注意:不能再采取之前的@EnableConfigurationProperties({RandomProperties.class})这个方法。
最后controller层或service获取的时候用@Autowired注解就可以获取。
@Autowired
private RandomProperties randomProperties;
@Value("${com.waiting.custom.one}")
private String stringOne;
@Value("${com.waiting.custom.two}")
private String stringTwo;
@Value("${com.waiting.custom.three}")
private Integer integerThree;
@RequestMapping(value = "/",name = "Hello")
public String testHello(){
logger.info("logback-ok");
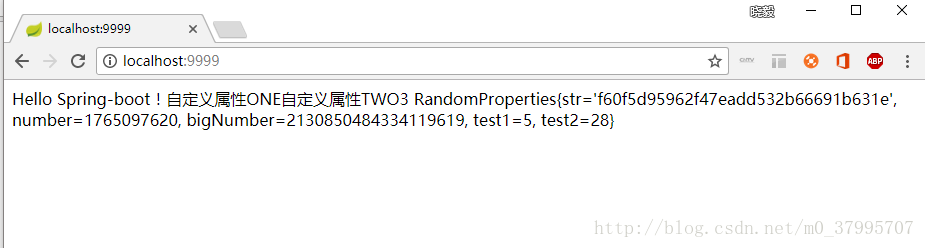
return "Hello Spring-boot!"+stringOne+stringTwo+integerThree+"\r"+randomProperties;
}
中文乱码问题
当在.properties的配置文件中有中文时,读取出来的是乱码。需要进行如下操作:
1、添加配置
#设置spring-boot 编码格式
banner.charset=UTF-8
server.tomcat.uri-encoding=UTF-8
spring.http.encoding.charset=UTF-8
spring.http.encoding.enabled=true
spring.http.encoding.force=true
spring.messages.encoding=UTF-8
2、设置文件类型
将application.properites的文件类型修改为UTF-8的编码类型。
通过以上方法测试获取出来的值还是乱码。
解决办法
2.1、IDEA
设置 File Encodings的Transparent native-to-ascii conversion为true,具体步骤如下:
依次点击
File -> Settings -> Editor -> File Encodings
将Properties Files (*.properties)下的Default encoding for properties files设置为UTF-8,将Transparent native-to-ascii conversion前的勾选上。
2.2、eclipse
在eclipse中安装properties插件PropertiesEditor及设置(附图),ASCII码转换成中文
推荐使用里面的离线安装。安装完成PropertiesEditor 插件后,使用该编辑器重新编辑属性文件中的中文,然后重新运行程序,发现读取的中文配置文件不是乱码了。