版权声明:本文为博主原创文章,未经博主允许不得转载。 https://blog.csdn.net/qq_34536167/article/details/78946437
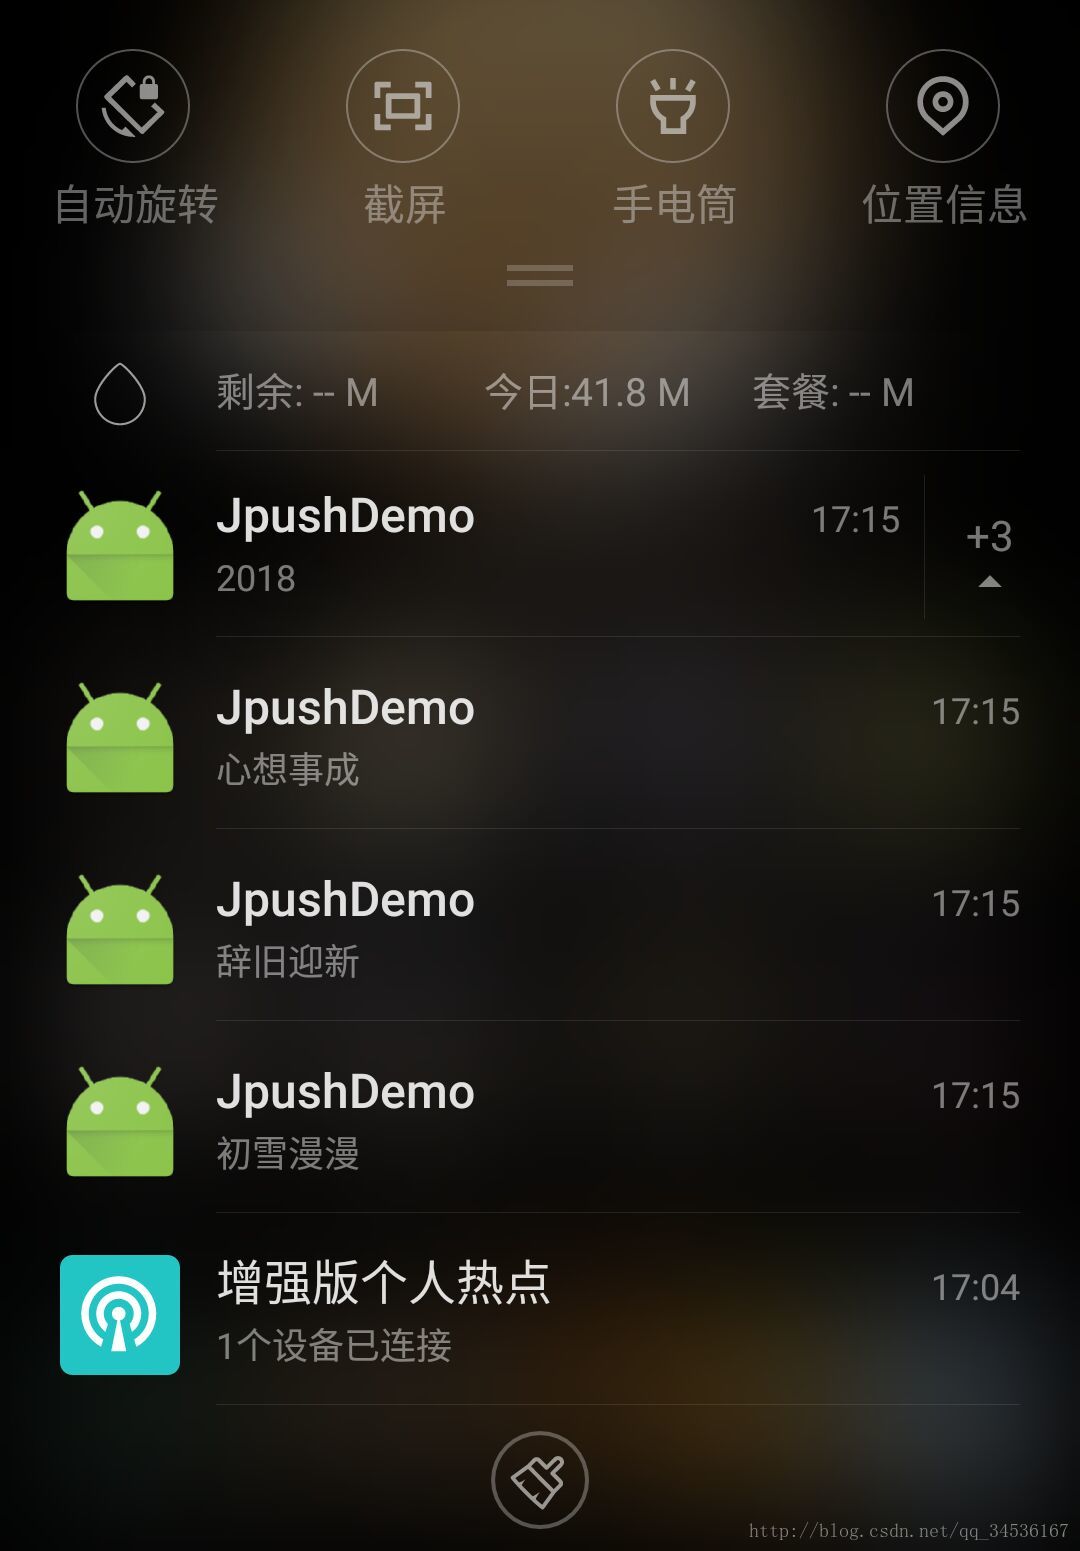
效果图:
前言:上一篇极光是7月份集成的,到12月份自己照着来发现很多方法用不了和过时了,同时写的十分臃肿,这次再次集成只需10分钟!
版本记录:
1、jcore:1.1.1 jpush:3.0.3 时间:2017-08-01
2、jcore:1.1.8 jpush:3.1.0 时间:2018-01-01
1、先下载极光SDK
地址:https://docs.jiguang.cn/jpush/resources/
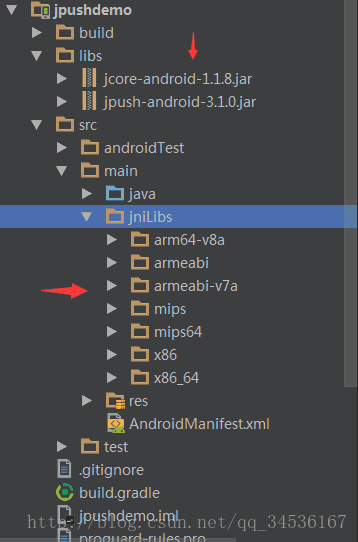
解压后进入libs将jar复制到项目libs文件夹下,main新建jniLibs文件夹注意与java平级,将要依赖的so库复制进去,也可同时放入libs下(注意jar右键Add As Library)
2、AndroidManifest清单文件配置
<?xml version="1.0" encoding="utf-8"?>
<manifest xmlns:android="http://schemas.android.com/apk/res/android"
    package="com.helloworld.jpushdemo">

    <permission
        android:name="com.helloworld.jpushdemo.permission.JPUSH_MESSAGE"
        android:protectionLevel="signature" />

    <!-- 要求 -->
    <uses-permission android:name="android.permission.INTERNET"/>
    <uses-permission android:name="com.helloworld.jpushdemo.permission.JPUSH_MESSAGE" />
    <uses-permission android:name="android.permission.RECEIVE_USER_PRESENT" />
    <uses-permission android:name="android.permission.ACCESS_NETWORK_STATE" />
    <uses-permission android:name="android.permission.WAKE_LOCK" />
    <uses-permission android:name="android.permission.VIBRATE" />
    <uses-permission android:name="android.permission.MOUNT_UNMOUNT_FILESYSTEMS" />
    <uses-permission android:name="android.permission.WRITE_SETTINGS" />
    <!-- 用于开启 debug 版本的应用在6.0 系统上 层叠窗口权限 -->
    <uses-permission android:name="android.permission.SYSTEM_ALERT_WINDOW" />
    <uses-permission android:name="android.permission.CHANGE_NETWORK_STATE" />
    <uses-permission android:name="android.permission.REAL_GET_TASKS" />

    <application
        android:name=".MyAppaction"
        android:allowBackup="true"
        android:icon="@mipmap/ic_launcher"
        android:label="@string/app_name"
        android:roundIcon="@mipmap/ic_launcher_round"
        android:supportsRtl="true"
        android:theme="@style/AppTheme">
        <activity android:name=".MainActivity">
            <intent-filter>
                <action android:name="android.intent.action.MAIN" />

                <category android:name="android.intent.category.LAUNCHER" />
            </intent-filter>
        </activity>

        <!-- Required SDK 核心功能-->
        <!-- 可配置android:process参数将PushService放在其他进程中 -->
        <service
            android:name="cn.jpush.android.service.PushService"
            android:enabled="true"
            android:exported="false" >
            <intent-filter>
                <action android:name="cn.jpush.android.intent.REGISTER" />
                <action android:name="cn.jpush.android.intent.REPORT" />
                <action android:name="cn.jpush.android.intent.PushService" />
                <action android:name="cn.jpush.android.intent.PUSH_TIME" />
            </intent-filter>
        </service>

        <!-- since 3.0.9 Required SDK 核心功能-->
        <provider
            android:authorities="com.helloworld.jpushdemo.DataProvider"
            android:name="cn.jpush.android.service.DataProvider"
            android:exported="true" />

        <!-- since 1.8.0 option 可选项。用于同一设备中不同应用的JPush服务相互拉起的功能。 -->
        <!-- 若不启用该功能可删除该组件,将不拉起其他应用也不能被其他应用拉起 -->
        <service
            android:name="cn.jpush.android.service.DaemonService"
            android:enabled="true"
            android:exported="true">
            <intent-filter >
                <action android:name="cn.jpush.android.intent.DaemonService" />
                <category android:name="com.helloworld.jpushdemo"/>
            </intent-filter>
        </service>

        <!-- Required SDK核心功能-->
        <receiver
            android:name="cn.jpush.android.service.PushReceiver"
            android:enabled="true" >
            <intent-filter android:priority="1000">
                <action android:name="cn.jpush.android.intent.NOTIFICATION_RECEIVED_PROXY" />
                <category android:name="com.helloworld.jpushdemo"/>
            </intent-filter>
            <intent-filter>
                <action android:name="android.intent.action.USER_PRESENT" />
                <action android:name="android.net.conn.CONNECTIVITY_CHANGE" />
            </intent-filter>
            <!-- Optional -->
            <intent-filter>
                <action android:name="android.intent.action.PACKAGE_ADDED" />
                <action android:name="android.intent.action.PACKAGE_REMOVED" />
                <data android:scheme="package" />
            </intent-filter>
        </receiver>

        <!-- Required SDK核心功能-->
        <activity
            android:name="cn.jpush.android.ui.PushActivity"
            android:configChanges="orientation|keyboardHidden"
            android:theme="@android:style/Theme.NoTitleBar"
            android:exported="false" >
            <intent-filter>
                <action android:name="cn.jpush.android.ui.PushActivity" />
                <category android:name="android.intent.category.DEFAULT" />
                <category android:name="com.helloworld.jpushdemo" />
            </intent-filter>
        </activity>

        <!-- Required SDK核心功能-->
        <receiver android:name="cn.jpush.android.service.AlarmReceiver" />

        <!-- Required since 3.0.7 -->
        <!-- 新的tag/alias接口结果返回需要开发者配置一个自定的广播 -->
        <!-- 该广播需要继承JPush提供的JPushMessageReceiver类, 并如下新增一个 Intent-Filter -->
        <receiver
            android:name=".MyJPushMessageReceiver"
            android:enabled="true" >
            <intent-filter>
                <action android:name="cn.jpush.android.intent.RECEIVE_MESSAGE" />
                <category android:name="com.helloworld.jpushdemo" />
            </intent-filter>
        </receiver>

        <!-- User defined. 用户自定义的广播接收器-->
        <receiver
            android:name=".MyReceiver"
            android:enabled="true">
            <intent-filter>
                <!--Required 用户注册SDK的intent-->
                <action android:name="cn.jpush.android.intent.REGISTRATION" />
                <!--Required 用户接收SDK消息的intent-->
                <action android:name="cn.jpush.android.intent.MESSAGE_RECEIVED" />
                <!--Required 用户接收SDK通知栏信息的intent-->
                <action android:name="cn.jpush.android.intent.NOTIFICATION_RECEIVED" />
                <!--Required 用户打开自定义通知栏的intent-->
                <action android:name="cn.jpush.android.intent.NOTIFICATION_OPENED" />
                <!-- 接收网络变化 连接/断开 since 1.6.3 -->
                <action android:name="cn.jpush.android.intent.CONNECTION" />
                <category android:name="com.helloworld.jpushdemo" />
            </intent-filter>
        </receiver>

        <!-- 设置 AppKey -->
        <meta-data android:name="JPUSH_APPKEY" android:value="b6fe630e2bce584839547ce0"/>

    </application>
</manifest>
提示:
注意包名的更换,分别在第6、54、66、76、99、114、133以及138(AppKey)的替换
3、MyAppaction
package com.helloworld.jpushdemo;

import android.app.Application;
import cn.jpush.android.api.JPushInterface;

public class MyAppaction extends Application {

    @Override
    public void onCreate() {
        super.onCreate();
        //TODO: 设置开启日志,发布时请关闭日志
        JPushInterface.setDebugMode(false);
        //初始化极光推送
        JPushInterface.init(this);
    }
}
4、MyJPushMessageReceiver
扫描二维码关注公众号,回复:
3059467 查看本文章

package com.helloworld.jpushdemo;

import android.content.Context;
import android.util.Log;

import cn.jpush.android.api.JPushMessage;
import cn.jpush.android.service.JPushMessageReceiver;

/**
 * 状态回调
 */

public class MyJPushMessageReceiver extends JPushMessageReceiver {

    private static final String TAG = "MyJPushMessageReceiver";

    /**
     * tag增删查改的操作会在此方法中回调结果
     */
    @Override
    public void onTagOperatorResult(Context context, JPushMessage jPushMessage) {
        super.onTagOperatorResult(context, jPushMessage);
        //下面2个回调类似
        Log.e(TAG, "onTagOperatorResult查询得到的别名: " + jPushMessage.getAlias());
        Log.e(TAG, "onTagOperatorResult查询得到的标签: " + jPushMessage.getTags());
        Log.e(TAG, "onTagOperatorResult错误码0为成功: " + jPushMessage.getErrorCode());
        Log.e(TAG, "onTagOperatorResult传入的标示: " + jPushMessage.getSequence());
    }

    /**
     * 查询某个tag与当前用户的绑定状态的操作会在此方法中回调结果
     */
    @Override
    public void onCheckTagOperatorResult(Context context, JPushMessage jPushMessage) {
        super.onCheckTagOperatorResult(context, jPushMessage);
        Log.e(TAG, "onCheckTagOperatorResult错误码0为成功: " + jPushMessage.getErrorCode());
    }

    /**
     * alias相关的操作会在此方法中回调结果
     */
    @Override
    public void onAliasOperatorResult(Context context, JPushMessage jPushMessage) {
        super.onAliasOperatorResult(context, jPushMessage);
        Log.e(TAG, "onAliasOperatorResult错误码0为成功: " + jPushMessage.getErrorCode());
    }
}
5、MyReceiver
package com.helloworld.jpushdemo;

import android.content.BroadcastReceiver;
import android.content.Context;
import android.content.Intent;
import android.os.Bundle;
import android.util.Log;

import cn.jpush.android.api.JPushInterface;

/**
 * 自定义广播接收器
 */
public class MyReceiver extends BroadcastReceiver {

    private static final String TAG = "MyReceiver";

    @Override
    public void onReceive(Context context, Intent intent) {
        Bundle bundle = intent.getExtras();
        if (JPushInterface.ACTION_REGISTRATION_ID.equals(intent.getAction())) {

            String regId = bundle.getString(JPushInterface.EXTRA_REGISTRATION_ID);
            Log.e(TAG, "JPush用户注册成功id: " + regId);
        } else if (JPushInterface.ACTION_MESSAGE_RECEIVED.equals(intent.getAction())) {

            Log.e(TAG, "接受到推送下来的自定义消息id: " + bundle.getString(JPushInterface.EXTRA_MESSAGE));
        } else if (JPushInterface.ACTION_NOTIFICATION_RECEIVED.equals(intent.getAction())) {

            int notifactionId = bundle.getInt(JPushInterface.EXTRA_NOTIFICATION_ID);
            Log.e(TAG, "接受到推送下来的通知id: " + notifactionId);
        } else if (JPushInterface.ACTION_NOTIFICATION_OPENED.equals(intent.getAction())) {

//                Intent i = new Intent(context, TestActivity.class);
//                i.putExtras(bundle);
//                i.setFlags(Intent.FLAG_ACTIVITY_NEW_TASK);
//                context.startActivity(i);
            Log.e(TAG, "用户点击打开了通知跳转的Activity: ");
        } else if (JPushInterface.ACTION_RICHPUSH_CALLBACK.equals(intent.getAction())) {

            Log.e(TAG, "onReceive: " + bundle.getString(JPushInterface.EXTRA_EXTRA));
        } else if (JPushInterface.ACTION_CONNECTION_CHANGE.equals(intent.getAction())) {
            boolean connected = intent.getBooleanExtra(JPushInterface.EXTRA_CONNECTION_CHANGE, false);

            Log.e(TAG, "onReceive: " + intent.getAction() + " 连接状态变化 " + connected);
        } else {
            Log.e(TAG, "onReceive:  未处理的意图- " + intent.getAction());
        }
    }
}
提示:其中关于接受到的具体参数可参考原来那篇文章!
6、NotificationsUtils(网上找的)
package com.helloworld.jpushdemo;

import android.annotation.SuppressLint;
import android.app.AppOpsManager;
import android.content.Context;
import android.content.pm.ApplicationInfo;

import java.lang.reflect.Field;
import java.lang.reflect.InvocationTargetException;
import java.lang.reflect.Method;

/**
 * 判断通知栏是否开启
 */

public class NotificationsUtils {

    private static final String CHECK_OP_NO_THROW = "checkOpNoThrow";
    private static final String OP_POST_NOTIFICATION = "OP_POST_NOTIFICATION";

    @SuppressLint("NewApi")
    public static boolean isNotificationEnabled(Context context) {
        AppOpsManager mAppOps = (AppOpsManager) context.getSystemService(Context.APP_OPS_SERVICE);
        ApplicationInfo appInfo = context.getApplicationInfo();
        String pkg = context.getApplicationContext().getPackageName();
        int uid = appInfo.uid;
        Class appOpsClass = null;
        try {
            appOpsClass = Class.forName(AppOpsManager.class.getName());
            Method checkOpNoThrowMethod = appOpsClass.getMethod(CHECK_OP_NO_THROW, Integer.TYPE, Integer.TYPE, String.class);
            Field opPostNotificationValue = appOpsClass.getDeclaredField(OP_POST_NOTIFICATION);
            int value = (Integer) opPostNotificationValue.get(Integer.class);
            return ((Integer) checkOpNoThrowMethod.invoke(mAppOps, value, uid, pkg) == AppOpsManager.MODE_ALLOWED);
        } catch (ClassNotFoundException e) {
            e.printStackTrace();
        } catch (NoSuchMethodException e) {
            e.printStackTrace();
        } catch (NoSuchFieldException e) {
            e.printStackTrace();
        } catch (InvocationTargetException e) {
            e.printStackTrace();
        } catch (IllegalAccessException e) {
            e.printStackTrace();
        }
        return false;
    }
}
7、MainActivity(代码非常少)
package com.helloworld.jpushdemo;

import android.content.Intent;
import android.provider.Settings;
import android.support.v7.app.AppCompatActivity;
import android.os.Bundle;
import android.util.Log;

import java.util.HashSet;
import java.util.Set;

import cn.jpush.android.api.JPushInterface;
import cn.jpush.android.api.JPushMessage;

/**
 * 文档:https://docs.jiguang.cn/jpush/client/Android/android_api/
 */
public class MainActivity extends AppCompatActivity {

    private static final String TAG = "MainActivity";

    @Override
    protected void onCreate(Bundle savedInstanceState) {
        super.onCreate(savedInstanceState);
        setContentView(R.layout.activity_main);

        if (NotificationsUtils.isNotificationEnabled(this)) {
            Log.e(TAG, "onCreate: 通知权限 已开启");
            setBasicSetup(1);
            setBasicSetup(4);
        } else {
            Log.e(TAG, "onCreate: 通知权限 未开启");
            //提示用户去设置,跳转到应用信息界面
            Intent intent = new Intent(Settings.ACTION_SETTINGS);
            startActivity(intent);
        }
    }

    /**
     * 1-2-3-4
     * 增、删、改、查
     */
    public void setBasicSetup(int type) {
        if (type == 1) {
            //设置别名(新的调用会覆盖之前的设置)
            JPushInterface.setAlias(this, 0, "0x123");
            //设置标签(同上)
            JPushInterface.setTags(this, 0, setUserTags());
        } else if (type == 2) {
            //删除别名
            JPushInterface.deleteAlias(this, 0);
            //删除指定标签
            JPushInterface.deleteTags(this, 0, setUserTags());
            //删除所有标签
            JPushInterface.cleanTags(this, 0);
        } else if (type == 3) {
            //增加tag用户量(一般都是登录成功设置userid为目标,在别处新增加比较少见)
            JPushInterface.addTags(this, 0, setUserTags());
        } else if (type == 4) {
            //查询所有标签
            JPushInterface.getAllTags(this, 0);
            //查询别名
            JPushInterface.getAlias(this, 0);
            //查询指定tag与当前用户绑定的状态(MyJPushMessageReceiver获取)
            JPushInterface.checkTagBindState(this, 0, "0x123");
            //获取注册id
            JPushInterface.getRegistrationID(this);
        }
    }

    /**
     * 标签用户
     */
    private static Set<String> setUserTags() {
        //添加3个标签用户(获取登录userid较为常见)
        Set<String> tags = new HashSet<>();
        tags.add("0x123");
        tags.add("0x124");
        tags.add("0x125");
        return tags;
    }
}
提示:其中activity_main中什么都没有使用的是默认的
8、来到极光后台进行推送,点击立即发送就能收到通知了
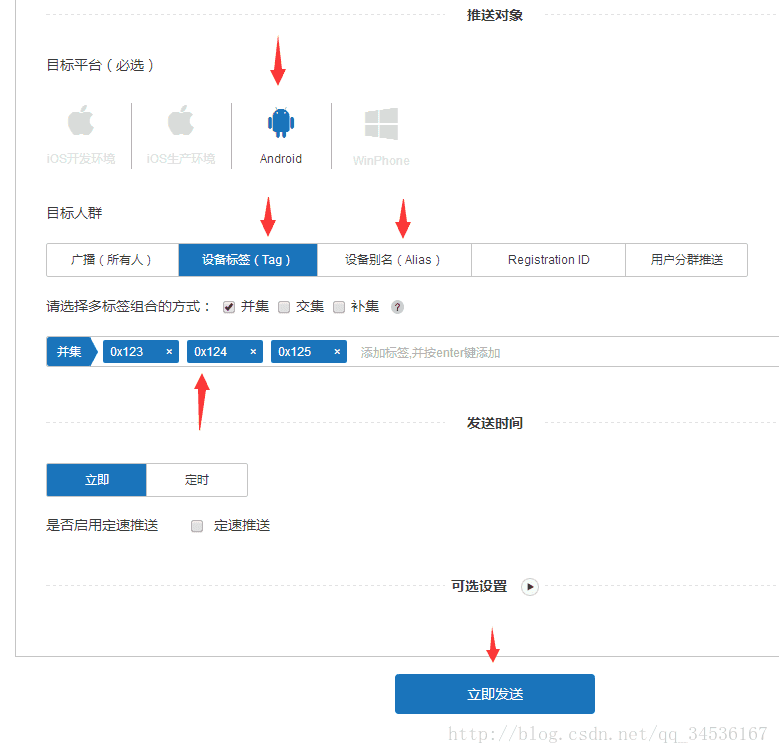
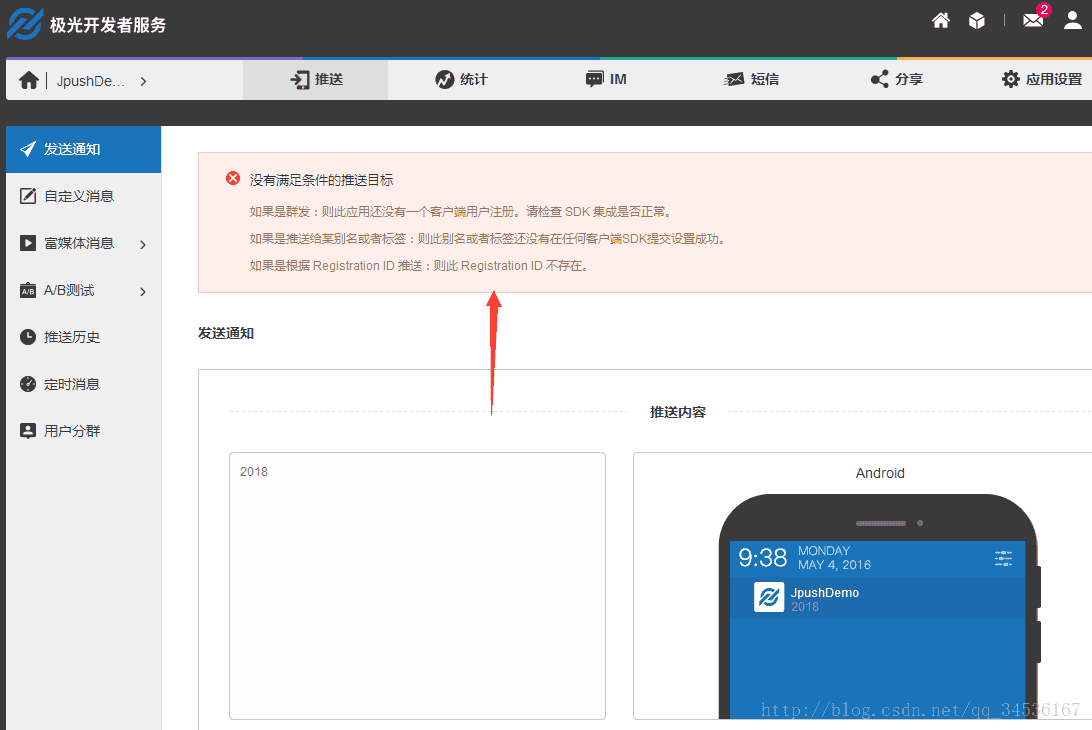
补充:如果出现下图状况说明标签或别名设置失败,检查失败原因
这样算下来5分钟即可集成推送,多、快、好、省!