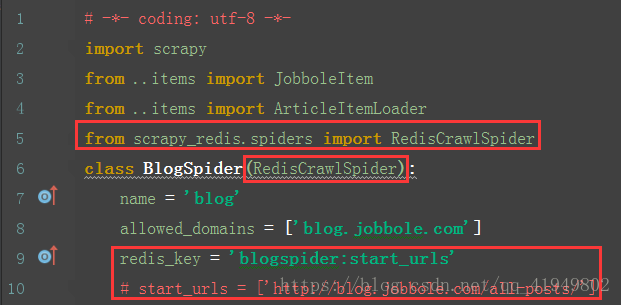
将单机爬虫jobbole修改为分布式爬虫
伯乐在线爬虫如下:
blog.py
# -*- coding: utf-8 -*-
import scrapy
from ..items import JobboleItem
from ..items import ArticleItemLoader

class BlogSpider(scrapy.Spider):
    name = 'blog'
    allowed_domains = ['blog.jobbole.com']
    start_urls = ['http://blog.jobbole.com/all-posts/']

    # 需求:获取所有文章的标题  图片地址 时间 详情页地址 收藏 点赞 评论
    def parse(self, response):
        item_list = response.xpath('//div[@class="post floated-thumb"]')
        for item in item_list :
            img = item.xpath('.//div[@class="post-thumb"]/a/img/@src').extract_first('')
            url = item.xpath('.//a[@class="archive-title"]/@href').extract_first('')
            yield  scrapy.Request(url=url,meta={'img':img},callback=self.get_detail_with_url)

        # next_url = response.xpath('//a[@class="next page-numbers"]/@href').extract()
        # if len(next_url) != 0 :
        #     page_url = next_url[0]
        #     yield scrapy.Request(url=page_url,callback=self.parse)

    def get_detail_with_url(self ,response):
        # img = response.meta['img']
        # # 标题
        # title = response.xpath('//div[@class="entry-header"]/h1/text()').extract_first('')
        # #时间
        # date_time = response.xpath('//div[@class="entry-meta"]/p/text()').extract_first('')
        # time = date_time.split('·')[0].strip()
        #
        # # 详情页地址
        # detail_url = response.url
        #
        # # 点赞数
        # dian_zan = response.xpath('//h10/text()').extract_first('')
        #
        # # 收藏数
        # book_mark = response.xpath('//span[contains(@class,"bookmark-btn")]/text()').extract_first('')
        #
        # book_mark_array = book_mark.split(' ')
        # book_mark_num = 0
        # if len(book_mark_array[1]) != 0:
        #     book_mark_num = int(book_mark_array[1])
        #
        # # 评论数
        # comment = response.xpath('//a[@href="#article-comment"]/span/text()').extract_first('')
        # comment_arr = comment.split(' ')
        # comment_num = 0
        # if len(comment_arr[1]) != 0:
        #     comment_num = int(comment_arr[1])
        #
        # item = JobboleItem()
        # item['img'] = img
        # item['title'] = title
        # item['detail_url'] = detail_url
        # item['date_time'] = time
        # item['dian_zan'] = dian_zan
        # item['book_mark'] = book_mark_num
        # item['comment'] = comment_num


        # 创建ItemLoader的实例化对象的时候
        # 需要传入两个参数
        # 参数1:item的实例化对象 item里面为还要提取的数据的字段
        # 参数2:网页的源码
        item_loader  = ArticleItemLoader(item=JobboleItem(),response=response)
        # add_xpath()用于给一个field设置值
        # 后面需要追加两个参数
        # 参数1;需要设置的field的名称
        # 参数2:xpath路径
        item_loader.add_xpath('title','//div[@class="entry-header"]/h1/text()')

        item_loader.add_xpath('date_time','//div[@class="entry-meta"]/p/text()')

        item_loader.add_xpath('dian_zan','//div[@class="post-adds"]//h10/text()')

        item_loader.add_xpath('book_mark','//span[contains(@class,"bookmark-btn")]/text()')

        item_loader.add_xpath('comment','//a[@href="#article-comment"]/span/text()')

        item_loader.add_value('img',[response.meta['img']])

        item_loader.add_value('detail_url',response.url)
        # 将itemloader加载器中保存的每一个field数据收集起来
        # 赋值给item 并且返回到管道
        item = item_loader.load_item()

        yield item
items.py
# -*- coding: utf-8 -*-

# Define here the models for your scraped items
#
# See documentation in:
# https://doc.scrapy.org/en/latest/topics/items.html

import scrapy
from scrapy.loader import ItemLoader
from scrapy.loader.processors import MapCompose ,TakeFirst
import re
# itemload是分离数据的另外一种方式 使用itemloader加载器
# 有这样一些优势:
# 1.默认使用xpath()/css()这种数据提取方式
#  是将数据的提取和数据的过滤等过程放在一个函数中
#  采用itemloader这种数据加载方式
#  可以将数据的提取和分离分成两部分
#  让代码更加清晰,代码更加整洁
# 2.可以将数据的处理函数,单独定义
#  也可以对一个数据使用多个处理函数
#  这样的话对代码的重用有着非常好的实现

def changeTitle(value):
    value = '标题:' + value
    return value
def getNewTime(value):
    newTime = value.split('·')[0]
    newTime = newTime.strip()
    return newTime
def getNum(value):
    pattern = re.compile(r'\d+')
    result = re.findall(pattern , value)
    if result :
        return  int(result[0])
    else :
        return 0
# 使用itemloader的话 需要先继承itemloadder
class ArticleItemLoader(ItemLoader):
    # default_output_processor 设置输出内容的类型
    # TakeFirst获取所有数据当中的第一条数据
    # 默认返回的数据为一个列表  列表当中有一条数据
    # default_output_processor = ItemLoader.default_output_processor
    default_output_processor = TakeFirst()

    # list = ['hello world']
    #
    # list = list
    #
    # list = list[0]

class JobboleItem(scrapy.Item):
    # define the fields for your item here like:
    img = scrapy.Field()
    title = scrapy.Field(
        # 如果函数以Map...开头 那么内部很大可能是一个可迭代对象
        # 在此处  MapCompose括号里面可以追加多个参数 每个参数都是一个函数
        # 那么获取的内容 会依次进入到每个函数当中被执行
        # title   map-reduce
        input_processor = MapCompose(changeTitle ,lambda x : x+'------------------')
    )
    date_time = scrapy.Field(
        input_processor = MapCompose(getNewTime)
    )
    detail_url = scrapy.Field(

    )
    dian_zan = scrapy.Field(

    )
    book_mark = scrapy.Field(
        input_processor = MapCompose(getNum)
    )
    comment = scrapy.Field(
        input_processor=MapCompose(getNum)
    )
pipelines.py
# -*- coding: utf-8 -*-

# Define your item pipelines here
#
# Don't forget to add your pipeline to the ITEM_PIPELINES setting
# See: https://doc.scrapy.org/en/latest/topics/item-pipeline.html

import pymysql
from scrapy.pipelines.images import  ImagesPipeline
class JobbolePipeline(object):
    # def __init__(self):
    #     # localhost
    #     self.connect = pymysql.connect(host='localhost',
    #                                    user='root',
    #                                    password='123456',
    #                                    db='jobbole',
    #                                    port=3306)
    #     self.cursor = self.connect.cursor()
    def process_item(self, item, spider):

        # self.cursor.execute('insert into blog (img , title ,detail_url ,time ,dian_zan,book_mark,comment) VALUES ("{}","{}","{}","{}","{}","{}","{}")'.
        #                     format(item['img'],item['title'],item['detail_url'],item['date_time'],item['dian_zan'],item['book_mark'],item['comment']))
        #
        # self.connect.commit()

        return item
    # def close_spider(self ,spider):
    #     self.cursor.close()
    #     self.connect.close()
class jobboleDownImage(ImagesPipeline):
    def get_media_requests(self, item, info):
        pass
        # 用来下载图片 使用图片链接
    def file_path(self, request, response=None, info=None):
        path = ''
        return path

# def test(a=1,b=2):
#
#     print('123')
# test(1,2)
# test(b=2 ,a = 1)
settings.py
# -*- coding: utf-8 -*-
# Scrapy settings for jobbole project
#
# For simplicity, this file contains only settings considered important or
# commonly used. You can find more settings consulting the documentation:
#
# https://doc.scrapy.org/en/latest/topics/settings.html
# https://doc.scrapy.org/en/latest/topics/downloader-middleware.html
# https://doc.scrapy.org/en/latest/topics/spider-middleware.html
BOT_NAME = 'jobbole'
SPIDER_MODULES = ['jobbole.spiders']
NEWSPIDER_MODULE = 'jobbole.spiders'
# Crawl responsibly by identifying yourself (and your website) on the user-agent
#USER_AGENT = 'jobbole (+http://www.yourdomain.com)'
# Obey robots.txt rules
ROBOTSTXT_OBEY = False
# Configure maximum concurrent requests performed by Scrapy (default: 16)
#CONCURRENT_REQUESTS = 32
# Configure a delay for requests for the same website (default: 0)
# See https://doc.scrapy.org/en/latest/topics/settings.html#download-delay
# See also autothrottle settings and docs
#DOWNLOAD_DELAY = 3
# The download delay setting will honor only one of:
#CONCURRENT_REQUESTS_PER_DOMAIN = 16
#CONCURRENT_REQUESTS_PER_IP = 16
# Disable cookies (enabled by default)
#COOKIES_ENABLED = False
# Disable Telnet Console (enabled by default)
#TELNETCONSOLE_ENABLED = False
# Override the default request headers:
#DEFAULT_REQUEST_HEADERS = {
# 'Accept': 'text/html,application/xhtml+xml,application/xml;q=0.9,*/*;q=0.8',
# 'Accept-Language': 'en',
#}
# Enable or disable spider middlewares
# See https://doc.scrapy.org/en/latest/topics/spider-middleware.html
#SPIDER_MIDDLEWARES = {
# 'jobbole.middlewares.JobboleSpiderMiddleware': 543,
#}
# Enable or disable downloader middlewares
# See https://doc.scrapy.org/en/latest/topics/downloader-middleware.html
#DOWNLOADER_MIDDLEWARES = {
# 'jobbole.middlewares.JobboleDownloaderMiddleware': 543,
#}
# Enable or disable extensions
# See https://doc.scrapy.org/en/latest/topics/extensions.html
#EXTENSIONS = {
# 'scrapy.extensions.telnet.TelnetConsole': None,
#}
# Configure item pipelines
# See https://doc.scrapy.org/en/latest/topics/item-pipeline.html
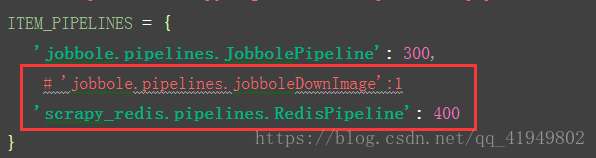
ITEM_PIPELINES = {
'jobbole.pipelines.JobbolePipeline': 300,
# 'jobbole.pipelines.jobboleDownImage':1
}
# IMAGES_STORE = ''
# scrapy crawl blog -o wenfeng.json -s FEED_EXPORT_ENCODEING=utf-8
# Enable and configure the AutoThrottle extension (disabled by default)
# See https://doc.scrapy.org/en/latest/topics/autothrottle.html
#AUTOTHROTTLE_ENABLED = True
# The initial download delay
#AUTOTHROTTLE_START_DELAY = 5
# The maximum download delay to be set in case of high latencies
#AUTOTHROTTLE_MAX_DELAY = 60
# The average number of requests Scrapy should be sending in parallel to
# each remote server
#AUTOTHROTTLE_TARGET_CONCURRENCY = 1.0
# Enable showing throttling stats for every response received:
#AUTOTHROTTLE_DEBUG = False
# Enable and configure HTTP caching (disabled by default)
# See https://doc.scrapy.org/en/latest/topics/downloader-middleware.html#httpcache-middleware-settings
#HTTPCACHE_ENABLED = True
#HTTPCACHE_EXPIRATION_SECS = 0
#HTTPCACHE_DIR = 'httpcache'
#HTTPCACHE_IGNORE_HTTP_CODES = []
#HTTPCACHE_STORAGE = 'scrapy.extensions.httpcache.FilesystemCacheStorage'
步骤:
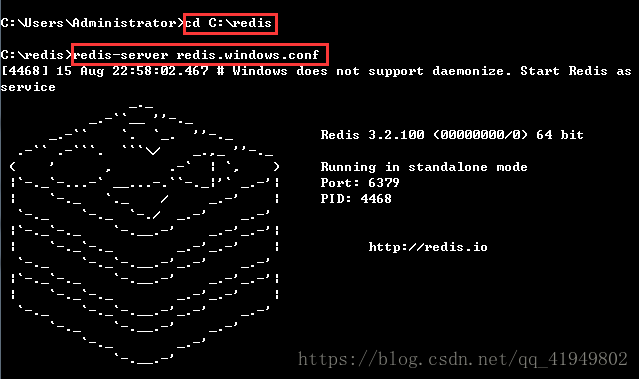
1.作为服务端的电脑打开终端输入如下命令开启redis服务(这个终端在爬虫过程中需要一直开启,不能关闭)
2. 服务端打开第二个终端输入如下命令:
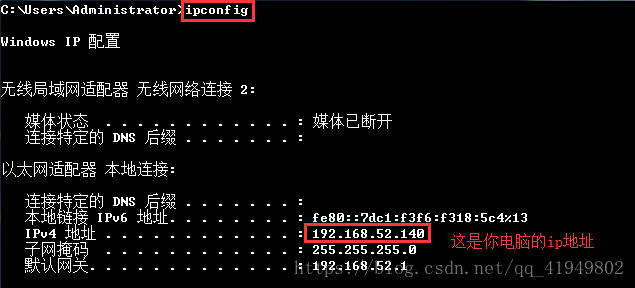

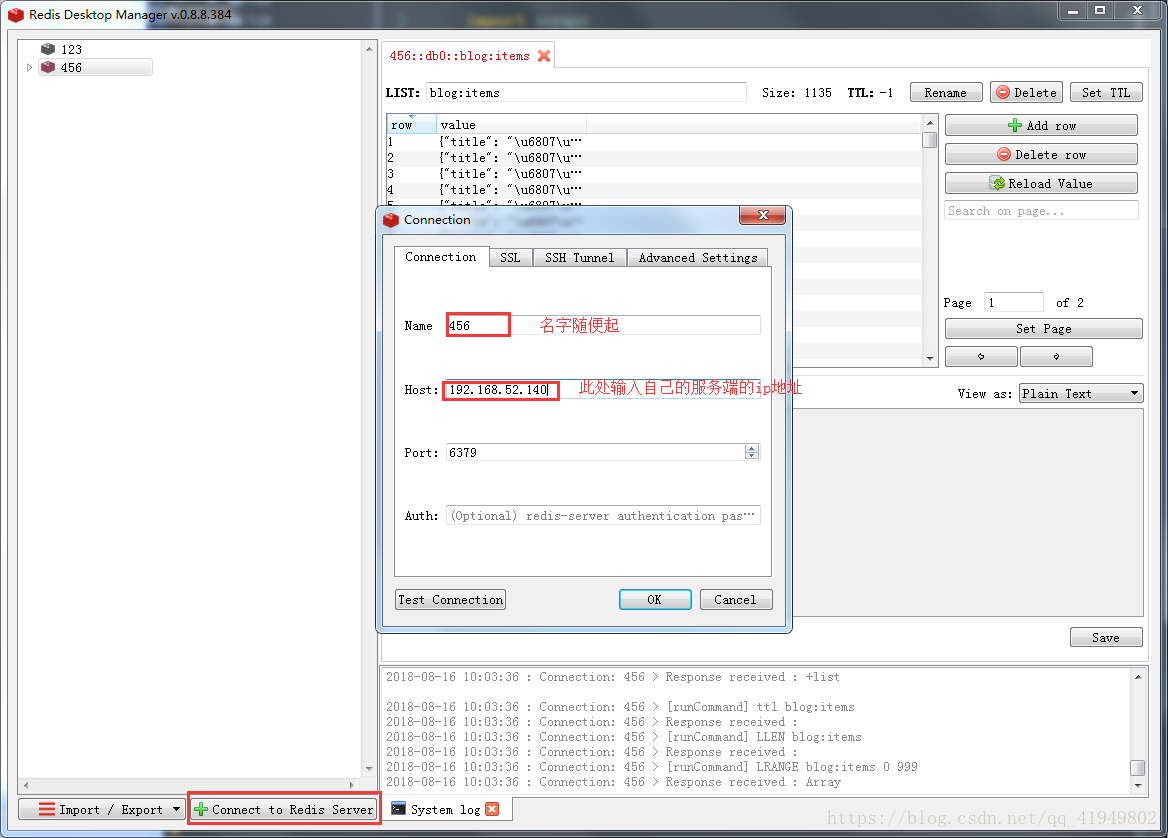
3.然后打开Redis的可视化工具RedisDesktopManager,点击左下角新建连接,然后输入name和host ,其他不用改
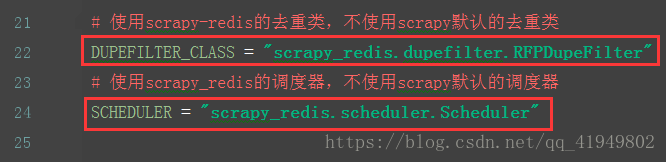
4..修改jobbole单机爬虫项目的代码
blog.py
settings.py
5.客户端打开终端输入命令

6.将修改好代码的项目压缩后发送给作为客户端的电脑
客户端电脑把项目解压后用pycharm打开,然后运行爬虫,服务端电脑也运行爬虫,然后爬虫会卡住,如下图所示:

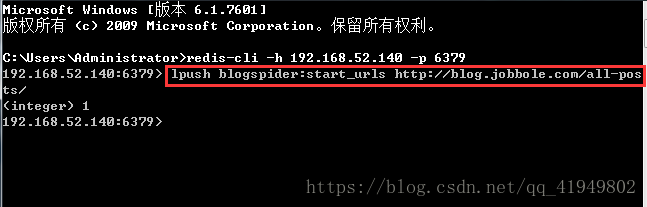
7.在服务端打开的第二个终端中输入:lpush blogspider:start_urls http://blog.jobbole.com/all-posts/,
然后爬虫会继续运行,客户端打开redis可视化工具里的456数据库,可以看到爬到的数据