版权声明:本文为博主原创文章,未经博主允许不得转载。 https://blog.csdn.net/SMF0504/article/details/79728332
1.Canvas组件
1.1 在Canvas组件上绘制对象,可以用create_xxx()的方法(xxx表示对象类型,例如直线line,矩形rectangle和文本text等)
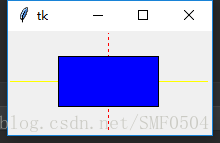
from tkinter import *

# 创建主窗口
root = Tk()
w = Canvas(root, width=200, height=100)
w.pack()

# 画一条黄色的横线
w.create_line(0, 50, 200, 50, fill="yellow")
# 画一条红色的竖线(虚线)
w.create_line(100, 0, 100, 100, fill="red", dash=(4, 4))
# 中间画一个蓝色的矩形
w.create_rectangle(50, 25, 150, 75, fill="blue")

mainloop()
运行结果显示:
1.2 添加到Canvas上的对象会一直保留着。如果希望修改他们,可以使用coords(),itemconfig()和move()方法来移动画布上的对象,或者delete()方法来删除:
from tkinter
import *
# 创建主窗口 root = Tk() w = Canvas(root
, width=
200, height=
100) w.pack()
# 画一条黄色的横线 line1 = w.create_line(
0, 50, 200, 50, fill=
"yellow")
# 画一条红色的竖线(虚线) line2 = w.create_line(
100, 0, 100, 100, fill=
"red", dash=(
4, 4))
# 中间画一个蓝色的矩形 rect1 = w.create_rectangle(
50, 25, 150, 75, fill=
"blue")
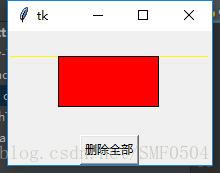
# 黄横线上移 w.coords(line1
, 0, 25, 200, 25)
# 矩形框被红色填充 w.itemconfig(rect1
, fill=
"red")
# 删除了红色虚竖线 w.delete(line2)
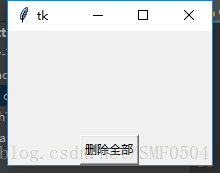
Button(root, text="删除全部", command=(lambda x=ALL: w.delete(x))).pack()
mainloop()
运行结果显示:
点击删除按钮:
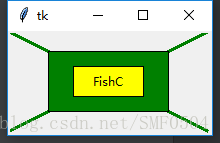
1.3 还可以在Canvas上显示文本,使用的是create_text()方法:
from tkinter import *

# 创建主窗口
root = Tk()
w = Canvas(root, width=200, height=100)
w.pack()

w.create_line(0, 0, 200, 100, fill="green", width=3)

w.create_line(200, 0, 0, 100, fill="green", width=3)
# 中间画一个蓝色的矩形
w.create_rectangle(40, 20, 160, 80, fill="green")
w.create_rectangle(65, 35, 135, 65, fill="yellow")
w.create_text(100, 50, text="FishC")

mainloop()
运行结果显示:
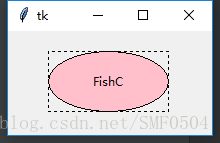
1.4 使用creater_oval()方法绘制椭圆形(或圆形),参数是指定的一个限定的矩形(Tkinter会自动在这个矩形内绘制一个椭圆):
from tkinter import *

# 创建主窗口
root = Tk()
w = Canvas(root, width=200, height=100)
w.pack()

w.create_rectangle(40, 20, 160, 80, dash=(4, 4))
w.create_oval(40, 20, 160, 80, fill="pink")
w.create_text(100, 50, text="FishC")

mainloop()
运行结果:
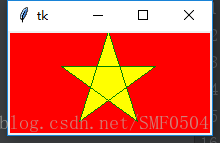
1.5 绘制多边形,可以使用create_polygon()方法。
示例画一个五角星:
from tkinter import *
import math as m

# 创建主窗口
root = Tk()
w = Canvas(root, width=200, height=100, background="red")
w.pack()

# 中心点坐标
center_x = 100
center_y = 50
# 半径长度
r = 50
points = [
    # 左上点
    center_x - int(r * m.sin(2 * m.pi / 5)),
    center_y - int(r * m.cos(2 * m.pi / 5)),
    # 右上点
    center_x + int(r * m.sin(2 * m.pi / 5)),
    center_y - int(r * m.cos(2 * m.pi / 5)),
    # 左下点
    center_x - int(r * m.sin(m.pi / 5)),
    center_y + int(r * m.cos(m.pi / 5)),
    # 顶点
    center_x,
    center_y-r,
    # 右下点
    center_x + int(r * m.sin(m.pi / 5)),
    center_y + int(r * m.cos(m.pi / 5)),
    ]
w.create_polygon(points, outline="green", fill="yellow")

mainloop()
运行结果:
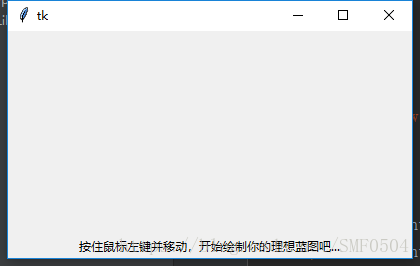
设计一个像window画图工具那样的面板,让用户可以在上面随心所欲地绘画。
其实原理很简单,就是获取用户拖动鼠标的坐标,然后每个坐标对应绘制一个点上去就好了。在这里,不得不承认有点遗憾让人的是TKINTER并每天没有“点”的方法。
其实:可以通过绘制一个超小的椭圆形来表示同一个点。在下面的例子里,通过相应“鼠标左键按住拖动”事件(<B1-Motion>),在鼠标拖动的同时获取鼠标的实时位置(x, y),并绘制一个超小的椭圆代表一个”点“:
from tkinter import *
import math as m

# 创建主窗口
root = Tk()
w = Canvas(root, width=400, height=200)
w.pack()

def paint(event):
    x1, y1 = (event.x - 1), (event.y - 1)
    x2, y2 = (event.x + 1), (event.y + 1)
    w.create_oval(x1, y1, x2, y2, fill="red")

w.bind("<B1 - Motion>", paint)
Label(root, text="按住鼠标左键并移动,开始绘制你的理想蓝图吧...").pack()

mainloop()
运行结果: