上节课我们介绍了Text组件的Indexs 索引和 Marks 标记,它们主要是用于定位,Marks 可以看做是特殊的 Indexs,但是它们又不是完全相同的,比如在默认情况下,你在Marks指定的位置中插入数据,Marks 的位置会自动发生改变, 因为Marks 认它后面的“那个家伙”,当 Marks 前面的数据被删除时,Marks 并不会被删除,它的位置只是相应的向前移动了,只有 mark_unset() 方法 才能够删除Marks,这节课我们接着来介绍 Tags 的用法。
Tags(标签)通常用于改变 Text 组件中内容的样式和功能。你可以修改文本的字体、尺寸和颜色。另外,Tags 还允许你将文本、嵌入的组件和图片与键盘和鼠标等事件相关联。除了 user-defined tags(用户自定义的 Tags),还有一个预定义的特殊 Tag:SEL。
SEL(或 "sel")用于表示对应的选中内容(如果有的话)。
你可以自定义任意数量的 Tags,Tags 的名字是由普通字符串组成,可以是除了空白字符外的任何字符。另外,任何文本内容都支持多个 Tags 描述,任何 Tag 也可以用于描述多个不同的文本内容。
我们来举个例子:
import tkinter as tk

root = tk.Tk()

text = tk.Text(root, width=40, height=5,)
text.pack()

text.insert("insert", 'I love Python.com')

text.tag_add("tag1", "1.7", "1.13", "1.15")
text.tag_config("tag1", background = "yellow", foreground = "red")

root.mainloop()

还有一点需要注意的是:如果你对同一个范围内的文本加上多个 Tags,并且设置相同的选项,那么新创建的 Tag 样式会覆盖比较旧的 Tag:
import tkinter as tk

root = tk.Tk()

text = tk.Text(root, width=40, height=5)
text.pack()

text.insert("insert", 'I love Python.com')

text.tag_add("tag1", "1.7", "1.13", "1.15")
text.tag_add("tag2", "1.7", "1.13", "1.15")
text.tag_config("tag2", foreground = "green")
text.tag_config("tag1", background = "yellow", foreground = "red")

root.mainloop()

那么新创建的 Tag2 会覆盖比较旧的 Tag1 的相同选项, 注意,与下边的调用顺序没有关系
你或许想控制 Tags 间的优先级,这可以实现吗?完全没有问题!你可以使用 tag_raise() 和 tag_lower() 方法来提高和降低某个 Tag 的优先级。
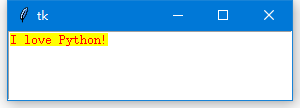
import tkinter as tk

root = tk.Tk()

text = tk.Text(root, width=40, height=5)
text.pack()

text.tag_config("tag1", background="yellow", foreground="red")
text.tag_config("tag2", foreground="green")

text.tag_lower("tag2")

text.insert("insert", "I love Python!", ("tag2", "tag1"))

root.mainloop()
另外 Tags 还支持事件绑定,使用的是 tag_bind() 的方法。
下边例子中我们将文本("Python.com")与鼠标事件进行绑定,当鼠标进入该文本段的时候,鼠标样式切换为 "arrow" 形态,离开文本段的时候切换回 "xterm" 形态。当触发鼠标“左键点击操作”事件的时候,使用默认浏览器打开Python的首页(https://www.python.org/):
import tkinter as tk
import webbrowser

root = tk.Tk()

text = tk.Text(root, width=40, height=5)
text.pack()

text.insert("insert", "I love Python.com!")

text.tag_add("link", "1.7", "1.17")
text.tag_config("link", foreground = "blue", underline = True)

def show_arrow_cursor(event):
    text.config(cursor = "arrow")

def show_xterm_cursor(event):
    text.config(cursor = "xterm")

def click(event):
    webbrowser.open("https://www.python.org/")

text.tag_bind("link", "<Enter>", show_arrow_cursor)
text.tag_bind("link", "<Leave>", show_xterm_cursor)
text.tag_bind("link", "<Button-1>", click)

root.mainloop()
接下来给大家介绍几个 Tags 使用上的技巧:
(一)判断内容是否发生变化
通过校检 Text 组件中文本的 MD5 摘要来判断内容是否发生改变
import tkinter as tk
import hashlib

root = tk.Tk()

text = tk.Text(root, width=40, height=5)
text.pack()

text.insert("insert", "I love Python.com!")
contents = text.get("1.0", "end")

def getSig(contents):
    m = hashlib.md5(contents.encode())
    return m.digest()

sig = getSig(contents)

def check():
    contents = text.get("1.0", "end")
    if sig != getSig(contents):
        print("警报:内容发生改变!")
    else:
        print("风平浪静")

tk.Button(root, text = "检查", command = check).pack()

root.mainloop()
(二)查找操作
使用 search() 方法可以搜索 Text 组件中的内容。但是传统的 search() 方法只查找到一个,就返回,我们可以加入一个循环,查找所有的。
import tkinter as tk
import hashlib

root = tk.Tk()

text = tk.Text(root, width=40, height=5)
text.pack()

text.insert("insert", "I love Python.com!")

def getIndex(text, index):
    return tuple(map(int, str.split(text.index(index), ".")))

start = "1.0"
while True:
    pos = text.search("o", start, stopindex = "end")
    if not pos:
        break
    print("找到啦,位置是:", getIndex(text, pos))
    start = pos + "+1c"

root.mainloop()
(三)恢复、撤销操作
Text 组件还支持“恢复”和“撤销”操作,这使得 Text 组件显得相当高大上。
通过设置 undo 选项为 True 可以开启 Text 组件的“撤销”功能。然后用 edit_undo() 方法实现“撤销”操作,用 edit_redo() 方法实现“恢复”操作。
import tkinter as tk
import hashlib

root = tk.Tk()

text = tk.Text(root, width=40, height=5, undo = True)
text.pack()

text.insert("insert", "I love Python.com!")

def show():
    text.edit_undo()


tk.Button(root, text = "撤销", command = show).pack()

root.mainloop()
Text 组件内部有一个栈专门用于记录内容的每次变动,所以每次“撤销”操作就是一次弹栈操作,“恢复”就是再次压栈。
默认情况下,每一次完整的操作将会放入栈中。但怎么样算是一次完整的操作呢?Tkinter 觉得每次焦点切换、用户按下 Enter 键、删除\插入操作的转换等之前的操作算是一次完整的操作。也就是说你连续输入“I love Python” 的话,一次的“撤销”操作就会将所有的内容删除。
那我们能不能自定义呢?比如我希望插入一个字符就算一次完整的操作,然后每次点击“撤销”就去掉一个字符。
当然可以!做法就是先将 autoseparators 选项设置为 False(因为这个选项是让 Tkinter 在认为一次完整的操作结束后自动插入“分隔符”),然后绑定键盘事件,每次有输入就用 edit_separator() 方法人为地插入一个“分隔符”:
import tkinter as tk
import hashlib

root = tk.Tk()

text = tk.Text(root, width=40, height=5, undo = True, autoseparators = False)
text.pack()

text.insert("insert", "I love Python.com!")

def callback(event):
    text.edit_separator()  #人为插入分隔符

text.bind('<Key>', callback)

def show():
    text.edit_undo()

tk.Button(root, text = "撤销", command = show).pack()

root.mainloop()