翻译自Creating a Custom Login Form
本指南构建了Hello Spring MVC Security Java Config,以解释如何使用Spring Security Java Configuration配置和使用自定义登录表单。
启动示例
本节概述如何在Spring Tool Suite(STS)中设置工作区,以便您可以遵循本指南。下一节将介绍如何将Spring Security应用于现有应用程序的通用步骤。虽然您可以简单地将步骤应用于现有应用程序,但我们鼓励您遵循本指南,以减少复杂性。
获取示例项目
将Spring Security Distribution解压缩到已知位置,并将其记为SPRING_SECURITY_HOME。
导入不安全的MVC示例应用程序
为了遵循,我们建议您将insecuremvc示例应用程序导入到IDE中。您可以使用任何您喜欢的IDE,但本指南中的说明将假设您正在使用Spring Tool Suite(STS)。
完整的示例应用程序可以在SPRING_SECURITY_HOME/samples/javaconfig/form中找到
- 如果您没有安装STS,请从https://spring.io/tools下载STS
- 启动STS并将示例应用程序导入STS,步骤如下:
- File→Import
- Existing Maven Projects
- Click Next >
- Click Browse…
- Navigate to the samples (i.e. SPRING_SECURITY_HOME/samples/xml/insecure) and click OK
- Click Finish
运行insecuremvc应用程序
在下面的练习中,我们将修改spring-security-samples-xml-insecuremvc应用程序。在进行任何更改之前,最好验证示例是否正常工作。执行以下步骤以确保spring-security-samples-javaconfig-hellomvc可以正常工作。
- Right click on the spring-security-samples-javaconfig-hellomvc application
- Select Run As→Run on Server
- Select the latest tc Server
- Click Finish
验证应用程序是否正常工作:
- 一个用户收件箱的页面可以在http//localhost8080/sample/通过用户名和密码验证后显示。
- 尝试点击撰写链接Compose 并创建一条消息。应显示消息详细信息。
- 现在点击收件箱链接Inbox ,看到列出的消息。您可以点击摘要链接查看再次显示的详细信息。
复写默认配置(HttpSecurity)方法
正如我们在Hello Spring MVC Security Java Config中所看到的那样,Spring Security的WebSecurityConfigurerAdapter提供了一些方便的默认值,使我们的应用程序能够快速启动并运行。但是,我们的登录表单看起来不像我们的其他应用程序。让我们看看如何更新我们的配置以使用自定义窗体。
默认配置(HttpSecurity)
configure(HttpSecurity)方法的默认配置可以在下面看到:
protected void configure(HttpSecurity http) throws Exception {
    http
        .authorizeRequests()
            .anyRequest().authenticated()
            .and()
        .formLogin()
            .and()
        .httpBasic();
}
该配置确保:
- 每个请求都要求用户进行身份验证
- 支持基于表单的身份验证
- 支持HTTP基本身份验证
配置自定义登录页面
我们希望确保我们在更新中补偿这些默认值。打开SecurityConfig并插入configure方法,如下所示:
src/main/java/org/springframework/security/samples/config/SecurityConfig.java
// ...

import org.springframework.security.config.annotation.web.builders.HttpSecurity;

@EnableWebSecurity
public class SecurityConfig extends WebSecurityConfigurerAdapter {

    @Override
    protected void configure(HttpSecurity http) throws Exception {
        http
            .authorizeRequests()
                .anyRequest().authenticated()
                .and()
            .formLogin()
                .loginPage("/login");
    }

    // ...
}
loginPage(“/login”)那一行指示Spring Security
- 当需要验证时,将浏览器重定向到 /login
- 我们负责呈现登录页面,当/login被请求时
- 当验证尝试失败时,将浏览器重定向到 /login?error(因为我们没有另外指定)
- 我们负责呈现失败页面,当 /login?error被请求时
- 当我们成功注销时,将浏览器重定向到 /login?logout(因为我们没有另外指定)
- 我们负责在 /login?logout 请求时提交注销确认页面
继续并启动服务器,并尝试访问 http://localhost:8080/sample/查看我们的配置的更新。在许多浏览器中,您将看到类似于此网页的错误有一个重定向循环。发生什么事?请看下文。
授予访问未经身份验证的用户
问题是Spring Security正在保护对我们的自定义登录页面的访问。特别是以下情况发生:
- 我们向我们的Web应用程序发出请求
- Spring Security认为我们没有认证
- 我们被重定向到/login
- 浏览器请求/login
- Spring Security认为我们没有认证
- 我们被重定向到 /login
要解决这个问题,我们需要指示Spring Security允许任何人访问/login URL。我们可以轻松地做以下修正:
src/main/java/org/springframework/security/samples/config/SecurityConfig.java
// ...

@EnableWebSecurity
public class SecurityConfig extends WebSecurityConfigurerAdapter {

    @Override
    protected void configure(HttpSecurity http) throws Exception {
        http
            .authorizeRequests()
                .anyRequest().authenticated()
                .and()
            .formLogin()
                .loginPage("/login")
                .permitAll();
    }

    // ...
}
方法formLogin().permitAll()语句指示Spring Security允许访问与formLogin()相关联的任何URL(例如 /login and /login?error)。
默认情况下,授予对 formLogin() URL的访问权限,因为Spring Security需要对允许的内容进行某些假设,哪些不允许。为了安全起见,最好确保授予对资源的访问是明确的。
启动服务器并尝试访问 http://localhost:8080/sample/以查看我们配置的更新。您现在应该收到一个500错误,指出Error resolving template “login”.
创建登录页面
在Spring Web MVC中,创建我们的登录页面有两个步骤:
- 创建一个控制器
- 创建视图
配置登录视图控制器
在Spring Web MVC中,第一步是确保我们有一个可以指向我们观点的控制器。由于我们的项目将javaconfig/messages项目添加为依赖关系,并且它包含用于/login的视图控制器,因此我们不需要在我们的应用程序中创建一个控制器。作为参考,您可以看到以下配置:
// ...

@EnableWebMvc
@ComponentScan("org.springframework.security.samples.mvc")
public class WebMvcConfiguration extends WebMvcConfigurerAdapter {

    // ...

    @Override
    public void addViewControllers(ViewControllerRegistry registry) {
        registry.addViewController("/login").setViewName("login");
        registry.setOrder(Ordered.HIGHEST_PRECEDENCE);
    }
}
这里,我要注明,是在pom.xml中的依赖关系:
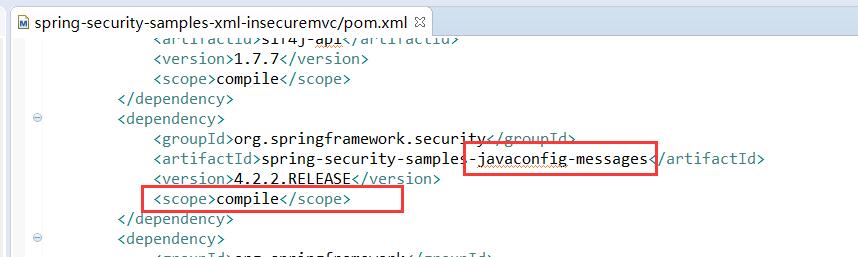
所以如果缺少依赖jar包,有必要进行把项目pom.xml编译生成jar。
创建登录视图
我们现有的配置意味着我们需要做的就是创建一个具有以下内容的login.html文件:
src/main/resources/views/login.html
<html xmlns:th="http://www.thymeleaf.org">
  <head th:include="layout :: head(title=~{::title},links=~{})">
    <title>Please Login</title>
  </head>
  <body th:include="layout :: body" th:with="content=~{::content}">
    <div th:fragment="content">
        <form name="f" th:action="@{/login}" method="post">
            <fieldset>
                <legend>Please Login</legend>
                <div th:if="${param.error}" class="alert alert-error">
                    Invalid username and password.
                </div>
                <div th:if="${param.logout}" class="alert alert-success">
                    You have been logged out.
                </div>
                <label for="username">Username</label>
                <input type="text" id="username" name="username"/>
                <label for="password">Password</label>
                <input type="password" id="password" name="password"/>
                <div class="form-actions">
                    <button type="submit" class="btn">Log in</button>
                </div>
            </fieldset>
        </form>
    </div>
  </body>
</html>- 我们提交我们的用户名和密码的网址与我们的登录表单(即 /login)相同,但是方法是 POST 而不是 GET。
- 当认证失败时,浏览器被重定向到/login?error错误,因此我们可以通过检测参数错误是否为非空值来显示错误消息。
- 当我们成功注销时,浏览器被重定向到/login?logout,所以我们可以通过检测参数注销是否为非空值来显示注销成功消息。
- 用户名应该出现在HTTP参数username上
- 密码应该出现在HTTP参数password上
不显示有关身份验证失败的详细信息。例如,我们不想显示用户不存在,因为这将告诉攻击者他们应该尝试不同的用户名。
我们使用Thymeleaf自动将CSRF令牌添加到我们的表单中。如果我们不使用Thymleaf或Spring MVC taglib,我们也可以使用手动添加CSRF令牌。
启动服务器并尝试访问 http://localhost:8080/sample/以查看我们配置的更新。我们现在看到我们的登录页面,但它看起来不太漂亮。问题是我们没有授权访问css文件。
授予对剩余资源的访问权
我们需要更新我们的配置,以允许任何人访问我们的资源和我们的注销页面。更新配置如下图所示:
src/main/java/org/springframework/security/samples/config/SecurityConfig.java
// ...

@EnableWebSecurity
public class SecurityConfig extends WebSecurityConfigurerAdapter {

    @Override
    protected void configure(HttpSecurity http) throws Exception {
        http
            .authorizeRequests()
                .antMatchers("/resources/**").permitAll()
                .anyRequest().authenticated()
                .and()
            .formLogin()
                .loginPage("/login")
                .permitAll()
                .and()
            .logout()
                .permitAll();
    }

    // ...
}- 这允许任何人访问以 /resources/开头的URL。因为这是我们的CSS,JavaScript和图像存储我们所有的静态资源是任何人都可以看到的。
- 如你所料logout().permitAll()允许任何用户请求注销并查看注销成功URL。
重新启动服务器并尝试访问 http://localhost:8080/sample/以查看我们的配置的更新。我们现在看到一个自定义登录页面,看起来像我们的应用程序的其余部分。
- 尝试输入无效的用户名和密码。您将看到我们的错误消息显示。
- 尝试输入有效的用户名(用户)和密码(密码)。您将被成功验证。
- 尝试点击注销按钮。您将看到我们的注销成功消息
您现在应该知道如何使用Spring Security的Java配置添加自定义登录表单了。