Service 概述
kubernetes 中的pod是有生生灭灭的,时刻都有可能被新的pod所代替,而不可复活(pod的生命周期)。一旦一个pod生命终止,通过ReplicaSets动态创建和销毁pod(Pod的动态扩缩容,滚动升级 等)。 每个pod都有自己的IP,这IP随着pod的生生灭灭而变化,不能被依赖。这样导致一个问题,如果这个POD作为后端(backend)提供一些功能供给一些前端POD(frontend),在kubernete集群中是如何实现让这些前台能够持续的追踪到这些后台的?所以之间需要一个服务作为后端的服务负载------service
Kubernetes Service 是一个定义了一组Pod的策略的抽象,这些被服务标记的Pod都是(一般)通过label Selector实现的
举个例子,考虑一个图片处理 backend,它运行了3个副本。这些副本是可互换的 —— frontend 不需要关心它们调用了哪个 backend 副本。 然而组成这一组 backend 程序的 Pod 实际上可能会发生变化,frontend 客户端不应该也没必要知道,而且也不需要跟踪这一组 backend 的状态。 Service 定义的抽象能够解耦这种关联。
Service 实现的三种方式
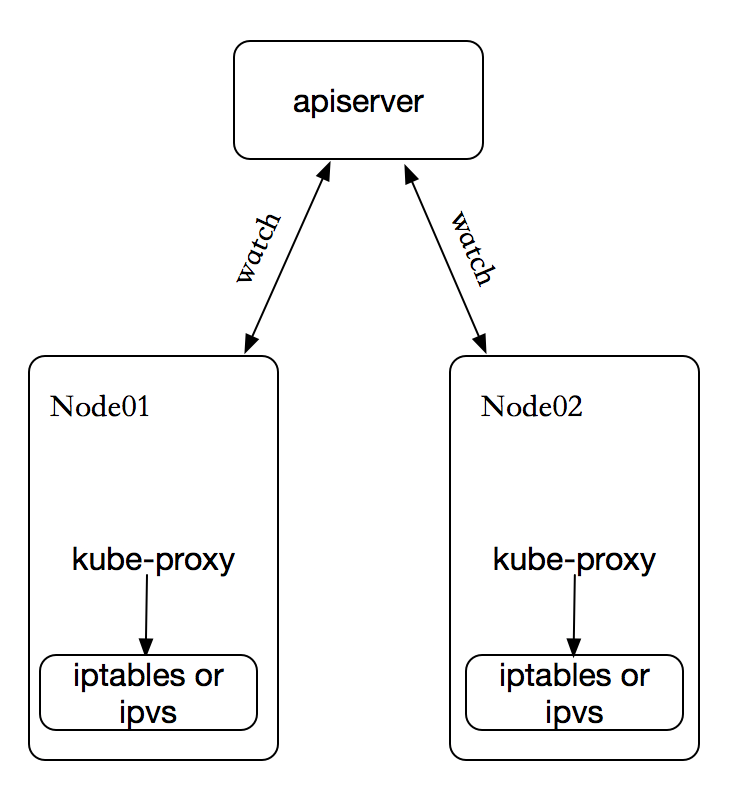
在 Kubernetes 集群中,每个 Node 运行一个 kube-proxy 进程。kube-proxy 负责为 Service 实现了一种 VIP(虚拟 IP)的形式,而不是 ExternalName 的形式,在 Kubernetes v1.0 版本,代理完全在 userspace。在 Kubernetes v1.1 版本,新增了 iptables 代理,但并不是默认的运行模式。 从 Kubernetes v1.2 起,默认就是 iptables 代理。在Kubernetes v1.8.0-beta.0中,添加了ipvs代理。在 Kubernetes v1.0 版本,Service 是 “4层”(TCP/UDP over IP)概念。 在 Kubernetes v1.1 版本,新增了 Ingress API(beta 版),用来表示 “7层”(HTTP)服务。
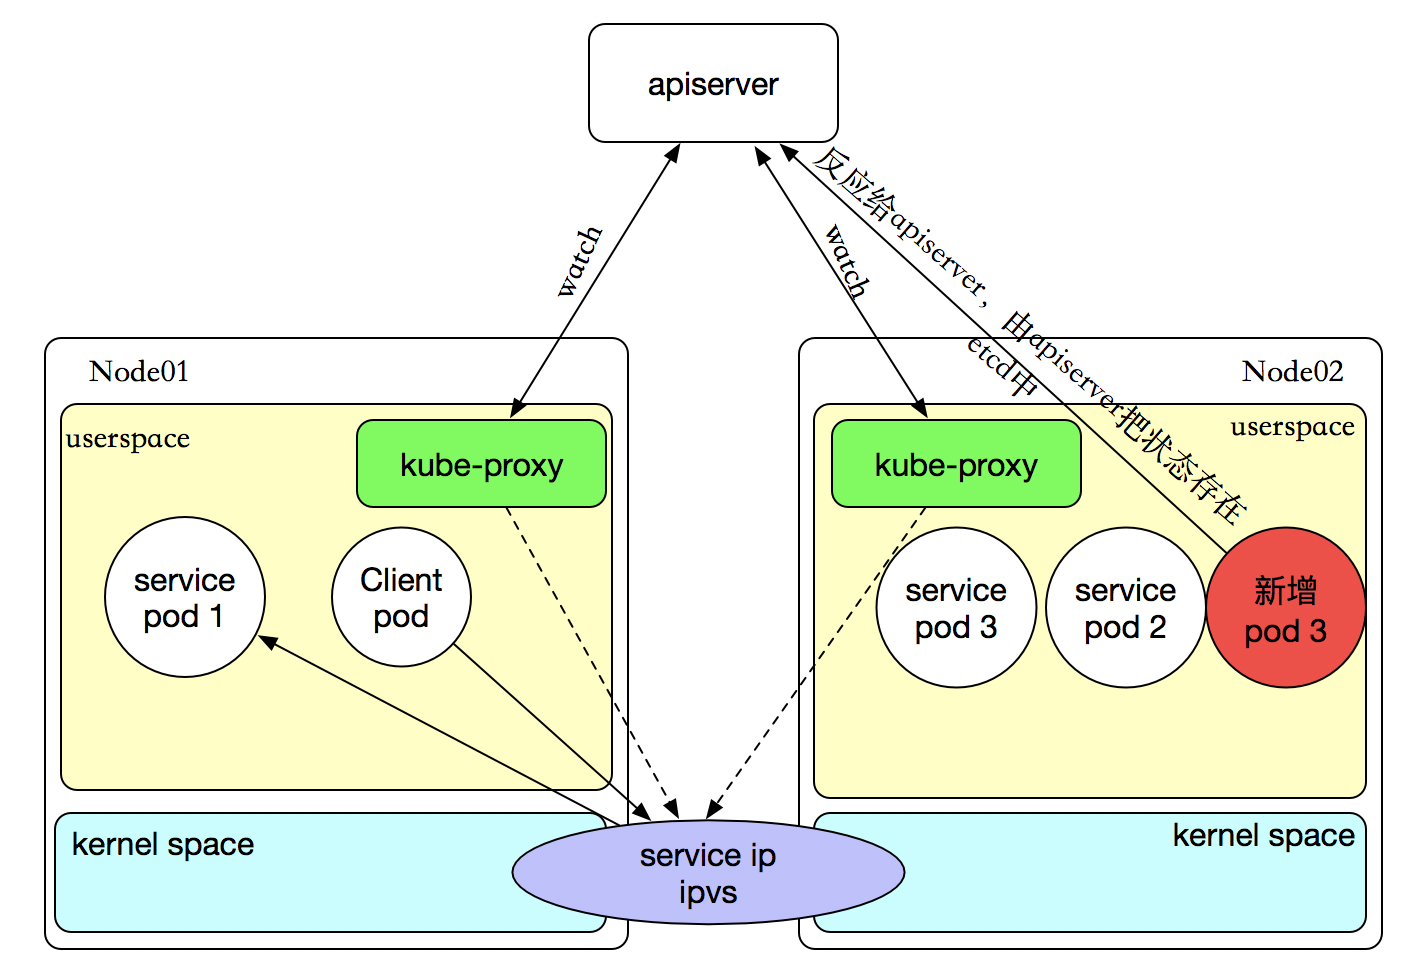
kube-proxy 这个组件始终监视着apiserver中有关service的变动信息,获取任何一个与service资源相关的变动状态,通过watch监视,一旦有service资源相关的变动和创建,kube-proxy都要转换为当前节点上的能够实现资源调度规则(例如:iptables、ipvs)
userspace 代理模式
这种模式,当客户端Pod请求内核空间的service iptables后,把请求转到给用户空间监听的kube-proxy 的端口,由kube-proxy来处理后,再由kube-proxy打请求转给内核空间的 service iptalbes,再由service iptalbes根据请求转给各节点中的的service pod。由此可见这个模式有很大的问题,由客户端请求先进入内核空间的,又进去用户空间访问kube-proxy,由kube-proxy封装完成后再进去内核空间的iptables,再根据iptables的规则分发给各节点的用户空间的pod。这样流量从用户空间进出内核带来的性能损耗是不可接受的

iptables 代理模式
客户端IP请求时,直接求情本地内核service ip,根据iptables的规则求情到各pod上,因为使用iptable NAT来完成转发,也存在不可忽视的性能损耗。另外,如果集群中存在上万的Service/Endpoint,那么Node上的iptables rules将会非常庞大,性能还会再打折扣。

ipvs 代理模式
客户端IP请求时,直接求情本地内核service ipvs,根据ipvs的规则求情到各pod上。kube-proxy会监视Kubernetes Service对象和Endpoints,调用netlink接口以相应地创建ipvs规则并定期与Kubernetes Service对象和Endpoints对象同步ipvs规则,以确保ipvs状态与期望一致。访问服务时,流量将被重定向到其中一个后端Pod。
与iptables类似,ipvs基于netfilter 的 hook 功能,但使用哈希表作为底层数据结构并在内核空间中工作。这意味着ipvs可以更快地重定向流量,并且在同步代理规则时具有更好的性能。此外,ipvs为负载均衡算法提供了更多选项,例如:
- rr:
轮询调度 - lc:最小连接数
dh:目标哈希sh:源哈希sed:最短期望延迟nq:不排队调度
注意: ipvs模式假定在运行kube-proxy之前在节点上都已经安装了IPVS内核模块。当kube-proxy以ipvs代理模式启动时,kube-proxy将验证节点上是否安装了IPVS模块,如果未安装,则kube-proxy将回退到iptables代理模式。
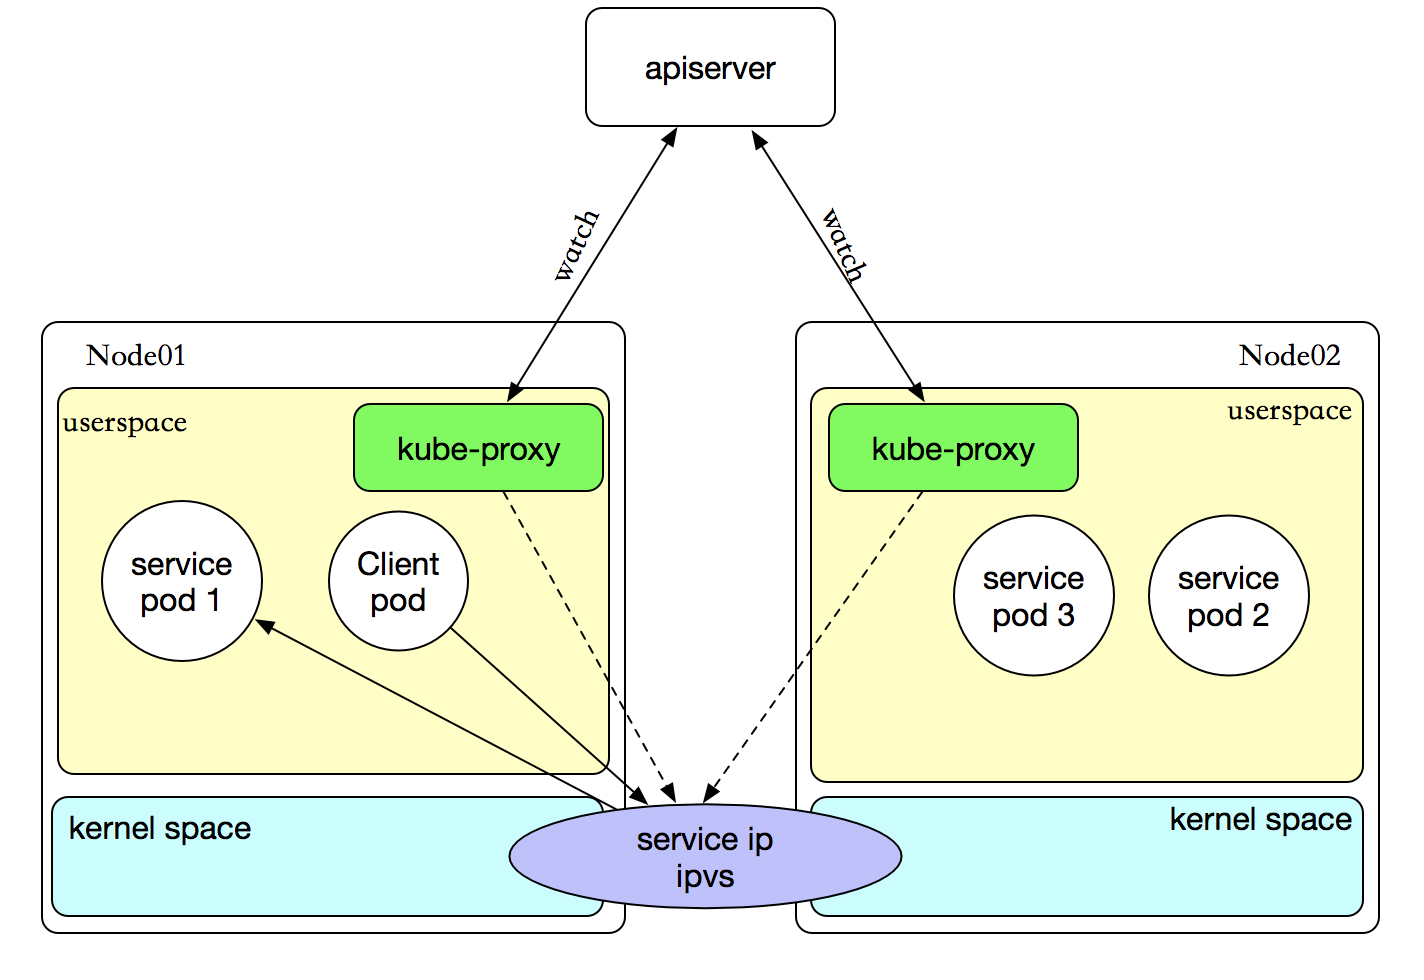
如果某个服务后端pod发生变化,标签选择器适应的pod有多一个,适应的信息会立即放映到apiserver上,而kube-proxy一定可以watch到etc中的信息变化,而将他立即转为ipvs或者iptables中的规则,这一切都是动态和实时的,删除一个pod也是同样的原理。
service 定义
kubectl explain svc.spec
- ports 建立哪些端口,暴露的端口是哪些
- selector 把哪些容器通过这个service暴露出去
- type 有四种 (ExternalName ClusterIP NodePort LoadBalancer) 默认是ClusterIP
ports 的定义
kubectl explain svc.spec.ports
- name 指定的port的名称
- nodePort 指定节点上的端口
- port 暴露给服务的端口
- targetPort 容器的端口
- protocol 执行协议(TCP or UDP)
ClusterIP方式
apiVersion: v1
kind: Service
metadata:
  name: redis
  namespace: default
spec:
  selector:
    app: redis
    role: log-store
  type: ClusterIP
  ports:
  - port: 6379
    targetPort: 6379
查看一下详细
$ kubectl describe svc redis
Name:                   redis
Namespace:              default
Labels:                 <none>
Annotations:            kubectl.kubernetes.io/last-applied-configuration={"apiVersion":"v1","kind":"Service","metadata":{"annotations":{},"name":"redis","namespace":"default"},"spec":{"ports":[{"port":6379,"targetPort":6379}...
Selector:               app=redis,role=log-store
Type:                   ClusterIP
IP:                     10.43.164.114
Port:                   <unset> 6379/TCP
Endpoints:              10.42.0.219:6379
Session Affinity:       None
Events:                 <none>
资源记录格式:
SVC_NAME.NS_NAME.DOMAIN.LTD.
默认的service的a记录 svc.cluster.local.
刚创建的service的a记录 redis.default.cluster.local.
NodePort方式
apiVersion: v1
kind: Service
metadata:
  name: myapp
  namespace: default
spec:
  selector:
    app: myapp
    release: dev
  type: NodePort
  ports:
  - port: 80
    targetPort: 80
    nodePort: 30080
$ kubectl describe svc myapp
Name:                   myapp
Namespace:              default
Labels:                 <none>
Annotations:            field.cattle.io/publicEndpoints=[{"addresses":["172.16.138.170"],"port":30080,"protocol":"TCP","serviceName":"default:myapp","allNodes":true}]
                        kubectl.kubernetes.io/last-applied-configuration={"apiVersion":"v1","kind":"Service","metadata":{"annotations":{},"name":"myapp","namespace":"default"},"spec":{"ports":[{"nodePort":30080,"port":80,"ta...
Selector:               app=myapp,release=dev
Type:                   NodePort
IP:                     10.43.162.175
Port:                   <unset> 80/TCP
NodePort:               <unset> 30080/TCP
Endpoints:              10.42.0.218:80,10.42.1.107:80,10.42.3.210:80
Session Affinity:       None
Events:                 <none>

#可以看到他负责均衡的效果
$  for a in  {1..10}; do    curl http://172.16.138.170:30080/hostname.html  && sleep 1s; done
myapp-deploy-869b888f66-4l4cv
myapp-deploy-869b888f66-7shh9
myapp-deploy-869b888f66-4l4cv
myapp-deploy-869b888f66-7shh9
myapp-deploy-869b888f66-4l4cv
myapp-deploy-869b888f66-7shh9
myapp-deploy-869b888f66-vwgj2
myapp-deploy-869b888f66-7shh9
myapp-deploy-869b888f66-4l4cv
LoadBalancer类型
使用支持外部负载均衡器的云提供商的服务,设置 type 的值为 "LoadBalancer",将为 Service 提供负载均衡器。 负载均衡器是异步创建的,关于被提供的负载均衡器的信息将会通过 Service 的 status.loadBalancer 字段被发布出去。
来自外部负载均衡器的流量将直接打到 backend Pod 上,不过实际它们是如何工作的,这要依赖于云提供商。 在这些情况下,将根据用户设置的 loadBalancerIP 来创建负载均衡器。 某些云提供商允许设置 loadBalancerIP。如果没有设置 loadBalancerIP,将会给负载均衡器指派一个临时 IP。 如果设置了 loadBalancerIP,但云提供商并不支持这种特性,那么设置的 loadBalancerIP 值将会被忽略掉。
ExternalName 类型
提供访问发布服务的,像使用集群内部一样使用外部服务。
会话粘性(常说的会话保持)
kubectl explain svc.spec.sessionAffinity
支持ClientIP和None 两种方式,默认是None(随机调度) ClientIP是来自于同一个客户端的请求调度到同一个pod中
apiVersion: v1
kind: Service
metadata:
  name: myapp
  namespace: default
spec:
  selector:
    app: myapp
    release: dev
  sessionAffinity: ClientIP
  type: NodePort
  ports:
  - port: 80
    targetPort: 80
    nodePort: 30080
查看来自同一客户端的请求始终访问同一个Pod
$ kubectl describe svc myapp
Name:            myapp
Namespace:        default
Labels:            <none>
Annotations:        field.cattle.io/publicEndpoints=[{"addresses":["172.16.138.170"],"port":30080,"protocol":"TCP","serviceName":"default:myapp","allNodes":true}]
            kubectl.kubernetes.io/last-applied-configuration={"apiVersion":"v1","kind":"Service","metadata":{"annotations":{},"name":"myapp","namespace":"default"},"spec":{"ports":[{"nodePort":30080,"port":80,"ta...
Selector:        app=myapp,release=dev
Type:            NodePort
IP:            10.43.162.175
Port:            <unset>    80/TCP
NodePort:        <unset>    30080/TCP
Endpoints:        10.42.0.218:80,10.42.1.107:80,10.42.3.210:80
Session Affinity:    ClientIP
Events:            <none>

$ for a in  {1..10}; do    curl http://172.16.138.170:30080/hostname.html  && sleep 1s; done
myapp-deploy-869b888f66-4l4cv
myapp-deploy-869b888f66-4l4cv
myapp-deploy-869b888f66-4l4cv
myapp-deploy-869b888f66-4l4cv
myapp-deploy-869b888f66-4l4cv
myapp-deploy-869b888f66-4l4cv
myapp-deploy-869b888f66-4l4cv
myapp-deploy-869b888f66-4l4cv
myapp-deploy-869b888f66-4l4cv
myapp-deploy-869b888f66-4l4cv
Headless service(就是没有Cluster IP 的Service )
有时不需要或不想要负载均衡,以及单独的 Service IP。 遇到这种情况,可以通过指定 Cluster IP(spec.clusterIP)的值为 "None" 来创建 Headless Service。它会给一个集群内部的每个成员提供一个唯一的DNS域名来作为每个成员的网络标识,集群内部成员之间使用域名通信
这个选项允许开发人员自由寻找他们自己的方式,从而降低与 Kubernetes 系统的耦合性。 应用仍然可以使用一种自注册的模式和适配器,对其它需要发现机制的系统能够很容易地基于这个 API 来构建。
对这类 Service 并不会分配 Cluster IP,kube-proxy 不会处理它们,而且平台也不会为它们进行负载均衡和路由。 DNS 如何实现自动配置,依赖于 Service 是否定义了 selector。
apiVersion: v1
kind: Service
metadata:
  name: myapp-headless
  namespace: default
spec:
  selector:
    app: myapp
    release: dev
  clusterIP: "None"
  ports:
  - port: 80
    targetPort: 80
验证
$ dig -t A myapp-headless.default.svc.cluster.local. @10.42.0.5

; <<>> DiG 9.9.4-RedHat-9.9.4-61.el7 <<>> -t A myapp-headless.default.svc.cluster.local. @10.42.0.5
;; global options: +cmd
;; Got answer:
;; ->>HEADER<<- opcode: QUERY, status: NOERROR, id: 55062
;; flags: qr aa rd ra; QUERY: 1, ANSWER: 3, AUTHORITY: 0, ADDITIONAL: 0

;; QUESTION SECTION:
;myapp-headless.default.svc.cluster.local. IN A

;; ANSWER SECTION:
myapp-headless.default.svc.cluster.local. 30 IN    A 10.42.0.218
myapp-headless.default.svc.cluster.local. 30 IN    A 10.42.1.107
myapp-headless.default.svc.cluster.local. 30 IN    A 10.42.3.210

;; Query time: 2 msec
;; SERVER: 10.42.0.5#53(10.42.0.5)
;; WHEN: Fri Aug 31 11:40:46 EDT 2018
;; MSG SIZE  rcvd: 106
Services
Kubernetes Pods are mortal. They are born and when they die, they are not resurrected. ReplicaSets in particular create and destroy Pods dynamically (e.g. when scaling up or down). While each Pod gets its own IP address, even those IP addresses cannot be relied upon to be stable over time. This leads to a problem: if some set of Pods (let’s call them backends) provides functionality to other Pods (let’s call them frontends) inside the Kubernetes cluster, how do those frontends find out and keep track of which backends are in that set?
Enter Services.
A Kubernetes Service is an abstraction which defines a logical set of Pods and a policy by which to access them - sometimes called a micro-service. The set of Pods targeted by a Service is (usually) determined by a Label Selector (see below for why you might want a Service without a selector).
As an example, consider an image-processing backend which is running with 3 replicas. Those replicas are fungible - frontends do not care which backend they use. While the actual Pods that compose the backend set may change, the frontend clients should not need to be aware of that or keep track of the list of backends themselves. The Service abstraction enables this decoupling.
For Kubernetes-native applications, Kubernetes offers a simple Endpoints API that is updated whenever the set of Pods in a Service changes. For non-native applications, Kubernetes offers a virtual-IP-based bridge to Services which redirects to the backend Pods.
- Defining a service
- Virtual IPs and service proxies
- Multi-Port Services
- Choosing your own IP address
- Discovering services
- Headless services
- Publishing services - service types
- Shortcomings
- Future work
- The gory details of virtual IPs
- API Object
- What's next
Defining a service
A Service in Kubernetes is a REST object, similar to a Pod. Like all of the REST objects, a Service definition can be POSTed to the apiserver to create a new instance. For example, suppose you have a set of Pods that each expose port 9376 and carry a label "app=MyApp".
kind:ServiceapiVersion:v1metadata:name:my-servicespec:selector:app:MyAppports:-protocol:TCPport:80targetPort:9376This specification will create a new Service object named “my-service” which targets TCP port 9376 on any Pod with the "app=MyApp" label. This Service will also be assigned an IP address (sometimes called the “cluster IP”), which is used by the service proxies (see below). The Service’s selector will be evaluated continuously and the results will be POSTed to an Endpoints object also named “my-service”.
Note that a Service can map an incoming port to any targetPort. By default the targetPort will be set to the same value as the port field. Perhaps more interesting is that targetPort can be a string, referring to the name of a port in the backend Pods. The actual port number assigned to that name can be different in each backend Pod. This offers a lot of flexibility for deploying and evolving your Services. For example, you can change the port number that pods expose in the next version of your backend software, without breaking clients.
Kubernetes Services support TCP and UDP for protocols. The default is TCP.
Services without selectors
Services generally abstract access to Kubernetes Pods, but they can also abstract other kinds of backends. For example:
- You want to have an external database cluster in production, but in test you use your own databases.
- You want to point your service to a service in another
Namespaceor on another cluster. - You are migrating your workload to Kubernetes and some of your backends run outside of Kubernetes.
In any of these scenarios you can define a service without a selector:
kind:ServiceapiVersion:v1metadata:name:my-servicespec:ports:-protocol:TCPport:80targetPort:9376Because this service has no selector, the corresponding Endpoints object will not be created. You can manually map the service to your own specific endpoints:
kind:EndpointsapiVersion:v1metadata:name:my-servicesubsets:-addresses:-ip:1.2.3.4ports:-port:9376Note: The endpoint IPs may not be loopback (127.0.0.0/8), link-local (169.254.0.0/16), or link-local multicast (224.0.0.0/24). They cannot be the cluster IPs of other Kubernetes services either because thekube-proxycomponent doesn’t support virtual IPs as destination yet.
Accessing a Service without a selector works the same as if it had a selector. The traffic will be routed to endpoints defined by the user (1.2.3.4:9376 in this example).
An ExternalName service is a special case of service that does not have selectors and uses DNS names instead. For more information, see the ExternalName section later in this document.
Virtual IPs and service proxies
Every node in a Kubernetes cluster runs a kube-proxy. kube-proxy is responsible for implementing a form of virtual IP for Services of type other than ExternalName.
In Kubernetes v1.0, Services are a “layer 4” (TCP/UDP over IP) construct, the proxy was purely in userspace. In Kubernetes v1.1, the Ingress API was added (beta) to represent “layer 7”(HTTP) services, iptables proxy was added too, and became the default operating mode since Kubernetes v1.2. In Kubernetes v1.8.0-beta.0, ipvs proxy was added.
Proxy-mode: userspace
In this mode, kube-proxy watches the Kubernetes master for the addition and removal of Service and Endpoints objects. For each Service it opens a port (randomly chosen) on the local node. Any connections to this “proxy port” will be proxied to one of the Service’s backend Pods (as reported in Endpoints). Which backend Pod to use is decided based on the SessionAffinity of the Service. Lastly, it installs iptables rules which capture traffic to the Service’s clusterIP (which is virtual) and Port and redirects that traffic to the proxy port which proxies the backend Pod. By default, the choice of backend is round robin.

Note that in the above diagram, clusterIP is shown as ServiceIP.
Proxy-mode: iptables
In this mode, kube-proxy watches the Kubernetes master for the addition and removal of Service and Endpoints objects. For each Service, it installs iptables rules which capture traffic to the Service’s clusterIP (which is virtual) and Port and redirects that traffic to one of the Service’s backend sets. For each Endpoints object, it installs iptables rules which select a backend Pod. By default, the choice of backend is random.
Obviously, iptables need not switch back between userspace and kernelspace, it should be faster and more reliable than the userspace proxy. However, unlike the userspace proxier, the iptables proxier cannot automatically retry another Pod if the one it initially selects does not respond, so it depends on having working readiness probes.

Note that in the above diagram, clusterIP is shown as ServiceIP.
Proxy-mode: ipvs
Kubernetes v1.9
beta
In this mode, kube-proxy watches Kubernetes Services and Endpoints, calls netlink interface to create ipvs rules accordingly and syncs ipvs rules with Kubernetes Services and Endpoints periodically, to make sure ipvs status is consistent with the expectation. When Service is accessed, traffic will be redirected to one of the backend Pods.
Similar to iptables, Ipvs is based on netfilter hook function, but uses hash table as the underlying data structure and works in the kernel space. That means ipvs redirects traffic much faster, and has much better performance when syncing proxy rules. Furthermore, ipvs provides more options for load balancing algorithm, such as:
rr: round-robinlc: least connectiondh: destination hashingsh: source hashingsed: shortest expected delaynq: never queue
Note: ipvs mode assumes IPVS kernel modules are installed on the node before running kube-proxy. When kube-proxy starts with ipvs proxy mode, kube-proxy would validate if IPVS modules are installed on the node, if it’s not installed kube-proxy will fall back to iptables proxy mode.

In any of these proxy model, any traffic bound for the Service’s IP:Port is proxied to an appropriate backend without the clients knowing anything about Kubernetes or Services or Pods. Client-IP based session affinity can be selected by setting service.spec.sessionAffinity to “ClientIP” (the default is “None”), and you can set the max session sticky time by setting the field service.spec.sessionAffinityConfig.clientIP.timeoutSeconds if you have already set service.spec.sessionAffinity to “ClientIP” (the default is “10800”).
Multi-Port Services
Many Services need to expose more than one port. For this case, Kubernetes supports multiple port definitions on a Service object. When using multiple ports you must give all of your ports names, so that endpoints can be disambiguated. For example:
kind:ServiceapiVersion:v1metadata:name:my-servicespec:selector:app:MyAppports:-name:httpprotocol:TCPport:80targetPort:9376-name:httpsprotocol:TCPport:443targetPort:9377Note that the port names must only contain lowercase alphanumeric characters and -, and must begin & end with an alphanumeric character. 123-abc and web are valid, but 123_abc and -web are not valid names.
Choosing your own IP address
You can specify your own cluster IP address as part of a Service creation request. To do this, set the .spec.clusterIP field. For example, if you already have an existing DNS entry that you wish to reuse, or legacy systems that are configured for a specific IP address and difficult to re-configure. The IP address that a user chooses must be a valid IP address and within the service-cluster-ip-range CIDR range that is specified by flag to the API server. If the IP address value is invalid, the apiserver returns a 422 HTTP status code to indicate that the value is invalid.
Why not use round-robin DNS?
A question that pops up every now and then is why we do all this stuff with virtual IPs rather than just use standard round-robin DNS. There are a few reasons:
- There is a long history of DNS libraries not respecting DNS TTLs and caching the results of name lookups.
- Many apps do DNS lookups once and cache the results.
- Even if apps and libraries did proper re-resolution, the load of every client re-resolving DNS over and over would be difficult to manage.
We try to discourage users from doing things that hurt themselves. That said, if enough people ask for this, we may implement it as an alternative.
Discovering services
Kubernetes supports 2 primary modes of finding a Service - environment variables and DNS.
Environment variables
When a Pod is run on a Node, the kubelet adds a set of environment variables for each active Service. It supports both Docker links compatible variables (see makeLinkVariables) and simpler {SVCNAME}_SERVICE_HOST and {SVCNAME}_SERVICE_PORT variables, where the Service name is upper-cased and dashes are converted to underscores.
For example, the Service "redis-master" which exposes TCP port 6379 and has been allocated cluster IP address 10.0.0.11 produces the following environment variables:
REDIS_MASTER_SERVICE_HOST=10.0.0.11
REDIS_MASTER_SERVICE_PORT=6379
REDIS_MASTER_PORT=tcp://10.0.0.11:6379
REDIS_MASTER_PORT_6379_TCP=tcp://10.0.0.11:6379
REDIS_MASTER_PORT_6379_TCP_PROTO=tcp
REDIS_MASTER_PORT_6379_TCP_PORT=6379
REDIS_MASTER_PORT_6379_TCP_ADDR=10.0.0.11
This does imply an ordering requirement - any Service that a Pod wants to access must be created before the Pod itself, or else the environment variables will not be populated. DNS does not have this restriction.
DNS
An optional (though strongly recommended) cluster add-on is a DNS server. The DNS server watches the Kubernetes API for new Services and creates a set of DNS records for each. If DNS has been enabled throughout the cluster then all Pods should be able to do name resolution of Services automatically.
For example, if you have a Service called "my-service" in Kubernetes Namespace "my-ns" a DNS record for "my-service.my-ns" is created. Pods which exist in the "my-ns" Namespace should be able to find it by simply doing a name lookup for "my-service". Pods which exist in other Namespaces must qualify the name as "my-service.my-ns". The result of these name lookups is the cluster IP.
Kubernetes also supports DNS SRV (service) records for named ports. If the "my-service.my-ns" Service has a port named "http" with protocol TCP, you can do a DNS SRV query for "_http._tcp.my-service.my-ns" to discover the port number for "http".
The Kubernetes DNS server is the only way to access services of type ExternalName. More information is available in the DNS Pods and Services.