HTML基础知识
如下所有操作都是基于这个文档http://ui.imdsx.cn/menu/
1.HTML基础知识:head
参考文档如下:http://www.imdsx.cn/index.php/2017/07/27/html0/
需要在pycharm中新建一上html File
 1 <!DOCTYPE html> <!--指定标准的html代码 格式-->
 2 <!--一个标签 通过<> 来定义-->
 3 <html lang="en">
 4 <head>
 5     <!--head标签中大部分的标签都是不可见 前端页面不可见-->
 6     <!--配置html字符集-->
 7     <!--写在标签中的charset="UTF-8" 叫做属性 -->
 8     <meta charset="UTF-8">
 9     <!--每隔一秒钟 刷新一次-->
10     <meta http-equiv="refresh" content="1;http://www.baidu.com">  页面展示一秒钟,然后跳转到百度
11     <!--关键字检索:表示百度要检索的关键字,输入如下content里面的内容,就能找到-->
12     <meta name="keywords" content="xxxx">
13     <!--描述-->
14     <meta name="description" content="xxxx">
15
16     <!--修改浏览器tab页的名字的-->
17     <title>水瓶座</title>
18     <!--链接标签  rel指定 要展示要链接的功能 href 路径-->
19     <link rel="shortcut icon" href="http://ui.imdsx.cn/static/image/dsx_Small.jpg">
20     <!--链接样式表 rel指定 要展示要链接的功能 href 路径 -->
21     <link rel="stylesheet" href="">
22
23     <!--自闭合标签-->
24         <!--它没有另一对,自己就是一个整体-->
25     <!--主动闭合标签-->
26         <!--成对出现-->
27 </head>
28 <body>
29 <a>水瓶座</a>
30 </body>
31 </html>
运行结果如下:(需要在代码中,晃动一下鼠标,右侧出一各种浏览器,打开浏览器,就能看到如下结果)

展示1秒后,又跳转到百度界面

2.HTML基础知识:body
s1.html
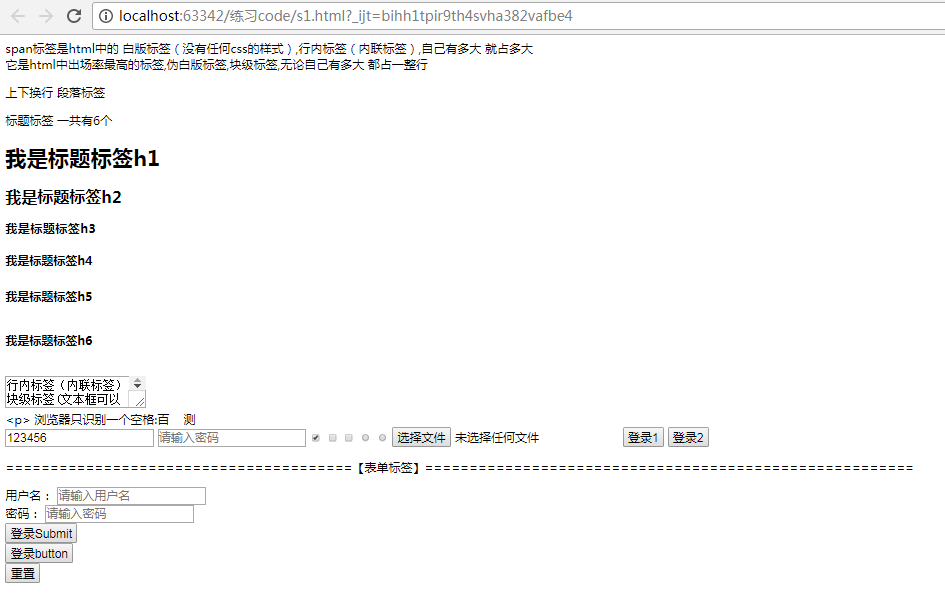
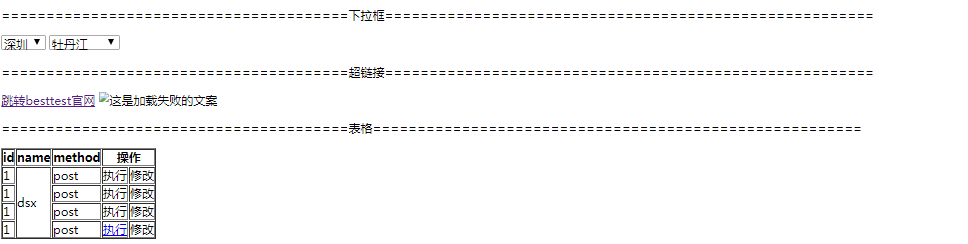
1 <!DOCTYPE html> 2 <html lang="en"> 3 <head> 4 <meta charset="UTF-8"> 5 <title>Title</title> 6 </head> 7 <body> 8 9 <span>span标签是html中的 白版标签(没有任何css的样式),行内标签(内联标签),自己有多大 就占多大</span> 10 11 <div>它是html中出场率最高的标签,伪白版标签,块级标签,无论自己有多大 都占一整行</div> 12 13 <p>上下换行 段落标签</p> 14 15 标题标签 一共有6个 16 <h1>我是标题标签h1</h1> 17 <h2>我是标题标签h2</h2> 18 <h3>我是标题标签h3</h3> 19 <h4>我是标题标签h4</h4> 20 <h5>我是标题标签h5</h5> 21 <h6>我是标题标签h6</h6> 22 23 <!--多行文本--> 24 <textarea>行内标签(内联标签)块级标签(文本框可以随意拖动它的大小)</textarea> 25 26 <div> 27 <!--特殊符号--> 28 <p> 29 <span>浏览器只识别一个空格:百    测</span> 30 </div> 31 32 <!--单行文本框 也叫 input框--> 33 <!--name代表传递给后端JSON的key 输入的字符串就是传递给后端的value--> 34 <!--placeholder 提示文案 type代表当前input的类型 默认是text--> 35 <input name="user" value="123456" placeholder="请输入用户名" type="text"> 36 <input name="password" placeholder="请输入密码" type="password"> 37 38 <!--{"user":"abdce","password":"123456"}--> 39 <!--是思考下 前端和后端如何交互?--> 40 41 <!--checkbox 多选框 checked代表默认勾选--> 42 <input type="checkbox" name="sex" value="1" checked="checked"> 43 <input type="checkbox" name="sex" value="2"> 44 <input type="checkbox" name="sex" value="3"> 45 <!--radio 单选 name相同则互斥--> 46 <input type="radio" name="sex" value="1"> 47 <input type="radio" name="sex" value="2"> 48 49 <!--上传文件--> 50 <!-- *****对于ui自动化来说 如果你需要上传文件的操作时,如果是input的方式实现的文件上传则可以通过sendkey直接搞--> 51 <input type="file" name="file"> 52 <!--button只是一个单纯的按钮 需要和js联动绑定事件来才可以进行动作操作--> 53 <input type="button" value="登录1"> 54 <input type="submit" value="登录2"> 55 56 <p>=======================================【表单标签】=======================================================</p> 57 <!--【表单标签】 理解为一张白纸 他是一个载体 承载的数据--> 58 <form action="http://www.baidu.com" method="get"> 59 <div> 60 <!--label扩展input可点击的范围,,点击用户名文本也可以定位到输入框--> 61 <label for="i1">用户名:</label> 62 <input id="i1" type="text" name="username" placeholder="请输入用户名"> 63 </div> 64 65 <div> 66 <label for="i2">密码:</label> 67 <input id="i2" type="password" placeholder="请输入密码" name="passwd"> 68 </div> 69 <!--如果submit和form连用,则点击时自动触发action请求--> 70 <div> 71 <input type="submit" value="登录Submit"> <!--form和submit一起用。点击submit时,会跳转到百度--> 72 </div> 73 74 <!--button必须和js连用--> 75 <div> 76 <input type="button" value="登录button"></div> <!--form和button一起用。点击button时,界面没有反映--> 77 <!--如果reset不和form表单连用 那将毫无作用 重置form中所有input变为默认模式--> 78 <input type="reset"> 79 </form> 80 81 <!--像后端发送请求的方式--> 82 <!--1、通过ajax进行异步请求--> 83 <!--每次提交不会刷新页面 如果验证通过才会跳转--> 84 <!--2、通过form表单进行请求--> 85 <!--提交时整个页面进行刷新提交--> 86 <!--会导致用户填写的数据被清空--> 87 88 <p>=======================================下拉框=======================================================</p> 89 <!--select先写框 在写value 具有层级关系 selected默认选择那一项--> 90 <select name="area"> 91 <option value="1">北京</option> 92 <option value="2">上海</option> 93 <option value="3" selected="selected">深圳</option> 94 </select> 95 <!--{“area”:“3”}--> 96 97 <select> 98 <!--label分组名--> 99 <optgroup label="黑龙江"> 100 <option value="1">牡丹江</option> 101 <option value="2">哈尔滨</option> 102 </optgroup> 103 <optgroup label="河北"> 104 <option value="3">秦皇岛</option> 105 <option value="4">石家庄</option> 106 </optgroup> 107 </select> 108 109 <p>=======================================超链接=======================================================</p> 110 <!--超链接标签 href 连接地址 target新建 一个tab再打开 --> 111 <a href="http://www.besttest.cn" target="_blank">跳转besttest官网</a> 112 <!--图片标签 alt 当图片加载失败后显示的文字 title 鼠标悬浮到图片时显示的文字 --> 113 <img src="http://ui.imdsx.cn/static/image/dsx_Small.jpg1" alt="这是加载失败的文案" title="这是鼠标炫悬浮式显示文字"> 114 115 <p>=======================================表格=======================================================</p> 116 <table border="1"> 117 <thead> <!--表格横向字段--> 118 <tr> <!--行--> 119 <th>id</th> <!---列---> 120 <th>name</th> 121 <th>method</th> 122 <th colspan="2">操作</th> <!--表格字段:2个合并成一个--> 123 </tr> <!--行--> 124 </thead> 125 <tbody> 126 <tr> <!--行--> 127 <td>1</td> 128 <td rowspan="4">dsx</td> <!--第1行,第2列中所有数据合并--> 129 <td>post</td> 130 <td>执行</td> 131 <td>修改</td> 132 </tr> 133 <tr> 134 <td>1</td> 135 <td>post</td> 136 <td>执行</td> 137 <td>修改</td> 138 </tr> 139 <tr> 140 <td>1</td> 141 <td>post</td> 142 <td>执行</td> 143 <td>修改</td> 144 </tr> 145 <tr> 146 <td>1</td> 147 <td>post</td> 148 <td><a href="s.html">执行</a></td> 149 <td>修改</td> 150 </tr> 151 </tbody> 152 </table> 153 </body> 154 </html>
运行结果如下:
一般用到的注释有以下几种:==============================================
html:<!-- -->;
css:/* */
js://注释单行
/*注释多行*/
====================================================================
3.HTML基础知识:CSS选择器
参考文档:http://www.imdsx.cn/index.php/2017/07/27/html1/
s2.html
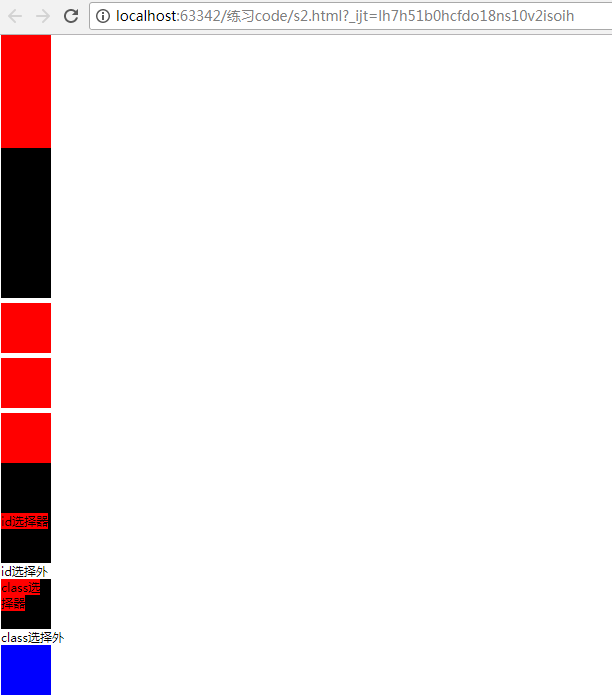
  1 <!DOCTYPE html>
  2 <html lang="en">
  3 <head>
  4     <meta charset="UTF-8">
  5     <title>Title</title>
  6     <!--选择器 定位body中的标签-->
  7     <!--在style标签中添加CSS样式 写在head中-->
  8     <style>
  9          /*******1.*id选择器 关键符号是#    */
 10         #i1{
 11             /*高度   <!--#i1表示:已经定位到body体中,id是i1的属性 --> */
 12             height: 100px;
 13             /*!*宽度*!*/
 14             width: 100px;
 15             /*!*背景色*!*/
 16             background-color: red;
 17         }
 18         /*2. id组合选择器*/
 19         #i1,#i2,#i3{
 20             /*高度*/
 21             height: 100px;
 22             /*宽度*/
 23             width: 100px;
 24             /*背景色*/
 25             background-color: red;
 26         }
 27
 28         /*3. class选择器  <!--  .c1表示:已经定位到body体中,class是c1的属性 --> */
 29         .c1{
 30             height: 100px;
 31             width: 100px;
 32             background-color: black;
 33         }
 34          /*4. class组合选择器*/
 35         .c2,.c3,.c4{
 36             /*高度*/
 37             height: 100px;
 38             /*宽度*/
 39             width: 100px;
 40             /*背景色*/
 41             background-color: red;
 42             margin-top: 10px;
 43         }
 44
 45         /* 5. 标签选择器*/
 46         div{
 47             height: 100px;
 48             width: 100px;
 49             background-color: black;
 50         }
 51
 52         /*!* 6.  id层级选择器*!*/
 53         #i31 span{
 54             background-color: red;
 55         }
 56         /*!* 7.  class层级选择器*!*/
 57         .c33 span{
 58             background-color: red;
 59         }
 60         /* 8.  属性选择器*/
 61         div[dsx="dsx"]{
 62             height: 100px;
 63             width: 100px;
 64             background-color: blue;
 65         }
 66     </style>
 67 </head>
 68 <body>
 69
 70     <!--1和2. id的属性随意写 但是一个html标签中只允许出现一个id 不能重复-->
 71     <div id="i1"></div>
 72     <div id="i2"></div>
 73     <div id="i3"></div>
 74     <!--3. class也可以随意写,一个html标签中可以存在多个相同的class属性-->
 75     <!--css样式中 class 应用的最频繁-->
 76     <div class="c1"></div>
 77     <div class="c1"></div>
 78     <div class="c1"></div>
 79
 80     <!--4. class组合选择器 知道就行 不要用-->
 81     <div class="c2"></div>
 82     <div class="c3"></div>
 83     <div class="c4"></div>
 84
 85     <!--5. 标签选择器是以"标签的名字来定位" 应用于所有div标签-->
 86     <div></div>
 87
 88     <!--6.  id层次选择器-->
 89     <div id="i31">
 90         <span>id选择器</span>
 91     </div>
 92     <span>id选择外</span>
 93
 94     <!-- 7.  class层次选择器-->
 95     <div class="c33">
 96         <span>class选择器</span>
 97     </div>
 98     <span>class选择外</span>
 99
100     <!--8. 属性选择器-->
101     <div dsx="dsx"></div>
102
103
104 </body>
105 </html>
运行结果如下:
4.HTML基础知识:CSS样式1
1.新建一个stylesheet
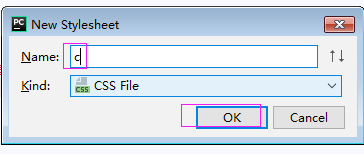
2. 按ctrl + 鼠标,进入c.css

.c1{
height: 100px;
width: 100px;
background-color: black;
}
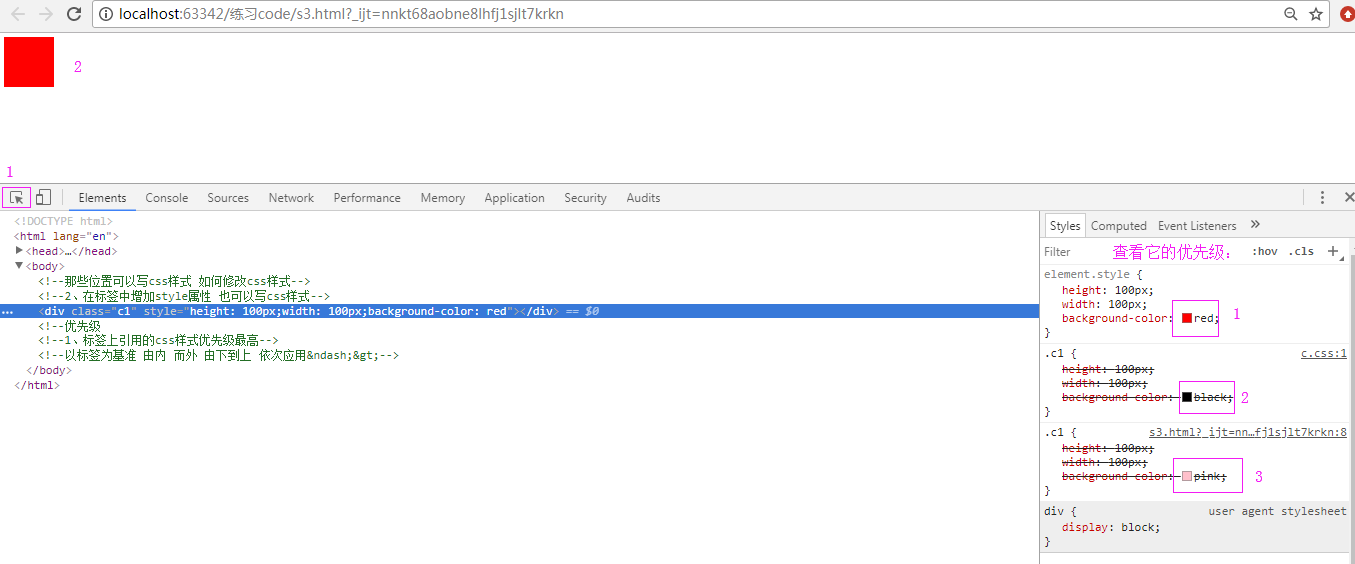
s3.html代码如下:
 1 <!DOCTYPE html>
 2 <html lang="en">
 3 <head>
 4     <meta charset="UTF-8">
 5     <title>Title</title>
 6     <!--1、head中添加一个style标签可以写css样式-->
 7     <style>
 8         .c1 {
 9             height: 100px;
10             width: 100px;
11             background-color: pink;
12         }
13     </style>
14     <!--3、通过link标签导入的css样式表 rel代表类型 href路径-->
15     <link rel="stylesheet" href="c.css">
16
17 </head>
18 <body>
19 <!--那些位置可以写css样式 如何修改css样式-->
20 <!--2、在标签中增加style属性 也可以写css样式-->
21 <div class="c1" style="height: 100px;width: 100px;background-color: red"></div>
22 <!--优先级
23 1、标签上引用的css样式优先级最高
24 以标签为基准 由内 而外 由下到上 依次应用-->
25 </body>
26 </html>
运行结果如下:
5.HTML基础知识:CSS样式2
s4.html代码如下:
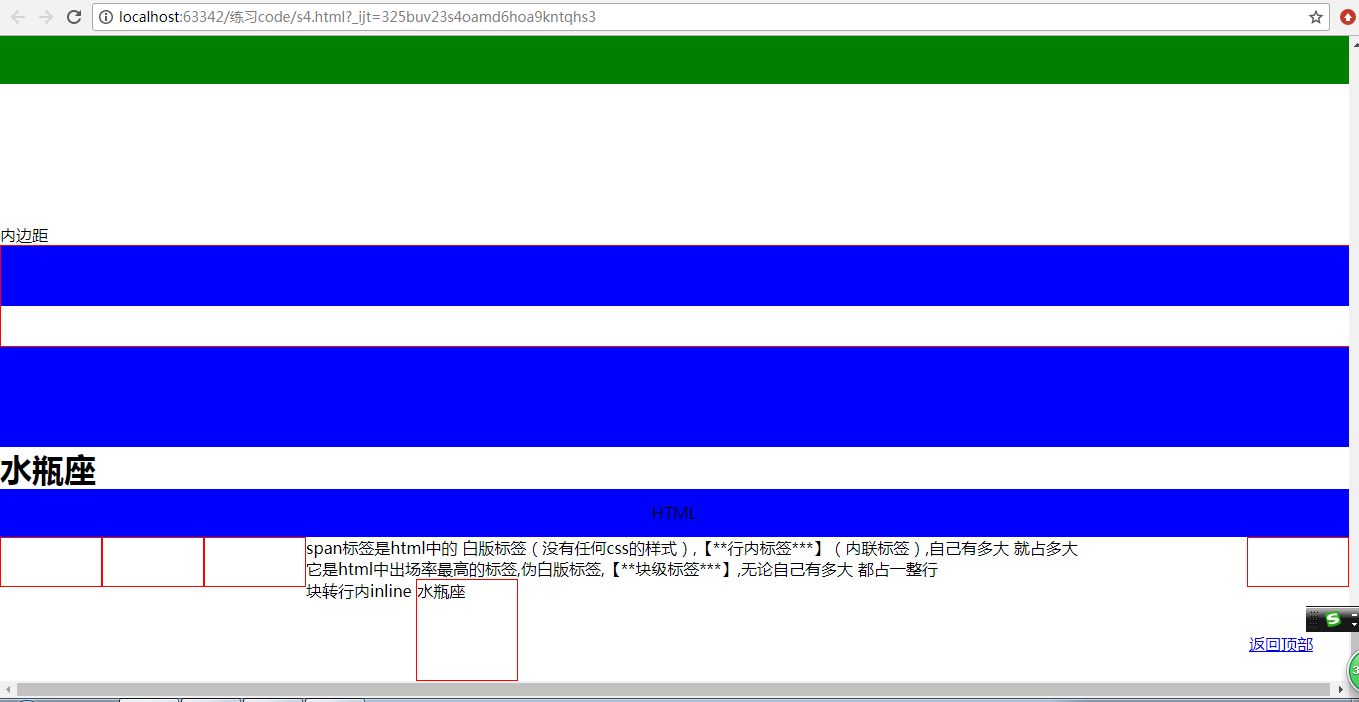
1 <!DOCTYPE html> 2 <html lang="en"> 3 <head> 4 <meta charset="UTF-8"> 5 <title>Title</title> 6 <style> 7 .active{ 8 display: none; 9 } 10 .c1{ 11 height: 100px; 12 width: 100px; 13 background-color: blue; 14 } 15 16 .c11{ 17 height: 100px; 18 /*宽度可以写百分比的 高度不可以*/ 19 width: 100%; 20 background-color: blue; 21 } 22 .c2{ 23 /*字体加大加粗*/ 24 font-size: xx-large; 25 font-weight: bolder; 26 } 27 28 .c21{ 29 width: 100%; 30 height: 48px; 31 background-color: blue; 32 /*水平居中*/ 33 text-align: center; 34 /*垂直居中*/ 35 line-height: 48px; 36 } 37 38 .c12{ 39 height: 48px; 40 width: 100px; 41 /*边框 1像素 红色 实线*/ 42 border: 1px red solid; 43 } 44 45 .c6{ 46 height: 100px; 47 width: 100px; 48 display: inline-block; 49 border: 1px red solid 50 } 51 52 53 .c9{ 54 height: 100px; 55 width: 100%; 56 border: 1px red solid; 57 } 58 59 .c0{ 60 height: 50px; 61 width: 100%; 62 background-color: blue; 63 } 64 .head{ 65 height: 48px; 66 background-color: green; 67 position: fixed; 68 top: 0; 69 right: 0; 70 left: 0 71 } 72 .go-top{ 73 height: 48px; 74 width: 100px; 75 position: fixed; 76 right: 0; 77 bottom: 0; 78 } 79 </style> 80 </head> 81 <body style="margin: 0"> 82 83 <!--外边距--> 84 <div class="head"></div> 85 <div id="i1"></div> 86 <div style="height: 10000px;width: 100%;margin-top: 48px"></div> 87 <div class="go-top"> 88 <!--a标签可以用作锚点--> 89 <a href="#i1">返回顶部</a> 90 </div> 91 92 <!--<div class="c9">--> 93 <!--<!–外边距margin top代表距离外层上边10px–>--> 94 <!--<!–外边距自己本身不做变化而相对于外层做移动–>--> 95 <!--<div class="c0" style="margin-top: 10px"></div>--> 96 <!--</div>--> 97 98 内边距 99 <div class="c9"> 100 <!--内边距padding top代表距自身增加10px--> 101 <!--内边距改变自身--> 102 <div class="c0" style="padding-top: 10px"></div> 103 </div> 104 105 106 107 <!--标签中的class属性是可以同时引用多个选择器--> 108 <div class="c1 active"></div> 109 <div class="c11"></div> 110 111 <div class="c2">水瓶座</div> 112 <div class="c21">HTML</div> 113 <!--浮动:可以左漂,也可以右飘--> 114 <div class="c12" style="float: right"></div> 115 <div class="c12" style="float: left"></div> 116 <div class="c12" style="float: left"></div> 117 <div class="c12" style="float: left"></div> 118 119 120 <span>span标签是html中的 白版标签(没有任何css的样式),【**行内标签***】(内联标签),自己有多大 就占多大</span> 121 <div>它是html中出场率最高的标签,伪白版标签,【**块级标签***】,无论自己有多大 都占一整行</div> 122 123 <!--display属性--> 124 <!--行内标签 不可以应用宽、高、外边距、内边距等css样式--> 125 <!--行内标签转块级标签 通过display block--> 126 <!--<span style="height: 100px;width: 100px;display: block">行内标签转块级标签block</span>--> 127 <!--块转行内 通过display的inline--> 128 <div style="height: 100px;width: 100px;display: inline">块转行内inline</div> 129 <!--即使行内 也是 块级--> 130 <span class="c6">水瓶座</span> 131 <!--display: none 隐藏当前元素--> 132 <div style="height: 100px;width: 100px;background-color: blue;display: none"></div> 133 134 135 <!--postion分层--> 136 <!--postion fixed 绝对定位 写完后永远都在哪一个地方--> 137 <!--<div style="height: 48px;background-color: green;position: fixed;top: 0;right: 0;left: 0"></div>--> 138 <!--<div style="height: 1000px;width: 100%"></div>--> 139 <!--<div style="height: 48px;width: 48px;position: fixed;right: 0;bottom: 0;background-color: blue"></div>--> 140 141 </body> 142 </html>
运行结果如下:
6.HTML基础知识:CSS样式3
s5.html代码如下:
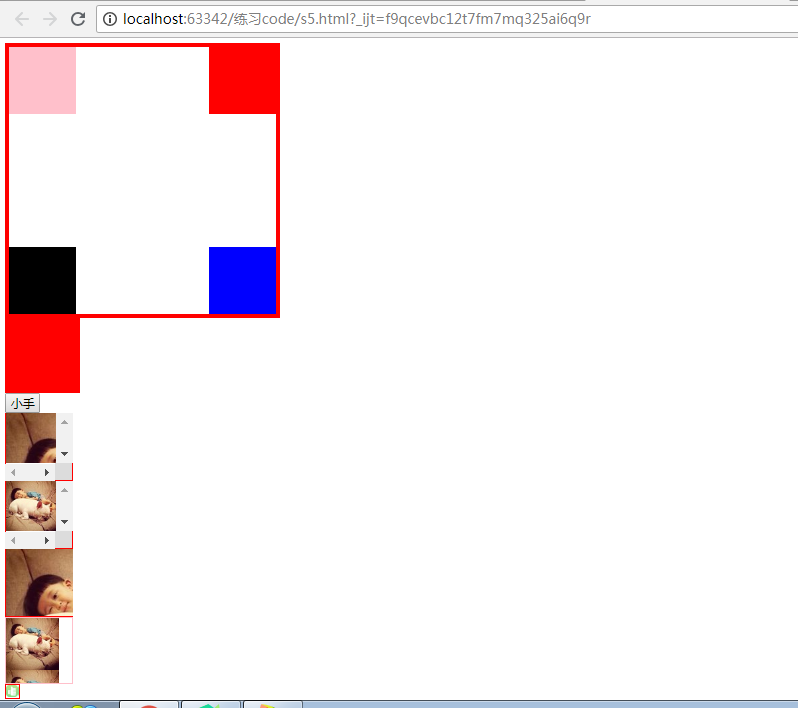
 1 <!DOCTYPE html>
 2 <html lang="en">
 3 <head>
 4     <meta charset="UTF-8">
 5     <title>Title</title>
 6
 7     <style>
 8         .out {
 9             height: 400px;
10             width: 400px;
11             border: 6px red solid;
12             position: relative;
13         }
14 /*postion:absolute与relative是成对出现的,不能单独使用*/
15         .inner {
16             height: 100px;
17             width: 100px;
18             position: absolute;
19         }
20
21         .out-zindex {
22             height: 100px;
23             width: 100px;
24             border: 6px red solid;
25             position: relative;
26         }
27
28         .inner-zindex {
29             height: 100px;
30             width: 100px;
31             position: absolute;
32         }
33         .image{
34             height:100px;width:100px;border: 1px pink solid;
35             background-image: url('http://ui.imdsx.cn/static/image/dsx_Small.jpg');
36             /*当图片小于外层时不做堆叠操作*/
37             /*background-repeat: no-repeat;*/
38             /*横向堆叠*/
39             /*background-repeat: repeat-x;*/
40             /*纵向堆叠*/
41             background-repeat: repeat-y;
42
43         }
44
45     </style>
46 </head>
47 <body>
48 <!--相对定位-->
49 <div class="out">
50 <div class="inner" style="background-color: blue;right: 0;bottom: 0"></div>
51 <div class="inner" style="background-color: red;right: 0;top: 0"></div>
52 <div class="inner" style="background-color: black;left: 0;bottom: 0"></div>
53 <div class="inner" style="background-color: pink;left: 0;top:0"></div>
54 </div>
55
56 <!--z-index的例子:z-index:10的值越高,它就越在最前面,如下部分颜色重叠了-->
57 <div class="out-zindex">
58     <div class="inner-zindex" style="background-color: blue;z-index:10"></div>
59     <div class="inner" style="background-color: red;z-index: 11"></div>
60     <div class="inner" style="background-color: black;"></div>
61     <div class="inner" style="background-color: pink;"></div>
62 </div>
63 <!--鼠标悬浮的样式-->
64 <input type="button" value="小手" style="cursor: pointer">
65 <!--滚动条-->
66 <!--当图片或内容超过外层div的宽和高时,overflow auto将自动添加滚动条-->
67 <div style="height: 100px;width: 100px;border: 1px red solid;overflow: auto">
68     <img src="http://ui.imdsx.cn/static/image/dsx.jpg">
69 </div>
70 <!--当图片或内容超过外层div的宽和高时,overflow scroll将自动添加滚动条. 区别于auto: 如果父类大于图片或内容大小
71 则,scroll依旧展示滚动条 而auto是自动识别的 -->
72 <div style="height: 100px;width: 100px;border: 1px red solid;overflow: scroll">
73     <img src="http://ui.imdsx.cn/static/image/dsx_Small.jpg">
74 </div>
75 <!--overflow hidden 当父类小于内部的图片或内容时,自动裁剪 以左上角为基准-->
76 <div style="height: 100px;width: 100px;border: 1px red solid;overflow: hidden">
77     <img src="http://ui.imdsx.cn/static/image/dsx.jpg">
78 </div>
79
80 <div class="image" style=""></div>
81 <!--background-position:0 0 表示调整它的x,y值后,可以取到图片中不同的值 -->
82 <div style="height: 20px;width: 20px;border: 1px red solid;background-image: url('http://ui.imdsx.cn/static/image/icon.png');background-position: 0 0"></div>
83
84 </body>
85 </html>
运行结果如下:
7.HTML基础知识:dom
参考文档如下:http://www.imdsx.cn/index.php/2017/07/27/html2/
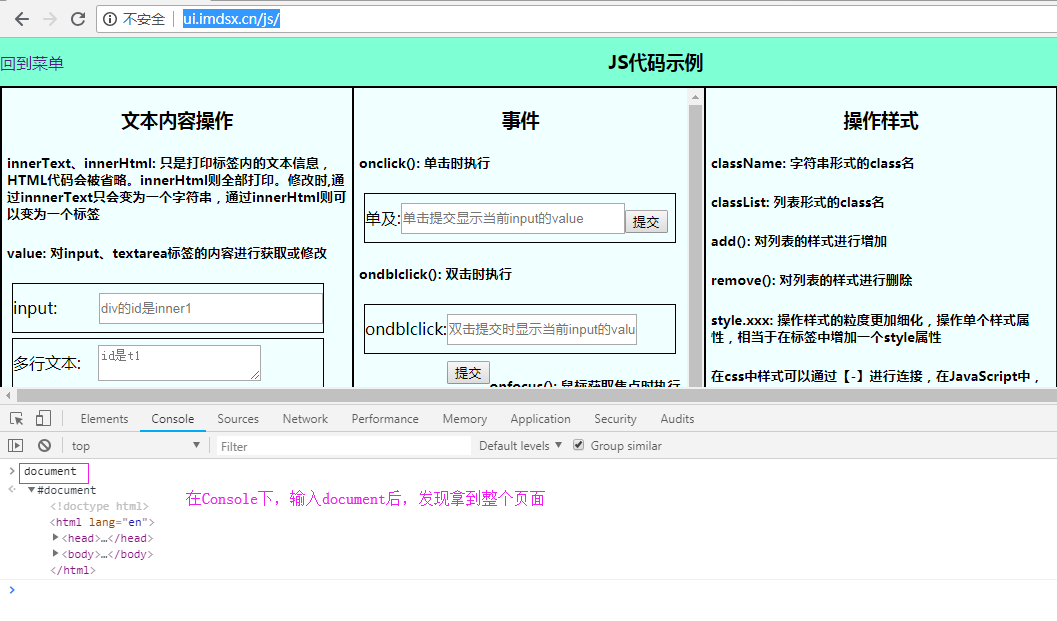
练习网址http://ui.imdsx.cn/js/
DOM(Document Object Model 文档对象模型)
一个web页面的展示,是由html标签组合成的一个页面,dom对象实际就是将html标签转换成了一个文档对象。可以通过dom对象中js提供的方法,找到html的各个标签。通过找到标签就可以操作标签使页面动起来,让页面动起来。
获取标签
 1 // 直接获取标签
 2
 3 document.getElementById('i1'); //获取id为i1的标签
 4
 5 document.getElementsByTagName('div'); //根据标签名称获得标签数组
 6
 7 document.getElementsByClassName('c1'); //根据class属性获取标签的数组
 8
 9 document.getElementsByName('dsx'); //根据name属性获取标签数组
10
11 // 间接获取标签
12
13 var tmp=document.getElementById('h-test');
14
15 tmp.parentElement; // 父节点标签元素
16
17 tmp.children; //所有子标签
18
19 tmp.firstElementChild; //第一个子标签元素
20
21 tmp.lastElementChild; // 最后一个子标签元素
22
23 tmp.nextElementSibling; //下一个兄弟标签元素
24
25 tmp.previousElementSibling; //上一个兄弟标签元素
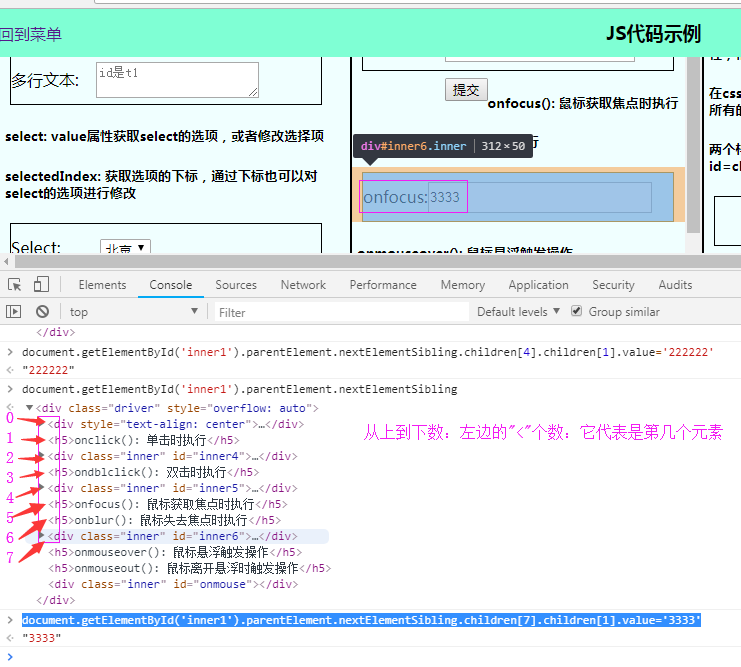
1. 如下如何找到这个inner1
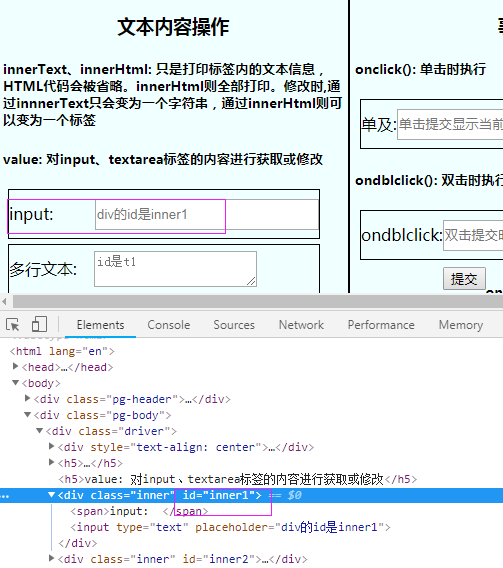
2. 在Console目录下,输入命令:document.getElementById('inner1')
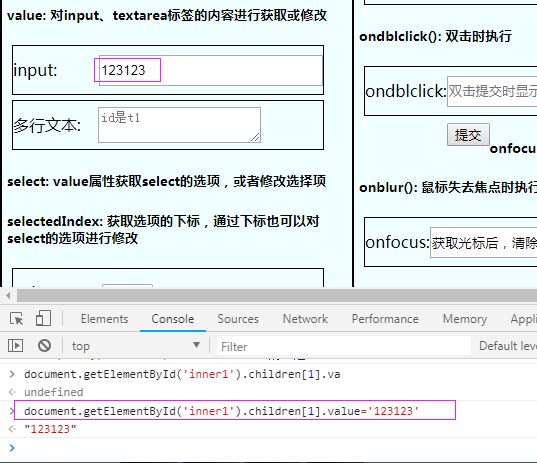
3. 取inner1的输入框: document.getElementById('inner1').children[1]

4. 操作这个inner1的属性值: document.getElementById('inner1').children[1].value='123123'
5. 通过inner1为坐标,找到inner4对应的input值
document.getElementById('inner1').parentElement.nextElementSibling.children[2].children[1].value='111111111'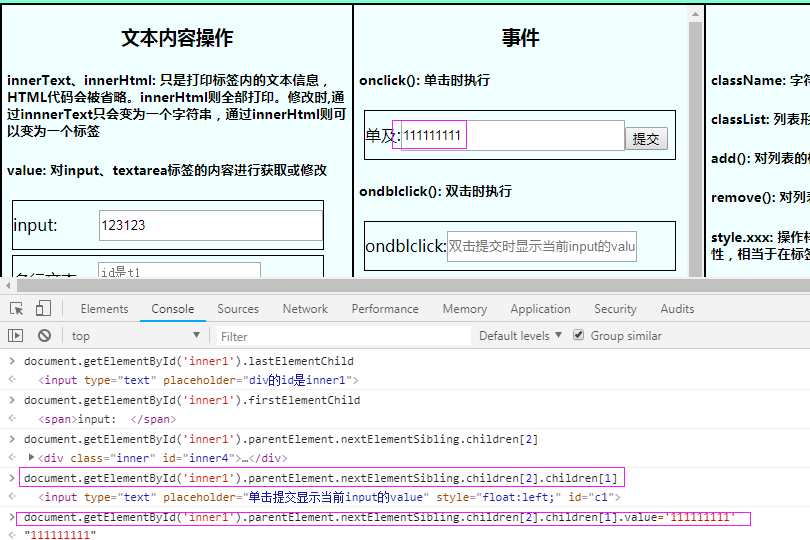
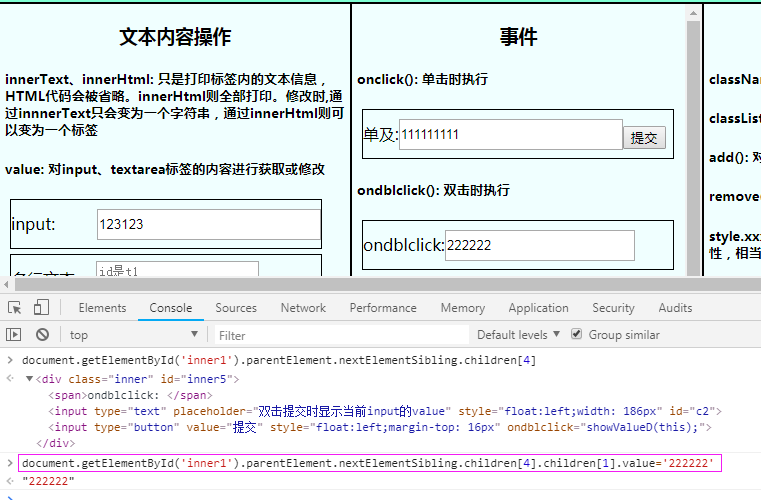
6.通过inner1找到 innner5的值 : document.getElementById('inner1').parentElement.nextElementSibling.children[4].children[1].value='222222'
7. 通过 inner1 为基准,找inner7 :
document.getElementById('inner1').parentElement.nextElementSibling.children[7].children[1].value='3333'