本文是对近期工作的一个总结,上段时间已经完成了Kinect2驱动、ROS依赖包的安装,以及ur5机器人的URDF、驱动安装等。
而且分步走通了物体位姿识别、MoveIt!点云信息导入、实物机器人联动等功能,现在准备将相机获得的信息与机器人位置标定到一起去。
一、
由于我用的是Kinect2,在手眼标定之前需要对Kinect2的彩色相机和深度相机进行配准,这样出来的RGB-D图精度才能高一些,否则彩色图与深度图会错位。由于iai_kinect2中自带了相机标定包,于是直接安装下面的教程来标定了。
- If you haven't already, start the kinect2_bridge with a low number of frames per second (to make it easy on your CPU):
rosrun kinect2_bridge kinect2_bridge _fps_limit:=2 - create a directory for your calibration data files, for example:
mkdir ~/kinect_cal_data; cd ~/kinect_cal_data - Record images for the color camera:
rosrun kinect2_calibration kinect2_calibration chess5x7x0.03 record color - (彩色相机内参)Calibrate the intrinsics:
rosrun kinect2_calibration kinect2_calibration chess5x7x0.03 calibrate color - Record images for the ir camera:
rosrun kinect2_calibration kinect2_calibration chess5x7x0.03 record ir - (深度相机内参)Calibrate the intrinsics of the ir camera:
rosrun kinect2_calibration kinect2_calibration chess5x7x0.03 calibrate ir - Record images on both cameras synchronized:
rosrun kinect2_calibration kinect2_calibration chess5x7x0.03 record sync - (二者外参)Calibrate the extrinsics:
rosrun kinect2_calibration kinect2_calibration chess5x7x0.03 calibrate sync - Calibrate the depth measurements:
rosrun kinect2_calibration kinect2_calibration chess5x7x0.03 calibrate depth - Find out the serial number of your kinect2 by looking at the first lines printed out by the kinect2_bridge. The line looks like this:
device serial: 012526541941 - Create the calibration results directory in kinect2_bridge/data/$serial:
roscd kinect2_bridge/data; mkdir 012526541941 - Copy the following files from your calibration directory (~/kinect_cal_data) into the directory you just created:
calib_color.yaml calib_depth.yaml calib_ir.yaml calib_pose.yaml - Restart the kinect2_bridge and be amazed at the better data.
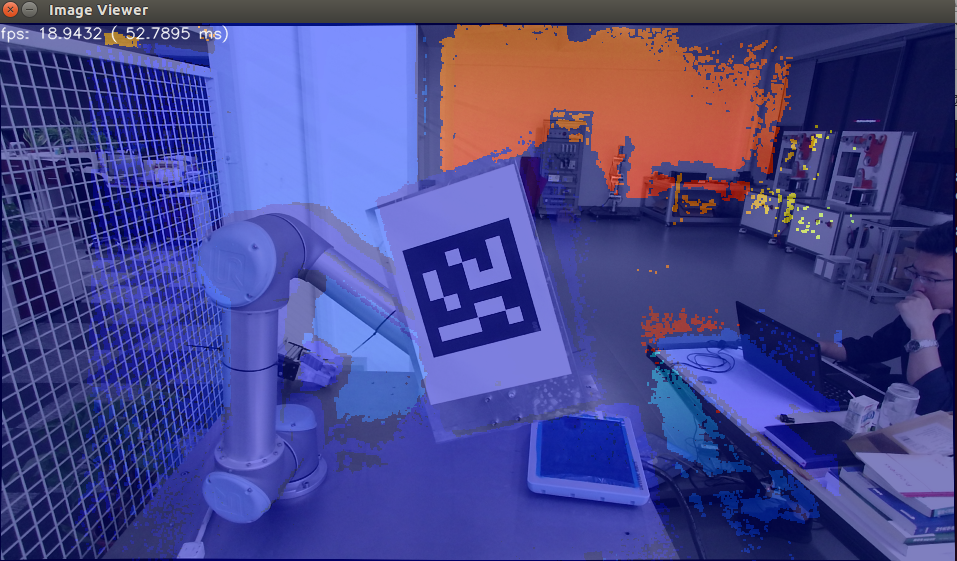
但是,我配准出来的效果并不好,如下图所示

二、
然后,进行手眼标定,主要是利用easy_handeye,在使用这个包之前,还需要按如下步骤安装一些依赖包:
1、sudo apt-get install ros-indigo-visp
2、
	$ cd ~/catkin_ws/src
	$ git clone -b indigo-devel https://github.com/lagadic/vision_visp.git
	$ cd ..
	$ catkin_make --pkg visp_hand2eye_calibration
3、安装aruco_ros:git clone -b indigo ......
4、最后安装 easy_handeye:git clone -b indigo ......
安装完成之后,修改ur5标定的launch文件,主要是为了能自动进行标定。easy_handeye的作者提供了一个示例launch,在此基础上进行修改。
<launch>
<arg name="namespace_prefix" default="ur5_kinect_handeyecalibration" />
<arg name="robot_ip" doc="The IP address of the UR5 robot" />
<!--<arg name="marker_frame" default="aruco_marker_frame"/>-->
<arg name="marker_size" doc="Size of the ArUco marker used, in meters" default="0.1" />
<arg name="marker_id" doc="The ID of the ArUco marker used" default="100" />
<!-- start the Kinect -->
<include file="$(find kinect2_bridge)/launch/kinect2_bridge.launch" />
<!-- <arg name="depth_registration" value="true" />
</include>-->
<!-- start ArUco -->
<node name="aruco_tracker" pkg="aruco_ros" type="single">
<remap from="/camera_info" to="/kinect2/hd/camera_info" />
<remap from="/image" to="/kinect2/hd/image_color_rect" />
<param name="image_is_rectified" value="true"/>
<param name="marker_size" value="$(arg marker_size)"/>
<param name="marker_id" value="$(arg marker_id)"/>
<param name="reference_frame" value="kinect2_rgb_optical_frame"/>
<param name="camera_frame" value="kinect2_rgb_optical_frame"/>
<param name="marker_frame" value="camera_marker" />
</node>
<!-- start the robot -->
<include file="$(find ur_modern_driver)/launch/ur5_bringup.launch">
<arg name="limited" value="true" />
<arg name="robot_ip" value="192.168.1.111" />
</include>
<include file="$(find ur5_moveit_config)/launch/ur5_moveit_planning_execution.launch">
<arg name="limited" value="true" />
</include>
<!-- start easy_handeye -->
<include file="$(find easy_handeye)/launch/calibrate.launch" >
<arg name="namespace_prefix" value="$(arg namespace_prefix)" />
<arg name="eye_on_hand" value="false" />
<arg name="tracking_base_frame" value="kinect2_rgb_optical_frame" />
<arg name="tracking_marker_frame" value="camera_marker" />
<arg name="robot_base_frame" value="base_link" />
<arg name="robot_effector_frame" value="wrist_3_link" />
<arg name="freehand_robot_movement" value="false" />
<arg name="robot_velocity_scaling" value="0.5" />
<arg name="robot_acceleration_scaling" value="0.2" />
</include>
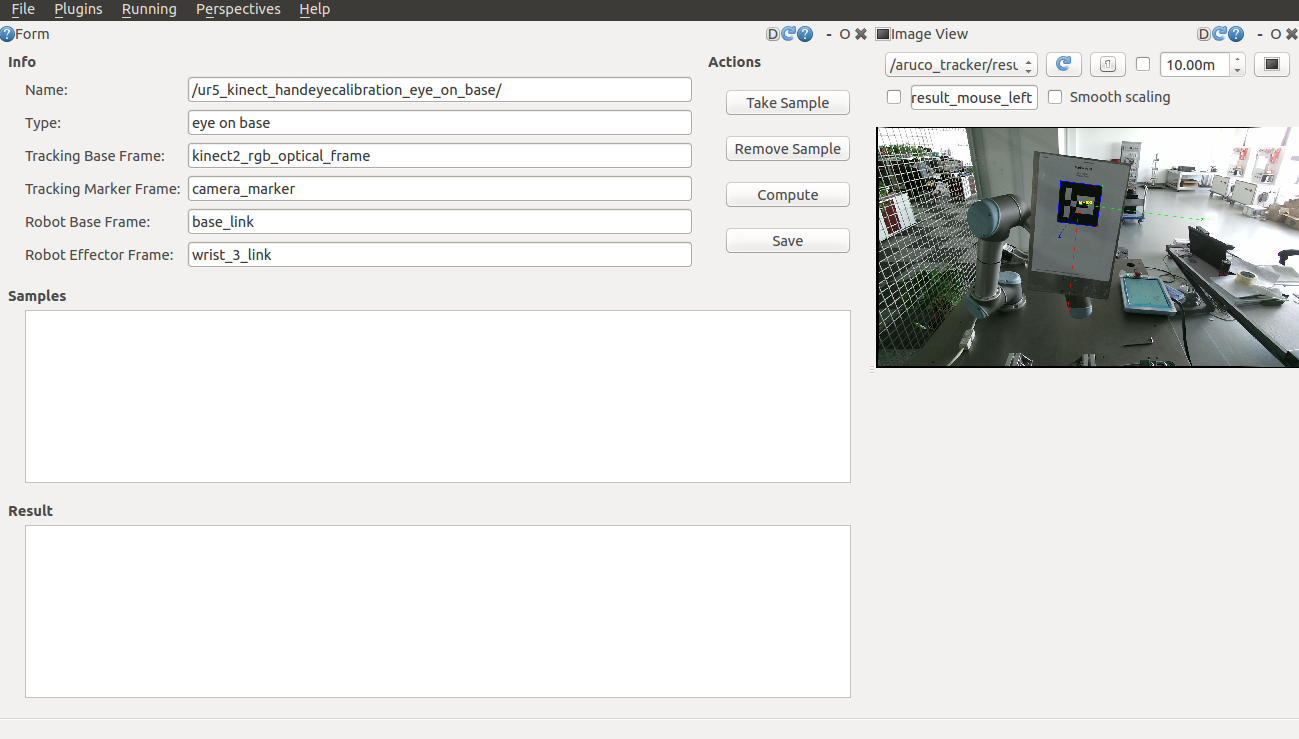
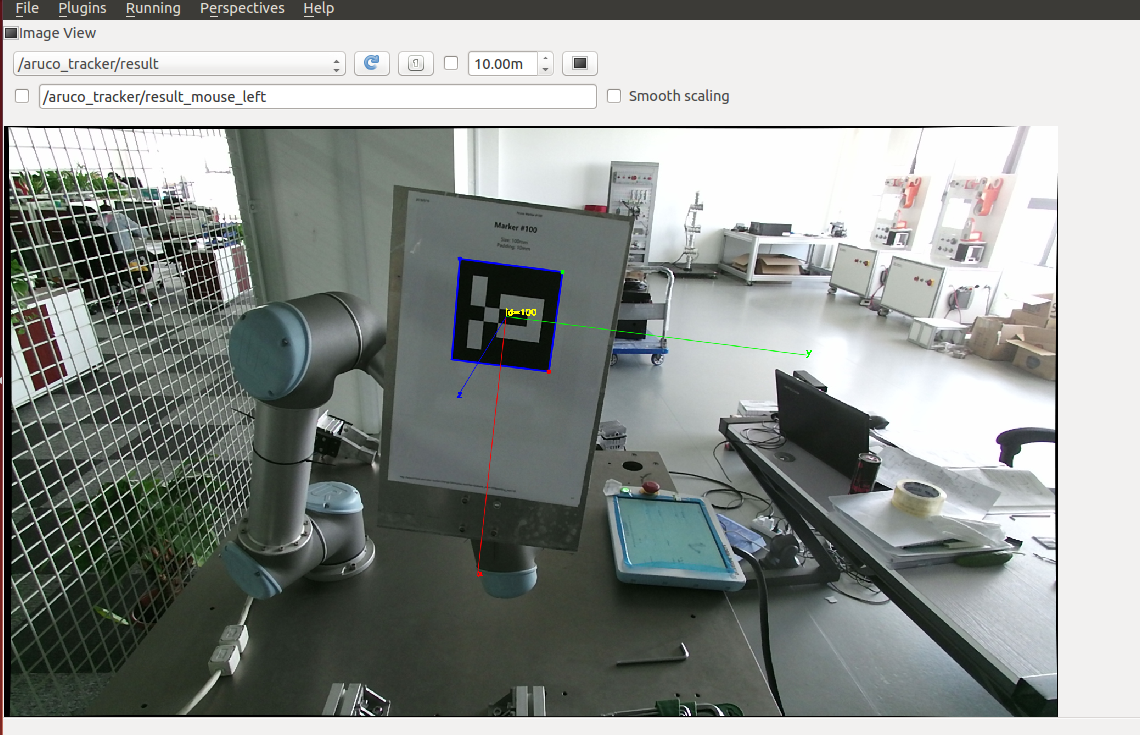
</launch>启动launch文件,然后出现标定画面,按教程步骤来走就行,但是有一个地方要注意,如下图所示,image view这个界面要打开,否则无法take sample(不知道别人有没有这个问题,我是在这个问题上卡了一天,一开始找了很多资料,也多次修改了launch文件,但是都没有效果,也是在无意中打开image view这个界面,可以看到aruco marker被识别,然后点击take sample就可以采样成功了。)
官方教程上是采17个点,但是我在标定的时候,机器人有两个位置的规划不成功,所以一共采集了15个点,经过计算,得到变换矩阵。关于怎么利用这个计算出的变换矩阵,有两种方法:
1、将它发布出去
roslaunch easy_handeye publish.launch2、将矩阵输入到 tf static_transform_publisher中发布。
三、
为了减少启动窗口,我将启动机器人、kinect、moveit、点云数据处理等写到了如下的launch文件中。
<launch>

		<!-- start the robot -->
  <include file="$(find ur_modern_driver)/launch/ur5_bringup.launch">
      <arg name="limited" value="true" />
      <arg name="robot_ip" value="192.168.1.111" />
  </include>
  <include file="$(find ur5_moveit_config)/launch/ur5_moveit_planning_execution.launch">
      <arg name="limited" value="true" />
  </include>

  <include file="$(find ur5_moveit_config)/launch/moveit_rviz.launch">
      <arg name="config" value="true" />
  </include>


	<include file="$(find kinect2_bridge)/launch/kinect2_bridge.launch" />

	<node pkg="my_pcl_tutorial" type="s1_passthrough" name="s1_pass_through" respawn="false">
        <remap from="/cloud_input" to="/kinect2/qhd/points" />
  </node>
	<node pkg="my_pcl_tutorial" type="s2_voxelgrid" name="s2_voxel_grid" respawn="false" />
	<node pkg="my_pcl_tutorial" type="s3_radiussearch" name="s3_radius_search" respawn="false" />

	<!--<include file="$(find easy_handeye)/launch/publish.launch" />-->

	<node pkg="tf" type="static_transform_publisher" name="ur5_broadcaster" args="0.9406357585383271 0.3433464076539559 0.7197483905319654 -0.5835392992879574 -0.6016692303262926 0.3737600530836062 0.39721460973134676 base_link kinect2_rgb_optical_frame 100" />

</launch>
下图是显示的效果,通过观察点云与机器人本体的重合情况,感觉标定的精度还不错。图中的立体格子机器人周围的实体障碍物,是moveit自带的octomap利用八叉树将Kinect获取的点云数据简化表示成体素。

现在,机器人与相机手眼标定已经完成,障碍物相对于的机器人位置和实物环境也较为吻合,接下来就是研究怎么避障了。
四、
我也测试过moveit自带路径规划算法,在有障碍物的情况下,经常会规划失败。有可能是规划算法不好,也有可能是求逆解的算法计算太慢。所以,后面会尝试将openrave的求逆解算法导入到moveit中。
另外,还有一个问题没有解决,octomap的地图信息是累加的,不会自动清除,比如我前面伸手到相机视野范围内,可以获得手臂的地图信息,但是当我把手臂收回来,地图并不会自动清除已经建立的地图。这就很麻烦了,后面再研究研究,看看怎么解决这个问题。
感谢如下作者的工作
https://github.com/code-iai/iai_kinect2/tree/master/kinect2_calibration#calibrating-the-kinect-one
https://github.com/robotic-ultrasound-image-system/easy_handeye
https://zhuanlan.zhihu.com/p/33441113