本章的主要内容:
一,高级几何体-凸面体ConvexGeometry,扫描体LatheGeometry,管状几何体TubeGeometry;
二,使用拉伸几何体ExtrudeGeometry将一个二维图形生成三维图形,并基于从外部引入的SVG图片生成一个三维图形;
三,基于three.js提供的ParamtericGeometry对象的公式定制自己的图形
四,使用TextGeometry创建三维文字
五,使用二元操作从已有的几何体中创建出新的几何体;
1 ConvexGeometry--凸面体
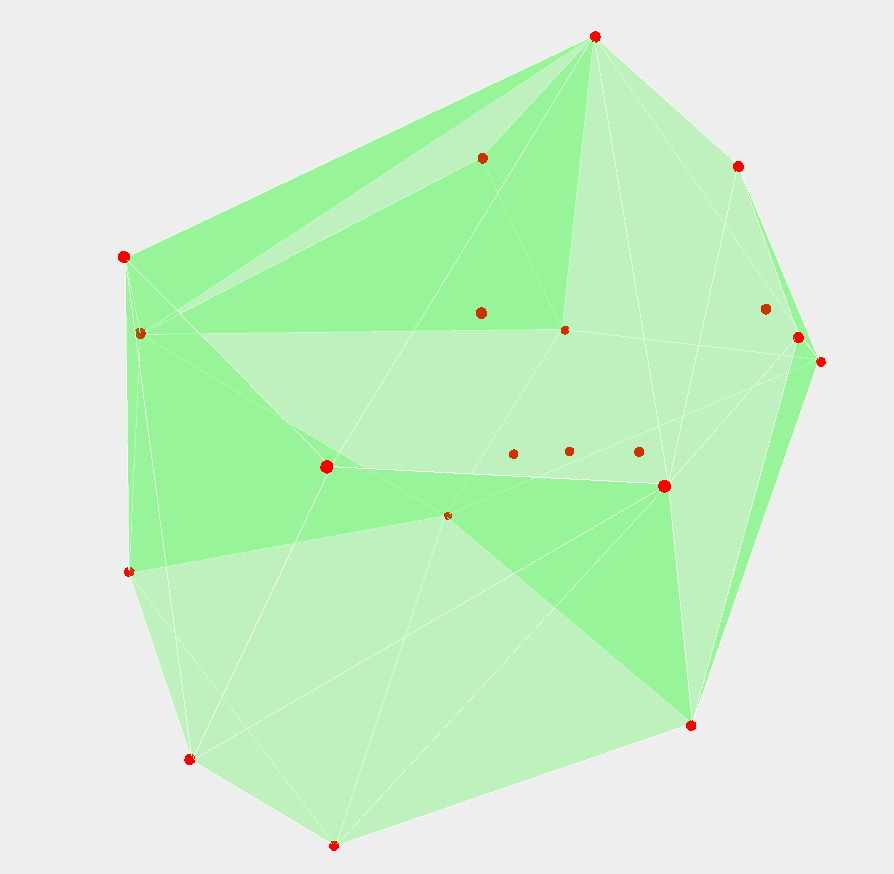

<!DOCTYPE html>

<html>

<head>
    <title>Example 06.01 - Advanced 3D geometries - Convex Hull</title>
    <script type="text/javascript" src="../libs/three.js"></script>

    <script type="text/javascript" src="../libs/stats.js"></script>
    <script type="text/javascript" src="../libs/ConvexGeometry.js"></script>
    <script type="text/javascript" src="../libs/dat.gui.js"></script>
    <style>
        body {
            /* set margin to 0 and overflow to hidden, to go fullscreen */
            margin: 0;
            overflow: hidden;
        }
    </style>
</head>
<body>

<div id="Stats-output">
</div>
<!-- Div which will hold the Output -->
<div id="WebGL-output">
</div>

<!-- Javascript code that runs our Three.js examples -->
<script type="text/javascript">

    // once everything is loaded, we run our Three.js stuff.
    function init() {

        var stats = initStats();

        // create a scene, that will hold all our elements such as objects, cameras and lights.
        var scene = new THREE.Scene();

        // create a camera, which defines where we're looking at.
        var camera = new THREE.PerspectiveCamera(45, window.innerWidth / window.innerHeight, 0.1, 1000);

        // create a render and set the size
        var webGLRenderer = new THREE.WebGLRenderer();
        webGLRenderer.setClearColor(new THREE.Color(0xEEEEEE, 1.0));
        webGLRenderer.setSize(window.innerWidth, window.innerHeight);
        webGLRenderer.shadowMapEnabled = true;

        // position and point the camera to the center of the scene
        camera.position.x = -30;
        camera.position.y = 40;
        camera.position.z = 50;
        camera.lookAt(new THREE.Vector3(10, 0, 0));

        // add the output of the renderer to the html element
        document.getElementById("WebGL-output").appendChild(webGLRenderer.domElement);

        // call the render function
        var step = 0;

        // the points group
        var spGroup;
        // the mesh
        var hullMesh;

        generatePoints();

        // setup the control gui
        var controls = new function () {
            // we need the first child, since it's a multimaterial

            this.redraw = function () {
                scene.remove(spGroup);
                scene.remove(hullMesh);
                generatePoints();

            };

        };

        var gui = new dat.GUI();
        gui.add(controls, 'redraw');


        render();

        function generatePoints() {
            // add 10 random spheres
            var points = [];
            //生成20个随机点
            for (var i = 0; i < 20; i++) {
                var randomX = -15 + Math.round(Math.random() * 30);
                var randomY = -15 + Math.round(Math.random() * 30);
                var randomZ = -15 + Math.round(Math.random() * 30);

                points.push(new THREE.Vector3(randomX, randomY, randomZ));
            }

            //将这些随机点用红色的小圆球来标识,将这些标识点的小圆球添加到集合中,然后再将该集合追加到场景中
            spGroup = new THREE.Object3D();
            var material = new THREE.MeshBasicMaterial({color: 0xff0000, transparent: false});
            //每一个点都生成一个红色的圆球来标识该点
            points.forEach(function (point) {

                var spGeom = new THREE.SphereGeometry(0.2);
                var spMesh = new THREE.Mesh(spGeom, material);
                //网格的位置复制该点的位置
                spMesh.position.copy(point);
                spGroup.add(spMesh);
            });
            // add the points as a group to the scene
            scene.add(spGroup);

            // use the same points to create a convexgeometry
            //利用这些随机点生成一个凸面体,注意这些随机点是ConvexGeometry的参数
            var hullGeometry = new THREE.ConvexGeometry(points);
            hullMesh = createMesh(hullGeometry);
            scene.add(hullMesh);
        }

        function createMesh(geom) {

            // assign two materials
            var meshMaterial = new THREE.MeshBasicMaterial({color: 0x00ff00, transparent: true, opacity: 0.2});
            meshMaterial.side = THREE.DoubleSide;
            var wireFrameMat = new THREE.MeshBasicMaterial();
            wireFrameMat.wireframe = true;

            // create a multimaterial
            var mesh = THREE.SceneUtils.createMultiMaterialObject(geom, [meshMaterial, wireFrameMat]);

            return mesh;
        }

        function render() {
            stats.update();

            spGroup.rotation.y = step;
            hullMesh.rotation.y = step += 0.01;

            // render using requestAnimationFrame
            requestAnimationFrame(render);
            webGLRenderer.render(scene, camera);
        }

        function initStats() {

            var stats = new Stats();
            stats.setMode(0); // 0: fps, 1: ms

            // Align top-left
            stats.domElement.style.position = 'absolute';
            stats.domElement.style.left = '0px';
            stats.domElement.style.top = '0px';

            document.getElementById("Stats-output").appendChild(stats.domElement);

            return stats;
        }
    }
    window.onload = init;
</script>
</body>
</html>
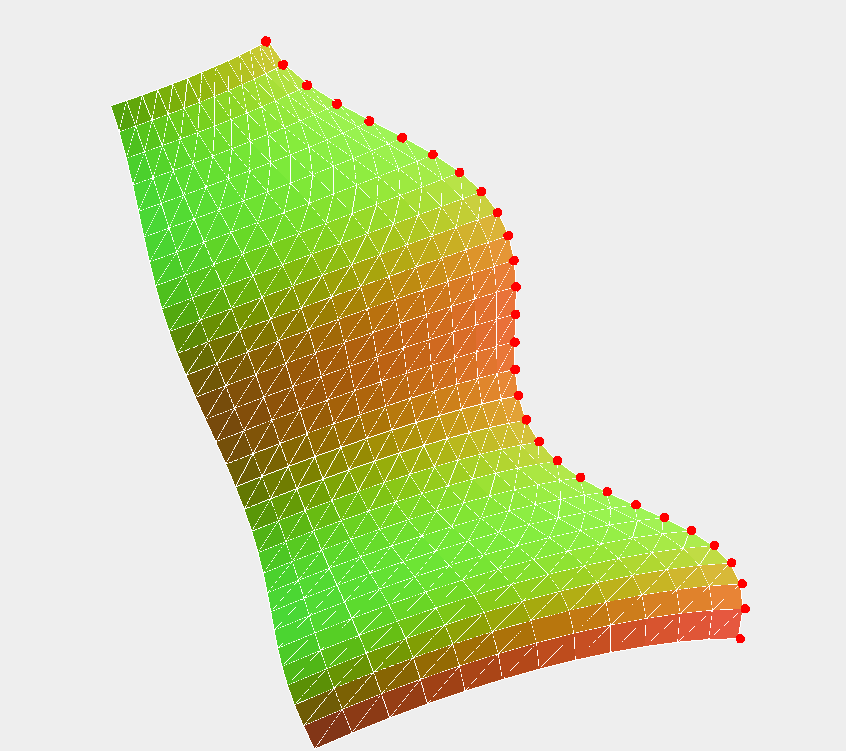
2 LatheGeometry---扫描体
通过LatheGeometry你可以从一条光滑曲线开始创建图形,该曲线成为样条曲线,当该曲线绕一个固定点进行旋转就形成一个类似于花瓶的图形
注意,该函数有两个地方不明白,1 绕固定点进行旋转,这个固定点是谁,是否可以指定,2 gui中的segments中的step(1)是什么含义


| 属性 | 描述 |
| points | 构成样条曲线的点的集合 |
| segments | 分段数,段数越高,图形越光滑 |
| phiStart | 开始角度 |
| phiLength | 创建多大角度的图形 |
<!DOCTYPE html>

<html>

<head>
    <title>Example 06.02 - Advanced 3D geometries - Lathe</title>
    <script type="text/javascript" src="../libs/three.js"></script>

    <script type="text/javascript" src="../libs/stats.js"></script>
    <script type="text/javascript" src="../libs/dat.gui.js"></script>
    <style>
        body {
            /* set margin to 0 and overflow to hidden, to go fullscreen */
            margin: 0;
            overflow: hidden;
        }
    </style>
</head>
<body>

<div id="Stats-output">
</div>
<!-- Div which will hold the Output -->
<div id="WebGL-output">
</div>

<!-- Javascript code that runs our Three.js examples -->
<script type="text/javascript">

    // once everything is loaded, we run our Three.js stuff.
    function init() {

        var stats = initStats();

        // create a scene, that will hold all our elements such as objects, cameras and lights.
        var scene = new THREE.Scene();

        // create a camera, which defines where we're looking at.
        var camera = new THREE.PerspectiveCamera(45, window.innerWidth / window.innerHeight, 0.1, 1000);

        // create a render and set the size
        var webGLRenderer = new THREE.WebGLRenderer();
        webGLRenderer.setClearColor(new THREE.Color(0xEEEEEE, 1.0));
        webGLRenderer.setSize(window.innerWidth, window.innerHeight);
        webGLRenderer.shadowMapEnabled = true;

        // position and point the camera to the center of the scene
        camera.position.x = -30;
        camera.position.y = 40;
        camera.position.z = 50;
        camera.lookAt(new THREE.Vector3(10, 0, 0));

        // add the output of the renderer to the html element
        document.getElementById("WebGL-output").appendChild(webGLRenderer.domElement);

        // call the render function
        var step = 0;

        // the points group
        var spGroup;
        // the mesh
        var latheMesh;

        generatePoints(12, 2, 2 * Math.PI);

        // setup the control gui
        var controls = new function () {
            // we need the first child, since it's a multimaterial

            this.segments = 12;
            this.phiStart = 0;
            this.phiLength = 2 * Math.PI;

            this.redraw = function () {
                scene.remove(spGroup);
                scene.remove(latheMesh);
                generatePoints(controls.segments, controls.phiStart, controls.phiLength);
            };
        };

        var gui = new dat.GUI();
        //以往gui的代码大致都能看懂,但是这里使用了一个step(1),不知道是什么含义
        gui.add(controls, 'segments', 0, 50).step(1).onChange(controls.redraw);
        gui.add(controls, 'phiStart', 0, 2 * Math.PI).onChange(controls.redraw);
        gui.add(controls, 'phiLength', 0, 2 * Math.PI).onChange(controls.redraw);


        render();

        function generatePoints(segments, phiStart, phiLength) {
            // add 10 random spheres
            var points = [];
            var height = 5;
            var count = 30;
            for (var i = 0; i < count; i++) {
            //x轴是正弦函数与余弦函数的结合
            //z轴是基于变量i和count
                var x=(Math.sin(i * 0.2) + Math.cos(i * 0.3)) * height + 12;
                var y=0;
                var z=( i - count ) + count / 2
                var point=new THREE.Vector3(x, y, z);
                points.push(point);
            }

            spGroup = new THREE.Object3D();
            var material = new THREE.MeshBasicMaterial({color: 0xff0000, transparent: false});
            points.forEach(function (point) {

                var spGeom = new THREE.SphereGeometry(0.2);
                var spMesh = new THREE.Mesh(spGeom, material);
                spMesh.position.copy(point);
                spGroup.add(spMesh);
            });
            // add the points as a group to the scene
            scene.add(spGroup);

            // use the same points to create a LatheGeometry
            var latheGeometry = new THREE.LatheGeometry(points, segments, phiStart, phiLength);
            latheMesh = createMesh(latheGeometry);

            scene.add(latheMesh);
        }

        function createMesh(geom) {

            // assign two materials
            //  var meshMaterial = new THREE.MeshBasicMaterial({color:0x00ff00, transparent:true, opacity:0.6});
            var meshMaterial = new THREE.MeshNormalMaterial();
            meshMaterial.side = THREE.DoubleSide;
            var wireFrameMat = new THREE.MeshBasicMaterial();
            wireFrameMat.wireframe = true;

            // create a multimaterial
            var mesh = THREE.SceneUtils.createMultiMaterialObject(geom, [meshMaterial, wireFrameMat]);

            return mesh;
        }

        function render() {
            stats.update();

            spGroup.rotation.x = step;
            latheMesh.rotation.x = step += 0.01;

            // render using requestAnimationFrame
            requestAnimationFrame(render);
            webGLRenderer.render(scene, camera);
        }

        function initStats() {

            var stats = new Stats();
            stats.setMode(0); // 0: fps, 1: ms

            // Align top-left
            stats.domElement.style.position = 'absolute';
            stats.domElement.style.left = '0px';
            stats.domElement.style.top = '0px';

            document.getElementById("Stats-output").appendChild(stats.domElement);

            return stats;
        }
    }
    window.onload = init;
</script>
</body>
</html>
3,TubeGeometry--管状几何体
管状几何体是沿着一条三维样条曲线拉伸出一根管子,可以通过指定顶点来定义路径,然后使用TubeGeometry来创建这根管子
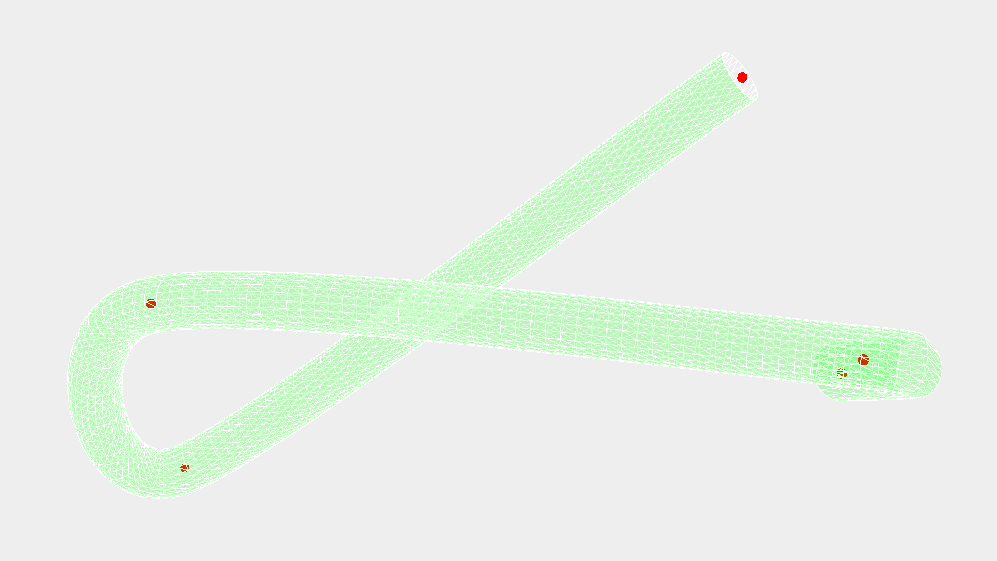
| 属性 | 描述 |
| path | 样条曲线, 在下面的demo中,我们使用SplineCurve对象对随机生成的点进行加工,构建出一条光滑曲线, 来作为TubeGeometry的样条曲线 |
| segments | 管道的分段数,管道越长,分段数越多才能保持管道的光滑度 |
| radius | 管道的半径 |
| radiusSegmnts | 管道圆周的分段数,分段数越多,管道越圆 |
| closed | 管道的头尾是否连接起来 |
| debug | 额外的调试信息是否添加到管道上 |
<!DOCTYPE html>

<html>

<head>
    <title>Example 06.04 - Extrude TubeGeometry</title>
    <script type="text/javascript" src="../libs/three.js"></script>

    <script type="text/javascript" src="../libs/stats.js"></script>
    <script type="text/javascript" src="../libs/dat.gui.js"></script>
    <style>
        body {
            /* set margin to 0 and overflow to hidden, to go fullscreen */
            margin: 0;
            overflow: hidden;
        }
    </style>
</head>
<body>

<div id="Stats-output">
</div>
<!-- Div which will hold the Output -->
<div id="WebGL-output">
</div>

<!-- Javascript code that runs our Three.js examples -->
<script type="text/javascript">

    // once everything is loaded, we run our Three.js stuff.
    function init() {

        var stats = initStats();

        // create a scene, that will hold all our elements such as objects, cameras and lights.
        var scene = new THREE.Scene();

        // create a camera, which defines where we're looking at.
        var camera = new THREE.PerspectiveCamera(45, window.innerWidth / window.innerHeight, 0.1, 1000);

        // create a render and set the size
        var webGLRenderer = new THREE.WebGLRenderer();
        webGLRenderer.setClearColor(new THREE.Color(0xEEEEEE, 1.0));
        webGLRenderer.setSize(window.innerWidth, window.innerHeight);
        webGLRenderer.shadowMapEnabled = true;

        // position and point the camera to the center of the scene
        camera.position.x = -30;
        camera.position.y = 40;
        camera.position.z = 50;
        camera.lookAt(new THREE.Vector3(10, 0, 0));

        // add the output of the renderer to the html element
        document.getElementById("WebGL-output").appendChild(webGLRenderer.domElement);

        // call the render function
        var step = 0;

        // the points group
        var spGroup;
        // the mesh
        var tubeMesh;


        // setup the control gui
        var controls = new function () {

            this.numberOfPoints = 5;
            this.segments = 64;
            this.radius = 1;
            this.radiusSegments = 8;
            this.closed = false;
            this.points = [];
            // we need the first child, since it's a multimaterial

            this.newPoints = function () {
                var points = [];
                //生成一定数量的点,这些点的x,y,z的坐标都是随机生成的
                for (var i = 0; i < controls.numberOfPoints; i++) {
                    var randomX = -20 + Math.round(Math.random() * 50);
                    var randomY = -15 + Math.round(Math.random() * 40);
                    var randomZ = -20 + Math.round(Math.random() * 40);
                    var point=new THREE.Vector3(randomX, randomY, randomZ);
                    points.push(point);
                }
                controls.points = points;
                controls.redraw();
            };

            this.redraw = function () {
                scene.remove(spGroup);
                scene.remove(tubeMesh);
                generatePoints(controls.points, controls.segments, controls.radius, controls.radiusSegments, controls.closed);
            };

        };

        var gui = new dat.GUI();
        gui.add(controls, 'newPoints');
        gui.add(controls, 'numberOfPoints', 2, 15).step(1).onChange(controls.newPoints);
        gui.add(controls, 'segments', 0, 200).step(1).onChange(controls.redraw);
        gui.add(controls, 'radius', 0, 10).onChange(controls.redraw);
        gui.add(controls, 'radiusSegments', 0, 100).step(1).onChange(controls.redraw);
        gui.add(controls, 'closed').onChange(controls.redraw);


        controls.newPoints();


        render();

        function generatePoints(points, segments, radius, radiusSegments, closed) {
            // add n random spheres


            spGroup = new THREE.Object3D();
            var material = new THREE.MeshBasicMaterial({color: 0xff0000, transparent: false});
            points.forEach(function (point) {

                var spGeom = new THREE.SphereGeometry(0.2);
                var spMesh = new THREE.Mesh(spGeom, material);
                spMesh.position.copy(point);
                spGroup.add(spMesh);
            });
            // add the points as a group to the scene
            scene.add(spGroup);

            // use the same points to create a convexgeometry
            //SplineCurve3函数的含义是通过一系列的点来创建一条平滑的曲线。
            //在这里创建出这条平滑曲线,作为样条曲线参数传递给TubeGeometry,构建管状几何体
            points=new THREE.SplineCurve3(points);
            var tubeGeometry = new THREE.TubeGeometry(points, segments, radius, radiusSegments, closed);
            tubeMesh = createMesh(tubeGeometry);
            scene.add(tubeMesh);
        }

        function createMesh(geom) {

            // assign two materials
            //var meshMaterial = new THREE.MeshNormalMaterial();
            var meshMaterial = new THREE.MeshBasicMaterial({color: 0x00ff00, transparent: true, opacity: 0.2});

            var wireFrameMat = new THREE.MeshBasicMaterial();
            wireFrameMat.wireframe = true;

            // create a multimaterial
            var mesh = THREE.SceneUtils.createMultiMaterialObject(geom, [meshMaterial, wireFrameMat]);

            return mesh;
        }

        function render() {
            stats.update();

            spGroup.rotation.y = step;
            tubeMesh.rotation.y = step += 0.01;

            // render using requestAnimationFrame
            requestAnimationFrame(render);
            webGLRenderer.render(scene, camera);
        }

        function initStats() {

            var stats = new Stats();
            stats.setMode(0); // 0: fps, 1: ms

            // Align top-left
            stats.domElement.style.position = 'absolute';
            stats.domElement.style.left = '0px';
            stats.domElement.style.top = '0px';

            document.getElementById("Stats-output").appendChild(stats.domElement);

            return stats;
        }
    }
    window.onload = init;
</script>
</body>
</html>
4,ExtrudeGeometry--拉伸几何体


| 属性 | 描述 |
| amount(数量) | 该图形可以拉伸多高,只有一面跟着增减 |
| bevelThickness(斜角厚度) | 图形拉伸后形成的中间的拉伸体,该属性标示斜角的深度,斜角就是拉伸体与前后面之间的倒角 amount和bevelThickness的区别没有看的很明白,暂时照抄下来,也许有一天忽然领悟了呢, 不过看着demo,amount,只有一面跟着增减,bevelThickness是两个面都跟着变化
|
| bevelSize(斜角尺寸) | 指定斜角的高度,如图所示,是内凹的还是外凸的 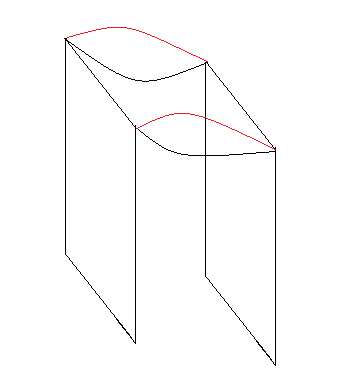 |
| bevelSegments(斜角分段数) | 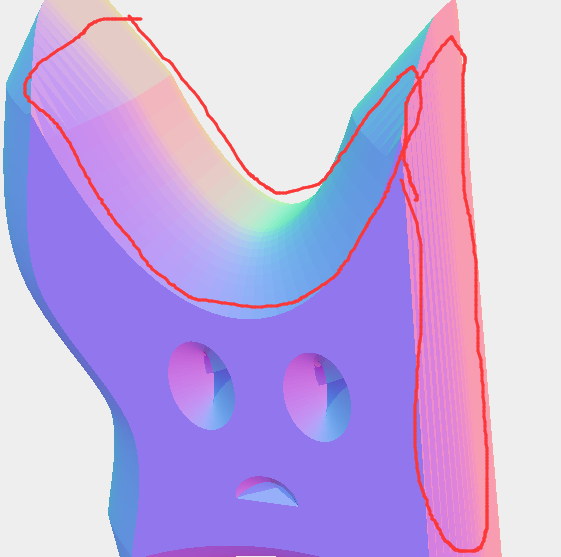 
|
| bevelEnabled(是否应用斜角) | |
| curveSegments(曲线分段数) | 拉伸图形时,二维曲线分为多少段 |
| step(拉伸体的段数) | 拉伸体被分为多少段,该属性也么有看懂,demo也没有看出差别来 |
| extrudePath(拉伸路径) | 该属性定义了图形沿着什么路径拉伸,没有指定的话,就会沿着z轴拉伸 |
| material(材质) | 拉伸后立体图形的前后面所使用的材质 |
| extrudeMaterial(拉伸材质) | 拉伸体所使用的材质 |
<!DOCTYPE html>

<html>

<head>
    <title>Example 06.03 - Extrude Geometry</title>
    <script type="text/javascript" src="../libs/three.js"></script>

    <script type="text/javascript" src="../libs/stats.js"></script>
    <script type="text/javascript" src="../libs/dat.gui.js"></script>
    <style>
        body {
            /* set margin to 0 and overflow to hidden, to go fullscreen */
            margin: 0;
            overflow: hidden;
        }
    </style>
</head>
<body>

<div id="Stats-output">
</div>
<!-- Div which will hold the Output -->
<div id="WebGL-output">
</div>

<!-- Javascript code that runs our Three.js examples -->
<script type="text/javascript">

    // once everything is loaded, we run our Three.js stuff.
    function init() {

        var stats = initStats();

        // create a scene, that will hold all our elements such as objects, cameras and lights.
        var scene = new THREE.Scene();

        // create a camera, which defines where we're looking at.
        var camera = new THREE.PerspectiveCamera(45, window.innerWidth / window.innerHeight, 0.1, 1000);

        // create a render and set the size
        var webGLRenderer = new THREE.WebGLRenderer();
        webGLRenderer.setClearColor(new THREE.Color(0xEEEEEE, 1.0));
        webGLRenderer.setSize(window.innerWidth, window.innerHeight);
        webGLRenderer.shadowMapEnabled = true;

        var shape = createMesh(new THREE.ShapeGeometry(drawShape()));
        // add the sphere to the scene
        scene.add(shape);

        // position and point the camera to the center of the scene
        camera.position.x = -20;
        camera.position.y = 60;
        camera.position.z = 60;
        camera.lookAt(new THREE.Vector3(20, 20, 0));

        // add the output of the renderer to the html element
        document.getElementById("WebGL-output").appendChild(webGLRenderer.domElement);

        // call the render function
        var step = 0;


        // setup the control gui
        var controls = new function () {

            this.amount = 2;
            this.bevelThickness = 2;
            this.bevelSize = 0.5;
            this.bevelEnabled = true;
            this.bevelSegments = 3;
            this.bevelEnabled = true;
            this.curveSegments = 12;
            this.steps = 1;

            this.asGeom = function () {
                // remove the old plane
                scene.remove(shape);
                // create a new one

                var options = {
                    amount: controls.amount,
                    bevelThickness: controls.bevelThickness,
                    bevelSize: controls.bevelSize,
                    bevelSegments: controls.bevelSegments,
                    bevelEnabled: controls.bevelEnabled,
                    curveSegments: controls.curveSegments,
                    steps: controls.steps
                };

                shape = createMesh(new THREE.ExtrudeGeometry(drawShape(), options));
                // add it to the scene.
                scene.add(shape);
            };

        };

        var gui = new dat.GUI();
        gui.add(controls, 'amount', 0, 20).onChange(controls.asGeom);
        gui.add(controls, 'bevelThickness', 0, 10).onChange(controls.asGeom);
        gui.add(controls, 'bevelSize', 0, 10).onChange(controls.asGeom);
        gui.add(controls, 'bevelSegments', 0, 30).step(1).onChange(controls.asGeom);
        gui.add(controls, 'bevelEnabled').onChange(controls.asGeom);
        gui.add(controls, 'curveSegments', 1, 30).step(1).onChange(controls.asGeom);
        gui.add(controls, 'steps', 1, 5).step(1).onChange(controls.asGeom);

        controls.asGeom();
        render();

        function drawShape() {

            // create a basic shape
            var shape = new THREE.Shape();

            // startpoint
            shape.moveTo(10, 10);

            // straight line upwards
            shape.lineTo(10, 40);

            // the top of the figure, curve to the right
            shape.bezierCurveTo(15, 25, 25, 25, 30, 40);

            // spline back down
            shape.splineThru(
                    [new THREE.Vector2(32, 30),
                        new THREE.Vector2(28, 20),
                        new THREE.Vector2(30, 10),
                    ]);

            // curve at the bottom
            shape.quadraticCurveTo(20, 15, 10, 10);

            // add 'eye' hole one
            var hole1 = new THREE.Path();
            hole1.absellipse(16, 24, 2, 3, 0, Math.PI * 2, true);
            shape.holes.push(hole1);

            // add 'eye hole 2'
            var hole2 = new THREE.Path();
            hole2.absellipse(23, 24, 2, 3, 0, Math.PI * 2, true);
            shape.holes.push(hole2);

            // add 'mouth'
            var hole3 = new THREE.Path();
            hole3.absarc(20, 16, 2, 0, Math.PI, true);
            shape.holes.push(hole3);

            // return the shape
            return shape;
        }

        function createMesh(geom) {

            geom.applyMatrix(new THREE.Matrix4().makeTranslation(-20, 0, 0));

            // assign two materials
            var meshMaterial = new THREE.MeshNormalMaterial({
                shading: THREE.FlatShading,
                transparent: true,
                opacity: 0.7
            });

            //  meshMaterial.side = THREE.DoubleSide;
            var wireFrameMat = new THREE.MeshBasicMaterial();
            wireFrameMat.wireframe = true;

            // create a multimaterial
            var mesh = THREE.SceneUtils.createMultiMaterialObject(geom, [meshMaterial]);

            return mesh;
        }

        function createLine(shape, spaced) {
            if (!spaced) {
        //使用shape的createPointsGeometry方法,将图形转化为一个点集,作为参数传递给Line
                var mesh = new THREE.Line(shape.createPointsGeometry(), new THREE.LineBasicMaterial({
                    color: 0xff3333,
                    linewidth: 2
                }));
                return mesh;
            } else {
                var mesh = new THREE.Line(shape.createSpacedPointsGeometry(20), new THREE.LineBasicMaterial({
                    color: 0xff3333,
                    linewidth: 2
                }));
                return mesh;
            }

        }

        function render() {
            stats.update();

            shape.rotation.y = step += 0.01;

            // render using requestAnimationFrame
            requestAnimationFrame(render);
            webGLRenderer.render(scene, camera);
        }

        function initStats() {

            var stats = new Stats();
            stats.setMode(0); // 0: fps, 1: ms

            // Align top-left
            stats.domElement.style.position = 'absolute';
            stats.domElement.style.left = '0px';
            stats.domElement.style.top = '0px';

            document.getElementById("Stats-output").appendChild(stats.domElement);

            return stats;
        }
    }
    window.onload = init;
</script>
</body>
</html>
5,引入svg文件构建路径,然后使用extrudeGeometry来构建立体图形,
由于本人是svg小白一只,所以这里不对svg做解读,其实与上面的demo使用Shape构建路径一样,
只是一个使用svg构建二维图形,一个使用Shape构建二维图形,二维图形构建出来以后,使用ExtrudeGeometry对二维图形进行拉伸就没有区别了
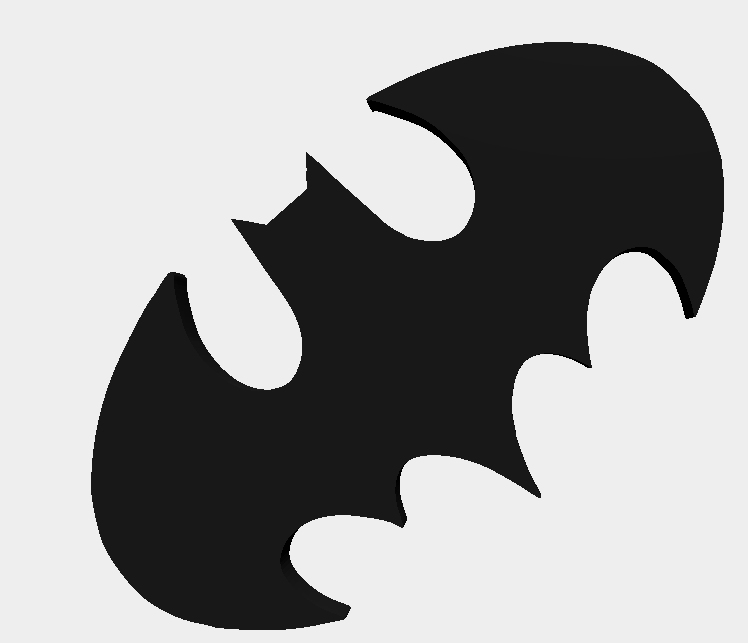
<!DOCTYPE html>

<html>

<head>
    <title>Example 06.05 - Extrude SVG</title>
    <script type="text/javascript" src="../libs/three.js"></script>

    <script type="text/javascript" src="../libs/stats.js"></script>
    <script type="text/javascript" src="../libs/dat.gui.js"></script>
    <script type="text/javascript" src="../libs/d3-threeD.js"></script>
    <script type="text/javascript" src="../libs/OrbitControls.js"></script>
    <style>
        body {
            /* set margin to 0 and overflow to hidden, to go fullscreen */
            margin: 0;
            overflow: hidden;
        }
    </style>
</head>
<body>

<div id="Stats-output">
</div>
<!-- Div which will hold the Output -->
<div id="WebGL-output">
</div>

<div id="batman" style="display:none">
    <svg version="1.0" xmlns="http://www.w3.org/2000/svg" xmlns:xlink="http://www.w3.org/1999/xlink" x="0px" y="0px" width="1152px" height="1152px" xml:space="preserve">
<g>
<path  id="batman-path" style="fill:rgb(0,0,0);" d="M 261.135 114.535 C 254.906 116.662 247.491 118.825 244.659 119.344 C 229.433 122.131 177.907 142.565 151.973 156.101 C 111.417 177.269 78.9808 203.399 49.2992 238.815 C 41.0479 248.66 26.5057 277.248 21.0148 294.418 C 14.873 313.624 15.3588 357.341 21.9304 376.806 C 29.244 398.469 39.6107 416.935 52.0865 430.524 C 58.2431 437.23 63.3085 443.321 63.3431 444.06 C 63.4748 446.883 102.278 479.707 120.51 492.418 C 131.003 499.734 148.168 509.93 158.654 515.075 C 169.139 520.22 179.431 525.34 181.524 526.454 C 187.725 529.754 187.304 527.547 179.472 515.713 C 164.806 493.553 158.448 464.659 164.322 446.861 C 169.457 431.303 192.013 421.501 214.324 425.132 C 234.042 428.341 252.142 439.186 270.958 459.064 C 286.677 475.67 292.133 482.967 295.31 491.634 C 297.466 497.514 298.948 495.91 304.862 481.293 C 313.673 459.519 329.808 445.735 346.35 445.851 C 367.654 446 399.679 478.239 412.801 512.745 C 414.093 516.144 416.593 522.632 418.355 527.163 C 420.118 531.695 423.604 542.319 426.103 550.773 C 430.848 566.832 432.355 566.851 434.872 550.88 C 436.395 541.215 451.403 502.522 455.655 497.298 C 457.038 495.599 460.63 489.896 463.636 484.625 C 471.696 470.498 492.318 452.688 505.387 448.568 C 514.602 445.663 517.533 445.549 525.51 447.782 C 539.676 451.749 553.43 467.773 560.706 488.788 L 563.242 496.114 L 567.096 490.012 C 577.709 473.208 593.665 453.899 602.47 447.206 C 607.884 443.09 613.378 438.825 614.679 437.729 C 615.98 436.632 622.927 433.259 630.118 430.233 C 655.159 419.693 681.195 423.407 693.273 439.241 C 697.957 445.382 698.932 448.971 699.538 462.294 C 700.174 476.284 699.51 479.864 693.686 493.854 C 690.073 502.533 684.912 512.883 682.217 516.854 C 679.523 520.825 678.172 524.074 679.215 524.074 C 681.932 524.074 718.787 504.481 732.525 495.734 C 760.018 478.228 788.909 452.599 803.9 432.418 C 807.266 427.886 810.569 423.715 811.239 423.149 C 814.498 420.395 828.253 393.099 833.17 379.627 C 838.223 365.782 838.713 361.822 838.741 334.582 C 838.776 300.425 836.431 291.124 820.154 260.873 C 810.649 243.207 807.498 239.005 788.417 218.543 C 751.511 178.968 688.147 142.549 621.582 122.654 C 581.7 110.734 580.388 110.465 580.388 114.195 C 580.388 115.328 581.302 116.255 582.418 116.255 C 584.279 116.255 587.705 122.106 603.399 152.085 C 613.977 172.29 618.077 189.427 618.264 214.21 C 618.42 234.928 617.88 238.368 612.285 252.269 C 604.327 272.04 590.066 286.889 572.829 293.352 C 558.526 298.714 549.193 297.86 535.704 289.955 C 526.777 284.723 512.304 267.644 509.816 259.404 C 509.132 257.138 507.129 251.358 505.366 246.558 C 503.602 241.759 501.646 231.564 501.018 223.902 C 500.39 216.24 498.491 198.402 496.797 184.261 C 495.104 170.121 493.307 152.047 492.803 144.097 C 492.299 136.147 491.292 125.625 490.565 120.715 L 489.242 111.787 L 483.323 118.267 C 480.067 121.832 477.404 125.618 477.404 126.681 C 477.404 127.744 476.603 128.613 475.624 128.613 C 474.645 128.613 471.275 132.321 468.135 136.852 L 462.426 145.091 L 431.038 145.091 L 399.65 145.091 L 386.811 128.494 C 379.749 119.365 373.509 112.36 372.943 112.926 C 372.377 113.491 371.57 118.875 371.15 124.888 C 370.73 130.902 368.94 147.744 367.172 162.315 C 365.405 176.887 363.523 195.424 362.99 203.509 C 360.283 244.622 352.784 266.044 335.323 282.544 C 326.456 290.923 312.488 297.497 303.508 297.518 C 294.864 297.539 278.732 290.063 269.473 281.748 C 246.952 261.521 238.846 229.614 245.481 187.314 C 247.894 171.928 266.562 131.612 275.927 121.56 C 277.987 119.348 279.673 116.786 279.673 115.867 C 279.673 114.947 279.905 113.593 280.188 112.856 C 281.28 110.017 271.977 110.837 261.136 114.536 L 261.135 114.535 "/>
</g>

</svg>
</div>

<!-- Javascript code that runs our Three.js examples -->
<script type="text/javascript">

    var orbit;

    // once everything is loaded, we run our Three.js stuff.
    function init() {

        var stats = initStats();

        // create a scene, that will hold all our elements such as objects, cameras and lights.
        var scene = new THREE.Scene();

        // create a camera, which defines where we're looking at.
        var camera = new THREE.PerspectiveCamera(45, window.innerWidth / window.innerHeight, 0.1, 1000);


        // create a render and set the size
        var webGLRenderer = new THREE.WebGLRenderer();
        webGLRenderer.setClearColor(new THREE.Color(0xEEEEEE, 1.0));
        webGLRenderer.setSize(window.innerWidth, window.innerHeight);
        webGLRenderer.shadowMapEnabled = true;

        var shape = createMesh(new THREE.ShapeGeometry(drawShape()));
        // add the sphere to the scene
        scene.add(shape);

        // position and point the camera to the center of the scene
        camera.position.x = -80;
        camera.position.y = 80;
        camera.position.z = 80;
        camera.lookAt(new THREE.Vector3(60, -60, 0));

        var spotLight = new THREE.DirectionalLight(0xffffff);
        spotLight.position = new THREE.Vector3(70, 170, 70);
        spotLight.intensity = 0.7;

        spotLight.target = shape;

        scene.add(spotLight);

        // add the output of the renderer to the html element
        document.getElementById("WebGL-output").appendChild(webGLRenderer.domElement);

        orbit = new THREE.OrbitControls(camera, webGLRenderer.domElement);

        // call the render function
        var step = 0;


        // setup the control gui
        var controls = new function () {

            this.amount = 2;
            this.bevelThickness = 2;
            this.bevelSize = 0.5;
            this.bevelEnabled = true;
            this.bevelSegments = 3;
            this.bevelEnabled = true;
            this.curveSegments = 12;
            this.steps = 1;

            this.asGeom = function () {
                // remove the old plane
                scene.remove(shape);
                // create a new one

                var options = {
                    amount: controls.amount,
                    bevelThickness: controls.bevelThickness,
                    bevelSize: controls.bevelSize,
                    bevelSegments: controls.bevelSegments,
                    bevelEnabled: controls.bevelEnabled,
                    curveSegments: controls.curveSegments,
                    steps: controls.steps
                };

                shape = createMesh(new THREE.ExtrudeGeometry(drawShape(), options));
                // add it to the scene.
                scene.add(shape);
            };

        };

        var gui = new dat.GUI();
        gui.add(controls, 'amount', 0, 20).onChange(controls.asGeom);
        gui.add(controls, 'bevelThickness', 0, 10).onChange(controls.asGeom);
        gui.add(controls, 'bevelSize', 0, 10).onChange(controls.asGeom);
        gui.add(controls, 'bevelSegments', 0, 30).step(1).onChange(controls.asGeom);
        gui.add(controls, 'bevelEnabled').onChange(controls.asGeom);
        gui.add(controls, 'curveSegments', 1, 30).step(1).onChange(controls.asGeom);
        gui.add(controls, 'steps', 1, 5).step(1).onChange(controls.asGeom);

        controls.asGeom();
        render();

        function drawShape() {


            var svgString = document.querySelector("#batman-path").getAttribute("d");

            var shape = transformSVGPathExposed(svgString);

            // return the shape
            return shape;
        }

        function createMesh(geom) {

            geom.applyMatrix(new THREE.Matrix4().makeTranslation(-390, -74, 0));


            // assign two materials
            var meshMaterial = new THREE.MeshPhongMaterial({color: 0x333333, shininess: 100, metal: true});
            var mesh = new THREE.Mesh(geom, meshMaterial);
            mesh.scale.x = 0.1;
            mesh.scale.y = 0.1;

            mesh.rotation.z = Math.PI;
            mesh.rotation.x = -1.1;
            return mesh;
        }


        function render() {
            stats.update();

            shape.rotation.y = step += 0.005;

            orbit.update();


            // render using requestAnimationFrame
            requestAnimationFrame(render);
            webGLRenderer.render(scene, camera);
        }

        function initStats() {

            var stats = new Stats();
            stats.setMode(0); // 0: fps, 1: ms

            // Align top-left
            stats.domElement.style.position = 'absolute';
            stats.domElement.style.left = '0px';
            stats.domElement.style.top = '0px';

            document.getElementById("Stats-output").appendChild(stats.domElement);

            return stats;
        }
    }
    window.onload = init;
</script>
</body>
</html>
6 ParametricGeometry
| 属性 | 描述 |
| function | 一个函数,以u,v为参数,其中u,v的值是0-1,返回一个Vector3的点对象 |
| slices | u分为多少份 |
| stacks | v分为多少份,分的份数越多,创建出来的图形越光滑 |
| useTris | 是否使用三角面片,在前面几章中,我们了解过构建面有两种方法,三角面或者是四边形 |

<!DOCTYPE html>

<html>

<head>
    <title>Example 06.06 - Parametric geometries</title>
    <script type="text/javascript" src="../libs/three.js"></script>

    <script type="text/javascript" src="../libs/stats.js"></script>
    <script type="text/javascript" src="../libs/dat.gui.js"></script>
    <style>
        body {
            /* set margin to 0 and overflow to hidden, to go fullscreen */
            margin: 0;
            overflow: hidden;
        }
    </style>
</head>
<body>

<div id="Stats-output">
</div>
<!-- Div which will hold the Output -->
<div id="WebGL-output">
</div>

<!-- Javascript code that runs our Three.js examples -->
<script type="text/javascript">

    // once everything is loaded, we run our Three.js stuff.
    function init() {

        var stats = initStats();

        // create a scene, that will hold all our elements such as objects, cameras and lights.
        var scene = new THREE.Scene();

        // create a camera, which defines where we're looking at.
        var camera = new THREE.PerspectiveCamera(45, window.innerWidth / window.innerHeight, 0.1, 1000);

        // create a render and set the size
        var webGLRenderer = new THREE.WebGLRenderer();
        webGLRenderer.setClearColor(new THREE.Color(0xEEEEEE, 1.0));
        webGLRenderer.setSize(window.innerWidth, window.innerHeight);
        webGLRenderer.shadowMapEnabled = true;

        // position and point the camera to the center of the scene
        camera.position.x = -30;
        camera.position.y = 50;
        camera.position.z = 50;
        camera.lookAt(new THREE.Vector3(10, -20, 0));

        var spotLight = new THREE.DirectionalLight();
        spotLight.position = new THREE.Vector3(-20, 250, -50);
        spotLight.target.position.x = 30;
        spotLight.target.position.y = -40;
        spotLight.target.position.z = -20;
        spotLight.intensity = 0.3;

        scene.add(spotLight);

        // add the output of the renderer to the html element
        document.getElementById("WebGL-output").appendChild(webGLRenderer.domElement);

        // call the render function
        var step = 0;


        // setup the control gui
        var controls = new function () {

        };

        var gui = new dat.GUI();
        var width=10;var depth=10;
        pp=function(u,v){
            var x=Math.cos(u*v)*width;
            var y=Math.sin(u)*width;
            var z=v*depth;
            return new THREE.Vector3(x,y,z);
        };
        klein = function (u, v) {
            u *= Math.PI;
            v *= 2 * Math.PI;

            u = u * 2;
            var x, y, z;
            if (u < Math.PI) {
                x = 3 * Math.cos(u) * (1 + Math.sin(u)) + (2 * (1 - Math.cos(u) / 2)) * Math.cos(u) * Math.cos(v);
                z = -8 * Math.sin(u) - 2 * (1 - Math.cos(u) / 2) * Math.sin(u) * Math.cos(v);
            } else {
                x = 3 * Math.cos(u) * (1 + Math.sin(u)) + (2 * (1 - Math.cos(u) / 2)) * Math.cos(v + Math.PI);
                z = -8 * Math.sin(u);
            }

            y = -2 * (1 - Math.cos(u) / 2) * Math.sin(v);

            return new THREE.Vector3(x, y, z);
        };

        radialWave = function (u, v) {
            var r = 50;

            var x = Math.sin(u) * r;
            var z = Math.sin(v / 2) * 2 * r;
            var y = (Math.sin(u * 4 * Math.PI) + Math.cos(v * 2 * Math.PI)) * 2.8;

            return new THREE.Vector3(x, y, z);
        };

        //var mesh = createMesh(new THREE.ParametricGeometry(radialWave, 120, 120, false));
        var mesh = createMesh(new THREE.ParametricGeometry(pp, 120, 120, false));
        scene.add(mesh);

        render();


        function createMesh(geom) {
            geom.applyMatrix(new THREE.Matrix4().makeTranslation(-25, 0, -25));
            // assign two materials
//            var meshMaterial = new THREE.MeshLambertMaterial({color: 0xff5555});
            //var meshMaterial = new THREE.MeshNormalMaterial();
            var meshMaterial = new THREE.MeshPhongMaterial({
                specular: 0xaaaafff,
                color: 0x3399ff,
                shininess: 40,
                metal: true
            });
            meshMaterial.side = THREE.DoubleSide;
            // create a multimaterial
            var plane = THREE.SceneUtils.createMultiMaterialObject(geom, [meshMaterial]);

            return plane;
        }

        function render() {
            stats.update();
            mesh.rotation.y = step += 0.01;
            mesh.rotation.x = step;
            // render using requestAnimationFrame
            requestAnimationFrame(render);
            webGLRenderer.render(scene, camera);
        }

        function initStats() {

            var stats = new Stats();
            stats.setMode(0); // 0: fps, 1: ms


            // Align top-left
            stats.domElement.style.position = 'absolute';
            stats.domElement.style.left = '0px';
            stats.domElement.style.top = '0px';

            document.getElementById("Stats-output").appendChild(stats.domElement);

            return stats;
        }
    }
    window.onload = init;
</script>
</body>
</html>
7 TextGeometry---渲染文本
| 属性 | 描述 |
| size | 文本大小 |
| height | 拉伸的长度 |
| weight | 字体权重,normal/bold/bolder等 |
| font | 字体名称 |
| style | 字体样式,normal/italic |
| bevelThickness | 斜角深度 |
| bevelSize | 斜角高度 |
| bevelSegments | 斜角的分段数 |
| bevelEnabled | 是否使用斜角 |
| curveSegments | 曲线分段数 |
| steps | 拉伸分段数 |
| extrudePath | 拉伸路径 |
| material | 拉伸体前后面的材质 |
| extrudeMaterial | 拉伸体中间的材质 |

<!DOCTYPE html>

<html>

<head>
    <title>Example 06.07 - Text geometry</title>
    <script type="text/javascript" src="../libs/three.js"></script>

    <script type="text/javascript" src="../libs/stats.js"></script>
    <script type="text/javascript" src="../libs/dat.gui.js"></script>
    <script type="text/javascript" src="../assets/fonts/helvetiker_regular.typeface.js"></script>
    <script type="text/javascript" src="../assets/fonts/helvetiker_bold.typeface.js"></script>
    <script type="text/javascript" src="../assets/fonts/bitstream_vera_sans_mono_roman.typeface.js"></script>

    <style>
        body {
            /* set margin to 0 and overflow to hidden, to go fullscreen */
            margin: 0;
            overflow: hidden;
        }
    </style>
</head>
<body>

<div id="Stats-output">
</div>
<!-- Div which will hold the Output -->
<div id="WebGL-output">
</div>

<!-- Javascript code that runs our Three.js examples -->
<script type="text/javascript">

    // once everything is loaded, we run our Three.js stuff.
    function init() {

        var stats = initStats();

        // create a scene, that will hold all our elements such as objects, cameras and lights.
        var scene = new THREE.Scene();

        // create a camera, which defines where we're looking at.
        var camera = new THREE.PerspectiveCamera(45, window.innerWidth / window.innerHeight, 0.1, 1000);

        // create a render and set the size
        var webGLRenderer = new THREE.WebGLRenderer();
        webGLRenderer.setClearColor(new THREE.Color(0x000000, 1.0));
        webGLRenderer.setSize(window.innerWidth, window.innerHeight);
        webGLRenderer.shadowMapEnabled = true;

        // position and point the camera to the center of the scene
        camera.position.x = 100;
        camera.position.y = 300;
        camera.position.z = 600;
        camera.lookAt(new THREE.Vector3(400, 0, -300));

        var dirLight = new THREE.DirectionalLight();
        dirLight.position.set(25, 23, 15);
        scene.add(dirLight);


        var dirLight2 = new THREE.DirectionalLight();
        dirLight2.position.set(-25, 23, 15);
        scene.add(dirLight2);

        // add the output of the renderer to the html element
        document.getElementById("WebGL-output").appendChild(webGLRenderer.domElement);

        // call the render function
        var step = 0;


        var text1;
        var text2;

        var controls = new function () {

            this.size = 90;
            this.height = 90;
            this.bevelThickness = 2;
            this.bevelSize = 0.5;
            this.bevelEnabled = true;
            this.bevelSegments = 3;
            this.bevelEnabled = true;
            this.curveSegments = 12;
            this.steps = 1;
            this.font = "helvetiker";
            this.weight = "normal";
//            this.style = "italics";

            this.asGeom = function () {
                // remove the old plane
                scene.remove(text1);
                scene.remove(text2);
                // create a new one

                var options = {
                    size: controls.size,
                    height: controls.height,
                    weight: controls.weight,
                    font: controls.font,
                    bevelThickness: controls.bevelThickness,
                    bevelSize: controls.bevelSize,
                    bevelSegments: controls.bevelSegments,
                    bevelEnabled: controls.bevelEnabled,
                    curveSegments: controls.curveSegments,
                    steps: controls.steps
                };

                console.log(THREE.FontUtils.faces);

                text1 = createMesh(new THREE.TextGeometry("Learning", options));
                text1.position.z = -100;
                text1.position.y = 100;
                scene.add(text1);

                text2 = createMesh(new THREE.TextGeometry("Three.js", options));
                scene.add(text2);
            };

        };

        controls.asGeom();

        var gui = new dat.GUI();
        gui.add(controls, 'size', 0, 200).onChange(controls.asGeom);
        gui.add(controls, 'height', 0, 200).onChange(controls.asGeom);
        gui.add(controls, 'font', ['bitstream vera sans mono', 'helvetiker']).onChange(controls.asGeom);
        gui.add(controls, 'bevelThickness', 0, 10).onChange(controls.asGeom);
        gui.add(controls, 'bevelSize', 0, 10).onChange(controls.asGeom);
        gui.add(controls, 'bevelSegments', 0, 30).step(1).onChange(controls.asGeom);
        gui.add(controls, 'bevelEnabled').onChange(controls.asGeom);
        gui.add(controls, 'curveSegments', 1, 30).step(1).onChange(controls.asGeom);
        gui.add(controls, 'steps', 1, 5).step(1).onChange(controls.asGeom);


        render();


        function createMesh(geom) {

            // assign two materials
//            var meshMaterial = new THREE.MeshLambertMaterial({color: 0xff5555});
//            var meshMaterial = new THREE.MeshNormalMaterial();
            var meshMaterial = new THREE.MeshPhongMaterial({
                specular: 0xffffff,
                color: 0xeeffff,
                shininess: 100,
                metal: true
            });
//            meshMaterial.side=THREE.DoubleSide;
            // create a multimaterial
            var plane = THREE.SceneUtils.createMultiMaterialObject(geom, [meshMaterial]);

            return plane;
        }

        function render() {
            stats.update();
            requestAnimationFrame(render);
            webGLRenderer.render(scene, camera);
        }

        function initStats() {

            var stats = new Stats();
            stats.setMode(0); // 0: fps, 1: ms


            // Align top-left
            stats.domElement.style.position = 'absolute';
            stats.domElement.style.left = '0px';
            stats.domElement.style.top = '0px';

            document.getElementById("Stats-output").appendChild(stats.domElement);

            return stats;
        }
    }
    window.onload = init;
</script>
</body>
</html>
7 二元操作
二元操作需要引入ThreeBSP库,地址如下:https://github.com/skalnik/ThreeBSP
| 二元操作的名称 | 描述 |
| intersect相交 | 两个几何体相互交叠的部分就形成了一个相交几何体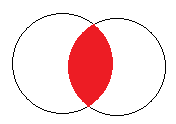
|
| union联合 | 两个几何体联合起来一起创建的几何体就是联合几何体
|
| subtract相减 | 从第一个几何体中减去两个几何体交叠的部分就得到了相减的几何体
|
下面demo中的二元操作都是针对sphere1进行的
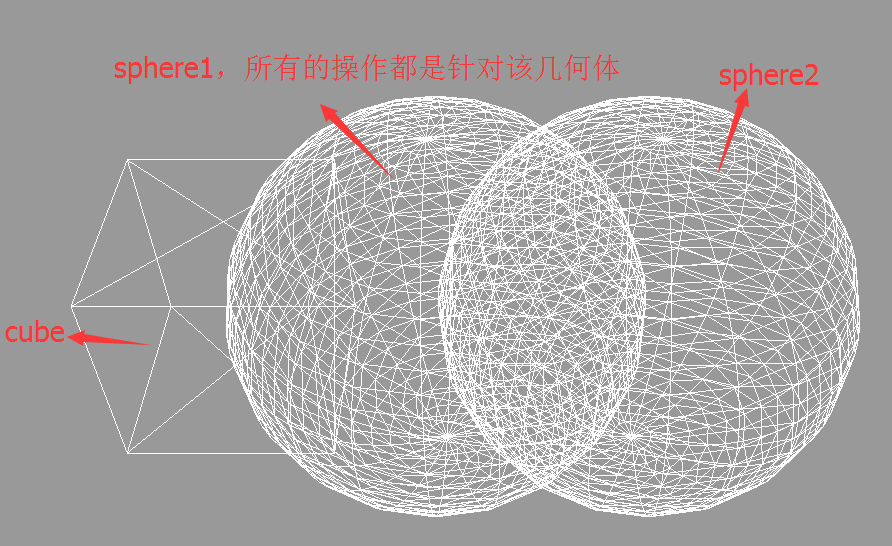
<!DOCTYPE html>

<html>

<head>
    <title>Example 06.08 - Binary operations</title>
    <script type="text/javascript" src="../libs/three.js"></script>

    <script type="text/javascript" src="../libs/stats.js"></script>
    <script type="text/javascript" src="../libs/dat.gui.js"></script>
    <script type="text/javascript" src="../libs/spin.js"></script>
    <script type="text/javascript" src="../libs/ThreeBSP.js"></script>
    <style>
        body {
            /* set margin to 0 and overflow to hidden, to go fullscreen */
            margin: 0;
            overflow: hidden;
        }
    </style>
</head>
<body>

<div id="Stats-output">
</div>
<!-- Div which will hold the Output -->
<div id="WebGL-output">
</div>


<!-- Javascript code that runs our Three.js examples -->
<script type="text/javascript">

    // once everything is loaded, we run our Three.js stuff.
    function init() {

        var stats = initStats();

        // create a scene, that will hold all our elements such as objects, cameras and lights.
        var scene = new THREE.Scene();

        // create a camera, which defines where we're looking at.
        var camera = new THREE.PerspectiveCamera(45, window.innerWidth / window.innerHeight, 0.1, 1000);

        // create a render and set the size
        var webGLRenderer = new THREE.WebGLRenderer();
        webGLRenderer.setClearColor(0x999999, 1.0);
        webGLRenderer.setSize(window.innerWidth, window.innerHeight);
        webGLRenderer.shadowMapEnabled = true;

        var sphere1 = createMesh(new THREE.SphereGeometry(5, 20, 30));
        sphere1.position.x = -2;


        var sphere2 = createMesh(new THREE.SphereGeometry(5, 20, 30));
        sphere2.position.set(3, 0, 0);

        var cube = createMesh(new THREE.BoxGeometry(5, 5, 5));
        cube.position.x = -7;

        var result;


        // add the sphere to the scene
        scene.add(sphere1);
        scene.add(sphere2);
        scene.add(cube);

        // position and point the camera to the center of the scene
        camera.position.x = 0;
        camera.position.y = 20;
        camera.position.z = 20;
        camera.lookAt(new THREE.Vector3(0, 0, 0));


        // add the output of the renderer to the html element
        document.getElementById("WebGL-output").appendChild(webGLRenderer.domElement);

        // call the render function
        var step = 0;


        // setup the control gui
        var controls = new function () {

            this.sphere1PosX = sphere1.position.x;
            this.sphere1PosY = sphere1.position.y;
            this.sphere1PosZ = sphere1.position.z;
            this.sphere1Scale = 1;

            this.sphere2PosX = sphere2.position.x;
            this.sphere2PosY = sphere2.position.y;
            this.sphere2PosZ = sphere2.position.z;
            this.sphere2Scale = 1;

            this.cubePosX = cube.position.x;
            this.cubePosY = cube.position.y;
            this.cubePosZ = cube.position.z;
            this.scaleX = 1;
            this.scaleY = 1;
            this.scaleZ = 1;

            this.actionCube = "subtract"; // add, substract, intersect
            this.actionSphere = "subtract";

            this.showResult = function () {
                redrawResult();
            };

            this.hideWireframes = false;
            this.rotateResult = false;


        };

        var gui = new dat.GUI();
        var guiSphere1 = gui.addFolder("Sphere1");
        guiSphere1.add(controls, "sphere1PosX", -15, 15).onChange(function () {
            sphere1.position.set(controls.sphere1PosX, controls.sphere1PosY, controls.sphere1PosZ)
        });
        guiSphere1.add(controls, "sphere1PosY", -15, 15).onChange(function () {
            sphere1.position.set(controls.sphere1PosX, controls.sphere1PosY, controls.sphere1PosZ)
        });
        guiSphere1.add(controls, "sphere1PosZ", -15, 15).onChange(function () {
            sphere1.position.set(controls.sphere1PosX, controls.sphere1PosY, controls.sphere1PosZ)
        });
        guiSphere1.add(controls, "sphere1Scale", 0, 10).onChange(function (e) {
            sphere1.scale.set(e, e, e)
        });

        var guiSphere2 = gui.addFolder("Sphere2");
        guiSphere2.add(controls, "sphere2PosX", -15, 15).onChange(function () {
            sphere2.position.set(controls.sphere2PosX, controls.sphere2PosY, controls.sphere2PosZ)
        });
        guiSphere2.add(controls, "sphere2PosY", -15, 15).onChange(function () {
            sphere2.position.set(controls.sphere2PosX, controls.sphere2PosY, controls.sphere2PosZ)
        });
        guiSphere2.add(controls, "sphere2PosZ", -15, 15).onChange(function () {
            sphere2.position.set(controls.sphere2PosX, controls.sphere2PosY, controls.sphere2PosZ)
        });
        guiSphere2.add(controls, "sphere2Scale", 0, 10).onChange(function (e) {
            sphere2.scale.set(e, e, e)
        });
        guiSphere2.add(controls, "actionSphere", ["subtract", "intersect", "union", "none"]);

        var guiCube = gui.addFolder("cube");
        guiCube.add(controls, "cubePosX", -15, 15).onChange(function () {
            cube.position.set(controls.cubePosX, controls.cubePosY, controls.cubePosZ)
        });
        guiCube.add(controls, "cubePosY", -15, 15).onChange(function () {
            cube.position.set(controls.cubePosX, controls.cubePosY, controls.cubePosZ)
        });
        guiCube.add(controls, "cubePosZ", -15, 15).onChange(function () {
            cube.position.set(controls.cubePosX, controls.cubePosY, controls.cubePosZ)
        });
        guiCube.add(controls, "scaleX", 0, 10).onChange(function (e) {
            cube.scale.x = e
        });
        guiCube.add(controls, "scaleY", 0, 10).onChange(function (e) {
            cube.scale.y = e
        });
        guiCube.add(controls, "scaleZ", 0, 10).onChange(function (e) {
            cube.scale.z = e
        });
        guiCube.add(controls, "actionCube", ["subtract", "intersect", "union", "none"]);

        gui.add(controls, "showResult");
        gui.add(controls, "rotateResult");
        gui.add(controls, "hideWireframes").onChange(function () {
            if (controls.hideWireframes) {
                sphere1.material.visible = false;
                sphere2.material.visible = false;
                cube.material.visible = false;
            } else {
                sphere1.material.visible = true;
                sphere2.material.visible = true;
                cube.material.visible = true;
            }
        });

        render();

        var spinner;

        function redrawResult() {

            showSpinner();

            // make the call async to avoid blocking the thread. Need
            // to set timeout > 1, if not executed immediately.
            setTimeout(function () {
                scene.remove(result);
                //生成球1,球2和方块的BSP对象
                var sphere1BSP = new ThreeBSP(sphere1);
                var sphere2BSP = new ThreeBSP(sphere2);
                var cube2BSP = new ThreeBSP(cube);

                var resultBSP;


                // first do the sphere
                switch (controls.actionSphere) {
                    case "subtract":
                    //球1减去球2
                        resultBSP = sphere1BSP.subtract(sphere2BSP);
                        break;
                    case "intersect":
                    //球1与球2相交
                        resultBSP = sphere1BSP.intersect(sphere2BSP);
                        break;
                    case "union":
                    //球1与球2联合
                        resultBSP = sphere1BSP.union(sphere2BSP);
                        break;
                    case "none": // noop;
                }

                // next do the cube
                if (!resultBSP) resultBSP = sphere1BSP;
                switch (controls.actionCube) {
                    case "subtract":
                    //如果球1与球2的二元操作已经进行完毕,那么此处的操作,则是针对球1与球2二元操作后得到的BSP对象的
                        resultBSP = resultBSP.subtract(cube2BSP);
                        break;
                    case "intersect":
                        resultBSP = resultBSP.intersect(cube2BSP);
                        break;
                    case "union":
                        resultBSP = resultBSP.union(cube2BSP);
                        break;
                    case "none": // noop;
                }


                if (controls.actionCube === "none" && controls.actionSphere === "none") {
                    // do nothing
                } else {
                    //BSP对象还需要使用toMesh函数,使得BSP对象转化为网格对象
                    result = resultBSP.toMesh();
                    //由于二元操作后得到的几何体的法向量发生了改变,所以这里需要重新计算点和面的法向量
                    result.geometry.computeFaceNormals();
                    result.geometry.computeVertexNormals();
                    scene.add(result);
                }

                hideSpinner(spinner);
            }, 200);
        }

        function createMesh(geom) {

            // assign two materials
            var meshMaterial = new THREE.MeshNormalMaterial();
            meshMaterial.side = THREE.DoubleSide;
            var wireFrameMat = new THREE.MeshBasicMaterial({transparency: true, opacity: 0.5, wireframeLinewidth: 0.5});
            wireFrameMat.wireframe = true;

            // create a multimaterial
            var mesh = new THREE.Mesh(geom, wireFrameMat);

            return mesh;
        }


        function showSpinner() {

            var opts = {
                lines: 13, // The number of lines to draw
                length: 20, // The length of each line
                width: 10, // The line thickness
                radius: 30, // The radius of the inner circle
                corners: 1, // Corner roundness (0..1)
                rotate: 0, // The rotation offset
                direction: 1, // 1: clockwise, -1: counterclockwise
                color: '#000', // #rgb or #rrggbb or array of colors
                speed: 1, // Rounds per second
                trail: 60, // Afterglow percentage
                shadow: false, // Whether to render a shadow
                hwaccel: false, // Whether to use hardware acceleration
                className: 'spinner', // The CSS class to assign to the spinner
                zIndex: 2e9, // The z-index (defaults to 2000000000)
                top: 'auto', // Top position relative to parent in px
                left: 'auto' // Left position relative to parent in px
            };
            var target = document.getElementById('WebGL-output');
            spinner = new Spinner(opts).spin(target);//这个地方暂时没有看明白,好像使用了另外一个库函数
            return spinner;
        }

        function hideSpinner(spinner) {
            spinner.stop();
        }

        function render() {
            stats.update();


//            sphere.rotation.y=step+=0.01;

//            if (typeof  ThreeBSP!='undefined') {console.log(ThreeBSP)};
//            console.log(ThreeBSP);

            if (controls.rotateResult && result) {
                result.rotation.y += 0.04;
                //      result.rotation.x+=0.04;
                result.rotation.z -= 0.005;
            }

            // render using requestAnimationFrame
            requestAnimationFrame(render);
            webGLRenderer.render(scene, camera);
        }

        function initStats() {

            var stats = new Stats();
            stats.setMode(0); // 0: fps, 1: ms

            // Align top-left
            stats.domElement.style.position = 'absolute';
            stats.domElement.style.left = '0px';
            stats.domElement.style.top = '0px';

            document.getElementById("Stats-output").appendChild(stats.domElement);

            return stats;
        }

    };

    window.onload = init();


</script>
</body>
</html>