文章目录
- 一、常用模块介绍
- 二、实验环境信息
- 三、环境部署准备
- 四、配置文件详解
- 五、修改配置文件
- 六、命令语法详解
- 七、常用模块实战
-
- 7.1、ping模块
- 7.2、command模块和shell模块
- 7.3、hostname模块
- 7.4、copy模块
- 7.5、user模块和group模块
- 7.6、cron模块
- 7.7、yum模块
- 7.8、file模块
- 7.9、service模块和systemd模块
- 7.10、yum_repository模块
- 7.11、find模块
- 7.12、get_url模块
- 7.13、fetch模块
- 7.14、script模块
- 7.15、lineinfile模块
- 7.16、docker_container模块
- 7.17、docker_image模块
- 7.18、docker_service模块
- 7.19、blockinfile模块
- 7.20、debug模块
- 7.21、assert模块
- 7.22、fail模块
- 总结:整理不易,如果对你有帮助,可否点赞关注一下?
一、常用模块介绍
由于ansible 2.9.2版本支持的模块为3387个,所以在这里主要介绍一些常用模块。请查阅官方模块合集详解
#1、查看支持的模块
[root@localhost ansible]# ansible-doc -l
#2、查看ansible的支持的模块个数
[root@localhost ansible]# ansible-doc -l |wc -l
3387
#3、查看模块命令帮助
[root@host-sdjw-ansible-server-190 ~]# ansible-doc -s copy
#4、查看ansible版本
[root@localhost ansible]# ansible --version
ansible 2.9.27
  config file = /etc/ansible/ansible.cfg
  configured module search path = [u'/root/.ansible/plugins/modules', u'/usr/share/ansible/plugins/modules']
  ansible python module location = /usr/lib/python2.7/site-packages/ansible
  executable location = /usr/bin/ansible
  python version = 2.7.5 (default, Nov 16 2020, 22:23:17) [GCC 4.8.5 20150623 (Red Hat 4.8.5-44)]
常用模块如下:
#ping模块: 检查指定节点机器是否还能连通,用法很简单,不涉及参数,主机如果在线,则回复pong
#command模块:适合使用简单的命令 无法支持"<",">","|",";","&"等符号
#shell模块:这是个万能模块,执行linux命令时可以用远程节点执行命令
#hostname模块:修改远程受控端节点的主机名的模块
#copy模块:在远程主机执行复制操作文件到受控端主机上
#user模块与group模块: user模块是请求的是useradd, userdel, usermod三个指令,goup模块请求的是groupadd, groupdel, groupmod 三个指令
#cron模块:执行任务计划模块
#yum模块:RedHat和CentOS的软件包安装和管理工具
#file模块:主要用于远程主机上的文件操作
二、实验环境信息
| 主机名 | IP | 操作系统 | 角色 |
|---|---|---|---|
| host-sdjw-ansible-server-190 | 192.168.1.190 | Centos7.6 | 管理端 |
| host-sdjw-ansible-client-191 | 192.168.1.190 | Centos7.6 | 受控端 |
| host-sdjw-ansible-client-192 | 192.168.1.190 | Centos7.6 | 受控端 |
| host-sdjw-ansible-client-193 | 192.168.1.190 | Centos7.6 | 受控端 |
| host-sdjw-ansible-client-198 | 192.168.1.190 | Centos7.6 | 受控端 |
三、环境部署准备
1、分别对所有节点设置主机名设置
[root@localhost ~]# hostnamectl set-hostname host-sdjw-ansible-server-190
[root@localhost ~]# hostnamectl set-hostname host-sdjw-ansible-client-191
[root@localhost ~]# hostnamectl set-hostname host-sdjw-ansible-client-192
[root@localhost ~]# hostnamectl set-hostname host-sdjw-ansible-client-193
[root@localhost ~]# hostnamectl set-hostname host-sdjw-ansible-client-198
2、设置主控节点到受控节点的ssh无密码信任关系 (ansible应用环境下, 主控节点必须要设置ssh无密码跳转到受控节点的信任关系), 当前操作只在管理端节点操作。
[root@host-sdjw-ansible-server-190 ~]# ssh-keygen -t dsa  -f ~/.ssh/id_dsa  -P ""
[root@host-sdjw-ansible-server-190 ~]# sshpass -p123456 ssh-copy-id -i .ssh/id_dsa.pub -o StrictHostKeyChecking=no -p22 [email protected]
[root@host-sdjw-ansible-server-190 ~]# sshpass -p123456 ssh-copy-id -i .ssh/id_dsa.pub -o StrictHostKeyChecking=no -p22 [email protected]
[root@host-sdjw-ansible-server-190 ~]# sshpass -p123456 ssh-copy-id -i .ssh/id_dsa.pub -o StrictHostKeyChecking=no -p22 [email protected]
[root@host-sdjw-ansible-server-190 ~]# sshpass -p123456 ssh-copy-id -i .ssh/id_dsa.pub -o StrictHostKeyChecking=no -p22 [email protected]
四、配置文件详解
ansible主要有两个配置文件
#yum默认安装的ansible,常用的配置文件有两个:
#1、/etc/ansible/ansible.cfg: ansible服务器配置文件
#2、/etc/ansible/hosts: 管理被控制主机的ip地址的文件
说明:ansible可同时操作属于一个组的多台主机,组和主机之间的关系通过inventory文件配置,默认的文件路径为 /etc/ansible/hosts,Inventory参数的说明,如下内容所示:
1、ansible_ssh_host 将要连接的远程主机名.与你想要设定的主机的别名不同的话,可通过此变量设置
2、ansible_ssh_port ssh端口号.如果不是默认的端口号,通过此变量设置
3、ansible_ssh_user 默认的ssh用户名
4、ansible_ssh_pass ssh密码(这种方式并不安全,我们强烈建议使用–ask-pass或SSH密钥)
5、ansible_sudo_pass sudo密码(这种方式并不安全,我们强烈建议使用–ask-sudo-pass)
6、ansible_sudo_exe (new in version 1.8) sudo命令路径(适用于1.8及以上版本)
7、ansible_connection 与主机的连接类型.比如:local, ssh 或者 paramiko. Ansible 1.2 以前默认使用 paramiko.1.2 以后默认使用 ‘smart’,‘smart’ 方式会根据是否支持 ControlPersist, 来判断’ssh’ 方式是否可行
8、ansible_ssh_private_key_file ssh使用的私钥文件.适用于有多个密钥,而你不想使用SSH代理的情况
9、ansible_shell_type 目标系统的shell类型.默认情况下,命令的执行使用 ‘sh’ 语法,可设置为 ‘csh’ 或 ‘fish’
10、ansible_python_interpreter 目标主机的python路径,适用于的情况: 系统中有多个Python, 或者命令路径不是"/usr/bin/python",比如 *BSD, 或者 /usr/bin/python,不是2.X版本的Python,我们不使用 “/usr/bin/env” 机制,因为这要求远程用户的路径设置正确,且要求 “python” 可执行程序名不可为 python以外的名字(实际有可能名为python26),与ansible_python_interpreter的工作方式相同,可设定如ruby或perl的路径
说明:ansible模块操作命令中可以省去默认inventory (即可以省去"-i /etc/ansible/hosts"), 如果inventory文件定义了其他路径,则在ansible模块操作命令中不能省去, 要加上"-i inventory路径"。
扩展:那么如何配置Inventory文件?
主控节点
1、支持主机名通配以及正则表达式,例如abc[1:3].xyz.com
2、支持基于非标准的ssh端口,例如abc.xyz.com:2222
3、支持指定变量,可对个别主机的特殊配置,如登陆用户,密码等
五、修改配置文件
1、配置ansible主机清单,主机清单配置文件/etc/ansible/hosts
[root@host-sdjw-ansible-server-190 ~]# vim /etc/ansible/hosts
[k8s_sdjw]
192.168.1.191
192.168.1.192
192.168.1.193
192.168.1.198
注意1:ssh端口不是22,请用如下命令修改端口
[root@linux-node1 ~]# sed -i s'&#remote_port = 22&remote_port = 2222&'g /etc/ansible/ansible.cfg
注意2:检查组名是否只包含了字母,数字,下划线"_",且组名不能数字开头,然后修改符合要求即可,如k8s_sdjw不能写成k8s-sdjw,否则会出现如下错误:

2、修改ansible配置文件,配置文件为/etc/ansible/ansible.cfg
[root@host-sdjw-ansible-server-190 ~]# vim /etc/ansible/ansible.cfg
inventory = /etc/ansible/hosts   #这个参数表示资源清单inventory文件的位置
forks = 5         #并发连接数,默认为5
ask_pass = False #是否提示输入SSH密码,如果使用ssh公钥身份验证,则可以是false
remote_user = root #要在受管主机上登录的用户名,如果未指定使用当前用户
poll_interval  = 15 #默认轮询时间间隔
remote_port = 22  #指定连接被管节点的管理端口,默认为22端口,建议修改,能够更加安全
host_key_checking = False  #首次连接是否检查key认证
timeout = 60		      #设置SSH连接的超时时间,单位为秒
log_path = /var/log/ansible.log		#指定一个存储ansible日志的文件(默认不记录日志)
六、命令语法详解
七、常用模块实战
说明:ansible可以自定义inventory文件的路径,需指定-i参数,配置文件只是定义默认inventory,在一些自动化的部署工具中,可能不会使用默认inventory文件路径,都是使用自定义路径,这里下面演示的实验都是自定义路径,这里在/opt目录下创建了hosts主机清单文件。
7.1、ping模块
说明:检查指定节点机器是否还能连通,用法很简单,不涉及参数。主机如果在线,则回复pong。
执行内容如下:
[root@host-sdjw-ansible-server-190 ~]# ansible -i /opt/hosts k8s_sdjw -m ping
[root@host-sdjw-ansible-server-190 ~]# ansible -i /opt/hosts 192.168.1.191 -m ping
执行结果如下:

7.2、command模块和shell模块
说明:用于在各受控端节点运行指定的命令,shell和command的区别:shell模块可以特殊字符,而command是不支持。ansible不支持命令别名,如ls -l不能简写成ll。
执行内容如下:
[root@host-sdjw-ansible-server-190 ~]# ansible -i /opt/hosts k8s_sdjw -m command -a 'hostname'
[root@host-sdjw-ansible-server-190 ~]# ansible -i /opt/hosts k8s_sdjw -m shell -a 'hostname && date'
执行结果如下:
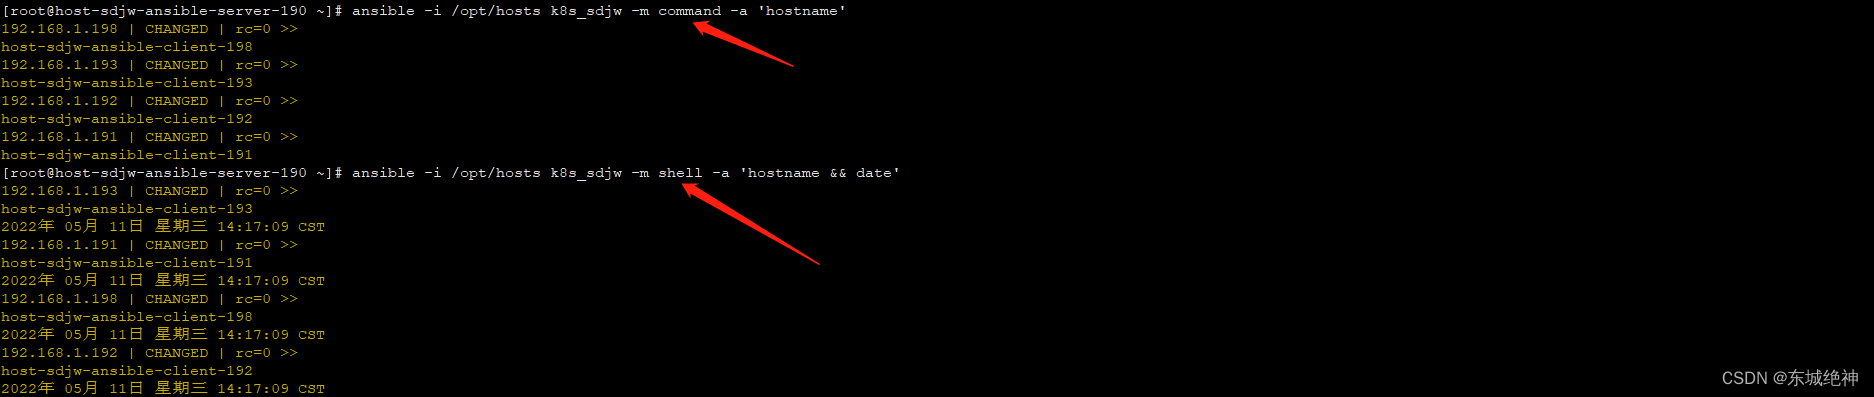
注意:ansible不支持命令别名,如ls -l不能简写成ll。

7.3、hostname模块
说明:hostname模块是修改远程受控节点的主机名的模块。
注意:使用hostname模块修改远程节点的主机名时, 最好指明远程单节点ip地址进行设置主机名了. 因为不同节点的主机名不一样。
执行内容如下:
[root@host-sdjw-ansible-server-190 ~]# ansible -i /opt/hosts 192.168.1.198 -m hostname -a 'name=host-sdjw-ansible-client-199'
执行结果如下:

7.4、copy模块
说明:在远程主机执行复制操作文件。
帮助文档
[root@host-sdjw-ansible-server-190 ~]# ansible-doc -s copy
参数详解
#src 推送数据的源文件信息
#dest 推送数据的目标路径
#backup 在覆盖之前将原文件备份,备份文件包含时间信息,有两个选项:yes|no
#content 取代src=,表示直接用此处指定的信息生成目标文件
#group  将本地文件推送到远端,指定文件属组信息
#owner 将本地文件推送到远端,指定文件属主信息
#mode  将本地文件推送到远端,指定文件权限信息
#force 如果目标主机包含该文件,但内容不同,如果设置为yes,则强制覆盖;如果为no,则只有当目标主机的目标位置不存在该文件时,才复制,默认为yes
执行内容如下:
[root@host-sdjw-ansible-server-190 ~]# ansible -i /opt/hosts k8s_sdjw -m copy -a 'src=/etc/hosts dest=/opt/hosts backup=yes'
[root@host-sdjw-ansible-server-190 ~]# ansible -i /opt/hosts k8s_sdjw -m copy -a "src=/etc/hosts dest=/opt/hosts owner=root group=root mode=0644"
[root@host-sdjw-ansible-server-190 ~]# ansible -i /opt/hosts k8s_sdjw -m copy -a 'src=/etc/hosts dest=/opt/hosts owner=root group=root mode="u=rw,g=r,o=r"'
[root@host-sdjw-ansible-server-190 ~]# ansible -i /opt/hosts k8s_sdjw -m copy -a 'content="Hello Word\n T am" dest=/opt/hosts'
7.5、user模块和group模块
说明:user模块是请求的是useradd, userdel, usermod三个指令,group模块请求的是groupadd, groupdel, groupmod 三个指令。
帮助文档
[root@host-sdjw-ansible-server-190 ~]# ansible-doc -s user
[root@host-sdjw-ansible-server-190 ~]# ansible-doc -s group
user模块参数详解
#home: 指定用户的家目录, 需要与createhome配合使用。
#groups: 指定用户的属组。
#uid: 指定用的uid。
#password: 设定用户密码, password参数需要接受md5加密后的值.  特别注意:  指定password参数时, 不能使用明文密码, 因为后面这一串密码会被直接传送到被管理主机的/etc/shadow文件中, 所以需要先将密码字符串进行加密处理, 然后将得到的字符串放到password中即可。
#name: 指定用户名。
#system: 是否为系统用户。 表示默认创建为普通用户, 而非系统用户, 指定是用yes. 也就是说yes是默认创建为普通用户, 而非系统用户;
#update_password: 修改用户密码, 其中always: 新密码和旧密码不同时进行修改; on_create: 为新创建的用户指定密码.
#createhome: 创建家目录, 其中yes表示默认项, 即创建用户默认是有家目录的; no表示创建用户时不创建家目录.
#remove: 其中yes是删除用户家目录, 需要指定此参数; no是默认项, 删除用户时默认不删除用户的家目录. 当state=absent时, remove=yes则表示连同家目录一起删除, 等价于userdel -r。
#state: 用户状态是创建还是删除. (present, absent) ;默认为present; 其中present表示添加用户; absent表示删除用户
#shell: 指定用户的shell环境,/bin/shell(默认),/sbin/nologin。
#generate_ssh_key: 是否为相关用户生成SSH密钥。 这不会覆盖现有的SSH密钥。
#ssh_key_bits: 可选择指定要创建的SSH密钥中的位数。
#ssh_key_passphrase: 设置SSH密钥的密码。 如果没有提供密码, SSH密钥将默认没有密码。
#ssh_key_file: 指定SSH密钥文件名(可选).  如果这是一个相对的文件名, 那么它将是相对于用户的主目录。
#ssh_key_type: 指定要生成的SSH密钥的类型(可选).  可用的SSH密钥类型将取决于目标主机上的实现。
group模块参数详解
#gid: 指定用的gid。
#name: 指定用户名。
#state: 是创建还是删除, (present,absent);
#system: 如果是,则表示创建的组是系统组;
执行内容如下:
#1、增加用户haha (必须先对密码做明文到密文的处理,否则ansible会不识别)
[root@host-sdjw-ansible-server-190 ~]# echo "123456" | openssl passwd -1 -stdin
$1$K5lNEJqj$B4iYAvJbI3HbWcdX9S6Nu0
[root@host-sdjw-ansible-server-190 ~]# ansible -i /opt/hosts k8s_sdjw -m user -a 'name=haha password=$1$K5lNEJqj$B4iYAvJbI3HbWcdX9S6Nu0 system=yes state=present'

#2、删除用户haha,不删除家目录
[root@host-sdjw-ansible-server-190 ~]# ansible -i /opt/hosts k8s_sdjw -m user -a 'name=haha remove=no state=absent'

#3、删除用户haha,并连家目录一起删除
[root@host-sdjw-ansible-server-190 ~]# ansible -i /opt/hosts k8s_sdjw -m user -a 'name=haha remove=yes state=absent'

#4、修改用户haha的密码
[root@host-sdjw-ansible-server-190 ~]# echo 123456789 | openssl passwd -1 -stdin
$1$V5mmQOmB$JaRuz0ln1FtwuMOhNM3eJ1
[root@host-sdjw-ansible-server-190 ~]# ansible -i /opt/hosts k8s_sdjw -m user -a 'name=haha update_password=always password=$1$V5mmQOmB$JaRuz0ln1FtwuMOhNM3eJ1'
7.6、cron模块
说明:执行任务计划模块。
帮助文档
[root@host-sdjw-ansible-server-190 ~]# ansible-doc -s cron
cron模块参数详解
#job:要执行的任务
#user:已什么用户运行定时任务,默认为root
#name:该任务的描述(必须项)
#支持时间:minute,hour,day,month,weekday
#两种状态(state):present表示添加(可以省略),absent表示移除
#backup:对远程主机上的原任务计划内容修改之前做备份
#disabled:注释定时任务
执行内容如下:
#1、使用ansible添加一条定时任务
[root@host-sdjw-ansible-server-190 ~]# ansible -i /opt/hosts k8s_sdjw -m cron -a "name='test a job' user=root job='/bin/sh /server/scripts/test.sh' minute=* hour=* day=* month=* weekday=*"

#2、删除相应定时任务
[root@host-sdjw-ansible-server-190 ~]# ansible -i /opt/hosts k8s_sdjw -m cron -a "name='test' user=root job='/bin/sh /server/scripts/test.sh' minute=* hour=* day=* month=* weekday=* state=absent"

#3、注释相应定时任务,使定时任务失效
[root@host-sdjw-ansible-server-190 ~]# ansible -i /opt/hosts k8s_sdjw -m cron -a "name='test a job' user=root job='/bin/sh /server/scripts/test.sh' minute=* hour=* day=* month=* weekday=* disabled=yes"
7.7、yum模块
说明:yum 模块: RedHat和CentOS的软件包安装和管理工具。
帮助文档
[root@host-sdjw-ansible-server-190 ~]# ansible-doc -s yum
参数详解
#config_file:yum的配置文件 (optional)
#disable_gpg_check:关闭gpg_check (optional)
#disablerepo:不启用某个源 (optional)
#enablerepo:启用某个源(optional)
#name:要进行操作的软件包的名字,默认最新的程序包,指明要安装的程序包,可以带上版本号,也可以传递一个url或者一个本地的rpm包的路径
#state:表示是安装还是卸载的状态, 其中present、installed、latest 表示安装,  absent 、removed表示卸载删除;  present默认状态, laster表示安装最新版本.
执行内容如下:
#1、安装httpd服务
[root@host-sdjw-ansible-server-190 ~]# ansible -i /opt/hosts k8s_sdjw -m yum -a "name=httpd state=present"
[root@host-sdjw-ansible-server-190 ~]# ansible -i /opt/hosts k8s_sdjw -m yum -a "name=httpd state=installed"

#2、卸载httpd服务
[root@host-sdjw-ansible-server-190 ~]# ansible -i /opt/hosts k8s_sdjw -m yum -a "name=httpd state=absent"
[root@host-sdjw-ansible-server-190 ~]# ansible -i /opt/hosts k8s_sdjw -m yum -a "name=httpd state=removed"
7.8、file模块
说明:file模块主要用于远程主机上的文件操作。
帮助文档
[root@host-sdjw-ansible-server-190 ~]# ansible-doc -s file
参数详解
#force: 需要在两种情况下强制创建软链接,一种是源文件不存在但之后会建立的情况下;另一种是目标软链接已存在,需要先取消之前的软链,然后创建新的软链,有两个选项: yes|no
#group: 定义文件/目录的属组
#mode: 定义文件/目录的权限
#owner: 定义文件/目录的属主
#path: 必选项,定义文件/目录的路径
#recurse: 递归的设置文件的属性,只对目录有效
#src: 要被链接的源文件的路径,只应用于state=link的情况
#dest: 被链接到的路径,只应用于state=link的情况
#state:  表示file的状态, 主要分为:
         #directory: 如果目录不存在,创建目录;
         #file: 即使文件不存在,也不会被创建;
         #link: 创建软链接;
         #hard: 创建硬链接;
         #touch: 如果文件不存在,则会创建一个新的文件,如果文件或目录已存在,则更新其最后修改时间;
         #absent: 删除目录、文件或者取消链接文件;
执行内容如下:
#1、创建目录/data1和/backup1,属主666,属组666
[root@host-sdjw-ansible-server-190 ~]# ansible -i /opt/hosts k8s_sdjw -m file -a "path=/data owner=666 group=666 recurse=yes state=directory"

#2、创建文件/etc/rsync.password,权限600
[root@host-sdjw-ansible-server-190 ~]# ansible -i /opt/hosts k8s_sdjw -m file -a "path=/root/rsync.password mode=600 state=touch"

#3、删除data目录
[root@host-sdjw-ansible-server-190 ~]# ansible -i /opt/hosts k8s_sdjw -m file -a "path=/data state=absent"

#4、对/etc/hosts做个软连接,到/tmp/hosts
[root@host-sdjw-ansible-server-190 ~]# ansible -i /opt/hosts k8s_sdjw -m file -a "src=/etc/hosts path=/tmp/hosts state=link"
7.9、service模块和systemd模块
说明:service或systemd 模块: 用于管理远程主机的服务。
帮助文档
[root@host-sdjw-ansible-server-190 ~]# ansible-doc -s service
[root@host-sdjw-ansible-server-190 ~]# ansible-doc -s systemd
由于当前系统环境为Centos7,所以只介绍systemd模块
systemd参数详解
#deamon_reload 设在执行任何其他操作之前运行守护进程重新加载,以确保systemd已经读取其他更改
#enabled 开机是否启动
#name 必选项
#state (reloaded、restarted、started、stopped)
执行内容如下:
#1、启动服务并设置开机自启
[root@host-sdjw-ansible-server-190 ~]# ansible -i /opt/hosts k8s_sdjw -m systemd -a "name=httpd state=started enabled=yes"

#2、停止服务并关闭开机自启
[root@host-sdjw-ansible-server-190 ~]# ansible -i /opt/hosts k8s_sdjw -m systemd -a "name=httpd state=stopped enabled=no"

#3、重启服务
[root@host-sdjw-ansible-server-190 ~]# ansible -i /opt/hosts k8s_sdjw -m systemd -a "name=httpd state=restarted"

#4、重新加载配置
[root@host-sdjw-ansible-server-190 ~]# ansible -i /opt/hosts k8s_sdjw -m systemd -a "name=httpd state=reloaded"

#5、重新载入systemd
[root@host-sdjw-ansible-server-190 ~]# ansible -i /opt/hosts k8s_sdjw -m systemd -a "name=httpd daemon_reload=yes"
7.10、yum_repository模块
说明:yum_repository模块: 配置yum仓库。
帮助文档
[root@host-sdjw-ansible-server-190 ~]# ansible-doc -s yum_repository
#name  仓库名
#description  仓库描述信息
#file  yum配置文件名称,不用带后缀repo,会默认加上
#baseurl  软件包源
#gpgcheck 检测软件合法性
#gpgkey   开启软件检测后的文件路径
#enabled  是否开启仓
执行内容如下:
#1、配置仓库
[root@host-sdjw-ansible-server-190 ~]# ansible -i /opt/hosts k8s_sdjw -m yum_repository -a "file=docker-ce name=docker-ce description='Docker-CE Repository' baseurl=http://192.168.1.23/localyum enabled=1 gpgcheck=0"

#2、删除仓库
[root@host-sdjw-ansible-server-190 ~]# ansible -i /opt/hosts k8s_sdjw -m yum_repository -a "file=docker-ce name=docker-ce state=absent"
7.11、find模块
说明:find模块: 帮助在被管理主机中查找符合条件的文件,就像find命令一样。
帮助文档
[root@host-sdjw-ansible-server-190 ~]# ansible-doc -s find
#paths:required,指定查找目录,可以指定多个,路径间用逗号隔开,此参数有别名,使用别名 path 或者别名 name 可以代替 paths
#recurse: 递归查找文件,默认值no
#hidden:查找隐藏文件,默认值no
#file_type: 指定的查找文件类型: any、directory、file、link
#patterns: 使用 shell 匹配对应的文件名,如果使用 python 的正则去匹配文件名,需要将 use_regex 的值设置为yes
#use_regex:使用 python 正则解析 patterns 值,默认值no
#contains:使用此参数可以根据文章内容查找文件,此参数的值为一个正则表达式,find模块会根据对应的正则表达式匹配文件内容
#age:根据时间范围查找文件,默认以文件的 mtime 为准与指定的时间进行对比,查找 mtime在3天之前的文件,设置 age=3d,查找 mtime 在3天以内的文件,设置age=-3d
#age_stamp:文件的时间属性中有三个时间种类,atime、ctime、mtime,指定以哪个时间种类为准,当根据时间查找文件时,默认mtime
#size:根据文件大小查找文件,查找大于3M的文件,设置 size=3m,查找小于50k的文件,设置 size=-50k,可以使用的单位有 t、g、m、k、b
#get_checksum:当有符合查找条件的文件被找到时,会同时返回对应文件的sha1校验码,如果要查找的文件比较大,那么生成校验码的时间会比较长
执行内容如下:
#1、查找/opt目录下内容包含456的文件,只能在/opt目录下,不能递归目录
[root@host-sdjw-ansible-server-190 ~]# ansible -i /opt/hosts k8s_sdjw -m find -a "path=/opt contains='.*456.*'"

#2、查找/opt目录下内容包含456的文件,同时也会递归/opt目录下的子目录
[root@host-sdjw-ansible-server-190 ~]# ansible -i /opt/hosts k8s_sdjw -m find -a "path=/opt contains='.*456.*' recurse=yes"

#3、递归查找以.txt结尾的文件不包含隐藏文件
[root@host-sdjw-ansible-server-190 ~]# ansible -i /opt/hosts k8s_sdjw -m find -a "path=/opt patterns='*.txt' hidden=no recurse=yes"

#4、递归查找以.txt结尾的文件包含隐藏文件
[root@host-sdjw-ansible-server-190 ~]# ansible -i /opt/hosts k8s_sdjw -m find -a "path=/opt patterns='*.txt' hidden=yes recurse=yes"

#5、找四天以内的文件,不包括软连接和隐藏文件
[root@host-sdjw-ansible-server-190 opt]# ansible -i /opt/hosts k8s_sdjw -m find -a "path=/opt age=-4d recurse=yes"

#6、查找atime在两星期内的文件
[root@host-sdjw-ansible-server-190 opt]# ansible -i /opt/hosts k8s_sdjw -m find -a "path=/opt age=-2w age_stamp=atime recurse=yes"

#7、递归查找大小小于1m的文件
[root@host-sdjw-ansible-server-190 opt]# ansible -i /opt/hosts k8s_sdjw -m find -a "path=/opt size=-1m recurse=yes"

#8、递归查找大小大于1m的文件
[root@host-sdjw-ansible-server-190 opt]# ansible -i /opt/hosts k8s_sdjw -m find -a "path=/opt size=1m recurse=yes"

#9、返回checksum校验码
[root@host-sdjw-ansible-server-190 opt]# ansible -i /opt/hosts k8s_sdjw -m find -a "path=/opt patterns='*.sh' get_checksum=yes recurse=yes hidden=yes"
7.12、get_url模块
说明:get_url模块: 用于将文件或软件从http、https或ftp下载到本地节点上或被管理机节点上。
帮助文档
[root@host-sdjw-ansible-server-190 ~]# ansible-doc -s get_url
#dest= : 下载到哪里(绝对路径),如果目标是一个目录,就用服务器上面文件的名称,如果目标设置了名称就用目标设置的名称。
#owner:指定属主
#group:指定属组
#mode:指定权限
#force : 如果yes,dest不是目录,将每次下载文件,如果内容改变,替换文件。如果否,则只有在目标不存在时才会下载该文件。
#others : [file]模块接受的所有参数也可以在这里工作
#sha256sum : 如果将SHA-256校验和传递给此参数,目标文件的摘要将在下载后计算,以确保其完整性
#url : HTTP,HTTPS或FTP URL(http | https | ftp)
#url_password : 用于HTTP基本认证的密码。 如果未指定`url_username'参数,则不会使用`url_password'参数。
#url_username : 用于HTTP基本认证的用户名。 对于允许空密码的站点,此参数可以不使用`url_password'使用。
#use_proxy : 如果是no,它将不使用代理,即使在目标主机上的环境变量中定义了一个代理。
#validate_certs :如果“no”,SSL证书将不会被验证。 这只能使用自签名证书在个人控制的网站上使用。
执行内容如下:
#1、下载文件
[root@host-sdjw-ansible-server-190 ~]# ansible -i /opt/hosts k8s_sdjw -m get_url -a "url=http://muzhi.baidu.com/question/13193725.html dest=/tmp"

#2、下载文件指定用户名和密码
[root@host-sdjw-ansible-server-190 ~]# ansible -i /opt/hosts k8s_sdjw -m get_url -a "url=http://muzhi.baidu.com/question/13193725.html dest=/tmp/b url_username='admin' url_password='admin@123'"
7.13、fetch模块
说明:fetch模块: copy模块将ansible主机上的文件拷贝到远程主机,fetch模块将远程主机上的文件拉取到ansible主机。
帮助文档
[root@host-sdjw-ansible-server-190 ~]# ansible-doc -s fetch
#src:指定拉取或拷贝的文件,适用于copy|fetch
#dest:指定存放的位置,适用于copy|fetch
#content:指定远程主机文件的内容,而不是拷贝文件到远程主机上,仅限copy
#force:当远程主机已存在同名文件时,yes强制覆盖,no不会执行覆盖操作,默认yes
#backup:当远程主机已存在同名文件时,yes先备份再拷贝
#owner:指定文件属主
#group:指定文件属组
#mode:指定文件权限
执行内容如下:
[root@host-sdjw-ansible-server-190 ~]# ansible -i /opt/hosts k8s_sdjw -m fetch -a "src=/etc/fstab dest=/opt"
7.14、script模块
7.15、lineinfile模块
7.16、docker_container模块
7.17、docker_image模块
7.18、docker_service模块
7.19、blockinfile模块
7.20、debug模块
7.21、assert模块
7.22、fail模块
总结:整理不易,如果对你有帮助,可否点赞关注一下?
更多详细内容请参考:Ansible自动化运维实战