整合MyBatis
一、前置内容
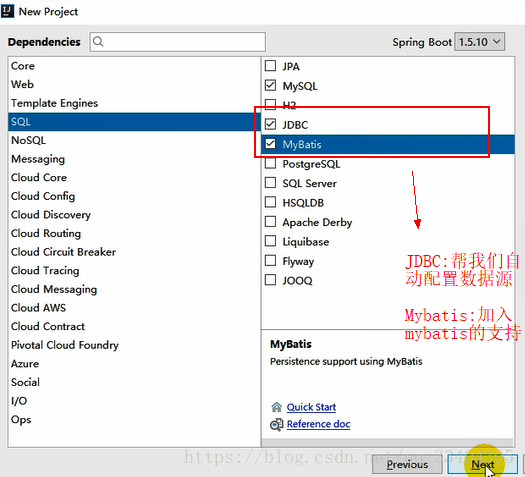
Tip:创建project时注意要勾选:JDBC和Mybatis
步骤:
1.引入依赖:
        <dependency>
            <groupId>org.mybatis.spring.boot</groupId>
            <artifactId>mybatis-spring-boot-starter</artifactId>
            <version>1.3.1</version>
        </dependency>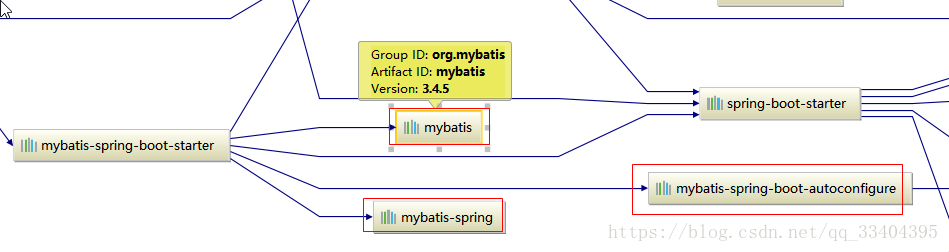
2、配置数据源相关属性(Druid依赖也需要引入)
spring:
  datasource:
#   数据源基本配置
    username: root
    password: 123456
    driver-class-name: com.mysql.jdbc.Driver
    url: jdbc:mysql://127.0.0.1:3306/mybatis
    type: com.alibaba.druid.pool.DruidDataSource
#   数据源其他配置
    initialSize: 5
    minIdle: 5
    maxActive: 20
    maxWait: 60000
    timeBetweenEvictionRunsMillis: 60000
    minEvictableIdleTimeMillis: 300000
    validationQuery: SELECT 1 FROM DUAL
    testWhileIdle: true
    testOnBorrow: false
    testOnReturn: false
    poolPreparedStatements: true
#   配置监控统计拦截的filters,去掉后监控界面sql无法统计,'wall'用于防火墙
    filters: stat,wall,log4j
    maxPoolPreparedStatementPerConnectionSize: 20
    useGlobalDataSourceStat: true
    connectionProperties: druid.stat.mergeSql=true;druid.stat.slowSqlMillis=500
3、给数据库建表
department.sql:
SET FOREIGN_KEY_CHECKS=0;

-- ----------------------------
-- Table structure for department
-- ----------------------------
DROP TABLE IF EXISTS `department`;
CREATE TABLE `department` (
  `id` int(11) NOT NULL AUTO_INCREMENT,
  `departmentName` varchar(255) DEFAULT NULL,
  PRIMARY KEY (`id`)
) ENGINE=InnoDB AUTO_INCREMENT=1 DEFAULT CHARSET=utf8;
employee.sql:
SET FOREIGN_KEY_CHECKS=0;

-- ----------------------------
-- Table structure for employee
-- ----------------------------
DROP TABLE IF EXISTS `employee`;
CREATE TABLE `employee` (
  `id` int(11) NOT NULL AUTO_INCREMENT,
  `lastName` varchar(255) DEFAULT NULL,
  `email` varchar(255) DEFAULT NULL,
  `gender` int(2) DEFAULT NULL,
  `d_id` int(11) DEFAULT NULL,
  PRIMARY KEY (`id`)
) ENGINE=InnoDB AUTO_INCREMENT=1 DEFAULT CHARSET=utf8;
application.yml(启动时自动创建表):
    schema:
      - classpath:sql/department.sql
      - classpath:sql/employee.sql
4、创建JavaBean
Department.java:
public class Department {

    private Integer id;
    private String departmentName;
}Employee.java:
public class Employee {

    private Integer id;
    private String lastName;
    private Integer gender;
    private String email;
    private Integer dId;
    }
二、整合注解版Mybatis(不需要任何的mybatis配置就可以直接使用了)
1、Mapper
@Mapper
public interface DepartmentMapper {

    @Select("select * from department where id=#{id}")
    public Department getDeptById(Integer id);

    @Delete("delete from department where id=#{id}")
    public int deleteDeptById(Integer id);

    @Options(useGeneratedKeys = true,keyProperty = "id")//告诉注解版的mybatis【department】对象中的id为自增主键
    @Insert("insert into department(departmentName) values(#{departmentName})")
    public int insertDept(Department department);

    @Update("update department set departmentName=#{departmentName} where id=#{id}")
    public int updateDept(Department department);
}
2、Controller
@RestController
public class DeptController {

    @Autowired
    DepartmentMapper departmentMapper;

    @Autowired
    EmployeeMapper employeeMapper;


    @GetMapping("/dept/{id}")
    public Department getDepartment(@PathVariable("id") Integer id){
        return departmentMapper.getDeptById(id);
    }

    @GetMapping("/dept")
    public Department insertDept(Department department){
        departmentMapper.insertDept(department);
        return department;
    }

}
3、自定义MyBatis的配置规则,增加自定义mybatis配置,只需要给容器中添加一个ConfigurationCustomizer;如:
@org.springframework.context.annotation.Configuration
public class MyBatisConfig {

    @Bean
    public ConfigurationCustomizer configurationCustomizer(){
        return new ConfigurationCustomizer(){
            @Override
            public void customize(Configuration configuration) {
                //可以将表字段的下划线自动转成驼峰命名的方式和对象属性映射
                configuration.setMapUnderscoreToCamelCase(true);
            }
        };
    }
}4、使用MapperScan批量扫描所有的Mapper接口;(这样mapper包下的mapper接口就不需要加注解@Mapper也能被扫描)
@MapperScan(value = "com.wangcw.springboot.mapper")
@SpringBootApplication
public class SpringBoot06DataMybatisApplication {

    public static void main(String[] args) {
        SpringApplication.run(SpringBoot06DataMybatisApplication.class, args);
    }
}
完成!
三、整合配置文件版的Mybatis
1、Mapper
//@Mapper或者@MapperScan将接口扫描装配到容器中
public interface EmployeeMapper {

    public Employee getEmpById(Integer id);

    public void insertEmp(Employee employee);
}
2、Mapper.xml
<mapper namespace="com.springboot.mapper.EmployeeMapper">
    <select id="getEmpById" resultType="com.atguigu.springboot.bean.Employee">
        SELECT * FROM employee WHERE id=#{id}
    </select>

    <insert id="insertEmp">
        INSERT INTO employee(lastName,email,gender,d_id) VALUES (#{lastName},#{email},#{gender},#{dId})
    </insert>
</mapper>
3、Controller
  @Autowired
   private EmployeeMapper employeeMapper;

  @GetMapping("/emp/{id}")
    public Employee getEmp(@PathVariable("id") Integer id){
       return employeeMapper.getEmpById(id);
    }
4、mybatis-config.xml
<?xml version="1.0" encoding="UTF-8" ?>
<!DOCTYPE configuration
        PUBLIC "-//mybatis.org//DTD Config 3.0//EN"
        "http://mybatis.org/dtd/mybatis-3-config.dtd">
<configuration>

    <settings>
        <setting name="mapUnderscoreToCamelCase" value="true"/>
    </settings>
</configuration>
5、application.yml
mybatis:
  # 指定全局配置文件位置
  config-location: classpath:mybatis/mybatis-config.xml
  # 指定sql映射文件位置
  mapper-locations: classpath:mybatis/mapper/*.xml
完成!
更多使用参照:
http://www.mybatis.org/spring-boot-starter/mybatis-spring-boot-autoconfigure/