上一篇是搭建了一个springboot+mybatis的项目demo,我们发现,整个项目除了application.properties文件,其他配置文件,如mybatis-config.xml、mapper.xml都不需要,甚至数据库java配置类也不需要。非常的方便,但是这方便却来得稀里糊涂,另外搭建一个springboot+mybatis的方式非常多,但是这对于一个初学者而言,并不是一个好事,因为很容易弄混,所以本片旨在于弄清楚springboot集成mybatis时,该框架默认做了那些东西。本文还是拿上一篇文件的demo进行演示,具体搭建过程不在演示。
1、springboot项目架构
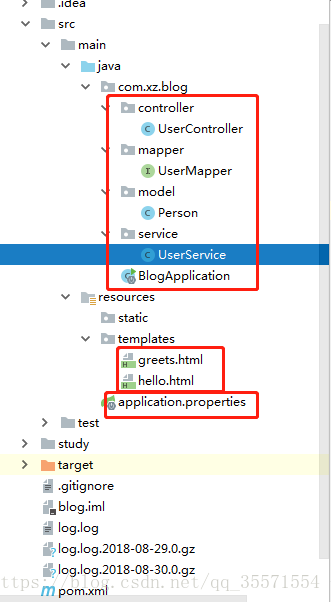
2、整个项目除了pom.xml文件和application.properties文件外,没有其他配置文件。
pom.xml文件内容(部分jar包没有用到,也还是加上去了):
<?xml version="1.0" encoding="UTF-8"?>
<project xmlns="http://maven.apache.org/POM/4.0.0" xmlns:xsi="http://www.w3.org/2001/XMLSchema-instance"
         xsi:schemaLocation="http://maven.apache.org/POM/4.0.0 http://maven.apache.org/xsd/maven-4.0.0.xsd">
    <modelVersion>4.0.0</modelVersion>

    <groupId>com.xz</groupId>
    <artifactId>blog</artifactId>
    <version>0.0.1-SNAPSHOT</version>
    <packaging>jar</packaging>

    <name>blog</name>
    <description>Demo project for Spring Boot</description>

    <parent>
        <groupId>org.springframework.boot</groupId>
        <artifactId>spring-boot-starter-parent</artifactId>
        <version>2.0.4.RELEASE</version>
        <relativePath/> <!-- lookup parent from repository -->
    </parent>

    <properties>
        <project.build.sourceEncoding>UTF-8</project.build.sourceEncoding>
        <project.reporting.outputEncoding>UTF-8</project.reporting.outputEncoding>
        <java.version>1.8</java.version>
        <!-- spring版本号 -->
        <spring.version>5.0.8.RELEASE</spring.version>
    </properties>

    <dependencies>
        <!-- 单元测试 -->
        <dependency>
            <groupId>junit</groupId>
            <artifactId>junit</artifactId>
            <version>4.11</version>
            <scope>test</scope>
        </dependency>

        <dependency>
            <groupId>org.springframework.boot</groupId>
            <artifactId>spring-boot-starter-web</artifactId>
        </dependency>

        <dependency>
            <groupId>org.springframework.boot</groupId>
            <artifactId>spring-boot-starter-test</artifactId>
            <scope>test</scope>
        </dependency>
        <dependency>
            <groupId>org.springframework.boot</groupId>
            <artifactId>spring-boot-starter-thymeleaf</artifactId>
        </dependency>
        <dependency>
            <groupId>org.mybatis.spring.boot</groupId>
            <artifactId>mybatis-spring-boot-starter</artifactId>
            <version>1.3.2</version>
        </dependency>

        <!-- JSTL (JSP standard Tag Library) JSP 标准标签库 -->
        <dependency>
            <groupId>javax.servlet</groupId>
            <artifactId>jstl</artifactId>
        </dependency>
        <dependency>
            <groupId>org.apache.tomcat.embed</groupId>
            <artifactId>tomcat-embed-jasper</artifactId>
            <scope>provided</scope>
            <!--<scope>provided</scope> 注意,这个scope需要被注释掉-->
        </dependency>
        <dependency>
            <groupId>javax.servlet</groupId>
            <artifactId>javax.servlet-api</artifactId>
            <scope>provided</scope>
        </dependency>

        <!--Spring Boot的JPA依赖包-->
        <dependency>
            <groupId>org.springframework.boot</groupId>
            <artifactId>spring-boot-starter-data-jpa</artifactId>
        </dependency>

        <dependency>
            <groupId>mysql</groupId>
            <artifactId>mysql-connector-java</artifactId>
            <version>5.1.38</version>
        </dependency>
        <!-- 数据库连接池 -->
        <dependency>
            <groupId>com.alibaba</groupId>
            <artifactId>druid</artifactId>
            <version>1.1.10</version>
        </dependency>
        <!--在导入druid数据源时,也就是外部数据源,我们必须导入相关依赖,因此我尝试将springboot默认数据源的相关依赖也导入-->
        <dependency>
            <groupId>org.apache.commons</groupId>
            <artifactId>commons-dbcp2</artifactId>
            <version>2.2.0</version>
        </dependency>

        <!-- https://mvnrepository.com/artifact/org.mybatis/mybatis-spring -->
        <dependency>
            <groupId>org.mybatis</groupId>
            <artifactId>mybatis-spring</artifactId>
            <version>1.3.1</version>
        </dependency>
        <!-- https://mvnrepository.com/artifact/org.apache.ibatis/ibatis-core -->
        <dependency>
            <groupId>org.apache.ibatis</groupId>
            <artifactId>ibatis-core</artifactId>
            <version>3.0</version>
        </dependency>
        <!--整合mybatis-->
        <dependency>
            <groupId>org.mybatis.spring.boot</groupId>
            <artifactId>mybatis-spring-boot-starter</artifactId>
            <version>1.3.2</version>
        </dependency>
        <!-- 数据库驱动 -
         https://mvnrepository.com/artifact/org.springframework/spring-jdbc -->
        <dependency>
            <groupId>org.springframework</groupId>
            <artifactId>spring-jdbc</artifactId>
            <version>5.0.8.RELEASE</version>
        </dependency>

        <!-- aop -->
        <dependency>
            <groupId>org.springframework</groupId>
            <artifactId>spring-aop</artifactId>
            <version>${spring.version}</version>
        </dependency>

        <dependency>
            <groupId>org.springframework</groupId>
            <artifactId>spring-aspects</artifactId>
            <version>${spring.version}</version>
        </dependency>

        <dependency>
            <groupId>org.aspectj</groupId>
            <artifactId>aspectjrt</artifactId>
            <version>1.6.11</version>
        </dependency>
        <dependency>
            <groupId>org.aspectj</groupId>
            <artifactId>aspectjweaver</artifactId>
            <version>1.6.11</version>
        </dependency>
        <dependency>
            <groupId>cglib</groupId>
            <artifactId>cglib</artifactId>
            <version>2.1_3</version>
        </dependency>
        <!-- end -->

        <!--redis jar包-->
        <dependency>
            <groupId>org.springframework.boot</groupId>
            <artifactId>spring-boot-starter-data-redis</artifactId>
            <version>2.0.4.RELEASE</version>
        </dependency>
    </dependencies>
    <build>
        <plugins>
            <plugin>
                <groupId>org.springframework.boot</groupId>
                <artifactId>spring-boot-maven-plugin</artifactId>
            </plugin>
        </plugins>
        <!--注意此次必须要放在此目录下才能被访问到
        <resources>
            <resource>
                <directory>src/main/webapp</directory>

                <targetPath>META-INF/resources</targetPath>
                <includes>
                    <include>**/**</include>
                </includes>
            </resource>
            <resource>
                <directory>src/main/resources</directory>
                <filtering>true</filtering>
                <includes>
                    <include>**/*</include>
                </includes>
            </resource>
        </resources>    -->
    </build>
</project>
application.properties文件内容主要是配置了下数据库连接信息(必须配置)以及tomcat server的端口号(默认是8080,如果没有修改tomcat端口号,这部分也是可以不用配置的),项目中application.properties文件配置内容如下:
#tomcat端口号
server.port=9999
#mysql配置
spring.datasource.url=jdbc:mysql://localhost:3306/ssmstu?useUnicode=true&characterEncoding=utf8
spring.datasource.username=root
spring.datasource.password=bjtungirc
spring.datasource.driver-class-name=com.mysql.jdbc.Driver
mybatis.typeAliasesPackage=com.tqh.demo.model3、接下来就可以直接写controller、mapper、model、service里面的java代码了
首先按model开始讲起:
a、model----Person.java 定义了一个POJO类
package com.xz.blog.model;

public class Person {

    private Integer id;
    private String name;
    private Integer age;

    public Integer getId() {
        return id;
    }

    public void setId(Integer id) {
        this.id = id;
    }

    public String getName() {
        return name;
    }

    public void setName(String name) {
        this.name = name;
    }

    public Integer getAge() {
        return age;
    }

    public void setAge(Integer age) {
        this.age = age;
    }

    @Override
    public String toString() {
        return
                "id=" + id +
                        ", name='" + name + '\'' +
                        ", age=" + age
                ;
    }
}
b、DAO层设计---mapper---》UserMapper.java 是一个接口类,在springmvc框架中,我们是需要为每一个mapper类写xml配置文件,例如UserMapper.xml,该文件负责具体的mapper类中的方法实现,因此我们不需要写dao的实现,就可以直接在service里面直接调用dao的方法了,mybatis会默认把UserMapper.xml映射为dao的实现。
在springboot中,我们甚至不用创建UserMapper.xml文件,可以直接在UserMapper.java里面,添加注解进行dao层操作,然后在启动类里面添加@MapperScan("com.xz.blog.mapper") //包扫描,即可。
UserMapper.java内容如下:
package com.xz.blog.mapper;

import com.xz.blog.model.Person;
import org.apache.ibatis.annotations.Select;
import org.springframework.stereotype.Repository;

import java.util.ArrayList;

@Repository
public interface UserMapper {
    @Select("SELECT * FROM person WHERE id = #{id}")   //具体dao层方法的实现
    Person selectUser(int id);//返回一个person对象

    @Select("select * from person order by id")
    ArrayList<Person> selectAllUser();//返回一个person对象
}

启动类BlogApplication.java
package com.xz.blog;
import org.mybatis.spring.annotation.MapperScan;
import org.springframework.boot.SpringApplication;
import org.springframework.boot.autoconfigure.SpringBootApplication;
import org.springframework.web.servlet.config.annotation.EnableWebMvc;
@MapperScan("com.xz.blog.mapper") //包扫描(很重要,否则注解无效)
@EnableWebMvc
@SpringBootApplication
public class BlogApplication {
public static void main(String[] args) {
SpringApplication.run(BlogApplication.class, args);
}
}
c、服务层--->service----->UserService.java 主要是对应业务方法中的实现
package com.xz.blog.service;

import com.xz.blog.mapper.UserMapper;
import com.xz.blog.mapper.UserMapper;
import com.xz.blog.model.Person;
import org.springframework.beans.factory.annotation.Autowired;
import org.springframework.stereotype.Service;
import org.springframework.transaction.annotation.Transactional;

import java.util.ArrayList;


@Service
public class UserService {

    @Autowired
    public UserMapper userMapper;

   // 获取单个用户信息
   @Transactional     //添加事务管理
    public Person selectUser(int id) {
        return userMapper.selectUser(id);
    }

    //获取所有的用户信息
    @Transactional
    public ArrayList<Person> selectAllUser() {

        return userMapper.selectAllUser();

    }

}
d、业务调度--controller--UserController.java 主要是对业务逻辑的调度代码,具体实现是在service层里面
package com.xz.blog.controller;

import com.xz.blog.service.UserService;
import org.springframework.beans.factory.annotation.Autowired;
import org.springframework.stereotype.Controller;
import org.springframework.ui.Model;
import org.springframework.web.bind.annotation.PathVariable;
import org.springframework.web.bind.annotation.RequestMapping;
import org.springframework.web.bind.annotation.RequestParam;
import org.springframework.web.bind.annotation.RestController;

//@RestController
@Controller
//@ResponseBody
//testController返回的不是页面,Controller返回的是页面  testController=Controller + ResponseBody
public class UserController {
    @Autowired
    private UserService userService;

    @RequestMapping("/showUser/{id}")
    public String selectUser (@PathVariable int id,Model model){
        model.addAttribute("name", userService.selectUser(id).toString());
        return "greets";

    }
    @RequestMapping("/showUser/all")
    public String selectAllUser(){
        return userService.selectAllUser().toString();

    }
    @RequestMapping("/name")
    public String name() {
        System.out.println("============================================");
        return "hello";
    }

    /**
    @RequestMapping("/greet")
    public String greeting(@RequestParam(value = "name", required = false, defaultValue = "World") String name,
                           Model model) {
        model.addAttribute("name", name);
        return "greets";
    }
    **/

}
注意:
1、理解@controller和@testcontroller两个注解,简单可以这么理解:
testController返回的不是页面,Controller返回的是页面 testController=Controller + ResponseBody
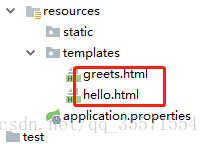
2、return "greets"后,springboot是怎么定位到页面的:
springboot的页面默认是放在:templates下面的,查询时默认文件的后缀名是html,也就是说默认是支持html文件的,但是jsp文件是不推荐的,需要额外配置。默认前缀名是通过return返回的字符串进行查找,如果找到了,就直接返回该页面文件视图,否则就直接返回默认的页面。
当然我们也可以在代码中设置指定的访问页面路径,如下图所示,但是这种方式实现太笨重了,如果要修改默认存放目录,可以通过设置属性 spring.mvc.static-path-pattern来实现。

4、至此整个基于springboot+mybatis默认配置的项目介绍完毕了。
总结归纳:
1、springboot+mybatis只需要application.properties文件就可以了,里面只需要配置下server.port(tomcat端口号,如果是8080,连该端口号也不需要配置),其次配置下mysql的连接属性.
2、springboot集成mybatis不需要mybatis-config.xml也不需要mapper.xml,也不需要相应的配置类(配置事务和数据源)。原因在于springboot提供的mybatis-spring-boot-starter,使用注解解决一切问题,注意一定要在启动类里面@MapperScan("com.xz.blog.mapper") //包扫描,否则注解会无效。(资料:https://www.cnblogs.com/shanheyongmu/p/6868669.html)
3、Spring boot不建议使用jsp开发web。而是推荐使用Thymeleaf来作为模板引擎开发web项目。
spring-boot项目静态文件目录:/src/java/resources/static
spring-boot项目模板文件目录:/src/java/resources/templates
html文件在/src/java/resources/templates下。
如果要使用jsp来开发web,需要自行配置。
4、controller层,代码中注意理解@controller和@testcontroller两个注解,简单可以这么理解:
testController返回的不是页面,Controller返回的是页面 testController=Controller + ResponseBody
最后附上一个借助于配置文件实现的springboot+mybatis+redis的项目代码