准备
本篇文章内容主要讲解SpringBoot如何用纯注解方式整合MyBatis,毕竟SpringBoot的优势就是配置量减少,再写繁复的配置文件不是SpringBoot的风格,因此本篇文章就抛弃配置文件,全面拥抱注解。
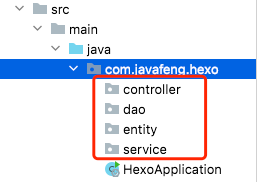
本篇文章开始前,已默认读者搭建好了SpringBoot基础框架,并已创建好了一个测试数据库;本文所需的框架目录结构与数据库测试表如下所示:
项目目录结构:

测试数据库:
SET NAMES utf8mb4;
SET FOREIGN_KEY_CHECKS = 0;

-- ----------------------------
-- Table structure for user
-- ----------------------------
DROP TABLE IF EXISTS `user`;
CREATE TABLE `user` (
  `id` int NOT NULL AUTO_INCREMENT,
  `username` varchar(255) COLLATE utf8mb4_general_ci DEFAULT NULL,
  `password` varchar(255) COLLATE utf8mb4_general_ci DEFAULT NULL,
  `addtime` datetime DEFAULT NULL,
  `updatetime` datetime DEFAULT NULL,
  PRIMARY KEY (`id`)
) ENGINE=InnoDB DEFAULT CHARSET=utf8mb4 COLLATE=utf8mb4_general_ci;

-- ----------------------------
-- Records of user
-- ----------------------------
BEGIN;
COMMIT;

SET FOREIGN_KEY_CHECKS = 1;
注解参考表,此处将后续会出现的注解进行释义,方便后续使用时理解其功能:
@ResponseBody:表示该方法的返回结果直接写入HTTP response body中,一般在异步获取数据时使用,用于构建RESTful的api。在使用@RequestMapping后,返回值通常解析为跳转路径,加上@responsebody后返回结果不会被解析为跳转路径,而是直接写入HTTP response body中。
@Controller:用于定义控制器类,在spring 项目中由控制器负责将用户发来的URL请求转发到对应的服务接口(service层),一般这个注解在类中,通常方法需要配合注解@RequestMapping。
@RestController:用于标注控制层组件,@ResponseBody和@Controller的合集。
@Autowired:自动导入依赖的bean
@Mapper:一般用于修饰dao层(Mapper层)的组件
@Service:一般用于修饰service层的组件
@Repository:使用@Repository注解可以确保DAO或者repositories提供异常转译,这个注解修饰的DAO或者repositories类会被ComponetScan发现并配置,同时也不需要为它们提供XML配置项。
@RequestMapping:提供路由信息,负责URL到Controller中的具体函数的映射。根据不同需求和场景可以使用 @GetMapping、 @PostMapping、@DeleteMapping和@PutMapping进行替代
@RequestBody:@RequestBody主要用来接收前端传递给后端的json字符串中的数据的(请求体中的数据的);而最常用的使用请求体传参的无疑是POST请求了,所以使用@RequestBody接收数据时,一般都用POST方式进行提交
此处知识简单介绍含义和扫盲,请尽量进行系统性学习深入了解,掌握每一个常用注解的使用方法和注意事项。其他一些在此处没出现的注解,会在使用的地方进行简述。
添加依赖
在项目POM文件中添加依赖,这里需要加入几个常用的依赖,分别如下:
<!-- spring-boot-starter-web依赖启动器的主要作用是提供Web开发场景所需的底层所有依赖 -->
<dependency>
    <groupId>org.springframework.boot</groupId>
    <artifactId>spring-boot-starter-web</artifactId>
</dependency>
<!-- MyBatis依赖、mysql驱动 -->
<dependency>
    <groupId>org.mybatis.spring.boot</groupId>
    <artifactId>mybatis-spring-boot-starter</artifactId>
    <version>1.3.2</version>
</dependency>
<dependency>
    <groupId>mysql</groupId>
    <artifactId>mysql-connector-java</artifactId>
    <scope>runtime</scope>
</dependency>
配置文件
接下来配置application.yml,将数据源和MyBatis分别进行配置,使其生效:
spring:
  datasource:
    url: jdbc:mysql://localhost:3306/hexo_demo
    username: root
    password: AsdZq123..
    driver-class-name: com.mysql.cj.jdbc.Driver

# Java结果集对象中自动转换成驼峰命名参数
mybatis:
  configuration:
    map-underscore-to-camel-case: true

# 访问端口
server:
  port: 8789
其中,对于map-underscore-to-camel-case配置,是为了将数据库字段和实体对象属性做映射,对于数据库表中aa_bb形式的表名或字段名,可自动映射成aaBb形式。
代码实现
首先需要在src中创建几个包,分别用于存放Dao、Service、Entity(实体类)和Controller:
- 实体类
首先在Entity中创建实体类User,来映射mysql数据库中的user表:
import java.sql.Timestamp;

public class User{


    Integer id;
    String username;
    String password;
    Timestamp addtime;
    Timestamp updatetime;
    //...此处省略Getter和Setter方法,若使用lombok在类定义上方添加@Data注解即可,不知道具体内容可以先学习Lombok
}
- Mapper
定义Mapper,在dao包中创建UserMapper接口,进行数据库查询的定义,这里先实现CRUD的基础操作:
import com.javafeng.hexo.entity.User;
import org.apache.ibatis.annotations.*;
import org.springframework.stereotype.Repository;

import java.util.List;

@Mapper
public interface UserMapper{


@Select(value = "SELECT * FROM USER")
    List<User> list();

    @Insert(value = "INSERT INTO USER (USERNAME,PASSWORD,ADDTIME,UPDATETIME) VALUES ('${user.username}','${user.password}','${user.addtime}','${user.updatetime}')")
    Integer add(@Param(value = "user") User user);

    //此处先不做非空判断,后续需要可自行添加
    @Update(value = "UPDATE USER SET USERNAME='${user.username}' , PASSWORD='${user.password}' , ADDTIME='${user.addtime}' , UPDATETIME='${user.updatetime}' WHERE ID=${user.id}")
    Integer update(@Param(value = "user") User user);

    @Delete(value = "DELETE FROM USER WHERE ID = #{id}")
    Integer delete(@Param(value = "id")Integer id);
}
因为是纯注解,需要使用@Mapper注解和@Repository注解来将这个类注册为Mapper类方便Spring识别,且无需配置Mapper映射xml文件,用注解来声明查询的Sql即可。
- @Mapper注解是MyBatis的注解,是用来说明这个是一个Mapper,对应的xxxMapper.xml就是来实现这个Mapper。然后再server层使用@Autowired注解或者@Resource引用进即可。可省略,需要在启动类上添加Mapper扫描基础包的配置:
@MapperScan(value = {

    "com.javafeng.hexo.mapper"})
-
@Insert注解、@Update、@Select、@Delete声明方法要执行的语句。
-
@Param注解用于给定映射器方法参数一个名字,如不添加,参数将会以他们的顺序位置来被命名。
以上注解释义仅为个人理解,详细含义、用法、注意事项和不良反应请出门左转百度谷歌谢谢。
- Service
Service接口与具体实现类编写,首先在service包中新建impl实现类子包,然后在service包中添加UserService类,编写查询业务:
import com.javafeng.hexo.entity.User;
import java.util.List;

public interface UserService {


    List<User> list();
    Integer add(User user);
    Integer update(User user);
    List<User> delete(Integer id);
}
impl实现类子包中创建实现类UserServiceImpl,实现UserService接口:
import com.javafeng.hexo.dao.UserMapper;
import com.javafeng.hexo.entity.User;
import com.javafeng.hexo.service.UserService;
import org.springframework.beans.factory.annotation.Autowired;
import org.springframework.stereotype.Service;

import java.util.List;

@Service
public class UserServiceImpl implements UserService {


    @Autowired
    UserMapper userMapper;

    @Override
    public List<User> list() {


        return userMapper.list();
    }

    @Override
    public Integer add(User user) {


        return userMapper.add(user);
    }

    @Override
    public Integer update(User user) {


        return userMapper.update(user);
    }

    @Override
    public List<User> delete(Integer id) {


        return userMapper.delete(id);
    }
}
需要注意的是,真正实现Service的作用的是实现类UserServiceImpl并非UserService接口,因此,@Service注解应添加至实现类上方。
- Controller
最后是Controller,在controller包中,创建UserController类,用来处理用户请求等操作:
import com.javafeng.hexo.entity.User;
import com.javafeng.hexo.service.UserService;
import org.springframework.beans.factory.annotation.Autowired;
import org.springframework.web.bind.annotation.GetMapping;
import org.springframework.web.bind.annotation.PostMapping;
import org.springframework.web.bind.annotation.RequestBody;
import org.springframework.web.bind.annotation.RestController;

import java.util.List;

@RestController
@RequestMapping("/mybatisdemo") //此Controller中所有api前缀路径为/mybatisdemo
public class UserController {


    @Autowired
    UserService userService;

    @GetMapping("/list")
    public List<User> getUserList(){


        return userService.list();
    }

    @PostMapping("/add")
    public boolean addUser(@RequestBody User user){


        Integer addCount = userService.add(user);
        if (addCount > 0){


            return true;
        }
        return false;
    }

    @PostMapping("/update")
    public boolean updateUser(@RequestBody User user){


        Integer addCount = userService.update(user);
        if (addCount > 0){


            return true;
        }
        return false;
    }

    @GetMapping("/delete")
    public boolean delUser(Integer id){


        Integer addCount = userService.delete(id);
        if (addCount > 0){


            return true;
        }
        return false;
    }
}
因为本文不涉及任何Web界面,所有的Controller方法均以restful api 方式呈现,因此直接使用@RestController注解来修饰;次出分别定义了四个API,用于实现CRUD,接下来运行项目,使用接口调试工具来测试接口可用性。
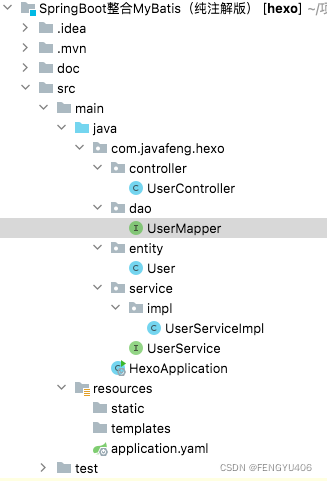
最终目录结构:
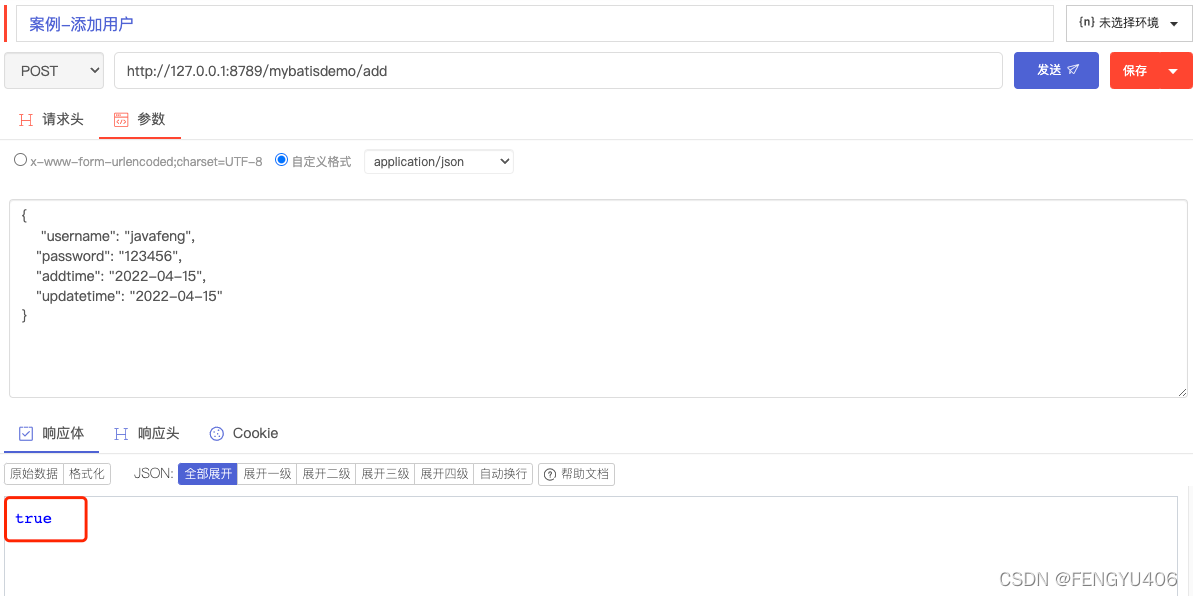
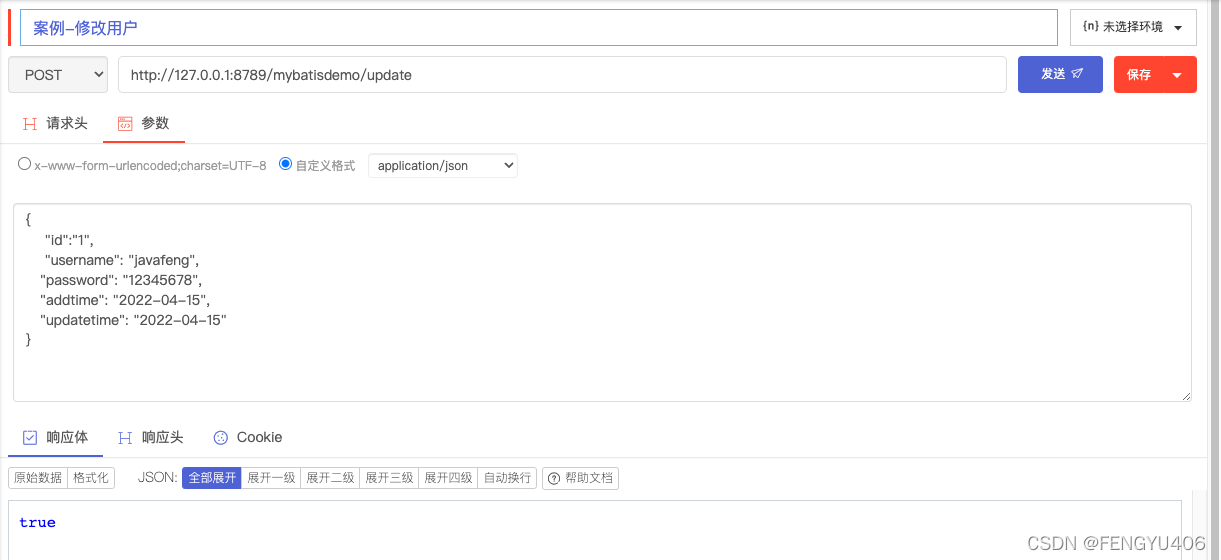
运行成功后,默认端口8080(可在application.yml中自行配置,我这里8080已占用,所以改成了8789,根据自己的端口进行配置即可),四个接口的访问路径分别为:
| 接口 | 访问路径 | 请求类型 |
|---|---|---|
| 添加用户 | http://127.0.0.1:8789/mybatisdemo/add | post |
| 修改用户 | http://127.0.0.1:8789/mybatisdemo/update | post |
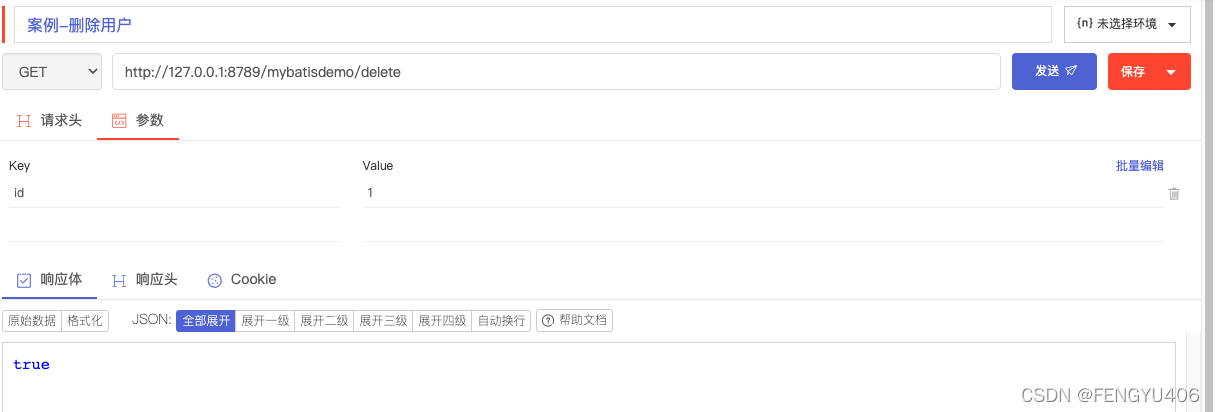
| 删除用户 | http://127.0.0.1:8789/mybatisdemo/delete | get |
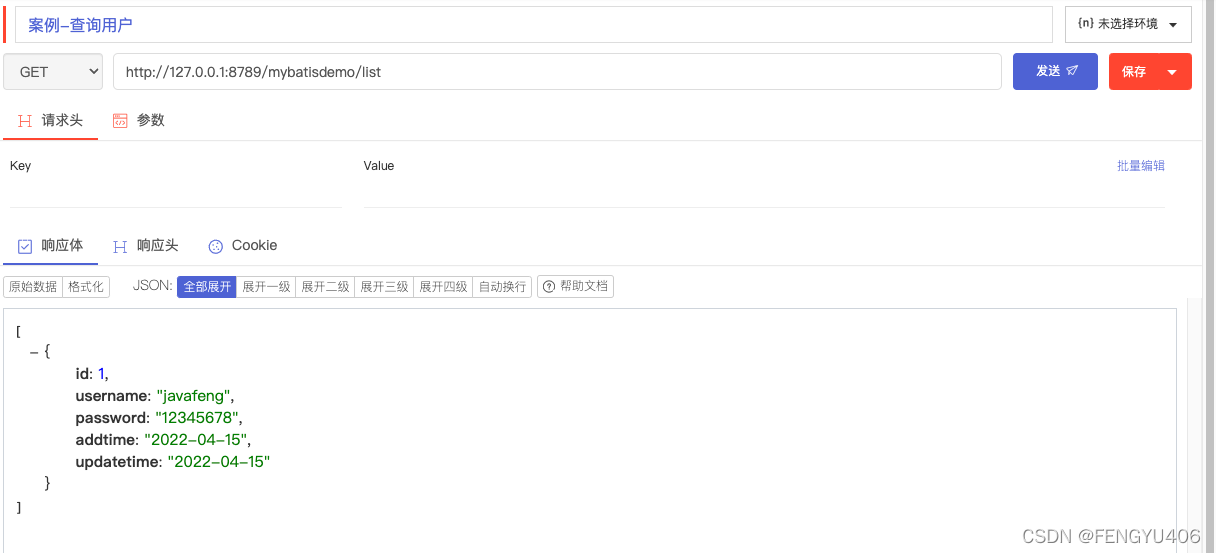
| 查询用户 | http://127.0.0.1:8789/mybatisdemo/list | get |
这里我用的是Chrome浏览器的一个接口调试插件,具体测试结果如下:
总结
其实SpringBoot整合内容都很简单,SpringBoot封装的Starter已经干了不少工作,主要是要理解SpringBoot的结构和机制,并掌握注解的使用。