各位,对代码有疑问得可加群讨论193369905,小编承接各种AI小项目开发
如何在嵌入式设备上跑通实时目标检测实在是太重要了,平常由于我们手上没有大显卡,只有一台笔记本或者一块小树莓派,毕竟大显卡非常昂贵,一块1080pi或者泰坦都得1w+ ,这些对于我们打工族来说实在是天价,前段时间微软开源了Moblenet,模型不到20M,精度也不低,刚好符合我们的要求,既然好用大家就应该拿来用,于是小编迫不及待用caffe实现了下,在此分享给大家,自己也有所记录。
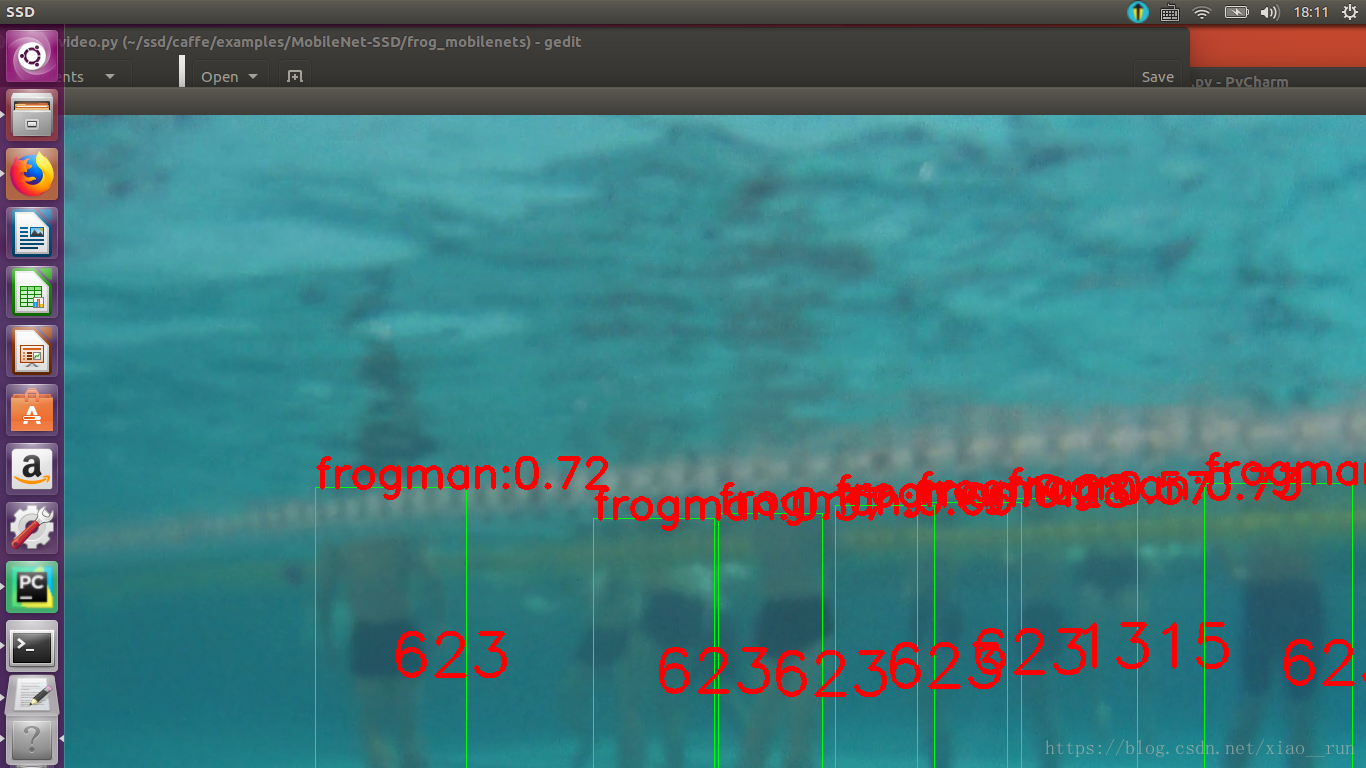
首先我们看下效果图吧,我检测了游泳池里游泳的人(不知道会不会被打,发了再说),效果还是非常不错哦,fps在14左右,后面我又增加了计数追踪等功能
1、安装caffe、opencv等
××××××
此处忽略
自行百度安装
我的课程也讲过
不再赘述
2、准备数据集
继续参考我的
这篇博客
https://blog.csdn.net/xiao__run/article/details/79940249
经典数据集格式,VOC,不在这上面做检测,审稿人也会让你去做的
这样以来我们就直接到了第三步了
3、下载SSD,并编译
其中makefile.config 修改参考caffe里的makefile.config文件
git clone https://github.com/weiliu89/caffe.git
cd caffe
git checkout ssd
cp Makefile.config.example Makefile.config
mkdir build
cd build
cmake ..
make all -j16
make install
make runtest
make pycaffe
4、下载MobileNet-SSD
git clone https://github.com/chuanqi305/MobileNet-SSD.git然后可以在自己的目录(我是用的是/home目录)下得到MobileNet-SSD文件夹,其中重要文件简介如下:
template 存放4个网络定义的公用模板,可以由gen.py脚本修改并生成
MobileNetSSD_deploy.prototxt 运行网络定义文件
solver_train.prototxt 网络训练超参数定义文件
solver_test.prototxt 网络测试超参数定义文件
train.sh 网络训练脚本
test.sh 网络测试脚本
gen_model.sh 生成自定义网络脚本(调用template文件夹内容)
gen.py 生成公用模板脚本(暂不用)
demo.py 实际检测脚本(图片存于images文件夹)
merge_bn.py 合并bn层脚本,用于生成最终的caffemodel
接下来下载已经训练好的caffemodel放入项目文件夹(好人莫过于博主了,我把百度云里的这个model分享给大家吧,省的小白要花两天时间去找https://pan.baidu.com/s/1sln2cUx) :最后打开demo.py脚本,根据个人情况修改以下路径:
caffe_root = '/home/xiaorun/ssd/caffe/'
net_file= 'MobileNetSSD_deploy.prototxt'
caffe_model='MobileNetSSD_deploy.caffemodel'
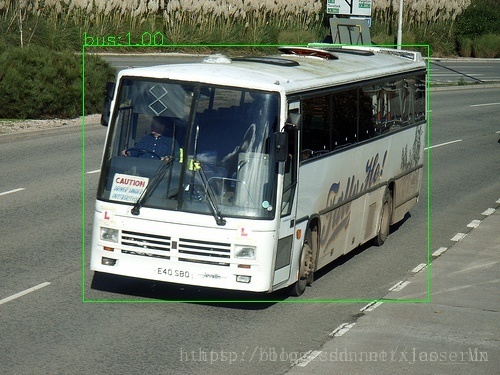
test_dir = "images"贴个结果图吧
5、训练自己的数据集
我们需要提前建立好适用于SSD训练的数据集(VOC格式),已经编译通过SSD,并且data路径下有了lmdb格式的数据集,到这一步的时候说明前面的工作已经全部到位,我们可以正式开始自己的工作
5.1.创建labelmap.prototxt文件
该文件用于定义训练样本的类别,我的只有两类,一个是背景,一个是蛙人,哈哈,置于项目文件夹下,我的放在caffe/data路径下,其内容如下:
item {
  name: "none_of_the_above"
  label: 0
  display_name: "background"
  }
  item {
  name: "frogman"
  label: 1
  display_name: "frogman"
  }
5.2 运行gen_model.sh脚本
由于VOC数据集是21类(加上背景),而这里只有1类,因此,我们需要重新生成训练、测试和运行网络文件,这里就要用到gen_model.sh脚本,它会调用template文件夹中的模板,按照我们指定的参数,生成所需的训练网络模型。这个脚本的用法usage: ./gen_model.sh CLASSNUM
VOC数据集是 21个类别数量的参数,因此我们执行命令如下:
./gen_model.sh2执行之后,得到examples文件夹,里面的3个prototxt就是从模板生成的正式网络定义,根据作者设置,其中的deploy文件是已经合并过bn层的,需要后面配套使用。
打开example文件下的三个文件train,prototxt , test,prototxt修改自己的路径,找到
'''''''''''''
data_param {
    source: "trainval_lmdb/"  #改为自己的路径
    batch_size: 24
    backend: LMDB
....................
 label_map_file: "labelmap.prototxt"
 .........
根据实际情况,修改solver_train.prototxt和solver_test.prototxt(新手不懂就先别动)。
其中test_iter=测试集图片数量/batchsize;初始学习率不宜太高,否则基础权重破坏比较严重;优化算法是RMSProp,可能对收敛有好处,不要改成SGD,也是为了保护权重。
5.4.下载预训练模型
下载地址:https://pan.baidu.com/s/1bpk6KI7,(做好事)放在项目文件夹下,这里的预训练模型是作者从Tensorflow那边转化过来的,然后经过了VOC数据集的初步调试。
5.5.开始训练
修改并运行train.sh脚本,中途可以不断调节参数。训练结束后,运行test.sh脚本,测试网络的精度值。
5.6.合并bn层
为了提高模型运行速度,作者在这里将bn层合并到了卷积层中,相当于bn的计算时间就被节省了,对检测速度可能有小幅度的帮助,打开merge_bn.py文件,然后注意修改其中的文件路径:
caffe_root = '/home/xiaorun/ssd/caffe/'
train_proto = 'MobileNetSSD_train.prototxt'
train_model = 'MobileNetSSD_train.caffemodel'  # should be your snapshot caffemodel, e.g. mobilnetnet_iter_72000.caffemodel
deploy_proto = 'MobileNetSSD_deploy.prototxt'
save_model = 'MobileNetSSD_deploy.caffemodel'
5.7/测试自己的模型
不讲了,直接给出我的代码吧
import numpy as np
import sys,os
import cv2
caffe_root = '/home/xiaorun/caffe/ssd/caffe/'
sys.path.insert(0, caffe_root + 'python')
import caffe


net_file= 'deploy.prototxt'
caffe_model='MobileNetSSD_deploy.caffemodel'
test_dir = "images"

if not os.path.exists(caffe_model):
    print("MobileNetSSD_deploy.caffemodel does not exist,")
    print("use merge_bn.py to generate it.")
    exit()
net = caffe.Net(net_file,caffe_model,caffe.TEST)

CLASSES = ('background','frogman')

def preprocess(src):
    img = cv2.resize(src, (300,300))
    img = img - 127.5
    img = img * 0.007843
    return img

def postprocess(img, out):
    h = img.shape[0]
    w = img.shape[1]
    box = out['detection_out'][0,0,:,3:7] * np.array([w, h, w, h])

    cls = out['detection_out'][0,0,:,1]
    conf = out['detection_out'][0,0,:,2]
    return (box.astype(np.int32), conf, cls)

def detect(imgfile):
    #origimg = cv2.imread(imgfile)
    #img = preprocess(origimg)
    img=preprocess(imgfile)
    img = img.astype(np.float32)
    img = img.transpose((2, 0, 1))

    net.blobs['data'].data[...] = img
    out = net.forward()
    box, conf, cls = postprocess(imgfile, out)

    for i in range(len(box)):
       p1 = (box[i][0], box[i][1])
       p2 = (box[i][2], box[i][3])
       cv2.rectangle(imgfile, p1, p2, (0,255,0))
       p3 = (max(p1[0], 15), max(p1[1], 15))
       title = "%s:%.2f" % (CLASSES[int(cls[i])], conf[i])
       cv2.putText(imgfile, title, p3, cv2.FONT_ITALIC, 0.6, (0, 255, 0), 1)
    cv2.imshow("SSD", imgfile)

    k = cv2.waitKey(0) & 0xff
        #Exit if ESC pressed
    if k == 27 : return False
    return True
for f in os.listdir(test_dir):
    if detect(test_dir + "/" + f) == False:
       break
视频测试代码我也放出来吧,大家可无需修改拿去用
import numpy as np
import sys, os
import cv2

caffe_root = '/home/b101/xiaorun/caffe/'
sys.path.insert(0, caffe_root + 'python')
import caffe

j = 1
net_file = 'MobileNetSSD_deploy.prototxt'
caffe_model = 'MobileNetSSD_deploy.caffemodel'
# caffe_model='mobilenet_iter_84000.caffemodel'
test_dir = "images"

if not os.path.exists(caffe_model):
    print("MobileNetSSD_deploy.affemodel does not exist,")
    print("use merge_bn.py to generate it.")
    exit()
net = caffe.Net(net_file, caffe_model, caffe.TEST)

# CLASSES = ('background',
#          'aeroplane', 'bicycle', 'bird', 'boat',
#         'bottle', 'bus', 'car', 'cat', 'chair',
#        'cow', 'diningtable', 'dog', 'horse',
#        'motorbike', 'person', 'pottedplant',
#      'sheep', 'sofa', 'train', 'tvmonitor')
# '''
CLASSES = ('background', 'head')

cap=cv2.VideoCapture('1.mp4')
def preprocess(src):
    img = cv2.resize(src, (300, 300))
    img = img - 127.5
    img = img * 0.007843
    return img


def postprocess(img, out):
    h = img.shape[0]
    w = img.shape[1]
    box = out['detection_out'][0, 0, :, 3:7] * np.array([w, h, w, h])

    cls = out['detection_out'][0, 0, :, 1]
    conf = out['detection_out'][0, 0, :, 2]
    return (box.astype(np.int32), conf, cls)


global j
while 1:
    ret,frame=cap.read()
    if ret==False:
        print 'erro'
    #origimg = cv2.imread(imgfile)
    origimg=frame
    img = preprocess(origimg)

    img = img.astype(np.float32)
    img = img.transpose((2, 0, 1))

    net.blobs['data'].data[...] = img
    out = net.forward()
    box, conf, cls = postprocess(origimg, out)
    m = len(box)
    for i in range(len(box)):
        p1 = (box[i][0], box[i][1])
        p2 = (box[i][2], box[i][3])
        cv2.rectangle(origimg, p1, p2, (0, 0, 255), 5)
        p3 = (max(p1[0], 15), max(p1[1], 15))
        title = "%s:%.2f" % (CLASSES[int(cls[i])], conf[i])
        cv2.putText(origimg, title, p3, cv2.FONT_ITALIC, 0.6, (0, 255, 0), 2)
        cv2.putText(origimg, 'person: ', (60, 80), cv2.FONT_ITALIC, 2, (0, 0, 255), 3)
        cv2.putText(origimg, str(m), (300, 80), cv2.FONT_ITALIC, 4, (0, 0, 255), 3)
    cv2.imshow("SSD", origimg)
    print origimg.shape
    saveimg = str(j) + '.jpg'
    if m>5:
        cv2.imwrite(saveimg, origimg)
        j = j + 1
    #detect(frame)
    key=cv2.waitKey(1)
    if key==ord('q'):
        break