一、配置Haproxy
HAProxy 是一款提供高可用性、负载均衡以及基于TCP(第四层)和HTTP(第七层)应用的代理软件。
1、
server1
[root@server1 ~]# ls
anaconda-ks.cfg  haproxy-1.6.11.tar.gz  install.log  install.log.syslog
[root@server1 ~]# yum install -y rpm-build
[root@server1 ~]# rpmbuild -tb haproxy-1.6.11.tar.gz
[root@server1 ~]# cd rpmbuild/
[root@server1 rpmbuild]# cd RPMS/
[root@server1 RPMS]# ls
x86_64
[root@server1 RPMS]# cd x86_64/
[root@server1 x86_64]# ls
haproxy-1.6.11-1.x86_64.rpm
[root@server1 x86_64]# rpm -qpl haproxy-1.6.11-1.x86_64.rpm   ##这里如果报错,那么就下载gcc或者 。。。。-devel 根据提示,下载相关
[root@server1 x86_64]# ls
haproxy-1.6.11-1.x86_64.rpm
[root@server1 x86_64]# rpm -ivh haproxy-1.6.11-1.x86_64.rpm
Preparing...                ########################################### [100%]
   1:haproxy                ########################################### [100%]
[root@server1 x86_64]# ls
haproxy-1.6.11-1.x86_64.rpm
[root@server1 x86_64]# cd
[root@server1 ~]# ls
anaconda-ks.cfg  haproxy-1.6.11.tar.gz  install.log  install.log.syslog  rpmbuild
[root@server1 ~]# tar zxf haproxy-1.6.11.tar.gz
[root@server1 ~]# ls
anaconda-ks.cfg  haproxy-1.6.11.tar.gz  install.log.syslog
haproxy-1.6.11   install.log            rpmbuild
[root@server1 ~]# cd haproxy-1.6.11
[root@server1 haproxy-1.6.11]# ls
CHANGELOG     doc       include      Makefile  src      VERDATE
contrib       ebtree    LICENSE      README    SUBVERS  VERSION
CONTRIBUTING  examples  MAINTAINERS  ROADMAP   tests
[root@server1 haproxy-1.6.11]# cd examples/
[root@server1 examples]# ls
acl-content-sw.cfg     debug2ansi    haproxy.spec           ssl.cfg
auth.cfg               debug2html    haproxy.vim            stats_haproxy.sh
check                  debugfind     init.haproxy           transparent_proxy.cfg
check.conf             errorfiles    option-http_proxy.cfg
content-sw-sample.cfg  haproxy.init  seamless_reload.txt
[root@server1 examples]# cp content-sw-sample.cfg  /etc/haproxy/haproxy.cfg
[root@server1 examples]# cd /etc/haproxy/
[root@server1 haproxy]# ls
haproxy.cfg
[root@server1 haproxy]# vim haproxy.cfg   ##只是查看,没有改东西
[root@server1 haproxy]# grep 200 /etc/passwd
[root@server1 haproxy]# groupadd -g 200 haproxy
[root@server1 haproxy]# useradd -u 200 -g 200 -M haproxy
[root@server1 haproxy]# id haproxy
uid=200(haproxy) gid=200(haproxy) groups=200(haproxy)
[root@server1 haproxy]# su - haproxy
su: warning: cannot change directory to /home/haproxy: No such file or directory
-bash-4.1$ logout
[root@server1 haproxy]# vim /etc/security/limits.conf  ##最后一行添加

       haproxy - nofile 10000

[root@server1 haproxy]# ll -d /var/empty/
drwxr-xr-x. 3 root root 4096 7月  26 22:05 /var/empty/
[root@server1 haproxy]# vim haproxy.cfg

查看图片(1)

[root@server1 haproxy]# /etc/init.d/haproxy start
Starting haproxy:                                          [  OK  ]
[root@server1 haproxy]# 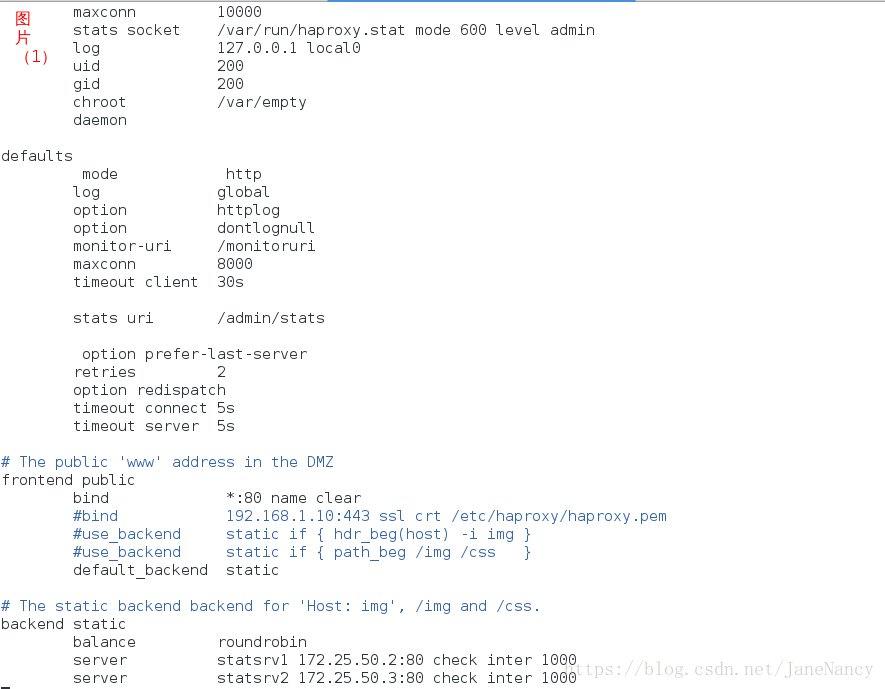
server 2
[root@server2 ~]# cd /var/www/html
[root@server2 html]# ls
[root@server2 html]# vim index.html
[root@server2 html]# /etc/init.d/httpd start
Starting httpd: httpd: Could not reliably determine the server's fully qualified domain name, using 172.25.0.2 for ServerName
                                                           [  OK  ]
server3
[root@server3 ~]# cd /var/www/html
[root@server3 html]# ls
[root@server3 html]# vim index.html
[root@server3 html]# /etc/init.d/httpd start
Starting httpd: httpd: Could not reliably determine the server's fully qualified domain name, using 172.25.0.3 for ServerName
                                                           [  OK  ]
测试,
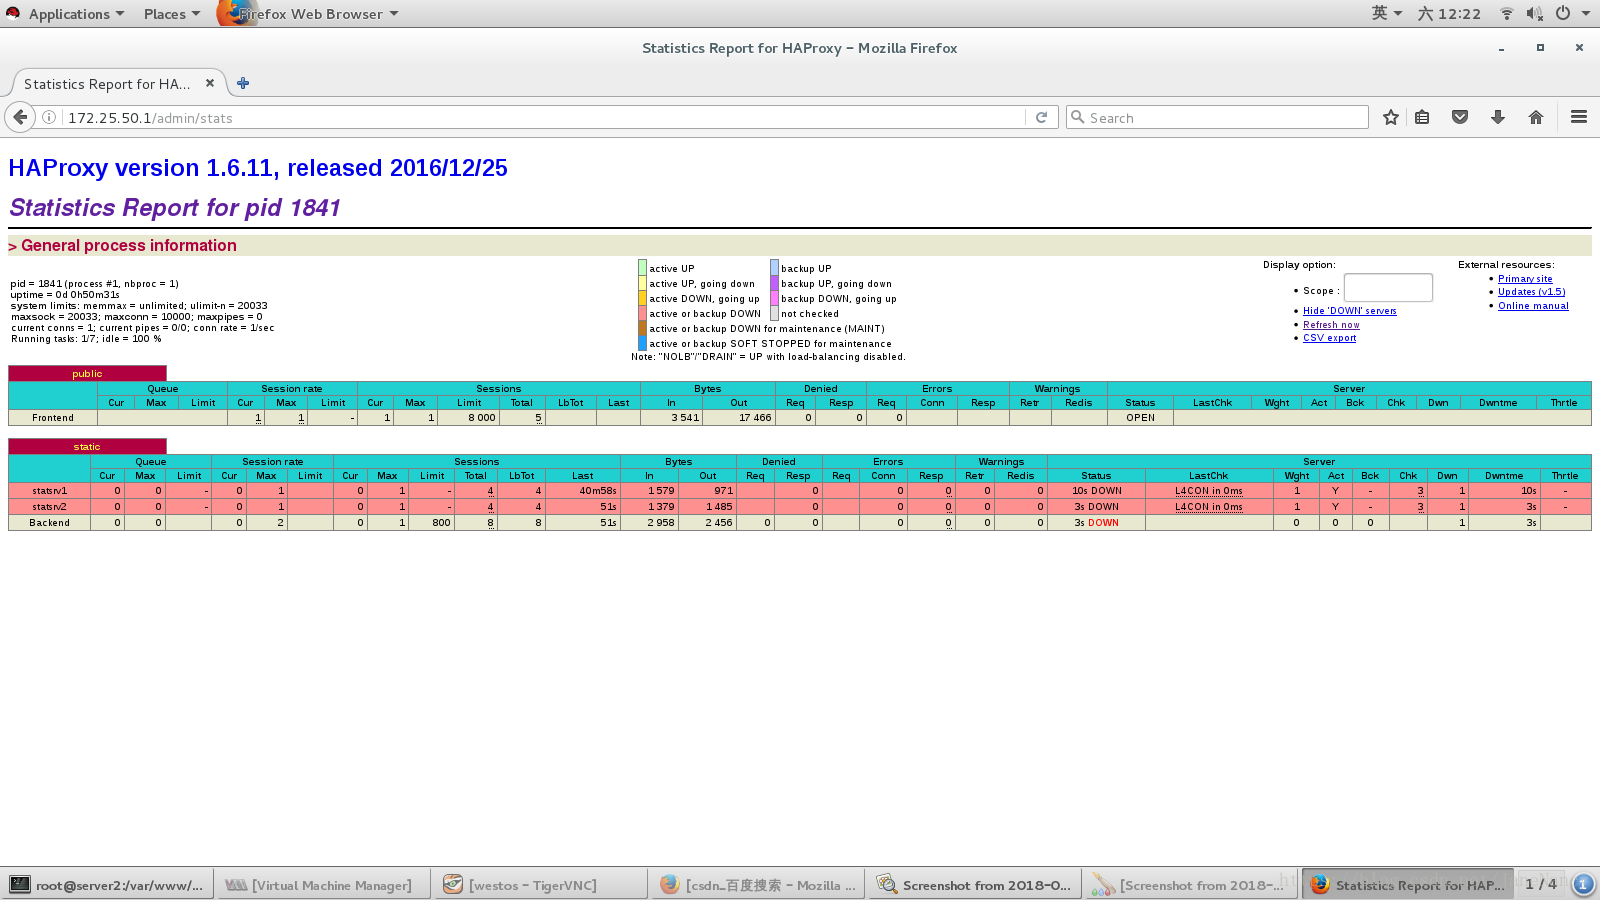
健康检查:

监控:
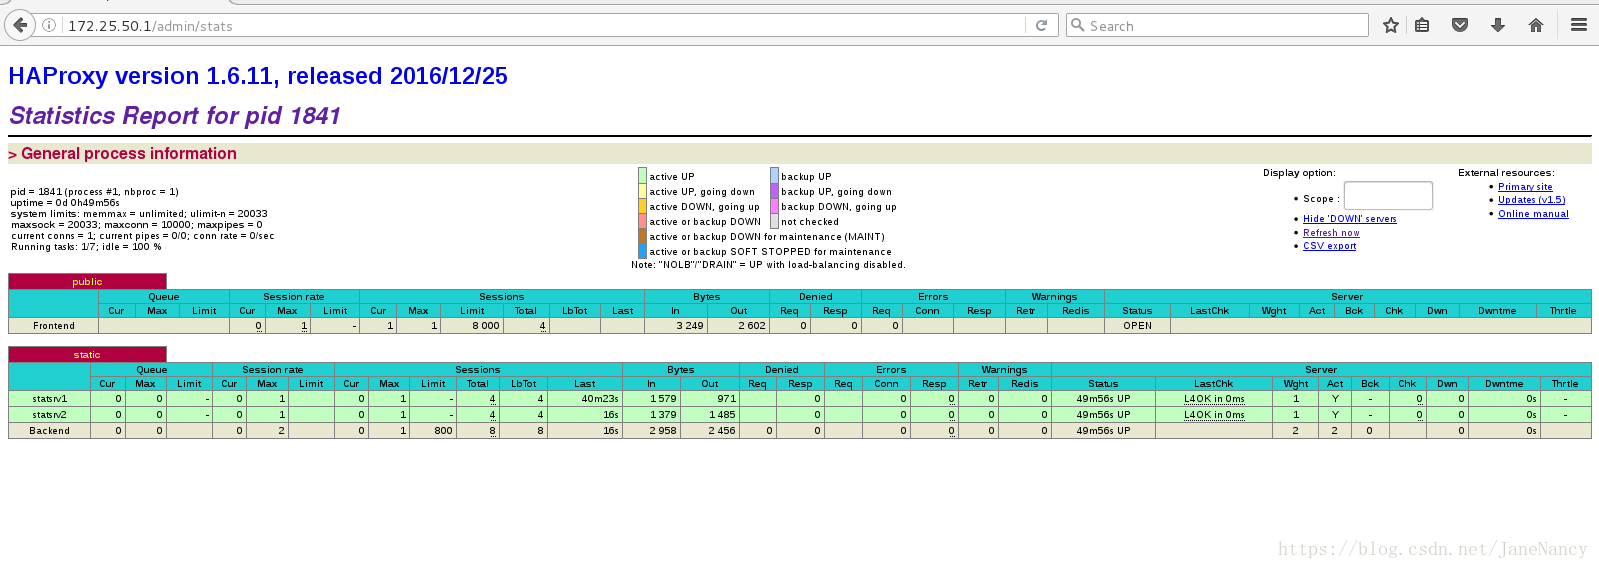
当server2和server3的httpd的服务是开着的,那么会出现这种绿色的界面
当全部关掉就会出现红色的
二、查看日志
[root@server1 ~]# cd /var/log
[root@server1 log]# ls
anaconda.ifcfg.log    anaconda.syslog   btmp       dracut.log  rhsm      wtmp
anaconda.log          anaconda.yum.log  cron       lastlog     secure    yum.log
anaconda.program.log  audit             dmesg      maillog     spooler
anaconda.storage.log  boot.log          dmesg.old  messages    tallylog
[root@server1 log]# vim /etc/rsyslog.conf
[root@server1 log]# /etc/init.d/rsyslog restart
Shutting down system logger:                               [  OK  ]
Starting system logger:                                    [  OK  ]
[root@server1 log]# cat haproxy.log 

再去网页上刷新,再次查看就会有内容了。
三、算法
1、ip_hash 在这里是哈希,source
[root@server1 haproxy]# ls
haproxy.cfg
[root@server1 haproxy]# vim haproxy.cfg
[root@server1 haproxy]# /etc/init.d/haproxy reload
[root@server1 haproxy]#        ##没有报错,说明文件修改正确
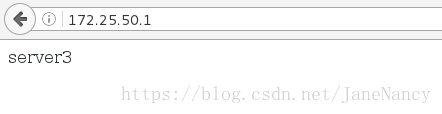
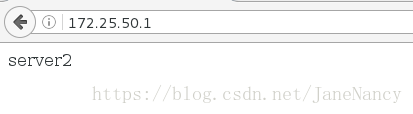
测试:确保 server2 server3 的httpd的服务是开着的。因为server2比server3的优先级高,所以会一直出现server2的内容
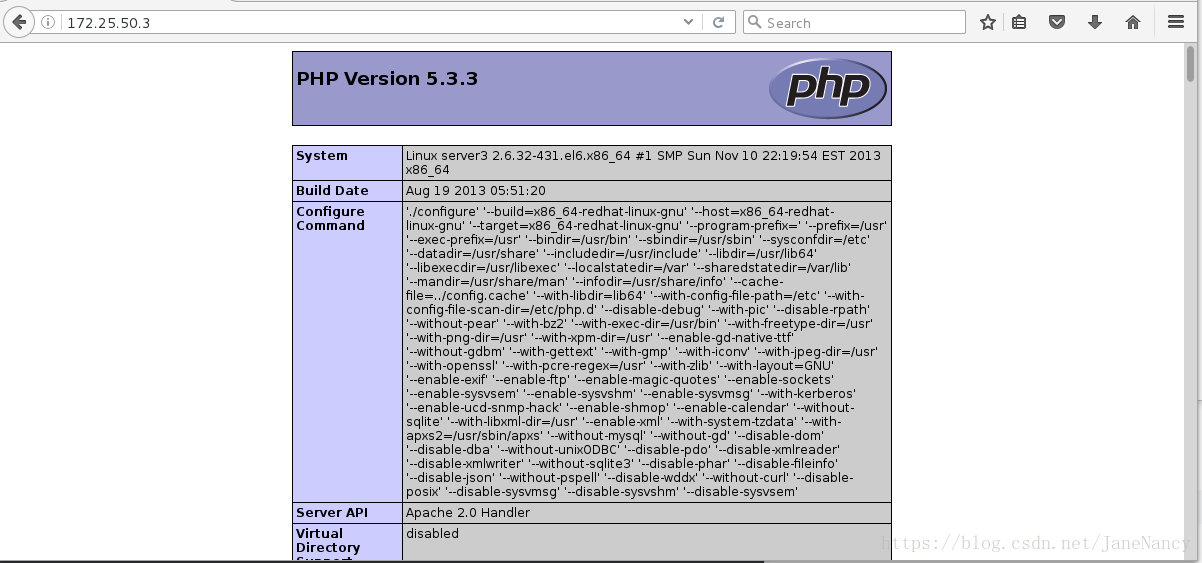
2、动态 php
[root@server3 ~]# yum install -y php
[root@server3 ~]# /etc/init.d/httpd restart
Stopping httpd:                                            [  OK  ]
Starting httpd: httpd: Could not reliably determine the server's fully qualified domain name, using 172.25.0.3 for ServerName
                                                           [  OK  ]
[root@server3 ~]# cd /var/www/html
[root@server3 html]# ls
index.html
[root@server3 html]# vim index.php
[root@server1 haproxy]# ls
haproxy.cfg
[root@server1 haproxy]# vim haproxy.cfg
[root@server1 haproxy]# /etc/init.d/haproxy reload
[root@server1 haproxy]#        ##没有报错,说明文件修改正确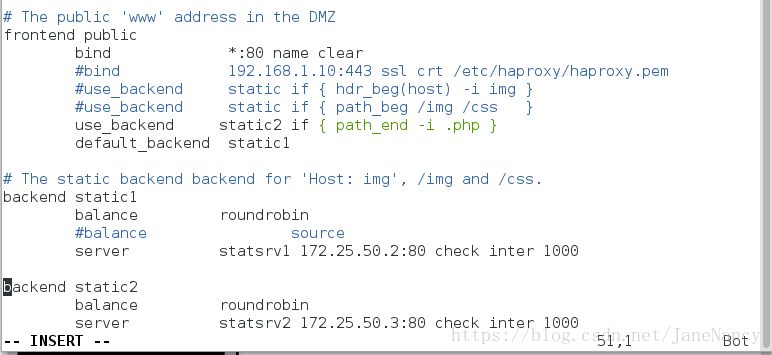
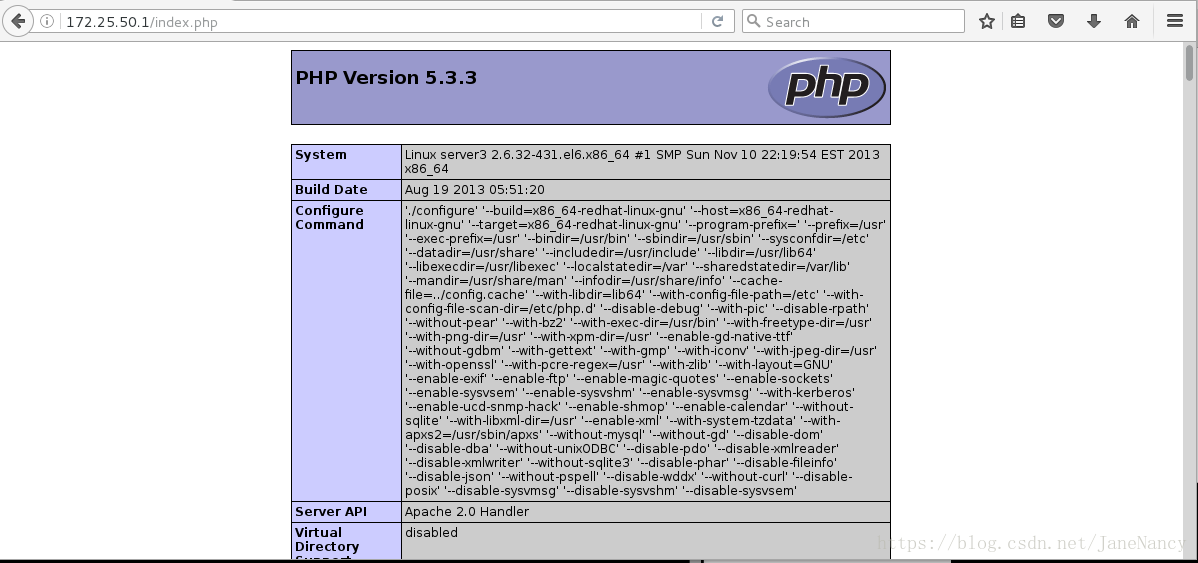
测试,在网页上输入172.25.50.1/index.php。就会出现
3、重定向
[root@server1 haproxy]# ls
haproxy.cfg
[root@server1 haproxy]# vim haproxy.cfg
[root@server1 haproxy]# /etc/init.d/haproxy reload
[root@server1 haproxy]# yum install -y httpd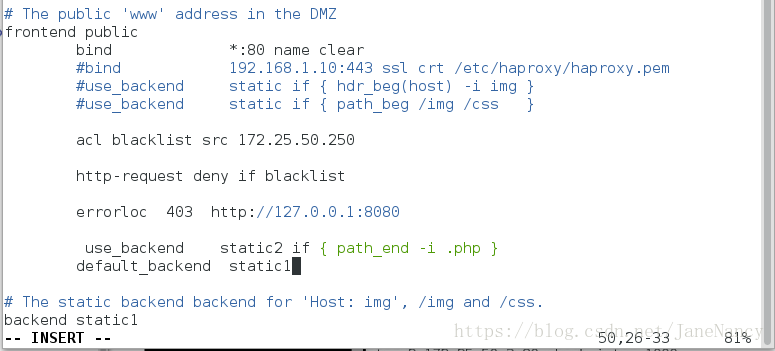
[root@server1 haproxy]# vim /etc/httpd/conf/httpd.conf
[root@server1 haproxy]# cd /var/www/html
[root@server1 html]# ls
[root@server1 html]# vim index.html  ##写进去   此站点正在维护 。。。。
[root@server1 html]# /etc/init.d/httpd start
Starting httpd: httpd: Could not reliably determine the server's fully qualified domain name, using 172.25.0.1 for ServerName
                                                           [  OK  ]
[root@server1 html]# /etc/init.d/haproxy reload
测试:就会出现刚才写进去的“此站点正在维护。。。”

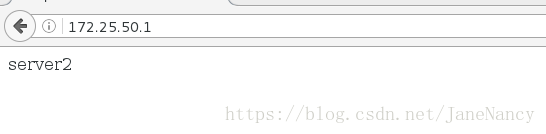
[root@server4 ~]# curl 172.25.50.1
server2
[root@server4 ~]# curl 172.25.50.1
server2
[root@server4 ~]# curl 172.25.50.1
server2[root@server1 haproxy]# ls
haproxy.cfg
[root@server1 haproxy]# vim haproxy.cfg
[root@server1 haproxy]# /etc/init.d/haproxy reload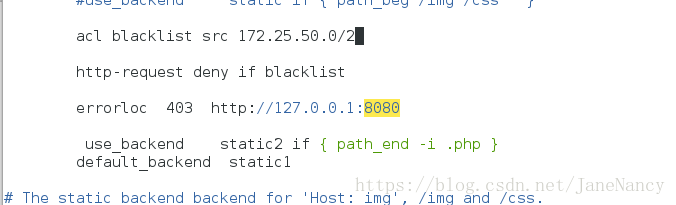
测试:
[root@server4 ~]# curl 172.25.50.1
[root@server4 ~]# curl 172.25.50.1 -I
HTTP/1.1 302 Found
Cache-Control: no-cache
Content-length: 0
Location: http://127.0.0.1:8080
[root@server4 ~]# 
[root@server1 haproxy]# ls
haproxy.cfg
[root@server1 haproxy]# vim haproxy.cfg
[root@server1 haproxy]# /etc/init.d/haproxy reload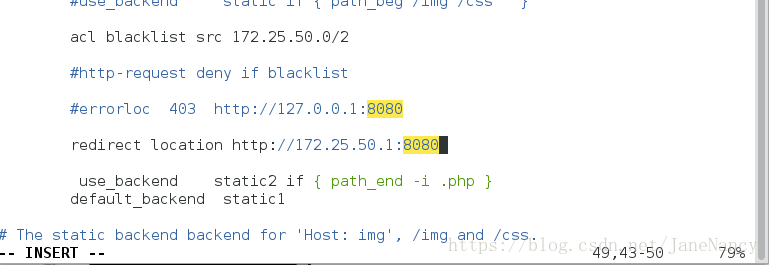
测试:因为我们的default_backend 是static1 不对,为啥出来的来是 “”

[root@server1 haproxy]# ls
haproxy.cfg
[root@server1 haproxy]# vim haproxy.cfg
[root@server1 haproxy]# /etc/init.d/haproxy reload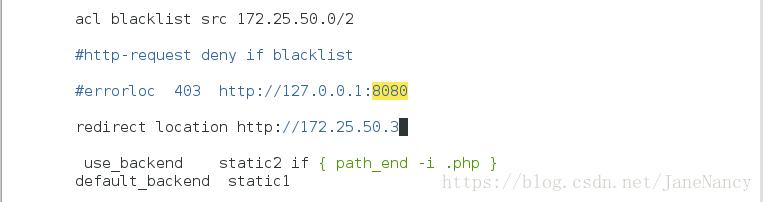
测试:输入server3的ip就会出现php的页面
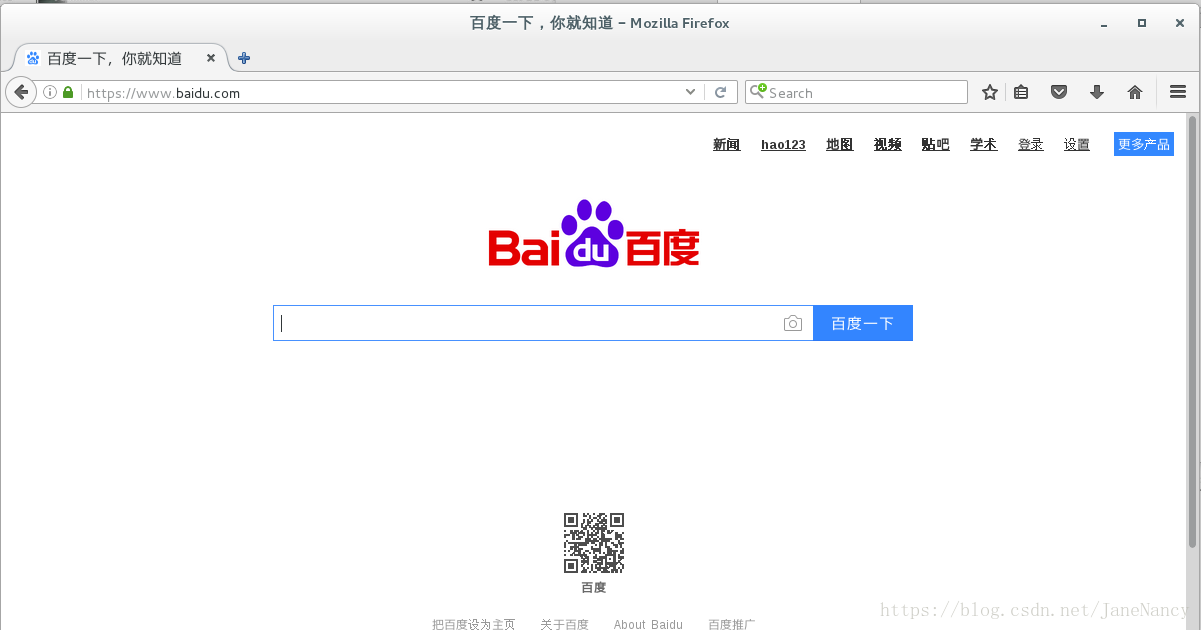
网页重定向百度
[root@server1 haproxy]# ls
haproxy.cfg
[root@server1 haproxy]# vim haproxy.cfg
[root@server1 haproxy]# /etc/init.d/haproxy reload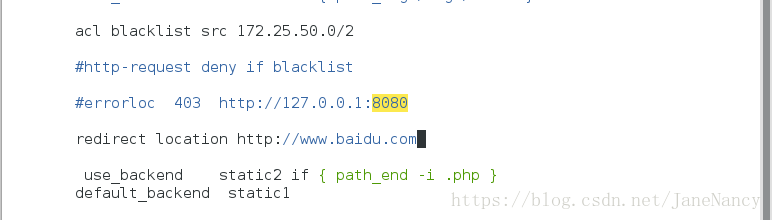
测试:在网页上输入 172.25.50.1的ip 就会转到百度的界面
4、读写
[root@server1 haproxy]# vim haproxy.cfg ##注释掉 百度一行
[root@server1 haproxy]# /etc/init.d/haproxy reload
[root@server1 haproxy]# [root@server2 html]# cd
[root@server2 ~]# ls
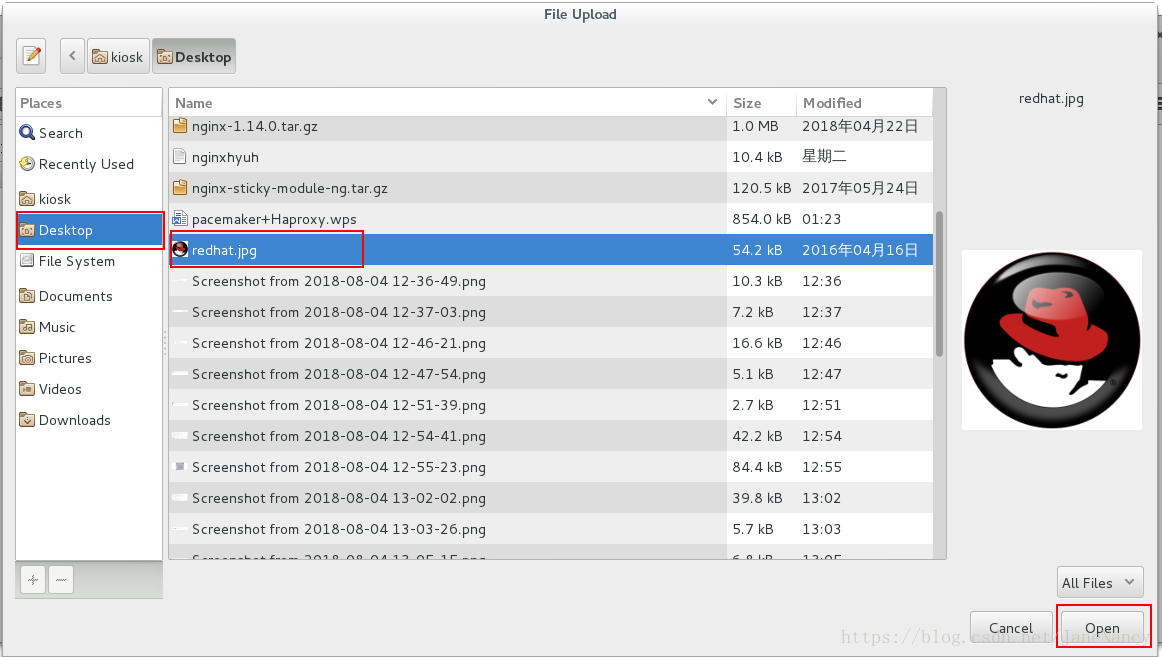
anaconda-ks.cfg install.log install.log.syslog redhat.jpg
[root@server2 ~]# cd /var/www/html
[root@server2 html]# ls
index.html
[root@server2 html]# mkdir images
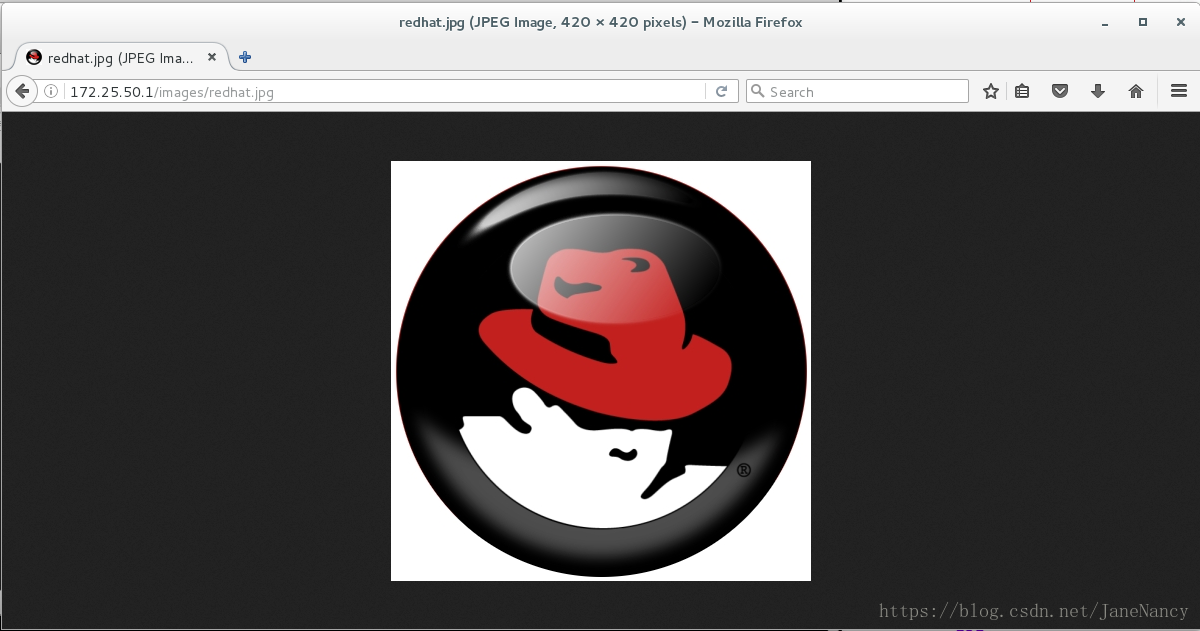
[root@server2 html]# cd
[root@server2 ~]# mv redhat.jpg /var/www/html/images/
[root@server2 ~]# cd /var/www/html/images/
[root@server2 images]# ls
redhat.jpg
[root@server2 images]# 测试:在网页输入 http://172.25.50.1/images/redhat.jpg 就会出现刚才传过去的图片
上传-写
真机穿过来一个目录
lftp 172.25.254.250:/pub/docs/haproxy> mirror upload/
Total: 1 directory, 2 files, 0 symlinks
New: 2 files, 0 symlinks
1184 bytes transferred
lftp 172.25.254.250:/pub/docs/haproxy> quit
[root@foundation50 Desktop]# scp -r /home/kiosk/Desktop/upload/ [email protected]:
root@172.25.50.3's password:
index.php 100% 257 0.3KB/s 00:00
upload_file.php 100% 927 0.9KB/s 00:00
[root@foundation50 Desktop]#
[root@server3 ~]# ls
anaconda-ks.cfg install.log install.log.syslog upload
[root@server3 ~]# cd upload/
[root@server3 upload]# ls
index.php upload_file.php
[root@server3 upload]# mv * /var/www/html/
mv: overwrite `/var/www/html/index.php'? y
[root@server3 upload]# cd ..
[root@server3 ~]# cd /var/www/html/
[root@server3 html]# ls
index.html index.php upload_file.php
[root@server3 html]# cd
[root@server3 ~]# ls
anaconda-ks.cfg install.log install.log.syslog upload
[root@server3 ~]# mv upload/ /var/www/html/
[root@server3 ~]# cd /var/www/html/
[root@server3 html]# ls
index.html index.php upload upload_file.php
[root@server3 html]# ll
total 16
-rw-r--r-- 1 root root 8 8月 3 22:35 index.html
-rw-r--r-- 1 root root 257 8月 4 01:48 index.php
drwxr-xr-x 2 root root 4096 8月 4 01:49 upload
-rw-r--r-- 1 root root 927 8月 4 01:48 upload_file.php
[root@server3 html]# chmod 777 upload
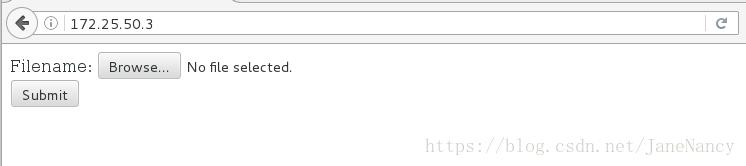
[root@server3 html]# 测试:在网页上输入 server3的ip 就会出现这个
在server1
[root@server1 haproxy]# ls
haproxy.cfg
[root@server1 haproxy]# vim haproxy.cfg
[root@server1 haproxy]# /etc/init.d/haproxy reload
[root@server2 ~]# ls
anaconda-ks.cfg  install.log  install.log.syslog  upload
[root@server2 ~]# mv upload/ /var/www/html/
[root@server2 ~]# cd /var/www/html/
[root@server2 html]# ls
images  index.html  upload
[root@server2 html]# cd
[root@server2 ~]# cd upload/
[root@server2 upload]# mv * /var/www/html/
[root@server2 upload]# cd /var/www/html/
[root@server2 html]# ls
images  index.html  index.php  upload  upload_file.php
[root@server2 html]# chmod 777 upload
[root@server2 html]# ll
total 20
drwxr-xr-x 2 root root 4096 8月   4 01:41 images
-rw-r--r-- 1 root root    8 8月   3 22:35 index.html
-rw-r--r-- 1 root root  257 8月   4 01:56 index.php
drwxrwxrwx 2 root root 4096 8月   4 01:54 upload
-rw-r--r-- 1 root root  927 8月   4 01:56 upload_file.php
[root@server2 html]# [root@server2 html]# vim index.php
[root@server2 html]# vim upload_file.php ##多加两个0
[root@server2 html]# ls
images index.html index.php upload upload_file.php
yum install -y php
[root@server2 html]# /etc/init.d/httpd restart
Stopping httpd: [ OK ]
Starting httpd: httpd: Could not reliably determine the server's fully qualified domain name, using 172.25.0.2 for ServerName
[ OK ][root@server3 ~]# ls
anaconda-ks.cfg install.log install.log.syslog upload
[root@server3 ~]# cd upload/
[root@server3 upload]# ls
index.php upload_file.php
[root@server3 upload]# mv * /var/www/html/
mv: overwrite `/var/www/html/index.php'? y
[root@server3 upload]# cd ..
[root@server3 ~]# cd /var/www/html/
[root@server3 html]# ls
index.html index.php upload_file.php
[root@server3 html]# cd
[root@server3 ~]# ls
anaconda-ks.cfg install.log install.log.syslog upload
[root@server3 ~]# mv upload/ /var/www/html/
[root@server3 ~]# cd /var/www/html/
[root@server3 html]# ls
index.html index.php upload upload_file.php
[root@server3 html]# ll
total 16
-rw-r--r-- 1 root root 8 8月 3 22:35 index.html
-rw-r--r-- 1 root root 257 8月 4 01:48 index.php
drwxr-xr-x 2 root root 4096 8月 4 01:49 upload
-rw-r--r-- 1 root root 927 8月 4 01:48 upload_file.php
[root@server3 html]# chmod 777 upload
[root@server3 html]# vim upload_file.php
[root@server3 html]# ls
index.html index.php upload upload_file.php
[root@server3 html]# /etc/init.d/httpd restart
Stopping httpd: [ OK ]
Starting httpd: httpd: Could not reliably determine the server's fully qualified domain name, using 172.25.0.3 for ServerName
[ OK ]
[root@server3 html]#
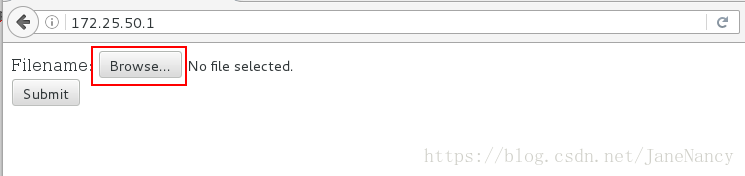
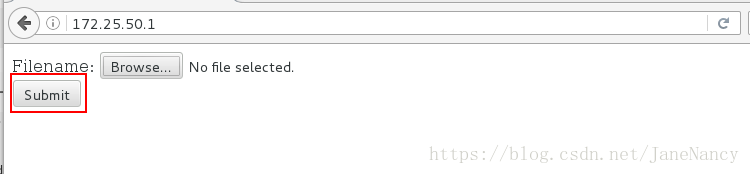
测试:在网页输入172.25.50.1.
这时,server2 只起到读的作用
[root@server2 ~]# cd /var/www/html
[root@server2 html]# ls
images  index.html  index.php  upload  upload_file.php
[root@server2 html]# cd upload
[root@server2 upload]# ls
index.php  upload_file.php
[root@server2 upload]#
而 server 3 却起到了 写的作用
[root@server3 ~]# cd /var/www/html
[root@server3 html]# ls
index.html  index.php  upload  upload_file.php
[root@server3 html]# cd upload_file.php
-bash: cd: upload_file.php: Not a directory
[root@server3 html]# cd upload
[root@server3 upload]# ls
redhat.jpg             ##图片在这里
[root@server3 upload]#