一、HAProxy介绍
1)HAProxy是由C语言编的自由且开源一款软件,主要是提供负载均衡功能以及TCP层和HTTP应用层的代理软件程序,它支持虚拟主机,HAProxy是一款专业的负载均衡代理软件,它特别适合用于负载量特别大的web站点,而这些站点通常需要对用户的会话需要做保持或者做七层的处理。HAProxy对硬件的要求性并不高,优化得当的话,完成可以支持数以万计的并发连接。而且它的运行模式可以使得它很简单的安全的整合于当前的网站架构中,同时可以保护后端服务器不暴露于网络上,提高了网站的安全性。
2)HAProxy实现了一种事件驱动、单一进行的工作模型,默认只启动一个进程工作,此种工作模型支持非常大的并发连接数。多进程或多线程模型受内存限制 、系统调度器限制以及无处不在的锁限制,很少能处理数千并发连接。事件驱动模型因为在有更好的资源和时间管理的用户端(User-Space) 实现所有这些任务,所以没有这些问题。此模型的弊端是,在多核系统上,这些程序通常扩展性较差。这就是为什么他们必须进行优化以 使每个CPU时间片(Cycle)做更多的工作。
3)HAProxy还支持ACL(访问控制),可以拒绝指定的主机请求,防止其恶意攻击行为,也可以根据设定规则,使得不同的资源调度到不同的后端服务器上。
4)HAProxy之所以代理能力强大,得益于在于它的工作性能的和设计模式,HAProxy是单进程的、时间驱动模型,这样就降低了进程上下文切换的开销及内存占用;而且HAProxy具有事件检查器(event checker)允许其在高并发连接中对任何连接的任何事件实现即时探测。HAProxy的作者专门为其工作开发出了弹性二叉树数据结构,实现了以O(log(N))的低开销来保持计时器命令、保持运行队列命令及管理轮询及最少连接队列。
二、HAProxy的安装与配置参数
主机环境说明:
| 角色 | 地址 |
|---|---|
| 调度器 | 192.168.126.141 |
| 后端服务器1 | 192.168.126.128 |
| 后端服务器2 | 192.168.126.138 |
安装方式:基于rpm软件包安装即可
[root@master ~]# yum install haproxy -y
Loaded plugins: fastestmirror
Loading mirror speeds from cached hostfile
base                                                            | 3.6 kB  00:00:00
配置文件参数:
haproxy的配置文件主要由两部分组成:全局设定和对代理的设定,共分为五段:global(全局配置段)、default(默认配置段)、fronte(前端服务器配置段)、backend(后端服务器配置段)、listen(默认监听配置段)
global  //全局配置段
    # to have these messages end up in /var/log/haproxy.log you will
    # need to:
    #
    # 1) configure syslog to accept network log events.  This is done
    #    by adding the '-r' option to the SYSLOGD_OPTIONS in
    #    /etc/sysconfig/syslog
    #
    # 2) configure local2 events to go to the /var/log/haproxy.log
    #   file. A line like the following can be added to
    #   /etc/sysconfig/syslog
    #
    #    local2.*                       /var/log/haproxy.log
    #
    log         127.0.0.1 local2    //指明haproxy的日志记录方式,此处为记录为自定义的rsyslog中的local2中;


    chroot      /var/lib/haproxy   //修改haproxy的工作目录至指定的目录;
    pidfile     /var/run/haproxy.pid   //指明haproxy的工作进程文件;
    maxconn     4000	//指明haproxy的最大并发连接数;
    user        haproxy   //指明以哪个用户运行haproxy进程;
    group       haproxy	//指明以哪个组运行haproxy进程;
    daemon     //让haproxy以守护进程的模式工作于系统后台;

    # turn on stats unix socket
    stats socket /var/lib/haproxy/stats  //指明haproxy的socket文件位置;


defaults    //默认配置段
    mode                    http  //haproxy的工作模式,此处指明基于http七层代理的方式工作;
    log                     global  //指明日志应用全局配置段的配置
    option                  httplog  //使用的日志格式
    option                  dontlognull
    option http-server-close
    option forwardfor       except 127.0.0.0/8
    option                  redispatch
    retries                 3
    timeout http-request    10s  //http的请求超时时长;
    timeout queue           1m  //队列超时时长;
    timeout connect         10s
    timeout client          1m  //客户端请求超时时长;
    timeout server          1m  //服务器端超时时长;
    timeout http-keep-alive 10s  //http的长连接会话超时时长;
    timeout check           10s  //健康状态检查超时时长;

#---------------------------------------------------------------------
# main frontend which proxys to the backends
#---------------------------------------------------------------------
frontend  main *:80    //前端监听地址和端口,*代表所有
    default_backend             webserv   //默认调度的后端主机群;


#---------------------------------------------------------------------
# static backend for serving up images, stylesheets and such
#---------------------------------------------------------------------
backend webserv   //自定义的后端主机群,名称为webserv
    balance   roundrobin    //使用的调度算法;默认为轮询;
    server    web1 192.168.126.128:80 check
    server    web2 192.168.126.138:80 check
三、HAProxy的负载均衡调度算法
动态调度算法:权重可动态调整;
静态调度算法:调整权重不会实时生效
roundrobin:轮询,动态算法,每个后端主机最多支持4128个连接;
static-rr:轮询,静态算法,每个后端主机支持的数量无上限;
leastconn:根据后端主机的负载数量进行调度;仅适用于长连接的会话,动态算法;
source:根据客户端源ip地址做hash计算,把同一个ip地址客户端始终调度到同一台后端服务器上;
		hash-type:哈希算类型
			map-based:取模法;静态
			consistent:一致性哈希算法;动态;(常用)
uri:根据用户所请求的uri地址做hash计算,把请求路径相同的客户端始终调度到同一台后端服务器上;
		hash-type
			map-based:
			consistent:
url_param:根据url中的指定的参数的值进行调度;把值做hash计算,并除以总权重;
		hash-type
			map-based:
			consistent:
hdr(<name>):根据请求报文中指定的header(如use_agent,referer,hostname)进行调度;把指定的header的值做hash计算;
		hash-type
			map-based:
			consistent:

!!!判断其调度算法是动态的还是静态的,要根据其hash类型来判定;
1)轮询调度
[root@master haproxy]# vim haproxy.cfg

frontend  main *:80
    default_backend             webserv


backend webserv
    balance   hdr(User-agent)
    hash-type consistent
    server    web1 192.168.126.128:80 check
    server    web2 192.168.126.138:80 check

[root@master haproxy]# systemctl restart haproxy
[root@master haproxy]# ss -tunlp | grep 80
tcp    LISTEN     0      128       *:80                    *:*                   users:(("haproxy",pid=70030,fd=5))
[root@master haproxy]#
[root@master haproxy]# curl 192.168.126.141
<h1>Page from web1</h1>
[root@master haproxy]# curl 192.168.126.141
<h1>Page from web2</h1>
[root@master haproxy]# curl 192.168.126.141
<h1>Page from web1</h1>
[root@master haproxy]# curl 192.168.126.141
<h1>Page from web2</h1>    //已然实现轮询调度
[root@master haproxy]#
2)加权轮询
[root@master haproxy]# vim haproxy.cfg
backend webserv
    balance   roundrobin
    server    web1 192.168.126.128:80 check  weight 1  //指明轮询次数;
    server    web2 192.168.126.138:80 check  weight 2

[root@master haproxy]# systemctl restart haproxy
[root@master haproxy]# ss -tunlp | grep 80
tcp    LISTEN     0      128       *:80                    *:*                   users:(("haproxy",pid=70730,fd=5))
[root@master haproxy]#
[root@master haproxy]# curl 192.168.126.141
<h1>Page from web2</h1>
[root@master haproxy]# curl 192.168.126.141
<h1>Page from web2</h1>
[root@master haproxy]# curl 192.168.126.141
<h1>Page from web1</h1>
[root@master haproxy]# curl 192.168.126.141
<h1>Page from web2</h1>
[root@master haproxy]# curl 192.168.126.141
<h1>Page from web2</h1>
[root@master haproxy]# curl 192.168.126.141
<h1>Page from web1</h1>    //已然实现了加权轮询调度方式;
[root@master haproxy]#
3)source源ip绑定算法
[root@master haproxy]# vim haproxy.cfg
backend webserv
    balance   source   //指明调度算法为source;
    hash-type consistent   //指明哈希类型;
    server    web1 192.168.126.128:80 check
    server    web2 192.168.126.138:80 check

[root@master haproxy]# systemctl restart haproxy
[root@master haproxy]# ss -tunlp | grep 80
tcp    LISTEN     0      128       *:80                    *:*                   users:(("haproxy",pid=71374,fd=5))
[root@master haproxy]#
[root@master haproxy]# curl 192.168.126.141
<h1>Page from web2</h1>
[root@master haproxy]# curl 192.168.126.141
<h1>Page from web2</h1>
[root@master haproxy]# curl 192.168.126.141
<h1>Page from web2</h1>
[root@master haproxy]# curl 192.168.126.141
<h1>Page from web2</h1>   //同一个客户端地址始终发送至同一台后端服务器上;
[root@master haproxy]#
4)uri算法
把请求目标资源路径相同的主机始终调度到同一台后端服务器
[root@master haproxy]# vim haproxy.cfg
backend webserv
    balance   uri   //指明调度算法为uri;
    hash-type consistent   //指明hash类型;
    server    web1 192.168.126.128:80 check
    server    web2 192.168.126.138:80 check

[root@master haproxy]# systemctl restart haproxy
[root@master haproxy]#
[root@master haproxy]#
[root@master haproxy]# ss -tunlp | grep 80
tcp    LISTEN     0      128       *:80                    *:*                   users:(("haproxy",pid=72386,fd=5))
[root@master haproxy]# curl http://192.168.126.141/test1.html
1 in web1
[root@master haproxy]# curl http://192.168.126.141/test1.html
1 in web1
[root@master haproxy]# curl http://192.168.126.141/test3.html
3 in web2
[root@master haproxy]# curl http://192.168.126.141/test3.html
3 in web2                        //请求同一个资源路径,始终调度到同一个后端服务器;
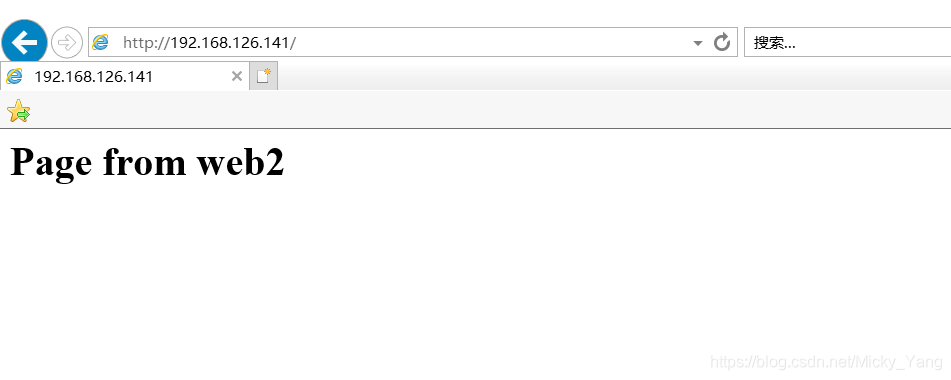
5)hdr基于(User-agent)用户浏览器类型调度
[root@master haproxy]# vim haproxy.cfg
backend webserv
    balance   hdr(User-agent)   //基于http请求报文中的用户浏览器类型进行调度;
    hash-type consistent  //指明hash算法类型;
    server    web1 192.168.126.128:80 check
    server    web2 192.168.126.138:80 check


[root@master haproxy]# systemctl restart haproxy
[root@master haproxy]#
[root@master haproxy]#
[root@master haproxy]# ss -tunlp | grep 80
tcp    LISTEN     0      128       *:80                    *:*                   users:(("haproxy",pid=73208,fd=5))
[root@master haproxy]#
谷歌浏览器:

IE浏览器:

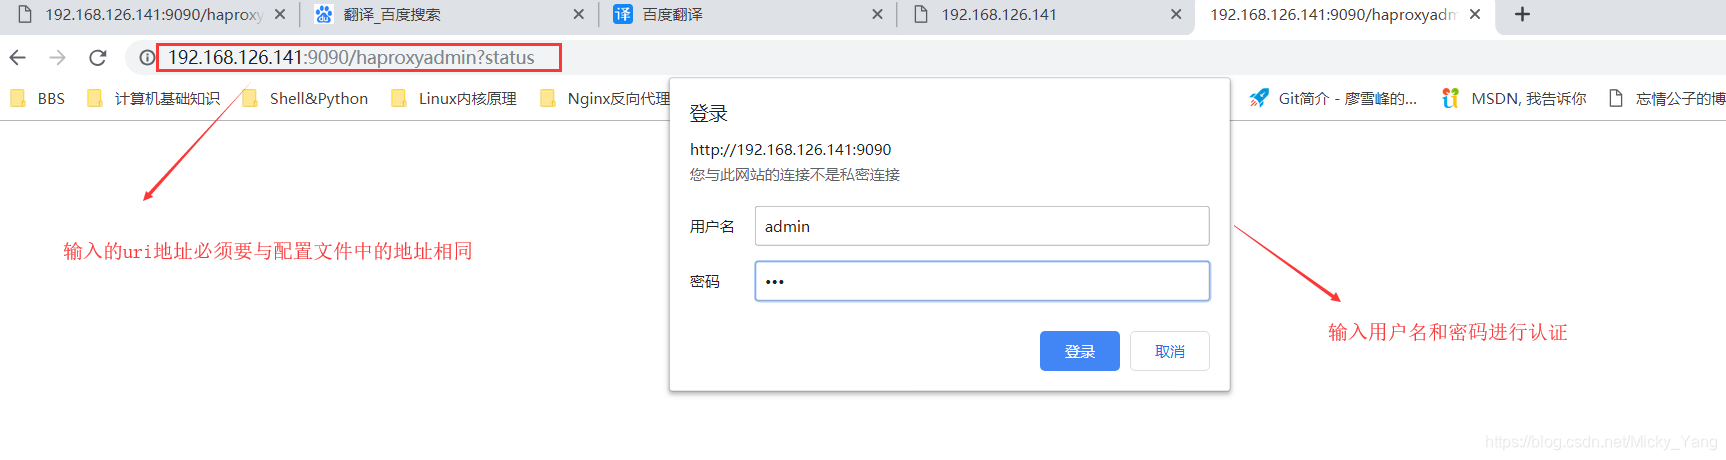
四、配置并查看HAProxy的程序状态页面
[root@master haproxy]#vim haproxy.cfg
frontend  main *:80
    default_backend             webserv
listen statistics    //添加listen监听字段;
    bind *:9090   //绑定端口地址(此处的端口为状态页面的端口)
    stats enable  //开启状态页面查看项;
    stats hide-version  //隐藏haproxy版本号信息,提高安全性。
    stats uri /haproxyadmin?status    //指明状态页面的uri地址;
    stats realm "HAProxy Statistics"   //指明认证时的提示信息;
    stats auth admin:jyy     //指明认证的用户名和密码;用冒号分隔;
    stats admin if TRUE   //打开管理员身份(TURE表示认证成功才显示详细信息);

[root@master haproxy]# systemctl restart haproxy
[root@master haproxy]# ss -tunlp | grep 80
tcp    LISTEN     0      128       *:80                    *:*                   users:(("haproxy",pid=75343,fd=5))
[root@master haproxy]# ss -tunlp | grep 9090
tcp    LISTEN     0      128       *:9090                  *:*                   users:(("haproxy",pid=75343,fd=7))
[root@master haproxy]#

五、配置后端服务器记录真实客户端ip地址信息
我们在对客户端访问做负载均衡调度时,千万要注意的是,我们需要把客户端真实的ip地址记录于后端服务器的访问日志中,这样才有利于我们以后做日志分析工作;所以让后端服务器记录真实的客户端ip地址是必然的。之前Nginx做负载均衡使后端服务器记录真实客户端ip地址信息是在客户端请求报文的首部添加自定义字段,把客户端ip地址与添加此字段信息绑定,然后修改后端服务器的日路日志的格式,使后端服务器记录客户端ip地址为我们添加此字段的ip地址信息。haproxy也几乎如此。
修改后端服务器日志格式:
[root@web2 ~]# vim /etc/httpd/conf/httpd.conf
LogLevel warn

#
# The following directives define some format nicknames for use with
# a CustomLog directive (see below).
#
#LogFormat "%h %l %u %t \"%r\" %>s %b \"%{Referer}i\" \"%{User-Agent}i\"" combined
LogFormat "%{X-Forwarded-For}i %l %u %t \"%r\" %>s %b \"%{Referer}i\" \"%{User-Agent}i\"" combined
//把%h更换为%{X-Forwarded-For}i,以此记录真实客户端ip地址信息;
[root@web2 ~]# service restart httpd
restart: 未被识别的服务
[root@web2 ~]# service  httpd  restart
停止 httpd:                                               [确定]
正在启动 httpd:httpd: apr_sockaddr_info_get() failed for web2
httpd: Could not reliably determine the server's fully qualified domain name, using 127.0.0.1 for ServerName
                                                           [确定]
[root@web2 ~]#
先在浏览器上访问几次后端服务器:
在后端服务器web上查看访问日志:
[root@web2 ~]# tail  /var/log/httpd/access_log
192.168.126.141 - - [24/Jan/2019:08:20:33 +0800] "GET / HTTP/1.1" 200 24 "-" "hehehehe"
192.168.126.141 - - [24/Jan/2019:08:20:33 +0800] "GET / HTTP/1.1" 200 24 "-" "hehehehe"
192.168.126.141 - - [24/Jan/2019:08:20:34 +0800] "GET / HTTP/1.1" 200 24 "-" "hehehehe"
192.168.126.141 - - [24/Jan/2019:08:20:35 +0800] "GET / HTTP/1.1" 200 24 "-" "hehehehe"
192.168.126.1 - - [24/Jan/2019:08:23:37 +0800] "GET / HTTP/1.1" 304 - "-" "Mozilla/5.0 (Windows NT 10.0; WOW64; Trident/7.0; rv:11.0) like Gecko"
192.168.126.1 - - [24/Jan/2019:08:23:38 +0800] "GET / HTTP/1.1" 304 - "-" "Mozilla/5.0 (Windows NT 10.0; WOW64; Trident/7.0; rv:11.0) like Gecko"
192.168.126.1 - - [24/Jan/2019:08:23:38 +0800] "GET / HTTP/1.1" 304 - "-" "Mozilla/5.0 (Windows NT 10.0; WOW64; Trident/7.0; rv:11.0) like Gecko"
192.168.126.1 - - [24/Jan/2019:08:23:38 +0800] "GET / HTTP/1.1" 304 - "-" "Mozilla/5.0 (Windows NT 10.0; WOW64; Trident/7.0; rv:11.0) like Gecko"
192.168.126.1 - - [24/Jan/2019:08:23:38 +0800] "GET / HTTP/1.1" 304 - "-" "Mozilla/5.0 (Windows NT 10.0; WOW64; Trident/7.0; rv:11.0) like Gecko"
192.168.126.1 - - [24/Jan/2019:08:23:38 +0800] "GET / HTTP/1.1" 304 - "-" "Mozilla/5.0 (Windows NT 10.0; WOW64; Trident/7.0; rv:11.0) like Gecko"
//此时日志记录的客户端地址信息已然从代理服务器地址改为真实客户端地址信息;
六、自定义cookie信息
HAProxy的还有一个强大的地方在于它可以对后端服务器自定义cookie信息,此处的cookie不是服务器端给客户端设定的cookie信息,而是前端调度器给后端服务器设定的cookie信息;可以使得具有统一cookie信息的用户始终调度到同一台后端服务器上,实现会话绑定功能。
[root@master haproxy]# vim haproxy.cfg
backend webserv
    balance   roundrobin
    cookie    SERERID insert nocache indirect   //指明cookie字段信息,cookie方式为插入方式;
    server    web1 192.168.126.128:80 check weight 1 cookie websrv1   //web1的cookie名称为websrv1;
    server    web2 192.168.126.138:80 check weight 2 cookie websrv2  //web2的cookie名称为websrv2;


[root@master haproxy]# systemctl restart haproxy
[root@master haproxy]# ss -tunlp | grep 80
tcp    LISTEN     0      128       *:80                    *:*                   users:(("haproxy",pid=81874,fd=5))
[root@master haproxy]#
做访问测试
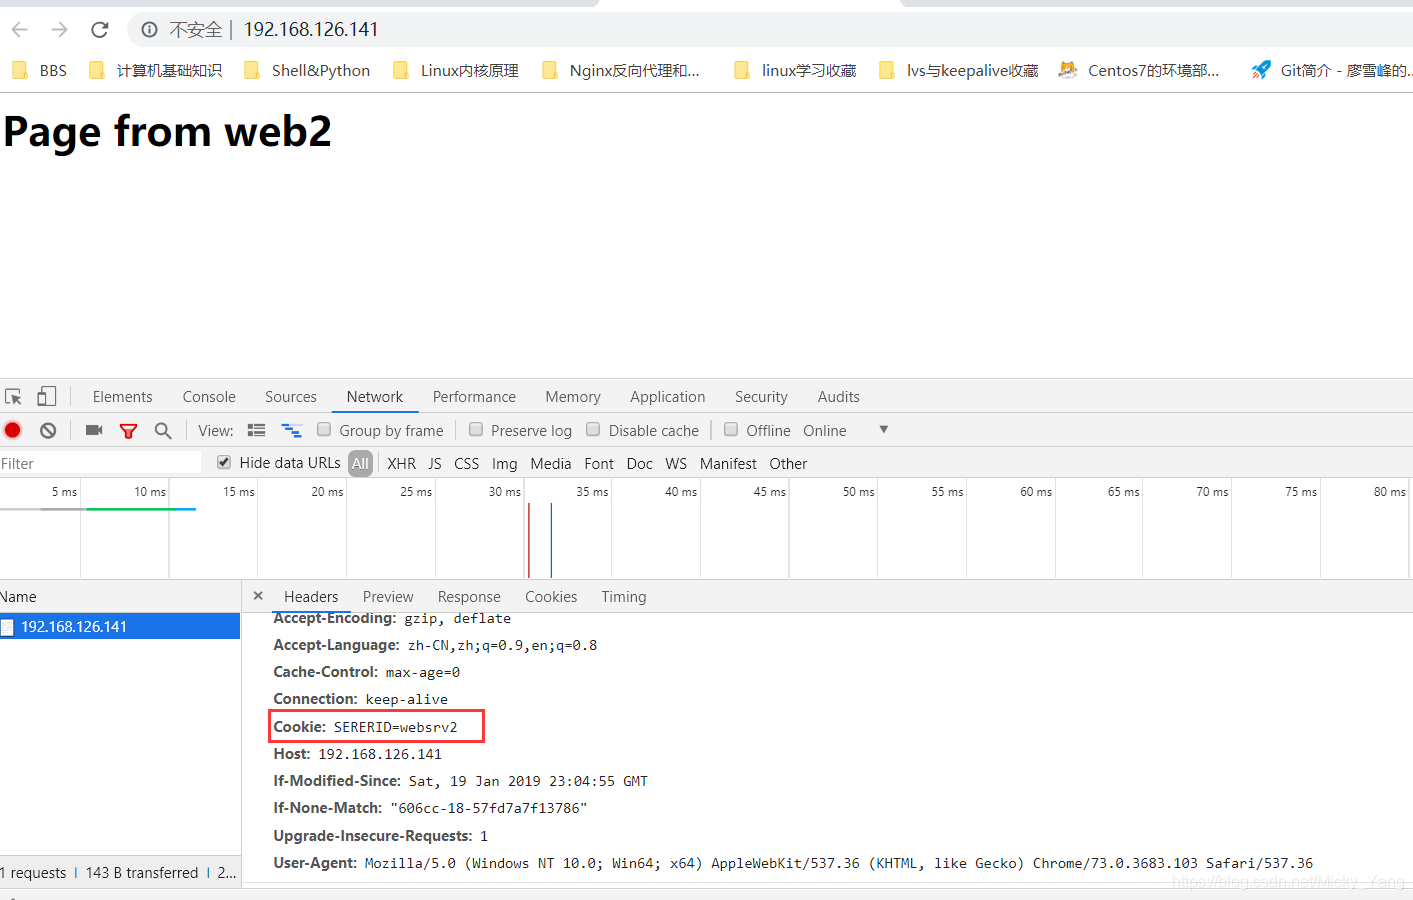
此时,不管调度算法为哪一种,客户端请求都会被调度到设定后端服务器相同的cookie名称服务器上,以实现会话绑定功能。
七、自定义请求或响应报文首部
有时我们需要在对http报文中的信息进行添加,以便实现某种功能;haproxy支持自定义添加请求报文或者是响应报文首部信息;
格式:
reqadd(添加请求首部信息,从代理服务器发往后端服务器)
rspadd (添加响应首部信息,从代理服务器发往客户端)
添加Via响应首部,告知客户端所经由的代理服务器名称:
[root@master haproxy]# vim haproxy.cfg
    maxconn                 3000

#---------------------------------------------------------------------
# main frontend which proxys to the backends
#---------------------------------------------------------------------
frontend  main *:80
    default_backend             webserv
    rspadd Via:\ master    //添加Via首部信息,后面有空格字段需要转义,master为代理服务器主机名;


[root@master haproxy]# systemctl restart haproxy
[root@master haproxy]# ss -tunlp | grep 80
tcp    LISTEN     0      128       *:80                    *:*                   users:(("haproxy",pid=83426,fd=5))
[root@master haproxy]#
