- 开发应用需要保存一些配置参数,对于Android应用来说,我们最适合采用SharedPreferences保存数据,它是一个轻量级的存储类,特别适合用于保存软件配置参数。
如何使用SharePreferences保存数据
- 使用SharedPreferences保存数据,其背后是用xml文件存放数据,文件存放在/data/data//shared_prefs目录下。例如:
       SharedPreferences sharedPreferences =getSharedPreferences("mltest", Context.MODE_PRIVATE);
      Editor editor = sharedPreferences.edit();//获取编辑器
      editor.putString("name", "四种模式");
      editor.putInt("age", 4);
      editor.commit();//提交修改
- 1
- 2
- 3
- 4
- 5
- 6
getSharedPreferences(name,mode)方法的第一个参数用于指定该文件的名称,名称不用带后缀,后缀会由Android自动加上。方法的第二个参数指定文件的操作模式,共有四种操作模式,分别是:
Context.MODE_PRIVATE = 0
Context.MODE_APPEND = 32768
Context.MODE_WORLD_READABLE = 1
Context.MODE_WORLD_WRITEABLE = 2解析:
- Context.MODE_PRIVATE:为默认操作模式,代表该文件是私有数据,只能被应用本身访问,在该模式下,写入的内容会覆盖原文件的内容,如果想把新写入的内容追加到原文件中。可以使用Context.MODE_APPEND
- Context.MODE_APPEND:模式会检查文件是否存在,存在就往文件追加内容,否则就创建新文件。
- Context.MODE_WORLD_READABLEContext.MODE_WORLD_WRITEABLE用来控制其他应用是否有权限读写该文件。
- MODE_WORLD_READABLE:表示当前文件可以被其他应用读取;
- MODE_WORLD_WRITEABLE:表示当前文件可以被其他应用写入。`
如何使用SharePreferences读取数据
SharedPreferences sharedPreferences = getSharedPreferences("ljq", Context.MODE_PRIVATE);
//getString()第二个参数为缺省值,如果preference中不存在该key,将返回缺省值
String name = sharedPreferences.getString("name", "");
int age = sharedPreferences.getInt("age", 1);
- 1
- 2
- 3
- 4
举例
main.xml布局文件
<?xml version="1.0" encoding="utf-8"?>
<LinearLayout xmlns:android="http://schemas.android.com/apk/res/android"
    android:orientation="vertical"
    android:layout_width="fill_parent"
    android:layout_height="fill_parent">
    <RelativeLayout
        xmlns:android="http://schemas.android.com/apk/res/android"
        android:layout_width="wrap_content"
        android:layout_height="wrap_content">
        <TextView android:layout_width="wrap_content"
            android:layout_height="wrap_content"
            android:text="@string/name"
            android:textSize="20px"
            android:id="@+id/nameLable" />
        <EditText android:layout_width="80px"
            android:layout_height="wrap_content"
            android:layout_toRightOf="@id/nameLable"
            android:layout_alignTop="@id/nameLable"
            android:layout_marginLeft="10px"
            android:id="@+id/name" />
    </RelativeLayout>
    <RelativeLayout
        xmlns:android="http://schemas.android.com/apk/res/android"
        android:layout_width="wrap_content"
        android:layout_height="wrap_content">
        <TextView android:layout_width="wrap_content"
            android:layout_height="wrap_content"
            android:textSize="20px"
            android:text="@string/age"
            android:id="@+id/ageLable" />
        <EditText android:layout_width="80px"
            android:layout_height="wrap_content"
            android:layout_toRightOf="@id/ageLable"
            android:layout_alignTop="@id/ageLable"
            android:layout_marginLeft="10px"
            android:id="@+id/age" />
    </RelativeLayout>
    <RelativeLayout
        xmlns:android="http://schemas.android.com/apk/res/android"
        android:layout_width="wrap_content"
        android:layout_height="wrap_content">
        <Button android:layout_width="wrap_content"
            android:layout_height="wrap_content"
            android:text="@string/button"
            android:id="@+id/button" />
        <Button android:layout_width="wrap_content"
            android:layout_height="wrap_content"
            android:text="@string/showButton"
            android:layout_toRightOf="@id/button"
            android:layout_alignTop="@id/button"
            android:id="@+id/showButton" />
    </RelativeLayout>
    <TextView android:layout_width="fill_parent"
            android:layout_height="wrap_content"
            android:textSize="20px"
            android:id="@+id/showText" />
</LinearLayout>
- 1
- 2
- 3
- 4
- 5
- 6
- 7
- 8
- 9
- 10
- 11
- 12
- 13
- 14
- 15
- 16
- 17
- 18
- 19
- 20
- 21
- 22
- 23
- 24
- 25
- 26
- 27
- 28
- 29
- 30
- 31
- 32
- 33
- 34
- 35
- 36
- 37
- 38
- 39
- 40
- 41
- 42
- 43
- 44
- 45
- 46
- 47
- 48
- 49
- 50
- 51
- 52
- 53
- 54
- 55
- 56
- 57
.Java文件
package com.ljq.activity;

import android.app.Activity;
import android.content.Context;
import android.content.SharedPreferences;
import android.content.SharedPreferences.Editor;
import android.os.Bundle;
import android.view.View;
import android.widget.Button;
import android.widget.EditText;
import android.widget.TextView;
import android.widget.Toast;

public class SpActivity extends Activity {
    private EditText nameText;
    private EditText ageText;
    private TextView resultText;
    @Override
    public void onCreate(Bundle savedInstanceState) {
        super.onCreate(savedInstanceState);
        setContentView(R.layout.main);

        nameText = (EditText)this.findViewById(R.id.name);
        ageText = (EditText)this.findViewById(R.id.age);
        resultText = (TextView)this.findViewById(R.id.showText);

        Button button = (Button)this.findViewById(R.id.button);
        Button showButton = (Button)this.findViewById(R.id.showButton);
        button.setOnClickListener(listener);
        showButton.setOnClickListener(listener);

        // 回显
        SharedPreferences sharedPreferences=getSharedPreferences("ljq123",
                Context.MODE_WORLD_READABLE+Context.MODE_WORLD_WRITEABLE);
        String nameValue = sharedPreferences.getString("name", "");
        int ageValue = sharedPreferences.getInt("age", 1);
        nameText.setText(nameValue);
        ageText.setText(String.valueOf(ageValue));
    }

    private View.OnClickListener listener = new View.OnClickListener(){
        public void onClick(View v) {
            Button button = (Button)v;
            //ljq123文件存放在/data/data/<package name>/shared_prefs目录下
            SharedPreferences sharedPreferences=getSharedPreferences("ljq123",
                    Context.MODE_WORLD_READABLE+Context.MODE_WORLD_WRITEABLE);
            switch (button.getId()) {
            case R.id.button:
                String name = nameText.getText().toString();
                int age = Integer.parseInt(ageText.getText().toString());
                Editor editor = sharedPreferences.edit(); //获取编辑器
                editor.putString("name", name);
                editor.putInt("age", age);
                editor.commit();//提交修改
                Toast.makeText(SpActivity.this, "保存成功", Toast.LENGTH_LONG).show();
                break;
            case R.id.showButton:
                String nameValue = sharedPreferences.getString("name", "");
                int ageValue = sharedPreferences.getInt("age", 1);
                resultText.setText("姓名:" + nameValue + ",年龄:" + ageValue);
                break;
            }
        }
    };
}
- 1
- 2
- 3
- 4
- 5
- 6
- 7
- 8
- 9
- 10
- 11
- 12
- 13
- 14
- 15
- 16
- 17
- 18
- 19
- 20
- 21
- 22
- 23
- 24
- 25
- 26
- 27
- 28
- 29
- 30
- 31
- 32
- 33
- 34
- 35
- 36
- 37
- 38
- 39
- 40
- 41
- 42
- 43
- 44
- 45
- 46
- 47
- 48
- 49
- 50
- 51
- 52
- 53
- 54
- 55
- 56
- 57
- 58
- 59
- 60
- 61
- 62
- 63
- 64
- 65
结果
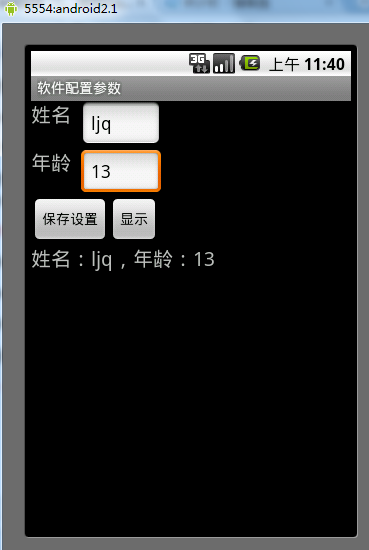
SharedPreferences类供开发人员保存和获取基本数据类型的键值对.该类主要用于基本类型, 例如boolean,float.int,long和string.
SharedPreferences类的数据以xml文件方式存储在本地
位置://文件存放地址 //data/data/包名/shared_pres
在应用程序结束后,数据仍旧会保存.只要程序没有被卸载,下次启动程序后还可以访问上次存放的数据。
SharedPreferences对象的创建不是通过new出来的,而是getSharedPreferences(String name,int mode)方法可以获得,这个方法是上下文里面有的静态方法,其第一个参数就是共享文件的名称.第二个参数是文件数据保存的模式。对于使用同一个文件名称获得的多个SharedPreferences引用,其指同一个 SharePreferences对象;
文件数据保存的模式:
1)MODE_PRIVATE ,这个模式用得最多,其他的模式很少用
2)MODE_APPEND
3)MODE_WORLD_READABLE
4)MODE_WORLD_WRITEABLE
从SharedPreferences对象中取值时,主要使用该类中定义的getXxx()方法.比如:
String name=share.getString(“name”);
SharedPreferences类中使用的步骤如下:
1)调用SharedPreference对象的edit()方法获得##SharedPreferences.Editor引用对象
2)调用诸如putBoolean(),putString()等方法增加值.
3)使用commit()方法提交新值. 存储操作模式有:
SharedPreferences类的应用:
1)判断用户是否第一次登录
2)设置用户相关默认设置开关
比如默认的声音设置,是否要消息推送等等。
3)用于设置用户的自动登录等等
下面介绍一个模拟可自动登录的示例程序:
程序功能:
1.验证用户名和密码的正确性;这里信息都是模拟的.
2.如果勾选记住密码选框,那么用户登录成功后,再退出程序,两个输入框会显示上次登录成功过的用户名和密码
3.如果勾选自动登录,页面启动时会验证用户名和密码,然后自动登录。
4.如果没有勾选记住密码登录,那么如果之前保存的用户名和密码也会被移除掉。下次登录时,用户名和密码的输入框不会有任何的信息。
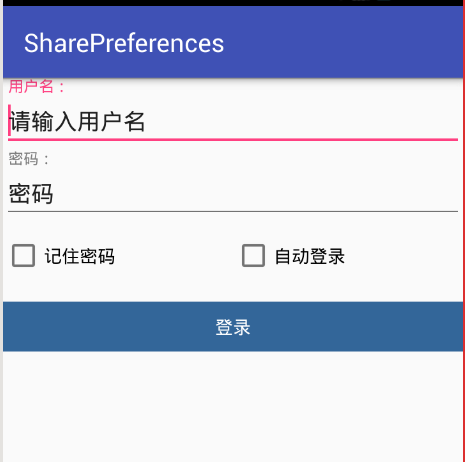
(一)xml布局文件
<?xml version="1.0" encoding="utf-8"?>
<LinearLayout xmlns:android="http://schemas.android.com/apk/res/android"
    xmlns:tools="http://schemas.android.com/tools"
    android:id="@+id/activity_main"
    android:layout_width="match_parent"
    android:layout_height="match_parent"
    android:orientation="vertical"
    tools:context="com.lwz.sharepreferences.MainActivity">

    <android.support.design.widget.TextInputLayout
        android:layout_width="match_parent"
        android:layout_height="wrap_content"
        android:hint="用户名:">

        <EditText
            android:id="@+id/main_et_username"
            android:layout_width="match_parent"
            android:layout_height="wrap_content"
            android:singleLine="true"
            android:text="请输入用户名" />
    </android.support.design.widget.TextInputLayout>

    <android.support.design.widget.TextInputLayout
        android:layout_width="match_parent"
        android:layout_height="wrap_content"
        android:hint="密码:">


        <EditText
            android:id="@+id/main_et_password"
            android:layout_width="match_parent"
            android:layout_height="wrap_content"
            android:singleLine="true"
            android:text="密码" />
    </android.support.design.widget.TextInputLayout>

    <LinearLayout
        android:layout_width="match_parent"
        android:layout_height="wrap_content"
        android:layout_marginTop="10dp"
        android:orientation="horizontal">

        <CheckBox
            android:id="@+id/main_cb_remember"
            android:layout_width="0dp"
            android:layout_height="wrap_content"
            android:layout_weight="1"
            android:text="记住密码" />

        <CheckBox
            android:id="@+id/main_cb_auto"
            android:layout_width="0dp"
            android:layout_height="wrap_content"
            android:layout_weight="1"
            android:text="自动登录" />
    </LinearLayout>

    <TextView
        android:id="@+id/main_tv_login"
        android:layout_width="match_parent"
        android:layout_height="wrap_content"
        android:layout_marginTop="20dp"
        android:background="#336699"
        android:gravity="center"
        android:padding="10dp"
        android:text="登录"
        android:textColor="@android:color/white" />

</LinearLayout>
- 1
- 2
- 3
- 4
- 5
- 6
- 7
- 8
- 9
- 10
- 11
- 12
- 13
- 14
- 15
- 16
- 17
- 18
- 19
- 20
- 21
- 22
- 23
- 24
- 25
- 26
- 27
- 28
- 29
- 30
- 31
- 32
- 33
- 34
- 35
- 36
- 37
- 38
- 39
- 40
- 41
- 42
- 43
- 44
- 45
- 46
- 47
- 48
- 49
- 50
- 51
- 52
- 53
- 54
- 55
- 56
- 57
- 58
- 59
- 60
- 61
- 62
- 63
- 64
- 65
- 66
- 67
- 68
- 69
上面的android.support.design.widget.TextInputLayout,是android中的design包里面的一个定义好布局样式,相对于垂直方向的线性布局。这里的包要导包,没有的话,还是直接用垂直方向的线性布局代替就可以了
(二)Share Preferences的工具类
package com.lwz.sharepreferences;

import android.content.Context;
import android.content.SharedPreferences;

/**
 * 这是一个SharePreference的根据类,使用它可以更方便的数据进行简单存储
 * 这里只要知道基本调用方法就可以了
 * 1.通过构造方法来传入上下文和文件名
 * 2.通过putValue方法传入一个或多个自定义的ContentValue对象,进行数据存储
 * 3.通过get方法来获取数据
 * 4.通过clear方法来清除这个文件的数据
 * 这里没有提供清除单个key的数据,是因为存入相同的数据会自动覆盖,没有必要去理会
 */

public class SPHelper {
    //定义一个SharePreference对象
    SharedPreferences sharedPreferences;
    //定义一个上下文对象

    //创建SharePreference对象时要上下文和存储的模式
    //通过构造方法传入一个上下文
    SPHelper(Context context, String fileName) {
        //实例化SharePreference对象,使用的是get方法,而不是new创建
        //第一个参数是文件的名字
        //第二个参数是存储的模式,一般都是使用私有方式:Context.MODE_PRIVATE
        sharedPreferences = context.getSharedPreferences(fileName, Context.MODE_PRIVATE);
    }

    /**
     * 存储数据
     * 这里要对存储的数据进行判断在存储
     * 只能存储简单的几种数据
     * 这里使用的是自定义的ContentValue类,来进行对多个数据的处理
     */
    //创建一个内部类使用,里面有key和value这两个值
    static class ContentValue {
        String key;
        Object value;

        //通过构造方法来传入key和value
        ContentValue(String key, Object value) {
            this.key = key;
            this.value = value;
        }
    }

    //一次可以传入多个ContentValue对象的值
    public void putValues(ContentValue... contentValues) {
        //获取SharePreference对象的编辑对象,才能进行数据的存储
        SharedPreferences.Editor editor = sharedPreferences.edit();
        //数据分类和存储
        for (ContentValue contentValue : contentValues) {
            //如果是字符型类型
            if (contentValue.value instanceof String) {
                editor.putString(contentValue.key, contentValue.value.toString()).commit();
            }
            //如果是int类型
            if (contentValue.value instanceof Integer) {
                editor.putInt(contentValue.key, Integer.parseInt(contentValue.value.toString())).commit();
            }
            //如果是Long类型
            if (contentValue.value instanceof Long) {
                editor.putLong(contentValue.key, Long.parseLong(contentValue.value.toString())).commit();
            }
            //如果是布尔类型
            if (contentValue.value instanceof Boolean) {
                editor.putBoolean(contentValue.key, Boolean.parseBoolean(contentValue.value.toString())).commit();
            }

        }
    }


    //获取数据的方法
    public String getString(String key) {
        return sharedPreferences.getString(key, null);
    }

    public boolean getBoolean(String key) {
        return sharedPreferences.getBoolean(key, false);
    }

    public int getInt(String key) {
        return sharedPreferences.getInt(key, -1);
    }

    public long getLong(String key) {
        return sharedPreferences.getLong(key, -1);
    }

    //清除当前文件的所有的数据
    public void clear() {
        sharedPreferences.edit().clear().commit();
    }

}
- 1
- 2
- 3
- 4
- 5
- 6
- 7
- 8
- 9
- 10
- 11
- 12
- 13
- 14
- 15
- 16
- 17
- 18
- 19
- 20
- 21
- 22
- 23
- 24
- 25
- 26
- 27
- 28
- 29
- 30
- 31
- 32
- 33
- 34
- 35
- 36
- 37
- 38
- 39
- 40
- 41
- 42
- 43
- 44
- 45
- 46
- 47
- 48
- 49
- 50
- 51
- 52
- 53
- 54
- 55
- 56
- 57
- 58
- 59
- 60
- 61
- 62
- 63
- 64
- 65
- 66
- 67
- 68
- 69
- 70
- 71
- 72
- 73
- 74
- 75
- 76
- 77
- 78
- 79
- 80
- 81
- 82
- 83
- 84
- 85
- 86
- 87
- 88
- 89
- 90
- 91
- 92
- 93
- 94
- 95
- 96
- 97
(三)主方法的代码
package com.lwz.sharepreferences;
import android.content.SharedPreferences;
import android.os.Bundle;
import android.support.v7.app.AppCompatActivity;
import android.text.TextUtils;
import android.view.View;
import android.widget.CheckBox;
import android.widget.CompoundButton;
import android.widget.EditText;
import android.widget.TextView;
import android.widget.Toast;
public class MainActivity extends AppCompatActivity implements View.OnClickListener, CompoundButton.OnCheckedChangeListener {
//定义布局内的控件
EditText et_username;
EditText et_password;
CheckBox cb_remenber;
CheckBox cb_auto;
TextView tv_login;
//判断是否自动登陆
boolean isAutoLogin = false;
@Override
protected void onCreate(Bundle savedInstanceState) {
super.onCreate(savedInstanceState);
setContentView(R.layout.activity_main);
//判断用户第一次登陆
idFirstlogin();
//初始化页面数据
initView();
}
private void initView() {
//实例化布局的控件
et_username = (EditText) findViewById(R.id.main_et_username);
et_password = (EditText) findViewById(R.id.main_et_password);
cb_remenber = (CheckBox) findViewById(R.id.main_cb_remember);
cb_auto = (CheckBox) findViewById(R.id.main_cb_auto);
tv_login = (TextView) findViewById(R.id.main_tv_login);
//对用户登陆界面的处理
//对登陆按钮进行监听
tv_login.setOnClickListener(this);
//给两个选框设置监听事件
cb_remenber.setOnCheckedChangeListener(this);
cb_auto.setOnCheckedChangeListener(this);
//获取SharePreference文件数据
SPHelper helper = new SPHelper(this, "login");
//判断用户是否自动登陆
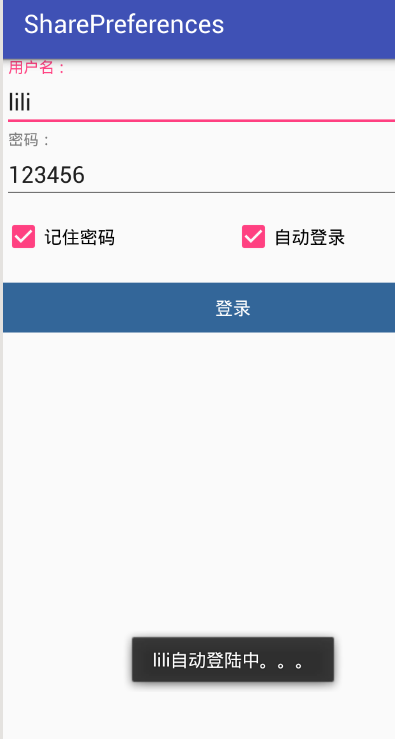
isAutoLogin = helper.getBoolean("isAutoLogin");
//获取用户名和密码
String name = helper.getString("username");
String pass = helper.getString("password");
//如果记录有用户名和密码,把用户名和密码放到输入框中
if (!TextUtils.isEmpty(name)) {
et_username.setText(name);
et_password.setText(pass);
//选中记住密码的选框
cb_remenber.setChecked(true);
}
if (isAutoLogin) {
Toast.makeText(this, name + "自动登陆中。。。", Toast.LENGTH_LONG).show();
//选中记住密码的选框
cb_auto.setChecked(true);
}
}
private void idFirstlogin() {
//获取SharedPreferences对象,这个方法没有使用自定义类的方法来获取对象
SharedPreferences sp = getSharedPreferences("set", MODE_PRIVATE);
//获取SharedPreferences对象里面的某一个值
boolean isfirst = sp.getBoolean("isfirst", true);
//对这个值进行判断
if (isfirst) {
//如果是第一次登陆,添加登陆过的标记,并显示第一次登陆
SharedPreferences.Editor et = sp.edit();
et.putBoolean("isfirst", false);
et.commit();
Toast.makeText(this, "第一次登陆", Toast.LENGTH_SHORT).show();
}
//这个方法里面如果使用自己定义的SPHelper类。代码如下:
/* SPHelper helper = new SPHelper(this, "set2");
boolean isfirt2 = helper.getBoolean("isfirst");
if (isfirt2) {
//这里和上面不同的是要创建一个ContentVa对象
helper.putValues(new SPHelper.ContentValue("isfirst", false));
Toast.makeText(this, "第一次登陆", Toast.LENGTH_SHORT).show();
}*/
}
/**
* 点击登陆后触发的方法
* 这里要进行各项判断,比如记住密码选框和自动登陆选框的选择情况
*/
@Override
public void onClick(View v) {
//模拟一组数据,要输入正确的用户名和密码123456
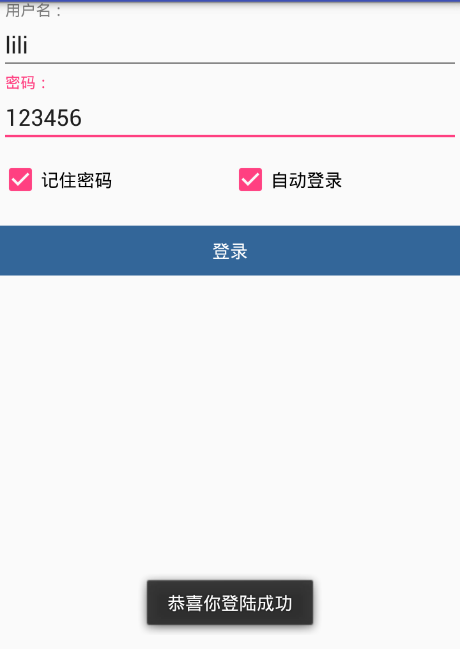
String[] name = {"李文志", "李世民", "李嘉诚", "lili"};
//获取用户输入的数据
String username = et_username.getText().toString();
String password = et_password.getText().toString();
//判断非空
if (TextUtils.isEmpty(username)) {
Toast.makeText(this, "用户名不能为空", Toast.LENGTH_SHORT).show();
return;
}
if (TextUtils.isEmpty(password)) {
Toast.makeText(this, "密码不能为空", Toast.LENGTH_SHORT).show();
return;
}
//如果用户名和密码正确才做相应的动作
//遍历每一个用户名做判断
boolean isrightname = false;
for (int i = 0; i < name.length; i++) {
if (username.equals(name[i]) && password.equals("123456")) {
Toast.makeText(this, "恭喜你登陆成功", Toast.LENGTH_LONG).show();
isrightname = true;
//下面是数据的相关存储
SPHelper helper = new SPHelper(this, "login");
//如果点击记住密码,那么要保存密码
if (cb_remenber.isChecked()) {
//保存用户名
helper.putValues(new SPHelper.ContentValue("username", username));
//保存密码
helper.putValues(new SPHelper.ContentValue("password", password));
} else {
//清除所有的信息
helper.clear();
}
//如果点击了自动登陆,要记住选择的状态
if (cb_auto.isChecked()) {
//保存自动登陆的状态
helper.putValues(new SPHelper.ContentValue("isAutoLogin", true));
} else {
helper.putValues(new SPHelper.ContentValue("isAutoLogin", false));
}
}
}
if (!isrightname) {
Toast.makeText(this, "用户名或密码不正确!", Toast.LENGTH_LONG).show();
}
}
//当选框的状态发生改变时触发的方法
@Override
public void onCheckedChanged(CompoundButton buttonView, boolean isChecked) {
//当对记住密码选框操作时
if (buttonView == cb_remenber) {
//当取消时,自动登陆也要取消
if (!isChecked) {
cb_auto.setChecked(false);
}
}
//当对自动登陆选框操作时
if (buttonView == cb_auto) {
//当选择时,记住密码也要自动去选择
if (isChecked) {
cb_remenber.setChecked(true);
}
}
}
}
- 1
- 2
- 3
- 4
- 5
- 6
- 7
- 8
- 9
- 10
- 11
- 12
- 13
- 14
- 15
- 16
- 17
- 18
- 19
- 20
- 21
- 22
- 23
- 24
- 25
- 26
- 27
- 28
- 29
- 30
- 31
- 32
- 33
- 34
- 35
- 36
- 37
- 38
- 39
- 40
- 41
- 42
- 43
- 44
- 45
- 46
- 47
- 48
- 49
- 50
- 51
- 52
- 53
- 54
- 55
- 56
- 57
- 58
- 59
- 60
- 61
- 62
- 63
- 64
- 65
- 66
- 67
- 68
- 69
- 70
- 71
- 72
- 73
- 74
- 75
- 76
- 77
- 78
- 79
- 80
- 81
- 82
- 83
- 84
- 85
- 86
- 87
- 88
- 89
- 90
- 91
- 92
- 93
- 94
- 95
- 96
- 97
- 98
- 99
- 100
- 101
- 102
- 103
- 104
- 105
- 106
- 107
- 108
- 109
- 110
- 111
- 112
- 113
- 114
- 115
- 116
- 117
- 118
- 119
- 120
- 121
- 122
- 123
- 124
- 125
- 126
- 127
- 128
- 129
- 130
- 131
- 132
- 133
- 134
- 135
- 136
- 137
- 138
- 139
- 140
- 141
- 142
- 143
- 144
- 145
- 146
- 147
- 148
- 149
- 150
- 151
- 152
- 153
- 154
- 155
- 156
- 157
- 158
- 159
- 160
- 161
- 162
- 163
- 164
- 165
- 166
- 167
- 168
- 169
- 170
- 171
- 172
- 173
- 174
- 175
- 176
- 177
- 178
- 179
上面程序运行后的结果:
输入正确密码,并选择自动登陆后登陆的显示界面
退出程序后,再进入程序显示的界面:
其他的功能的各项测试的结果还是比较理想的。
本程序还没有实现多个用户名登录的情况,比如QQ登录的那种情况,如果要设计那中更能应该使用使用一个ExpandableList View的下拉框来显示用户登录过的用户名。