上一节前端入门之(vuex源码解析一)我们简单的过了一下vuex的源码,然后也大概了解了vuex的原理,这一节我们继续带着demo,然后对照着vuex源码做解析.
先看一张官网文档vuex工作的流程图:

可以看到,当我们点击view中的某个按钮(+号)然后触发了一个action(‘increase‘)然后action继续commit到了mutation,mutation改变state(state.count++),然后改变view中数据(count+1)
可能文字解释起来有点抽象哈,我们直接上代码了,当我们点击+的时候,我们代码走了:
increase() {
        this.$store.dispatch('increase');
      },
我们找到vuex中Store对象的dispatch方法:
构造方法中
Store.prototype.dispatch = function dispatch (_type, _payload) {
    var this$1 = this;

  // check object-style dispatch
  //格式化我们传过来的参数
  var ref = unifyObjectStyle(_type, _payload);
    var type = ref.type;
    var payload = ref.payload;

  var action = { type: type, payload: payload };
  //获取store中的actions
  var entry = this._actions[type];
  if (!entry) {
    {
      console.error(("[vuex] unknown action type: " + type));
    }
    return
  }
  //触发action的钩子函数
  this._actionSubscribers.forEach(function (sub) { return sub(action, this$1.state); });
  //返回对应的action的处理结果
  return entry.length > 1
    ? Promise.all(entry.map(function (handler) { return handler(payload); }))
    : entry[0](payload)
};
不要被吓到哈,不难,我们一行一行解释,首先看到这么一行:
//格式化我们传过来的参数
  var ref = unifyObjectStyle(_type, _payload);
    var type = ref.type;
    var payload = ref.payload;
继续看unifyObjectStyle方法:
function unifyObjectStyle (type, payload, options) {
  if (isObject(type) && type.type) {
    options = payload;
    payload = type;
    type = type.type;
  }

  {
    assert(typeof type === 'string', ("Expects string as the type, but found " + (typeof type) + "."));
  }

  return { type: type, payload: payload, options: options }
}
看到这里我们是不是有点明白了,官网上说的调用dispatch发送一个action的时候可以为:
// 以载荷形式分发
store.dispatch('incrementAsync', {
  amount: 10
})

// 以对象形式分发
store.dispatch({
  type: 'incrementAsync',
  amount: 10
})
我们试试~~~
我们目前就是以载荷形式分发的:
decrease() {
        this.$store.dispatch('decrease');
      }
我们换成对象形式:

 decrease() {
        this.$store.dispatch({type:'decrease'});
      }
我们运行代码(结果一样,我就不截屏了哈!!!)
所以不管我们用哪种方式,最后都会被转换成这样的一个对象~~~
{ type: type, payload: payload, options: options }继续dispatch方法往下走~ 我们看到之后触发了
//触发action的钩子函数
  this._actionSubscribers.forEach(function (sub) { return sub(action, this$1.state); });
我们用用哈,比如我需要在每次执行action操作的时候打一个alert提示一下,那么我们的_actionSubscribers又是哪来的呢? 我们找呀找,找到这么一段代码:
Store.prototype.subscribeAction = function subscribeAction (fn) {
  return genericSubscribe(fn, this._actionSubscribers)
};
function genericSubscribe (fn, subs) {
if (subs.indexOf(fn) < 0) {
subs.push(fn);
}
return function () {
var i = subs.indexOf(fn);
if (i > -1) {
subs.splice(i, 1);
}
}
}可以看到Store已经为我们提供了添加action钩子函数的方法了,我们就来用用,我们直接在我们的HelloWorld.vue的mounted的时候,添加action钩子函数:
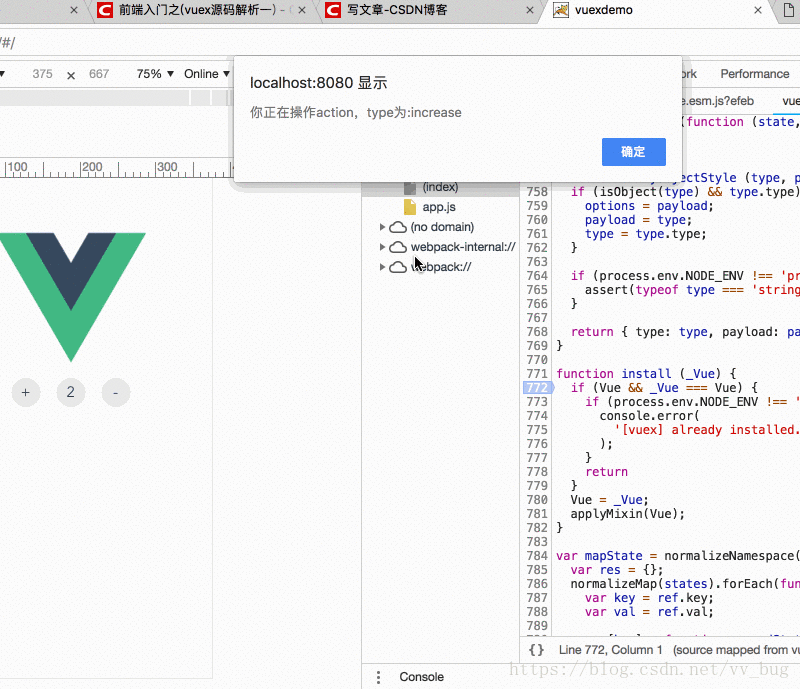
mounted(){
      this.$store.subscribeAction((action,state)=>{
        alert('你正在操作action,type为:'+action.type);
      })
    }
运行代码:

好啦,我们继续dispatch 方法往下走:
 //返回对应的action的处理结果
  return entry.length > 1
    ? Promise.all(entry.map(function (handler) { return handler(payload); }))
: entry[0](payload)我们这里处理increase跟decrease只有一个方法,所以走了entry0,那么entry数组又是啥呢?
 //获取store中的actions
  var entry = this._actions[type];
_actions又是啥呢?
我们可以在构造函数中看到一个叫installModule方法(也就是初始化我们的每个模块)小伙伴应该有点感觉哈,既然是注册整个模块,那么我们的action肯定也包含在里面了
function installModule (store, rootState, path, module, hot) {
  ..
  module.forEachAction(function (action, key) {
    var type = action.root ? key : namespace + key;
    var handler = action.handler || action;
    registerAction(store, type, handler, local);
  });
....
}
function registerAction (store, type, handler, local) {
var entry = store._actions[type] || (store._actions[type] = []);
entry.push(function wrappedActionHandler (payload, cb) {
var res = handler.call(store, {
dispatch: local.dispatch,
commit: local.commit,
getters: local.getters,
state: local.state,
rootGetters: store.getters,
rootState: store.state
}, payload, cb);
if (!isPromise(res)) {
res = Promise.resolve(res);
}
if (store._devtoolHook) {
return res.catch(function (err) {
store._devtoolHook.emit('vuex:error', err);
throw err
})
} else {
return res
}
});
}好啦,终于是看到了store._actions声明了, 所以当disptach中执行
entry[0](payload)的时候,最后执行的方法为:
function wrappedActionHandler (payload, cb) {
    var res = handler.call(store, {
      dispatch: local.dispatch,
      commit: local.commit,
      getters: local.getters,
      state: local.state,
      rootGetters: store.getters,
      rootState: store.state
    }, payload, cb);
    if (!isPromise(res)) {
      res = Promise.resolve(res);
    }
    if (store._devtoolHook) {
      return res.catch(function (err) {
        store._devtoolHook.emit('vuex:error', err);
        throw err
      })
    } else {
      return res
    }
  }
其中的handler又是什么呢?其实就是我们在action中定义的increase跟decrease方法:
const actions = {
  increase({commit}) {
    commit('increase');
  },
  decrease({commit}) {
    commit('decrease');
  }
};
然后判断我们action方法中返回的值是不是Promise对象,如果不是则用返回值返回一个Promise对象:
if (!isPromise(res)) {
      res = Promise.resolve(res);
    }
所以我们通过 store dispatch一个action的时候,其实都会返回一个Promise对象:
 methods: {
      increase() {
        this.$store.dispatch({type:'increase'});
      },
      decrease() {
        this.$store.dispatch({type:'decrease'});
      }
    },
我们试试,当我们执行完this.$store.dispatch({type:’increase’});的时候,我们打一个alert提示一下:
increase() {
        this.$store.dispatch({type:'increase'}).then(()=>{
          alert('执行了一次加法');
        });
      },
dispatch方法我们还没走完哈,我们继续往下,哈哈! 继续往下走就已经走到我们写的increase跟decrease方法中了:
const actions = {
  increase({commit}) {
    commit('increase');
  },
  decrease({commit}) {
    commit('decrease');
  }
};
好啦, dispatch方法算是给我们走完了,我们一般会在action中做一些网络请求啊、或者一些耗时的操作,最后才去执行commit,具体参照特定场景哈.
其实走完dispatch方法,我们会发现commit的操作其实差不多,我们就走得稍微快点了哈,还是Store的构造函数中:
 this.commit = function boundCommit (type, payload, options) {
    return commit.call(store, type, payload, options)
  };
然后最后走了Store的原型中的commit方法:
Store.prototype.commit = function commit (_type, _payload, _options) {
    var this$1 = this;

  // check object-style commit
  var ref = unifyObjectStyle(_type, _payload, _options);
    var type = ref.type;
    var payload = ref.payload;
    var options = ref.options;

  var mutation = { type: type, payload: payload };
  var entry = this._mutations[type];
  if (!entry) {
    {
      console.error(("[vuex] unknown mutation type: " + type));
    }
    return
  }
  this._withCommit(function () {
    entry.forEach(function commitIterator (handler) {
      handler(payload);
    });
  });
  this._subscribers.forEach(function (sub) { return sub(mutation, this$1.state); });

  if (
    "development" !== 'production' &&
    options && options.silent
  ) {
    console.warn(
      "[vuex] mutation type: " + type + ". Silent option has been removed. " +
      'Use the filter functionality in the vue-devtools'
    );
  }
};
是不是跟dispatch的套路一样? 是的! 所以我们直接看重点方法哈:
var entry = this._mutations[type];
 this._withCommit(function () {
    entry.forEach(function commitIterator (handler) {
      handler(payload);
    });
  });
我们一样,先找到_mutations在哪定义的,好吧,照着dispatch的思路,想都应该能想到了,就是在installModule的时候定义的:
function installModule (store, rootState, path, module, hot) {
  .....
  module.forEachMutation(function (mutation, key) {
    var namespacedType = namespace + key;
    registerMutation(store, namespacedType, mutation, local);
  });

  module.forEachAction(function (action, key) {
    var type = action.root ? key : namespace + key;
    var handler = action.handler || action;
    registerAction(store, type, handler, local);
  });
.....
}
function registerMutation (store, type, handler, local) {
var entry = store._mutations[type] || (store._mutations[type] = []);
entry.push(function wrappedMutationHandler (payload) {
handler.call(store, local.state, payload);
});
}所以当我们执行:
const actions = {
  increase({commit}) {
    commit('increase');
  },
  decrease({commit}) {
    commit('decrease');
  }
};
的时候,最后走了 handler.call(store, local.state, payload);那么handler又是什么呢? 其实就是我们定义在store中的mutations:
const mutations = {
  increase(state) {
    this.state.count++;
  },
  decrease(state) {
    this.state.count--;
  }
};
所以绕来绕去最后其实就是执行了this.state.count++;跟this.state.count–;那么我们绑定在页面中的count为什么会变换呢? 哈哈!! 上一节已经把vuex的执行原理讲了一遍了哈,不懂的小伙伴自己去看哈~~
讲到这里,vuex就只剩下一些(模块化、动态注册模块、浏览器调试插件),哦~~ 还有一个比较重要的东西,那就是getter了,本以为这一节就结束了的,哈哈哈!! 睡觉了,下节继续哈~~ 大牛勿喷!!!!!