js获取当前时间或者时间戳的转换:
function timeStampToDate(timestamp) {
        var date;
        if (timestamp == undefined || timestamp == '') {
            date = new Date();
        } else {
            if (timestamp.toString().length == 10) {
                date = new Date(timestamp * 1000);
            }
            if (timestamp.toString().length == 13) {
                date = new Date(timestamp);
            }
        }
        var year = date.getFullYear() + '-';
        var month = (date.getMonth() + 1 < 10 ? '0' + (date.getMonth() + 1) : date.getMonth() + 1) + '-';
        var day = (date.getDate() < 10 ? '0' + date.getDate() : date.getDate()) + ' ';
        var hours = (date.getHours() < 10 ? '0' + date.getHours() : date.getHours()) + ':';
        var minutes = (date.getMinutes() < 10 ? '0' + date.getMinutes() : date.getMinutes()) + ':';
        var seconds = (date.getSeconds() < 10 ? '0' + date.getSeconds() : date.getSeconds());
        return year + month + day + hours + minutes + seconds;
    }
——————————————————————————————————————————
常用正则验证
    //验证手机号
    function isPhone(phone_no) {
        return /^(13[0-9]|14[5-9]|15[012356789]|166|17[0-8]|18[0-9]|19[8-9])[0-9]{8}$/.test(phone_no);
    }

    //验证身份证号
    function isIDCard(id_no) {
        return /^[1-9]\d{5}(18|19|20)\d{2}((0[1-9])|(1[0-2]))(([0-2][1-9])|10|20|30|31)\d{3}[0-9Xx]$/.test(id_no);
    }

    //验证邮箱
    function isEmail(email_no) {
        return /^([A-Za-z0-9_\-\.\u4e00-\u9fa5])+\@([A-Za-z0-9_\-\.])+\.([A-Za-z]{2,8})$/.test(email_no);
    }
——————————————————————————————————————————
1、短信验证码倒计时:
var time = 60;

//获取验证码
    function getVertifyCode() {
        if (time==1) {
            $api.removeCls(vertify_code, 'unclick');//移除不可点击class
            vertify_code.innerHTML = "重新发送";
            time = 60;
        }else{
            $api.addCls(vertify_code, 'unclick');//添加不可点击class
            time--;
            vertify_code.innerHTML = time + "s";
            setTimeout(function() {
                getVertifyCode();
            },  1000);
        }
    }
其中动态控制一个样式,来控制按钮是否可点击:
.unclick{
            pointer-events:none;
        }
也可以用自身api来控制点击事件
$api.removeAttr(vertify_code, 'onclick');//移除点击事件
$api.attr(vertify_code,'onclick','getVertifyCode()');//恢复点击事件
下面看一下小程序中是如何实现的:
布局:(一个按钮)
<button type='primary' bindtap='daojishi' disabled='{{enable}}'>{{text}}</button>Page:
var time = 60;
  /**
   * 初始变量
   */
  data: {
    text: "获取验证码",
    enable: false
},daojishi: function () {
if (time == 1) {
this.setData({
text: '重新获取',
enable: false,
});
time = 60;
} else {
time--;
this.setData({
text: time + 's',
enable: true,
});
setTimeout(()=> {
this.daojishi();
}, 1000);
}
},都是相似的!
——————————————————————————————————————————
2、input标签弹出软键盘时,会挤扁控件,解决方案
var h = document.body.scrollHeight;
window.onresize = function(){
    if (document.body.scrollHeight < h) {
       $api.byId('new_user').style.display = "none";
    }else{
       $api.byId('new_user').style.display = "block";
    }
}
——————————————————————————————————————————
3、设置图片旋转动画
.rotate{
        -webkit-animation:rotateImg 1s linear infinite;
        width: 50px;
        height: 50px;
        vertical-align: middle;
    }
    @keyframes rotateImg {
        0% {transform : rotate(0deg);}
        100% {transform : rotate(360deg);}
    }
    @-webkit-keyframes rotateImg {
        0%{-webkit-transform : rotate(0deg);}
        100%{-webkit-transform : rotate(360deg);}
    }
——————————————————————————————————————————
4、再按一次退出APP:
function exitApp() {
        api.addEventListener({
            name: 'keyback'
        }, function(ret, err) {
            api.toast({
                msg: '再按一次退出',
                duration: 2000,
                location: 'bottom'
            });
            api.addEventListener({
                name: 'keyback'
            }, function(ret, err) {
                api.closeWidget({
                    silent: true
                });
            });
            setTimeout(function() {
                exitApp();
            }, 2000);
        });
    }
——————————————————————————————————————————
5、电商抢购倒计时效果:
首先引入js
<script type="text/javascript" src="../script/jquery.min.js"></script>
<script type="text/javascript" src="../script/timer-simple-seconds.js"></script>
布局里显示
.timer-simple-seconds,.day,.hour,.minute,.second{
        font-size:14px;
        color: #2BBC5B;
    }


<div class="timer-simple-seconds" timer="3600">
     <span class="day">00</span>:
     <span class="hour">00</span>:
     <span class="minute">00</span>:
     <span class="second">00</span>
</div>
timer就是秒数。
两个js下载地址:https://download.csdn.net/download/androidstudioo/10342550
——————————————————————————————————————————
6、textarea标签去掉右下角可拉伸按钮。
resize: none;——————————————————————————————————————————
7、img标签的边距问题。
消除2个img标签的左右间距问题:去除空格就行了
<img src="" alt="" class="pic"><img src="" alt="" class="pic1">

底部边距问题,设置父布局,比如div的font-size: 0即可
——————————————————————————————————————————
8、input textarea标签placeholder字体颜色调整。
.edit::-webkit-input-placeholder {
            color: #f00;
        }
edit就是class
——————————————————————————————————————————
9、设置input只能输入正整数
<input type="tel" placeholder="请输入购买数量" onkeyup="if(this.value.length==1){this.value=this.value.replace(/[^1-9]/g,'')}else{this.value=this.value.replace(/\D/g,'')}" onafterpaste="if(this.value.length==1){this.value=this.value.replace(/[^1-9]/g,'')}else{this.value=this.value.replace(/\D/g,'')}">——————————————————————————————————————————
10、设置文本内容过长时显示省略号
.text{
          overflow: hidden;
          text-overflow: ellipsis;
          display: -webkit-box;
          -webkit-line-clamp:1;
          -webkit-box-orient:vertical
        }
——————————————————————————————————————————
11、设置图片旋转180°
-webkit-transform: rotate(180deg);
transform: rotate(180deg);
——————————————————————————————————————————
12、软键盘右下角显示搜索按钮
type="search"//设置一下type,但是右边会出现一个小叉号,在有的手机上奇丑无比,可以去掉
input[type=search]::-webkit-search-cancel-button {
            -webkit-appearance: none;
        }
//如果想要换成自定义的图标呢?再加上:
position: relative;
height: 18px;
width: 18px;
background-image: url(../image/icon_delete.png);
background-repeat: no-repeat;
background-position: center;
background-size: contain;
//那搜索按钮点击事件监听呢?
document.onkeyup = function(e) {
            if (e.keyCode == '13') {
                $api.byId('search').blur();//点击搜索后让软键盘消失
            }
        }

//如果想让ios上软键盘显示搜索按键,需要用form嵌套起来
<form>
    <input type="search" id="search">
</form>
//去掉ios上input的默认自带lowB样式:
-webkit-appearance: none;
——————————————————————————————————————————
13、实现水平居中的常用几种方式
//对于行内元素:
text-align:center;
//对于已知宽度的元素:
margin:auto;
//对于未知宽度的元素:
display: table;
margin: auto;
//通过相对定位:
position: relative;
left: 50%;
transform: translateX(-50%);
——————————————————————————————————————————
14、自定义单选或者多选的图标:如下图:
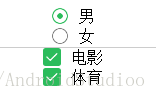
文字前面都是图片资源,可自行替换。
单选:
<div style="width:100px;margin:auto;text-align:center">
     <input type="radio" id="radio1" name="radio" checked="" />
     <label for="radio1">男</label>
</div>
<div style="width:100px;margin:auto;text-align:center">
     <input type="radio" id="radio2" name="radio" />
     <label for="radio2">女</label>
</div>
样式:
label {
            height: 20px;
            line-height: 20px
        }

        input {
            display: none;
        }

        input[type="radio"]+label:after {
            content: "";
            float: left;
            width: 18px;
            height: 18px;
            background-image: url(../image/radio_unselected.png);
            background-repeat: no-repeat;
            background-size: contain;
            margin-right: 10px;
        }

        input[type="radio"]:checked+label:after {
            float: left;
            background-image: url(../image/radio_selected.png);
            background-repeat: no-repeat;
            background-size: contain;
        }
多选:
<div style="width:100px;margin:auto;text-align:center">
     <input type="checkbox" id="checkbox1" />
     <label for="checkbox1">电影</label>
</div>
<div style="width:100px;margin:auto;text-align:center">
     <input type="checkbox" id="checkbox2" />
     <label for="checkbox2">体育</label>
</div>
样式:
input[type="checkbox"]+label:after {
            content: "";
            float: left;
            width: 18px;
            height: 18px;
            background-image: url(../image/checkbox_unselected.png);
            background-repeat: no-repeat;
            background-size: contain;
            margin-right: 10px;
        }

        input[type="checkbox"]:checked+label:after {
            float: left;
            background-image: url(../image/checkbox_selected.png);
            background-repeat: no-repeat;
            background-size: contain;
        }
——————————————————————————————————————————
15、移动端html上传文件,通过input type=file来实现,修改一下样式就行了
<div class="file-box">
    <input type="file" class="file-btn" />
    <div style="font-size:14px">上传文件</div>
</div>
css样式:
.file-box {
            display: table;
            position: relative;
            margin: auto;
            padding: 3px 5px;
            overflow: hidden;
            color: #fff;
            background-color: #ccc;
            margin-top: 10px;
        }

        .file-btn {
            position: absolute;
            width: 100%;
            height: 100%;
            top: 0;
            left: 0;
            outline: none;
            background-color: transparent;
            filter: alpha(opacity=0);
            opacity: 0;
        }
回调:
$("input[type='file']").change(function() {
        var file = this.files[0]; //file.name获取文件名
        if (window.FileReader) {
            var reader = new FileReader();
            reader.readAsDataURL(file);
            //监听文件读取结束后事件
            reader.onloadend = function(e) {
                console.log(e.target.result);
            };
        }
    });
通过回调e.target.result处理一下可以拿到base64字符串传给后台,后台进行解析还原一下,实在想不到别的办法来拿到文件的路径了,如果有知道的大佬,麻烦私信我一下,谢谢
——————————————————————————————————————————
16、html 0.5px的实现
.line {
            margin-top: 10px
        }

        .line:after {
            position: absolute;
            content: '';
            width: 100%;
            height: 1px;
            background-color: #f00;
            -webkit-transform: scale(1, .5);
            transform: scale(1, .5);
            -webkit-transform-origin: center bottom;
            transform-origin: center bottom
        }
——————————————————————————————————————————
17、图片加载过程中先显示默认图片,如果显示失败,也显示默认图片
事先用一个背景样式来显示加载过程中的图片
.swiper-slide{
          background-image: url(../image/default.png);
          background-repeat: no-repeat;
          background-size: contain;
        }
<img class="swiper-slide" src="url" onerror="this.src='../image/default.png'">——————————————————————————————————————————
18、通过css样式来实现一个箭头(通过旋转角度改变指向)
.arrow{
  width: 20rpx;
  height: 20rpx;
  margin: 30rpx;
  border-right: 1px solid #f00;
  border-bottom: 1px solid #f00;
  -webkit-transform: rotate(-45deg);
  transform: rotate(-45deg);
}
——————————————————————————————————————————
19、js对数组的常用操作:
push:在数组末尾位置添加项
unshift:在数组开头位置添加项
.concat:数组合并
.slice(start,end):数组分割,不包含end下标,不会改变原数组
.splice(index,1):去掉index下标的元素,会改变原数组
——————————————————————————————————————————
20、设置渐变色(默认上下渐变)
background: linear-gradient(to right,#fff 30%,#f00);——————————————————————————————————————————
21、实时监听input中的值:
$('#edit').bind('input propertychange', function() {
            if ($(this).val().length == 0) {
                $api.html($api.byId('button'), '不可用');
            } else {
                $api.html($api.byId('button'), '可用');
            }
        });