一、前言
这里是参考鸿洋_大神的博客写的,觉得大神将自定义控件分为View与ViewGroup来写很有助与我们的学习,能够起到一个对比分析的作用,这里我也仅仅是将两者结合起来,并对鸿洋大神在viewgroup代码中一点点忽略的地方加了点小小改动,总之非常谢谢大神带来的帮助,写此博客希望大家一起成长学习。
二、自定义View
(1)自定义View步骤
1)、在res/values/ 下建立一个attrs.xml,自定义View的属性
2)、在View的构造方法中获得我们自定义的属性
3)、重写onMesure 方法
4)、重写onDraw方法
自定义view属性代码如下:
<?xml version="1.0" encoding="utf-8"?>
<resources>
    <!--字体-->
    <attr name="titleText" format="string" />
    <!--字体颜色-->
    <attr name="titleTextColor" format="color" />
    <!--字体大小-->
    <attr name="titleTextSize" format="dimension" />
    <declare-styleable name="CustomTitleView">
        <attr name="titleText" />
        <attr name="titleTextColor" />
        <attr name="titleTextSize" />
    </declare-styleable>
</resources>
然后就可以在自定义view中获取和设置这些属性值了,具体自定义view代码如下:
public class CustomTitleView extends View
{
    //文本
    private String mTitleText;
    //文本的颜色
    private int mTitleTextColor;
    //文本的大小
    private int mTitleTextSize;
    // 绘制时控制文本绘制的范围
    private Rect mBound;
    //画笔
    private Paint mPaint;
    public CustomTitleView(Context context, AttributeSet attrs)
    {
        this(context, attrs, 0);
    }
    public CustomTitleView(Context context)
    {
        this(context, null);
    }
    /**
     * 获得我自定义的样式属性
     * @param context
     * @param attrs
     * @param defStyle
     */
    public CustomTitleView(Context context, AttributeSet attrs, int defStyle)
    {
        super(context, attrs, defStyle);
        /**
         * 获得我们所定义的自定义样式属性
         */
        TypedArray a = context.getTheme().obtainStyledAttributes(attrs, R.styleable.CustomTitleView, defStyle, 0);
        int n = a.getIndexCount();
        for (int i = 0; i < n; i++)
        {
            int attr = a.getIndex(i);
            switch (attr)
            {
            case R.styleable.CustomTitleView_titleText:
                mTitleText = a.getString(attr);
                break;
            case R.styleable.CustomTitleView_titleTextColor:
                // 默认颜色设置为黑色
                mTitleTextColor = a.getColor(attr, Color.BLACK);
                break;
            case R.styleable.CustomTitleView_titleTextSize:
                // 默认设置为16sp,TypeValue也可以把sp转化为px
                mTitleTextSize = a.getDimensionPixelSize(attr, (int) TypedValue.applyDimension(
                        TypedValue.COMPLEX_UNIT_SP, 16, getResources().getDisplayMetrics()));
                break;
            }
        }
        a.recycle();
        /**
         * 获得绘制文本的宽和高
         */
        mPaint = new Paint();
        mPaint.setTextSize(mTitleTextSize);
        // mPaint.setColor(mTitleTextColor);
        mBound = new Rect();
        mPaint.getTextBounds(mTitleText, 0, mTitleText.length(), mBound);
        this.setOnClickListener(new OnClickListener()
        {
            @Override
            public void onClick(View v)
            {
                mTitleText = randomText();
                postInvalidate();
            }
        });

    }
    private String randomText()
    {
        Random random = new Random();
        Set<Integer> set = new HashSet<Integer>();
        while (set.size() < 4)
        {
            int randomInt = random.nextInt(10);
            set.add(randomInt);
        }
        StringBuffer sb = new StringBuffer();
        for (Integer i : set)
        {
            sb.append("" + i);
        }
        return sb.toString();
    }
    @Override
    protected void onMeasure(int widthMeasureSpec, int heightMeasureSpec)
    {
        // super.onMeasure(widthMeasureSpec, heightMeasureSpec);

        int width = 0;
        int height = 0;
        /**
         * 设置宽度
         */
        int specMode = MeasureSpec.getMode(widthMeasureSpec);
        int specSize = MeasureSpec.getSize(widthMeasureSpec);
        switch (specMode)
        {
        case MeasureSpec.EXACTLY:// 明确指定了
            width = getPaddingLeft() + getPaddingRight() + specSize;
            break;
        case MeasureSpec.AT_MOST:// 一般为WARP_CONTENT
            width = getPaddingLeft() + getPaddingRight() + mBound.width();
            break;
        }
        /**
         * 设置高度
         */
        specMode = MeasureSpec.getMode(heightMeasureSpec);
        specSize = MeasureSpec.getSize(heightMeasureSpec);
        switch (specMode)
        {
        case MeasureSpec.EXACTLY:// 明确指定了
            height = getPaddingTop() + getPaddingBottom() + specSize;
            break;
        case MeasureSpec.AT_MOST:// 一般为WARP_CONTENT
            height = getPaddingTop() + getPaddingBottom() + mBound.height();
            break;
        }

        setMeasuredDimension(width, height);

    }

    @Override
    protected void onDraw(Canvas canvas)
    {
        mPaint.setColor(Color.YELLOW);
        canvas.drawRect(0, 0, getMeasuredWidth(), getMeasuredHeight(), mPaint);
        mPaint.setColor(mTitleTextColor);
        canvas.drawText(mTitleText, getWidth() / 2 - mBound.width() / 2, getHeight() / 2 + mBound.height() / 2, mPaint);
    }
}
自定义view之后就可以在自己的布局文件当中引用了,具体代码如下:
<RelativeLayout xmlns:android="http://schemas.android.com/apk/res/android"
    xmlns:tools="http://schemas.android.com/tools"
    xmlns:custom="http://schemas.android.com/apk/res/com.example.customview01"
    android:layout_width="match_parent"
    android:layout_height="match_parent" >
    <com.example.customview01.view.CustomTitleView
        android:layout_width="200dp"
        android:layout_height="100dp"
        custom:titleText="3712"
        custom:titleTextColor="#ff0000"
        custom:titleTextSize="40sp" />
</RelativeLayout> 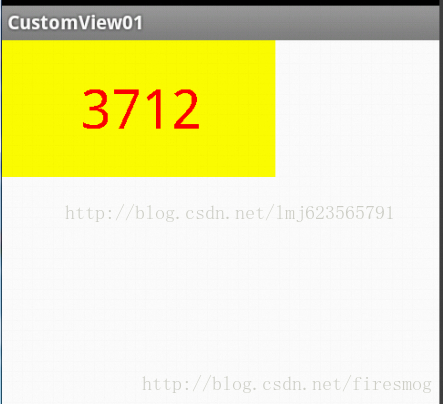
上述自定义view比较简单,主要是为后期自己使用自定义view时不用到处再去找其他博客了。
三、自定义ViewGroup
1、ViewGroup简析
ViewGroup相当于一个放置View的容器,并且我们在写布局xml的时候,会告诉容器(凡是以layout为开头的属性,都是为用于告诉容器的),我们的宽度(layout_width)、高度(layout_height)、对齐方式(layout_gravity)等;当然还有margin等;
ViewGroup的职能为:给childView计算出建议的宽和高和测量模式 ;决定childView的位置;为什么只是建议的宽和高,而不是直接确定呢,别忘了childView宽和高可以设置为wrap_content,这样只有childView才能计算出自己的宽和高。
2、View简析
View的职责,根据测量模式和ViewGroup给出的建议的宽和高,计算出自己的宽和高;同时还有个更重要的职责是:在ViewGroup为其指定的区域内绘制自己的形态。
3、ViewGroup和LayoutParams之间的关系
大家可以回忆一下,当在LinearLayout中写childView的时候,可以写layout_gravity,layout_weight属性;在RelativeLayout中的childView有layout_centerInParent属性,却没有layout_gravity,layout_weight,这是为什么呢?这是因为每个ViewGroup需要指定一个LayoutParams,用于确定支持childView支持哪些属性,比如LinearLayout指定LinearLayout.LayoutParams等。如果大家去看LinearLayout的源码,会发现其内部定义了LinearLayout.LayoutParams,在此类中,你可以发现weight和gravity的身影。
4、View的3种测量模式
上面提到了ViewGroup会为childView指定测量模式,下面简单介绍下三种测量模式:
EXACTLY:表示设置了精确的值,一般当childView设置其宽、高为精确值、match_parent时,ViewGroup会将其设置为EXACTLY;
AT_MOST:表示子布局被限制在一个最大值内,一般当childView设置其宽、高为wrap_content时,ViewGroup会将其设置为AT_MOST;
UNSPECIFIED:表示子布局想要多大就多大,一般出现在AadapterView的item的heightMode中、ScrollView的childView的heightMode中;此种模式比较少见。
注:上面的每一行都有一个一般,意思上述不是绝对的,对于childView的mode的设置还会和ViewGroup的测量mode有一定的关系;当然了,这是第一篇自定义ViewGroup,而且绝大部分情况都是上面的规则,所以为了通俗易懂,暂不深入讨论其他内容。
5、从API角度进行浅析
上面叙述了ViewGroup和View的职责,下面从API角度进行浅析。
View的根据ViewGroup传人的测量值和模式,对自己宽高进行确定(onMeasure中完成),然后在onDraw中完成对自己的绘制。
ViewGroup需要给View传入view的测量值和模式(onMeasure中完成),而且对于此ViewGroup的父布局,自己也需要在onMeasure中完成对自己宽和高的确定。此外,需要在onLayout中完成对其childView的位置的指定。

6、自定义viewgroup实例
需求:我们定义一个ViewGroup,内部可以传入0到4个childView,分别依次显示在左上角,右上角,左下角,右下角。(紧紧贴在四个角落上、并无margin间隙)。
自定义ViewGroup的类代码如下:
public class CustomImgContainer extends ViewGroup
{
    private static final String TAG = "CustomImgContainer";
    public CustomImgContainer(Context context, AttributeSet attrs, int defStyle)
    {
        super(context, attrs, defStyle);
    }
    public CustomImgContainer(Context context)
    {
        super(context);
    }

    public CustomImgContainer(Context context, AttributeSet attrs)
    {
        super(context, attrs);
    }
    /**
     * 计算所有ChildView的宽度和高度 然后根据ChildView的计算结果,设置自己的宽和高
     */
    @Override
    protected void onMeasure(int widthMeasureSpec, int heightMeasureSpec)
    {
        /**
         * 获得此ViewGroup上级容器为其推荐的宽和高(对应matchparent),以及计算模式
         */
        int widthMode = MeasureSpec.getMode(widthMeasureSpec);
        int heightMode = MeasureSpec.getMode(heightMeasureSpec);
        int sizeWidth = MeasureSpec.getSize(widthMeasureSpec);
        int sizeHeight = MeasureSpec.getSize(heightMeasureSpec);
        // 计算出所有的childView的宽和高
        measureChildren(widthMeasureSpec, heightMeasureSpec);
        /**
         * 记录如果是wrap_content是设置的宽和高
         */
        int width = 0;
        int height = 0;

        int cCount = getChildCount();

        int cWidth = 0;
        int cHeight = 0;
        MarginLayoutParams cParams = null;

        // 用于计算左边两个childView的高度
        int lHeight = 0;
        // 用于计算右边两个childView的高度,最终高度取二者之间大值
        int rHeight = 0;

        // 用于计算上边两个childView的宽度
        int tWidth = 0;
        // 用于计算下面两个childiew的宽度,最终宽度取二者之间大值
        int bWidth = 0;

        /**
         * 根据childView计算的出的宽和高,以及设置的margin计算容器的宽和高,主要用于容器是warp_content时
         */
        for (int i = 0; i < cCount; i++)
        {
            View childView = getChildAt(i);
            cWidth = childView.getMeasuredWidth();
            cHeight = childView.getMeasuredHeight();
            cParams = (MarginLayoutParams) childView.getLayoutParams();
            // 上面两个childView
            if (i == 0 || i == 1)
            {
                tWidth += cWidth + cParams.leftMargin + cParams.rightMargin;
            }

            if (i == 2 || i == 3)
            {
                bWidth += cWidth + cParams.leftMargin + cParams.rightMargin;
            }

            if (i == 0 || i == 2)
            {
                lHeight += cHeight + cParams.topMargin + cParams.bottomMargin;
            }

            if (i == 1 || i == 3)
            {
                rHeight += cHeight + cParams.topMargin + cParams.bottomMargin;
            }

        }

        width = Math.max(tWidth, bWidth);
        height = Math.max(lHeight, rHeight);

        /**
         * 如果是wrap_content设置为我们计算的值
         * 否则:直接设置为父容器计算的值
         */
        setMeasuredDimension((widthMode == MeasureSpec.EXACTLY) ? sizeWidth
                : width, (heightMode == MeasureSpec.EXACTLY) ? sizeHeight
                : height);
    }

    // abstract method in viewgroup
    @Override
    protected void onLayout(boolean changed, int l, int t, int r, int b)
    {
        int cCount = getChildCount();
        int cWidth = 0;
        int cHeight = 0;
        MarginLayoutParams cParams = null;
        /**
         * 遍历所有childView根据其宽和高,以及margin进行布局
         */
        for (int i = 0; i < cCount; i++)
        {
            View childView = getChildAt(i);
            cWidth = childView.getMeasuredWidth();
            cHeight = childView.getMeasuredHeight();
            cParams = (MarginLayoutParams) childView.getLayoutParams();
            int cl = 0, ct = 0, cr = 0, cb = 0;
            switch (i)
            {
            case 0:
                cl = cParams.leftMargin;
                ct = cParams.topMargin;
                break;
            case 1:
            //这里可以自己画图试试
                cl = getWidth() - cWidth
                        - cParams.rightMargin;
                ct = cParams.topMargin;
                break;
            case 2:
                cl = cParams.leftMargin;
                ct = getHeight() - cHeight - cParams.bottomMargin;
                break;
            case 3:
                cl = getWidth() - cWidth- cParams.rightMargin;
                ct = getHeight() - cHeight - cParams.bottomMargin;
                break;
            }
            cr = cl + cWidth;
            cb = cHeight + ct;
            childView.layout(cl, ct, cr, cb);
        }

    }

    @Override
    public LayoutParams generateLayoutParams(AttributeSet attrs)
    {
        return new MarginLayoutParams(getContext(), attrs);
    }

    @Override
    protected LayoutParams generateDefaultLayoutParams()
    {
        Log.e(TAG, "generateDefaultLayoutParams");
        return new MarginLayoutParams(LayoutParams.MATCH_PARENT,
                LayoutParams.MATCH_PARENT);
    }

    @Override
    protected LayoutParams generateLayoutParams(
            LayoutParams p)
    {
        Log.e(TAG, "generateLayoutParams p");
        return new MarginLayoutParams(p);
    }

    /*
     * if (heightMode == MeasureSpec.UNSPECIFIED)
        {
            int tmpHeight = 0 ;
            LayoutParams lp = getLayoutParams();
            if (lp.height == LayoutParams.MATCH_PARENT)
            {
                Rect outRect = new Rect();
                getWindowVisibleDisplayFrame(outRect);
                tmpHeight = outRect.height();
            }else
            {
                tmpHeight = getLayoutParams().height ;
            }
            height = Math.max(height, tmpHeight);
        }
     */
}
布局文件如下:
<example.com.mydemo.CustomImgContainer xmlns:android="http://schemas.android.com/apk/res/android"
    xmlns:tools="http://schemas.android.com/tools"
    android:layout_width="wrap_content"
    android:layout_height="wrap_content"
    android:background="#AA333333" >

    <TextView
        android:layout_width="150dp"
        android:layout_height="150dp"
        android:background="#E5ED05"
        android:gravity="center"
        android:layout_margin="0dp"
        android:text="0"
        android:textColor="#FFFFFF"
        android:textSize="22sp"
        android:textStyle="bold" />

    <TextView
       android:layout_margin="0dp"
        android:layout_width="50dp"
        android:layout_height="50dp"
        android:background="#00ff00"
        android:gravity="center"
        android:text="1"
        android:textColor="#FFFFFF"
        android:textSize="22sp"
        android:textStyle="bold" />

    <TextView
        android:layout_width="50dp"
        android:layout_height="50dp"
        android:background="#ff0000"
        android:gravity="center"
        android:text="2"
        android:textColor="#FFFFFF"
        android:textSize="22sp"
        android:textStyle="bold" />

    <TextView
        android:layout_width="150dp"
        android:layout_height="150dp"
        android:background="#0000ff"
        android:gravity="center"
        android:text="3"
        android:textColor="#FFFFFF"
        android:textSize="22sp"
        android:textStyle="bold" />

</example.com.mydemo.CustomImgContainer>