本文参考了【张鸿洋的博客】: Android 手把手教您自定义ViewGroup(一)和Android 自定义ViewGroup 实战篇 -> 实现FlowLayout
在很多应用里面,我们能看到类似于这样的流式
用现有的控件我们实现这种动态适应的布局很麻烦,对于如何比较简单的去实现这种布局,就需要我们去自定义ViewGroup了
实现步骤
一、新建一个FlowLayout类,继承ViewGroup,并重写generateLayoutParams方法
重写generateLayoutParams是为了设置布局的LayoutParams,在这里,我们用系统的MarginLayoutParams就可以了
 //设置布局的LayoutParams,用系统的MarginLayoutParams就行
    @Override
    public LayoutParams generateLayoutParams(AttributeSet attrs) {
        return new MarginLayoutParams(getContext(), attrs);
    }
二、重写onMeasure方法
重写onMeasure方法是为了根据子控件去计算布局的宽高,并进行设置
 //根据childView的高宽,计算布局的宽高,并进行设置
    @Override
    protected void onMeasure(int widthMeasureSpec, int heightMeasureSpec) {
        super.onMeasure(widthMeasureSpec, heightMeasureSpec);
        //获取布局的父容器为它设置的测量模式和大小
        int widthSize = MeasureSpec.getSize(widthMeasureSpec);
        int widthMode = MeasureSpec.getMode(widthMeasureSpec);
        int heightSize = MeasureSpec.getSize(heightMeasureSpec);
        int heightMode = MeasureSpec.getMode(heightMeasureSpec);

        //最后计算的布局宽高
        int width = 0, height = 0;
        //每一行的宽高
        int lineWidth = 0, lineHeight = 0;
        //循环childView
        for (int i = 0, count = getChildCount(); i < count; i++) {
            View view = getChildAt(i);
            //计算当前childView的高和宽
            measureChild(view, widthMeasureSpec, heightMeasureSpec);
            //得到childView的LayoutParams
            MarginLayoutParams params = (MarginLayoutParams) view.getLayoutParams();
            //得到childView所占的宽度和高度
            int childWidth = view.getMeasuredWidth() + params.leftMargin + params.rightMargin;
            if (childWidth > widthSize) {
                params.width = widthSize - params.leftMargin - params.rightMargin;
                view.setLayoutParams(params);
                measureChild(view, widthMeasureSpec, heightMeasureSpec);
            }
            params = (MarginLayoutParams) view.getLayoutParams();
            childWidth = view.getMeasuredWidth() + params.leftMargin + params.rightMargin;
            int childHeight = view.getMeasuredHeight() + params.topMargin + params.bottomMargin;

            //如果加入当前childView的宽度会超出父容器计算的宽度话,则需要开启新的一行,累加height
            //否则累加当前行的宽高
            if (lineWidth + childWidth > widthSize) {
                //取宽度最大值
                width = Math.max(lineWidth, childWidth);
                //累加height
                height += lineHeight;
                //记录下一行的宽高
                lineWidth = childWidth;
                lineHeight = childHeight;
            } else {
                lineWidth += childWidth;
                lineHeight = Math.max(lineHeight, childHeight);
            }

            //如果是最后一个,则将当前行的宽度与width做比较,累加height
            if (i == count - 1) {
                width = Math.max(lineWidth, width);
                height += lineHeight;
            }
        }

        //设置布局的宽高
        setMeasuredDimension((widthMode == MeasureSpec.EXACTLY ? widthSize : width),
                (heightMode == MeasureSpec.EXACTLY ? heightSize : height));
    }
三、重写onLayout方法
重写onLayout方法是为了对布局所有的子控件进行重新排版,对他们的位置进行设置
//对所有的childView位置和大小进行设置
    @Override
    protected void onLayout(boolean changed, int l, int t, int r, int b) {
        int widht = getWidth();
        int height = getHeight();

        //记录的高度
        int recordHeight = 0;
        //每行的宽高
        int lineWidth = 0, lineHeight = 0;
        //每个childView的坐标
        int left = 0, top = 0, right = 0, bottom = 0;
        //循环childView
        for (int i = 0, count = getChildCount(); i < count; i++) {
            View view = getChildAt(i);
            //得到childView的LayoutParams
            MarginLayoutParams params = (MarginLayoutParams) view.getLayoutParams();
            //得到childView宽高
            int childWidth = view.getMeasuredWidth();
            int childHeight = view.getMeasuredHeight();
            if (childWidth + params.leftMargin + params.rightMargin + lineWidth > widht) {
                recordHeight = recordHeight + lineHeight;
                left = params.leftMargin;
                right = left + childWidth;
                top = recordHeight + params.topMargin;
                bottom = top + childHeight;
                lineWidth = childWidth + params.leftMargin + params.rightMargin;
                lineHeight = childHeight + params.topMargin + params.bottomMargin;
            } else {
                left = lineWidth + params.leftMargin;
                right = left + childWidth;
                top = recordHeight + params.topMargin;
                bottom = top + childHeight;
                lineWidth = lineWidth + childWidth + params.leftMargin + params.rightMargin;
                lineHeight = Math.max(lineHeight, childHeight + params.topMargin + params.bottomMargin);
            }
            view.layout(left, top, right, bottom);
        }
    }
四、代码中使用
至此,我们的流式布局已经写完,现在去用他进行布局
布局文件activity_main.xml
<?xml version="1.0" encoding="utf-8"?>
<LinearLayout
    xmlns:android="http://schemas.android.com/apk/res/android"
    xmlns:tools="http://schemas.android.com/tools"
    android:layout_width="match_parent"
    android:layout_height="match_parent"
    android:orientation="vertical"
    tools:context="com.krubo.flowlayout.MainActivity">

    <com.krubo.flowlayout.FlowLayout
        android:layout_width="match_parent"
        android:layout_height="wrap_content">

        <TextView
            android:layout_width="wrap_content"
            android:layout_height="wrap_content"
            android:layout_margin="5dp"
            android:background="#dddddd"
            android:text="遍历所有的childView"/>

        <TextView
            android:layout_width="wrap_content"
            android:layout_height="wrap_content"
            android:layout_margin="5dp"
            android:background="#dddddd"
            android:text="用于设置allViews的值"/>

        <TextView
            android:layout_width="wrap_content"
            android:layout_height="wrap_content"
            android:layout_margin="5dp"
            android:background="#dddddd"
            android:text="根据"/>

        <TextView
            android:layout_width="wrap_content"
            android:layout_height="wrap_content"
            android:layout_margin="5dp"
            android:background="#dddddd"
            android:text="childView"/>

        <TextView
            android:layout_width="wrap_content"
            android:layout_height="wrap_content"
            android:layout_margin="5dp"
            android:background="#dddddd"
            android:text="所有的"/>

        <TextView
            android:layout_width="wrap_content"
            android:layout_height="wrap_content"
            android:layout_margin="5dp"
            android:background="#dddddd"
            android:text="遍历"/>

        <TextView
            android:layout_width="wrap_content"
            android:layout_height="wrap_content"
            android:layout_margin="5dp"
            android:background="#dddddd"
            android:text="到此完成了所有的childView的绘制区域的确定,到此,我们的FlowLayout的代码也结束了~~静下心来看一看是不是也不难"/>

        <TextView
            android:layout_width="wrap_content"
            android:layout_height="wrap_content"
            android:layout_margin="5dp"
            android:background="#dddddd"
            android:text="静下心"/>

        <TextView
            android:layout_width="wrap_content"
            android:layout_height="wrap_content"
            android:layout_margin="5dp"
            android:background="#dddddd"
            android:text="用于设置allViews的值"/>

        <TextView
            android:layout_width="wrap_content"
            android:layout_height="wrap_content"
            android:layout_margin="5dp"
            android:background="#dddddd"
            android:text="根据"/>

        <TextView
            android:layout_width="wrap_content"
            android:layout_height="wrap_content"
            android:layout_margin="5dp"
            android:background="#dddddd"
            android:text="childView"/>

        <TextView
            android:layout_width="wrap_content"
            android:layout_height="wrap_content"
            android:layout_margin="5dp"
            android:background="#dddddd"
            android:text="所有的"/>

        <TextView
            android:layout_width="wrap_content"
            android:layout_height="wrap_content"
            android:layout_margin="5dp"
            android:background="#dddddd"
            android:text="遍历"/>
    </com.krubo.flowlayout.FlowLayout>
</LinearLayout>
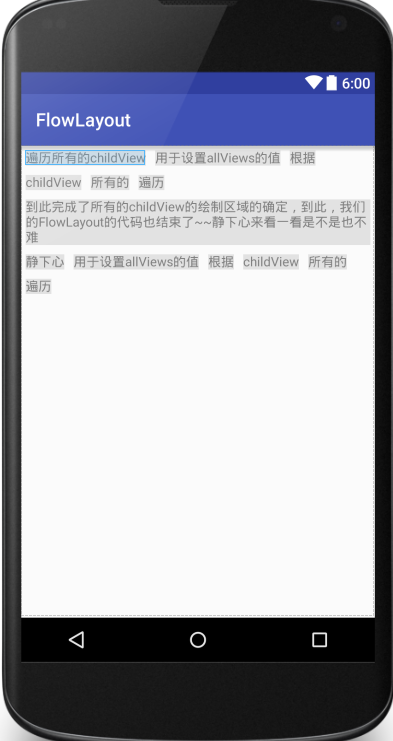
运行后的效果图如下