简述
mail 命令是 Linux 下一个非常轻巧的交互式的命令行邮件客户端,基于 Berkeley Mail 8.1,提供 MIME、MAP、POP3、SMTP 和 S/MIME 等扩展
mail 默认是调用本机 MTA 发送邮件的,这意味着需要在本机上安装 sendmail 或 postfix 或 exim 或…,配置比较麻烦,而且会带来不必要的资源占用。
通过修改配置文件,可以达到不使用 sendmail 而用外部 smtp 服务器发送邮件的目的。
命令介绍
-
命令名称
mail/mailx -
基本语法
常用选项的简化语法可能包括:mail [-s subject] [-c cc-addr] to-addr . . . -
功能描述
发送和接收网络邮件
命令选项
| 选项 | 说明 |
|---|---|
-b address |
指定密件副本的收信人地址 |
-c address |
指定副本的收信人地址 |
-f [file] |
读取指定邮件文件中的邮件 |
-i |
忽略终端发出的信息 |
-I |
使用互动模式 |
-n |
启动时禁止读取 /etc/mail.rc |
-N |
阅读邮件时,不显示邮件的标题 |
-s subject |
指定邮件的主题 |
-t |
要发送的消息应包含带有 To:、Cc:、或 Bcc: 字段的消息头,在命令行上指定的收件人将被忽略。 |
-u user |
读取指定用户的邮件 |
-v |
执行时,显示详细的信息 |
-V |
显示版本信息并退出 |
mail/mailx
mail 默认指向 mailx,不妨一起来看看:
[root@localhost ~]# which mail
/bin/mail
[root@localhost ~]# ls -l /bin/mail
lrwxrwxrwx. 1 root root 5 8月 30 12:11 /bin/mail -> mailx- 1
- 2
- 3
- 4
- 1
- 2
- 3
- 4
如果没有安装,使用 yum install -y mailx 进行安装。
配置 mail
修改配置文件 /etc/mail.rc
[root@localhost ~]# vi /etc/mail.rc
# 在文件末尾添加以下信息
set from=xxx@163.com  # 发送的邮件地址
set smtp=smtp.163.com  # 发送邮件服务器
set smtp-auth-user=xxx@163.com  # 发件人账号
set smtp-auth-password=xxx  # 发件人密码
set smtp-auth=login # 邮件认证方式- 1
- 2
- 3
- 4
- 5
- 6
- 7
- 1
- 2
- 3
- 4
- 5
- 6
- 7
配置成功后,就可以使用外部 smtp 服务器发送邮件了。
发送邮件
1.标准输入录入邮件信息
直接把当前 shell 当成编辑器来用,可以输入正文,当邮件正文输入完成后,需要按 Ctrl+D 结束输入。
[root@localhost ~]# mail -s "邮件主题" 123456@qq.com
hello  # 邮件正文
world  # 邮件正文
EOT  # 按 Ctrl+D
[root@localhost ~]# - 1
- 2
- 3
- 4
- 5

- 1
- 2
- 3
- 4
- 5
2.管道方式
这种方式用的较多,可能因为我比较喜欢管道。其中 echo 后面的是邮件的正文。
[root@localhost ~]# echo "邮件正文" | mail -s "邮件主题" 123456@qq.com- 1
- 1
以文件 file.txt 的内容为邮件正文发送。
[root@localhost ~]# cat file.txt | mail -s "邮件主题" 123456@qq.com- 1
- 1
3.文件重定向
以文件 file.txt 的内容为邮件正文发送。
[root@localhost ~]# mail -s "邮件主题" 123456@qq.com < file.txt- 1
- 1
注意:如果需要发送给多个收件人,收件人之间用逗号分隔,例如:[email protected],[email protected]。
发送附件
uuencode/uudecode
uuencode 是将二进制文件转换为文本文件的过程,转换后的文件可以通过纯文本 e-mail 进行传输,在接收方对该文件进行 uudecode,即将其转换为初始的二进制文件。
uuencode 包含在 sharutils 包里,需要安装 sharutils:
[root@localhost ~]# yum install -y sharutils- 1
- 1
uuencode 编码后的文件比原文件要大,内容一般是下面形式:
[root@localhost ~]# uuencode file.txt file.txt
begin 644 file.txt
=:&5L;&\@=V]R;&0*"C$Q+C$Q(&ES(&-O;6EN9PH`
`
end
[root@localhost ~]# - 1
- 2
- 3
- 4
- 5
- 6
- 1
- 2
- 3
- 4
- 5
- 6
注意:如果使用 -m 选项,则使用 base64 编码格式。
上面命令行参数第一个 file.txt 是需要编码的文件名,第二个 file.txt 是编码后的文件名(解码时使用)。可以重定向文件,对比一下编码前后的大小:
[root@localhost ~]# uuencode file.txt file.txt > file.txt.uue
[root@localhost ~]# ls -l file.txt file.txt.uue
-rw-r--r--. 1 root root 29 11月 10 15:26 file.txt
-rw-r--r--. 1 root root 67 11月 11 13:35 file.txt.uue- 1
- 2
- 3
- 4
- 1
- 2
- 3
- 4
新建 tmp 目录,把 file.txt.uue 拷贝进去,用 uudecode 对文件解码:
[root@localhost tmp]# uudecode file.txt.uue
[root@localhost tmp]# ls -l
总用量 8
-rw-r--r--. 1 root root 29 11月 11 13:39 file.txt
-rw-r--r--. 1 root root 67 11月 11 13:39 file.txt.uue- 1
- 2
- 3
- 4
- 5
- 1
- 2
- 3
- 4
- 5
解码后的文件名,就是前面编码时输入的第二个 file.txt 参数,文件的权限为 644,也就是编码时默认的 644。
mail 命令结合 uuencode 发送附件
用 mail 命令结合 uuencode 快速发送邮件附件:
[root@localhost ~]# uuencode file.txt file.txt | mail -s "邮件主题" 123456@qq.com- 1
- 1
是不是很简单?这里发了一封内容为空、附件为 file.txt 的邮件。
如果需要包含两个及以上附件,使用下面方式:
[root@localhost ~]# (uuencode file.txt file.txt;uuencode file2.txt file2.txt) | mail -s "邮件主题" 123456@qq.com- 1
- 1
在 Winows 中,用 Outlook、Foxmail 等客户端能自动识别经过 uuencode 编码的附件。如果附件被收取到 Linux/Unix 等系统下,如果 Linux 下的 MUA 或者客户端不识别,可以手工处理邮件提取相应的部分,用 uudecode 解码即可。
脚本
创建一个 send_mail.sh 的脚本,内容如下:
#!/bin/bash

help() {
   echo "eg: $0 [subject] [address] [content_file]"   # 脚本发送格式
   exit 1
}

if [ ! -n "$1" ] ; then
    help
fi

if [ ! -n "$2" ] ; then
    help
else
    mail_to=$2
    echo "Send mail to ${mail_to} ..."
fi

if [ ! -n "$3" ] ; then
    help
else
    mail -s $1 ${mail_to} < $3  # 发送邮件
fi- 1
- 2
- 3
- 4
- 5
- 6
- 7
- 8
- 9
- 10
- 11
- 12
- 13
- 14
- 15
- 16
- 17
- 18
- 19
- 20
- 21
- 22
- 23
- 1
- 2
- 3
- 4
- 5
- 6
- 7
- 8
- 9
- 10
- 11
- 12
- 13
- 14
- 15
- 16
- 17
- 18
- 19
- 20
- 21
- 22
- 23
赋予脚本可执行权限,然后执行:
[root@localhost ~]# ./send_mail.sh "邮件标题" [email protected],[email protected] file.txt
Send mail to 123456@qq.com,888888@qq.com ...
[root@localhost ~]# - 1
- 2
- 3

- 1
- 2
- 3
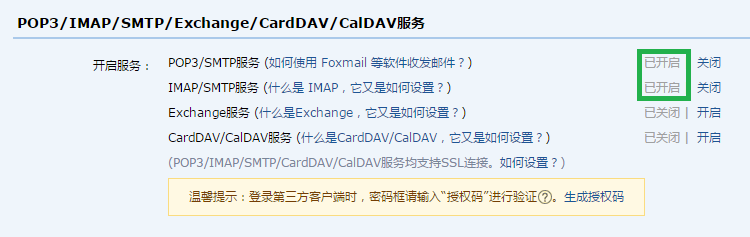
开启服务
出于邮箱安全的考虑,很多邮箱缺省是关闭 POP3/SMTP 服务的,需要登录邮箱设置后开启。
以 QQ 邮箱为例,进入邮箱“设置”,在“帐户”项里就可找到“POP3/SMTP服务”的设置项,进行开启。