前言
Android开发中,常用的第三方网络请求框架有Retrofit,OKHttp,Volley。最近重构项目框架采用的是Kotlin + Retrofit + RxJava,Retrofit的底层实现就是OKHttp实现。本篇文章介绍OKHttp源码执行过程。
请求示例
1.Gradle引入
GRADLE

compile 'com.squareup.okhttp3:okhttp:(insert latest version)'
2.GET请求
OkHttpClient client = new OkHttpClient();

String run(String url) throws IOException {
  Request request = new Request.Builder()
      .url(url)
      .build();

  Response response = client.newCall(request).execute();
  return response.body().string();
}
4.OKHttp请求流程
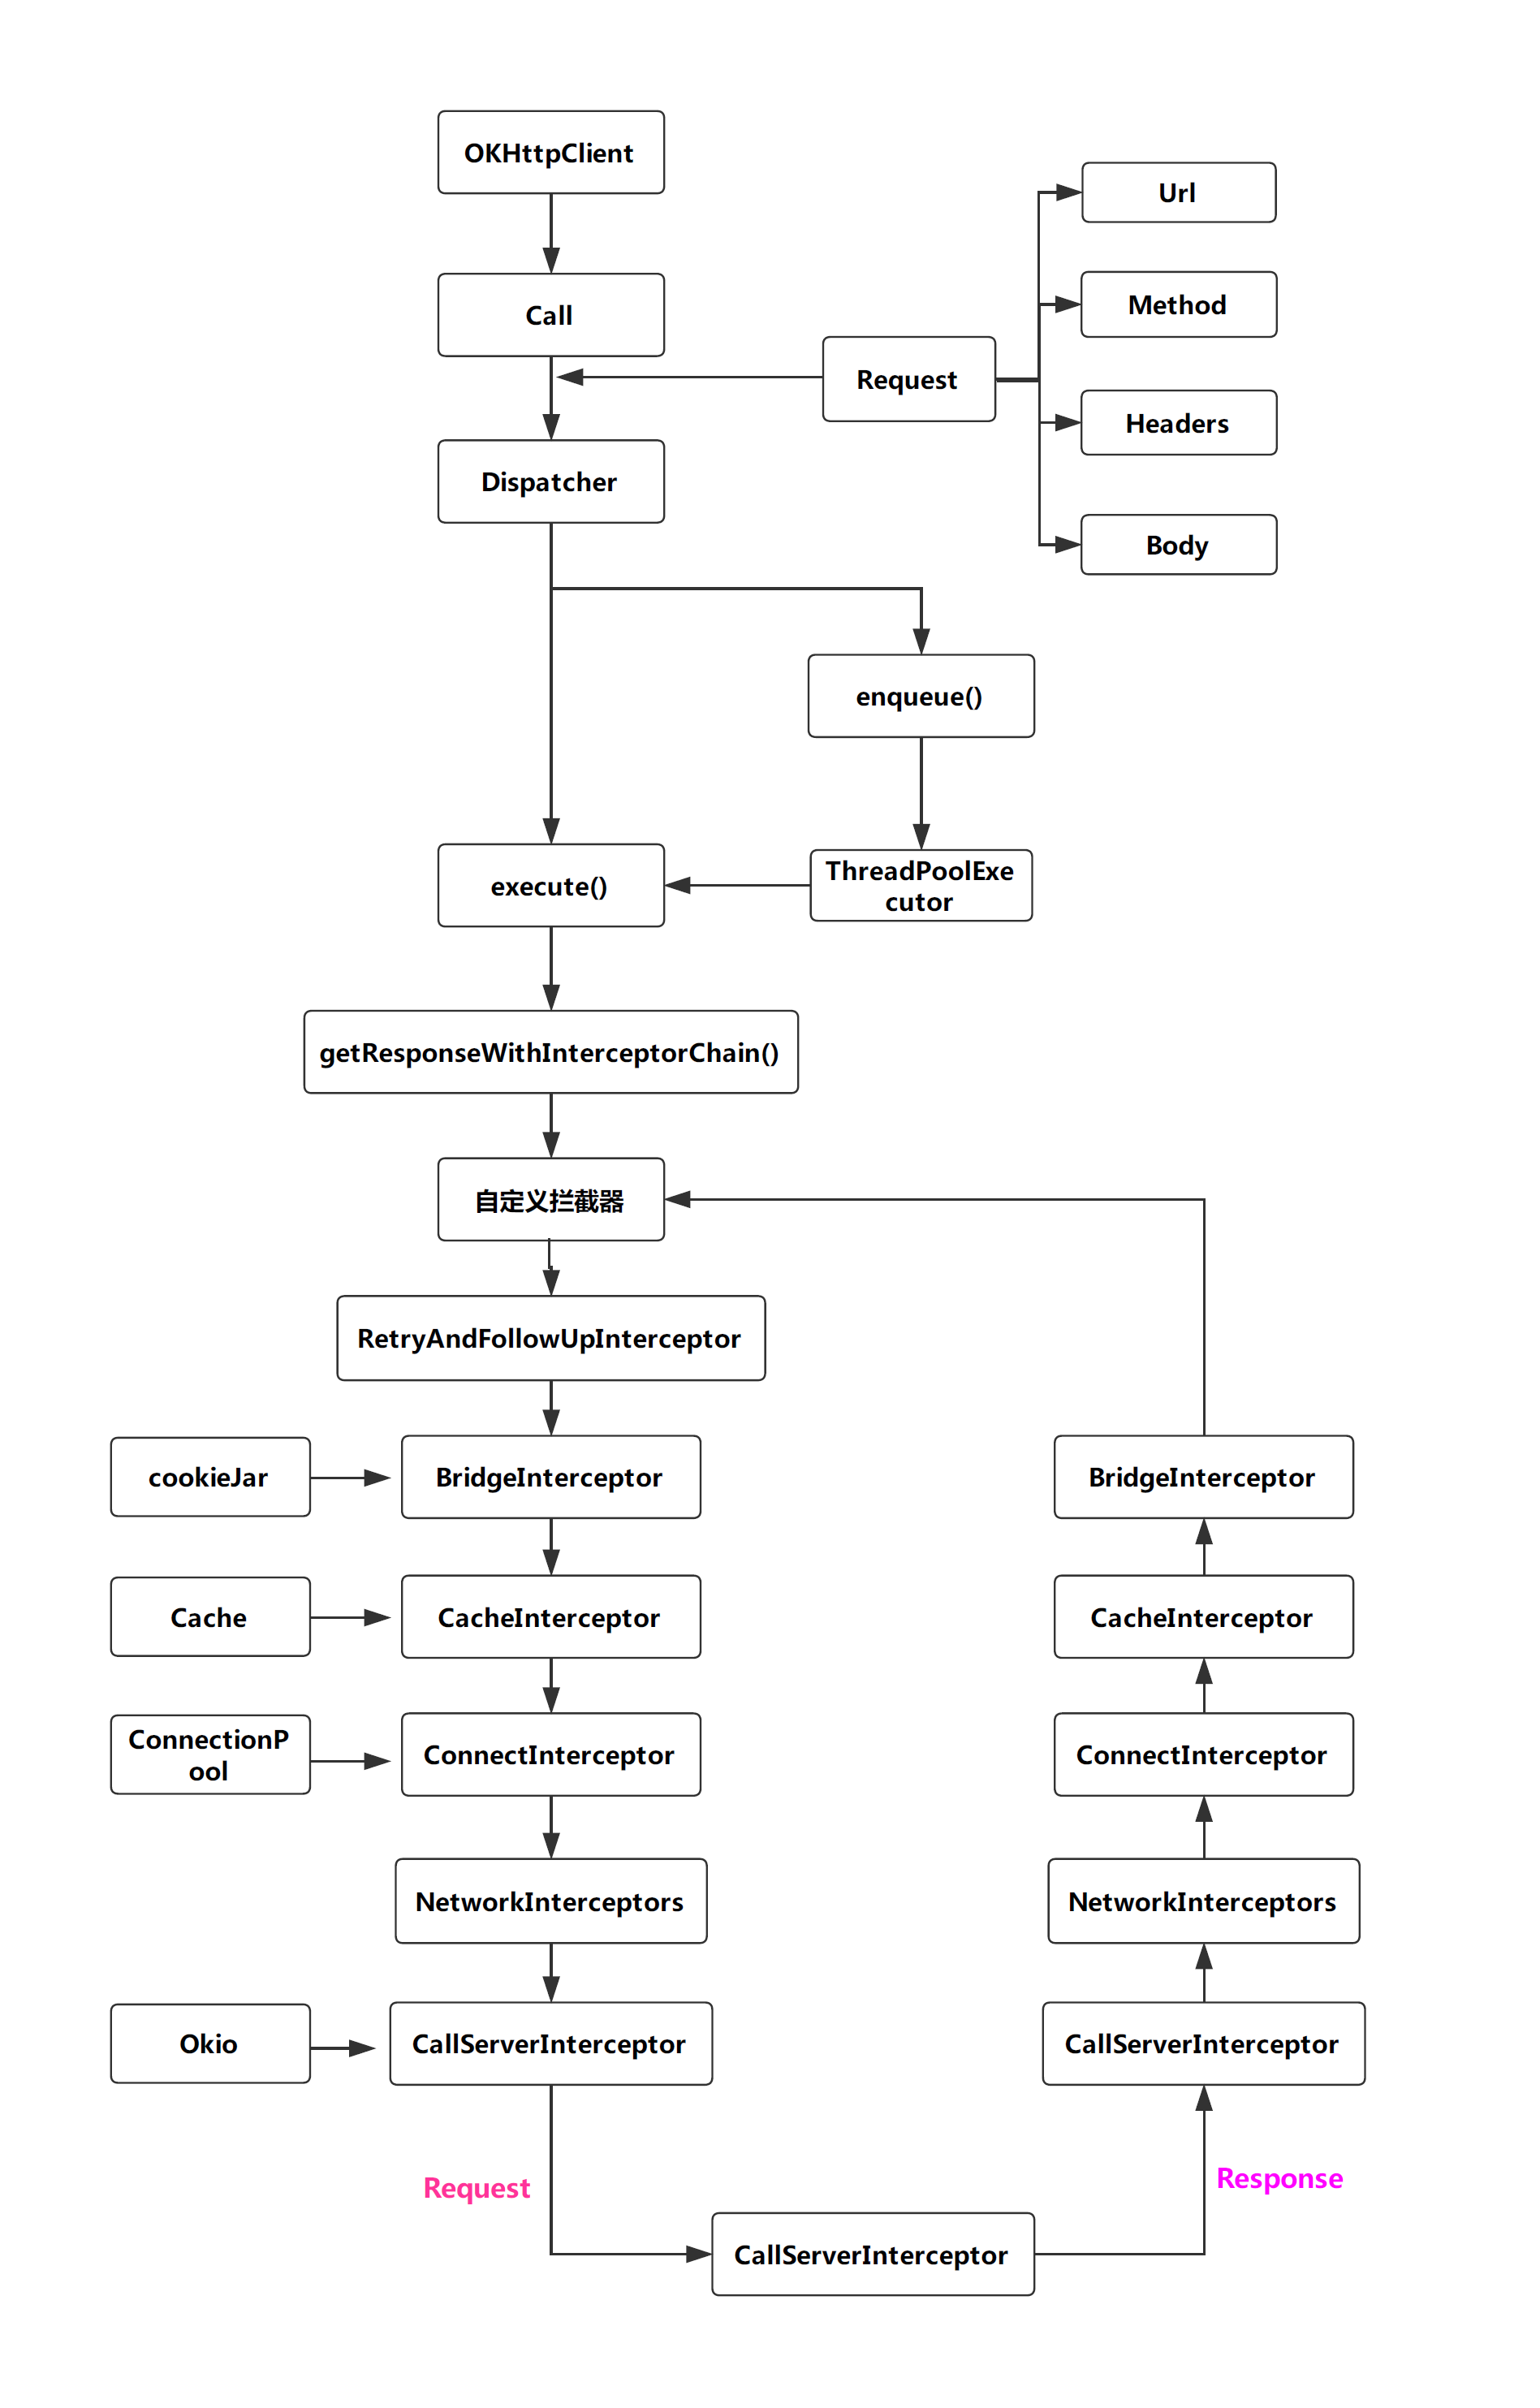
5.源码执行流程
根据上面的执行流程和GET请求,我们来看下源码是如何是如何实现的。
OKHttpClient是什么?
网络请求的工厂,用于发送HTTP请求并且读取响应的一个类。通过new OKHttpClient()方式来创建一个单一的HTTP客户端。我们来分析一波OKHttpClient的源码。
client.newCall(request).execute(); //请求网络核心代码我们来看下OKHttpClient类的newCall(request)方法做了啥。
 /**
   * Prepares the {@code request} to be executed at some point in the future.
   * 准备request网络请求 在将来某个时候执行。
   */
  @Override public Call newCall(Request request) {
    return new RealCall(this, request, false /* for web socket */);
}网络请求Request的构建很简单。我们的Request类中通过建造者(Builder)模式,将请求的Url(请求地址链接),Method(请求方法),Headers(请求头),Body(请求体)等信息添加到Request对象中。我们可以看到new Call(request)方法很简单返回了RealCall的实例。接下来我们进入RealCall类中一探究竟。
RealCall 实现了Call接口,在Call中我们定义了请求方法。
Call接口:
 /**
   * 请求方法
   */
  Request request();

 /**
   * 同步请求方法
   */
  Response execute() throws IOException;

  /**
   * 异步请求方法
   */
  void enqueue(Callback responseCallback);

  /**
   * 取消请求调用
   */
  void cancel();

  /**
   * 判断请求调用是否执行
   */
  boolean isExecuted();

  /**
   * 判断请求调用是否取消
   */
  boolean isCanceled();

  /**
   * 克隆一个请求调用
   */
  Call clone();
RealCall.构造函数
  RealCall(OkHttpClient client, Request originalRequest, boolean forWebSocket) {
    final EventListener.Factory eventListenerFactory = client.eventListenerFactory();
    //传入的OKHttpClient对象
    this.client = client;
    //传入的Request请求对象
    this.originalRequest = originalRequest;
    //是否是webSocket请求,这里默认false
    this.forWebSocket = forWebSocket;
    //一个可以重故障中恢复的拦截器(出镜很高-->拦截器)
    this.retryAndFollowUpInterceptor = new RetryAndFollowUpInterceptor(client, forWebSocket);

  }
RealCall.excute()
 @Override public Response execute() throws IOException {
    //1.当前请求已经执行过 抛异常
    synchronized (this) {
      if (executed) throw new IllegalStateException("Already Executed");
      executed = true;
    }
    //2.捕获当前请求堆栈跟踪变化
    captureCallStackTrace();
    try {
      //3.执行同步网络请求操作(**Dispatcher分发器是什么?**)
      client.dispatcher().executed(this);
      //4.获取请求返回的结果
      Response result = getResponseWithInterceptorChain();
      if (result == null) throw new IOException("Canceled");
      return result;
    } finally {
      //5.结束当前网络请求
      client.dispatcher().finished(this);
    }
  }
Dispatcher分发器是什么?
执行异步请求时的策略?通俗点来说,我们有很多的异步请求,请求的执行顺序,执行规则都是由分发器决定的,每个分发器的内部有个ThreadPoolExecutor,这是线程池的核心类。作用是什么呢?当然是将线程进行复用,每个请求需要一个线程去执行,当执行完一个请求任务结束之后,重新创建新的线程太消耗性能。不需要在重新创建一个新的线程去执行下一个任务。我们先有这样一个概念,Java的线程池是个很”重”的知识点,改天我们将他’扒个干净’。接下来我们看下Dispatcher类中的请求方法。
同步:
  /** 运行同步调用。包括尚未结束的已取消呼叫 */
  private final Deque<RealCall> runningSyncCalls = new ArrayDeque<>();

  /** 将我们请求添加到同步请求队列中 */
  synchronized void executed(RealCall call) {
     runningSyncCalls.add(call);
  }
异步:
  /** 运行异步调用。包括尚未结束的已取消呼叫 */
  private final Deque<AsyncCall> runningAsyncCalls = new ArrayDeque<>();

 synchronized void enqueue(AsyncCall call) {
    if (runningAsyncCalls.size() < maxRequests && runningCallsForHost(call) < maxRequestsPerHost) {
      runningAsyncCalls.add(call);
      executorService().execute(call);
    } else {
      readyAsyncCalls.add(call);
}每一个请求都创建了一个RealCall实例,而异步请求AsyncCall 是RealCall的内部类,每个Call都需要一个线程去任务,执行Call的过程其实就是执行线程的excute()过程。当Dispatcher接收到一个请求时,Dispatcher负责在其内部维护的线程池中找出空闲的线程去执行其execute()方法。
Response返回
RealCall类中执行请求动作后就通过 Response result = getResponseWithInterceptorChain();返回了服务端响应的结果。
  Response getResponseWithInterceptorChain() throws IOException {
    // 建立一个完整的拦截器堆栈
    List<Interceptor> interceptors = new ArrayList<>();

    interceptors.addAll(client.interceptors());

    //1.暂且叫它 -->可恢复的拦截器,根据需要进行重定向
    interceptors.add(retryAndFollowUpInterceptor);

    //2.桥接拦截器
    interceptors.add(new BridgeInterceptor(client.cookieJar()));

    //3.请求是从内部缓存中发出,缓存拦截器将返回写入到响应缓存中和此请求对应
    interceptors.add(new CacheInterceptor(client.internalCache()));

    //4.打开客户端与目标服务器的连接-->连接服务器
    interceptors.add(new ConnectInterceptor(client));

    //5.拦截器链中最后一个拦截器,对服务器进行请求呼叫
    interceptors.add(new CallServerInterceptor(forWebSocket));

    //6.Boss是我:承载整个拦截器链的具体拦截器链:所有应用程序,拦截器、OkHttp核心、所有网络拦截器,最后是网络调用者。
    Interceptor.Chain chain = new RealInterceptorChain(
        interceptors, null, null, null, 0, originalRequest);
    return chain.proceed(originalRequest);
  }
核心方法proceed(….)的请求返回核心代码如下。
 public Response proceed(Request request, StreamAllocation streamAllocation, HttpCodec httpCodec,
      RealConnection connection) throws IOException {

    // Call the next interceptor in the chain.
    RealInterceptorChain next = new RealInterceptorChain(
        interceptors, streamAllocation, httpCodec, connection, index + 1, request);
    Interceptor interceptor = interceptors.get(index);
    Response response = interceptor.intercept(next);
    return response;
  }
结尾
本篇介绍了OKHttp的源码执行的流程,下篇将对OKHttp网络请求究竟发生了什么?如何得到服务器返回值?以及对OKHttp的核心拦截器将会作详细的介绍。