OkHttp官网地址:http://square.github.io/okhttp/
OkHttp GitHub地址:https://github.com/square/okhttp
本篇文章阐述一下OKHttp的整体流程。首先通过代码来一步一步进行分析它的内部流程。
源码环境
OKHttp3.2.0
1,基本用法
1.1,创建 OkHttpClient 对象
final OkHttpClient client = new OkHttpClient();这是OKHttp提供的一个默认的构造函数,我们进去可以发现,它里面设置了一个默认的Builder,如果我们需要设置自己的Builder的话则可以使用它的有Builder参数的构造函数。
无参构造函数
public OkHttpClient() {
    this(new Builder());
  }
有参构造函数
 private OkHttpClient(Builder builder) {
    this.dispatcher = builder.dispatcher;
    this.proxy = builder.proxy;
    //省略部分其他的参数...
  }
构造完了对象后我们就可以发起请求了,请求分为同步请求和异步请求。我们首先来看下请求部分的代码。
1.2,发起http请求
//构造Request
Request request = new Request.Builder()
                .url("https://github.com/crazyandcoder")
                .build();

//响应结果
Response response = client.newCall(request).execute();
         if (response.isSuccessful()) {
              String  result= response.body().string());
         }
网络请求方式一般有get、post、delete等等,这个请求中并没有设置是哪种请求方式,所以一般情况下都有设置的默认方法。
public Builder() {
      this.method = "GET";
      this.headers = new Headers.Builder();
    }
我们进去发现它的默认方式get。以上便是一个最简单,完整的请求流程。接下来我们分步进行分析一下。
2,请求类型
2.1,同步请求
OKHttp请求类型分为同步请求和异步请求,上面其实是用同步方式完成的网络请求。即:
Response response = client.newCall(request).execute();我们进入发现execute它是接口Call中的方法,那么我们就去它的实现类中去查看它的实现方法。进入到client.newCall中查看。
  @Override public Call newCall(Request request) {
    return new RealCall(this, request);
  }
其实真正实现call的是类RealCall,我们就去这个类中查看。
 @Override public Response execute() throws IOException {
    synchronized (this) {
      if (executed) throw new IllegalStateException("Already Executed");
      executed = true;
    }
    try {
      client.dispatcher().executed(this);
      Response result = getResponseWithInterceptorChain(false);
      if (result == null) throw new IOException("Canceled");
      return result;
    } finally {
      client.dispatcher().finished(this);
    }
  }
因为这是一个同步请求方式,所在开始的时候就进行了判断,如果已经在执行的话就设置一下flag标明正在执行中,每个 call 只能被执行一次。
接着通过下面的代码来进行实际的请求,其中Dispatcher是Builder中的参数之一,即这是一个请求策略实现类。
client.dispatcher().executed(this);执行完了请求之后通过getResponseWithInterceptorChain来返回相应结果
Response result = getResponseWithInterceptorChain(false);接着通过dispatcher来通知结束请求。
我们来看下getResponseWithInterceptorChain方法里面的实现内容,通过名字可以简单看出这是一个关于拦截器的实现,拦截器,观察,修改以及可能短路的请求输出和响应请求的回来。通常情况下拦截器用来添加,移除或者转换请求或者回应的头部信息。
  private Response getResponseWithInterceptorChain(boolean forWebSocket) throws IOException {
    Interceptor.Chain chain = new ApplicationInterceptorChain(0, originalRequest, forWebSocket);
    return chain.proceed(originalRequest);
  }
进入到方法中可以看出真正执行response的还是getResponse方法。由于getResponse方法太长我们一步一步分析。
Response getResponse(Request request, boolean forWebSocket)首先判断进行RequestBody判断是否为null然后进行一系列的设置。
RequestBody body = request.body();
    if (body != null) {
      Request.Builder requestBuilder = request.newBuilder();

      MediaType contentType = body.contentType();
      if (contentType != null) {
        requestBuilder.header("Content-Type", contentType.toString());
      }

      long contentLength = body.contentLength();
      if (contentLength != -1) {
        requestBuilder.header("Content-Length", Long.toString(contentLength));
        requestBuilder.removeHeader("Transfer-Encoding");
      } else {
        requestBuilder.header("Transfer-Encoding", "chunked");
        requestBuilder.removeHeader("Content-Length");
      }

      request = requestBuilder.build();
    }
接着构造了一个HttpEngine,通过HttpEngine来发起请求以及读取响应结果,即:
//构造HttpEngine
engine = new HttpEngine(client, request, false, false, forWebSocket, null, null, null);

//发送请求以及读取响应结果
engine.sendRequest();
engine.readResponse();
在读取响应结果中,又进行了是否有本地缓存cacheResponse进行判断,如果没有的话则进行网络请求networkResponse,否则就读取cacheResponse,最后将response返回。
Response response = engine.getResponse();
      Request followUp = engine.followUpRequest();

      if (followUp == null) {
        if (!forWebSocket) {
          engine.releaseStreamAllocation();
        }
        return response;
      }
借用网上一张流程图来表示。
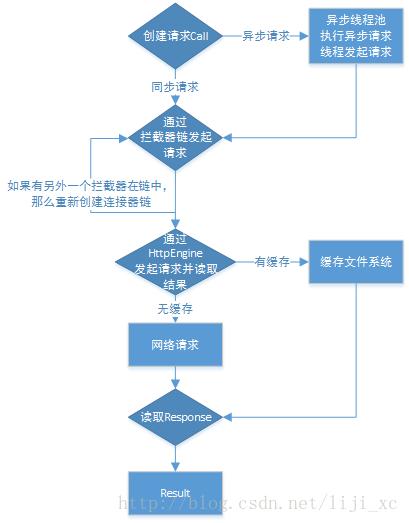
以上便是同步请求的一个整体流程,接着我们来分析下异步请求流程。
2.2,异步请求
client.newCall(request).enqueue(new Callback() {
            @Override
            public void onFailure(Call call, IOException e) {
            }

            @Override
            public void onResponse(Call call, Response response) throws IOException {

            }
        });
OKHttp的异步请求其实是通过将请求Request插入到队列中,然后在回调中返回结果response的过程。下面我们来详细的了解一下异步请求。
从上面我们可以知道执行call的其实是RealCall,我们进入到里面看下enqueue的方法
 @Override public void enqueue(Callback responseCallback) {
    enqueue(responseCallback, false);
  }

void enqueue(Callback responseCallback, boolean forWebSocket) {
    synchronized (this) {
      if (executed) throw new IllegalStateException("Already Executed");
      executed = true;
    }
    client.dispatcher().enqueue(new AsyncCall(responseCallback, forWebSocket));
  }
同样的一次只能执行一个call,接着我们看下AsyncCall类,其中存在excute方法。
@Override protected void execute() {
      boolean signalledCallback = false;
      try {
        Response response = getResponseWithInterceptorChain(forWebSocket);
        if (canceled) {
          signalledCallback = true;
          responseCallback.onFailure(RealCall.this, new IOException("Canceled"));
        } else {
          signalledCallback = true;
          responseCallback.onResponse(RealCall.this, response);
        }
      } catch (IOException e) {
        if (signalledCallback) {
          // Do not signal the callback twice!
          logger.log(Level.INFO, "Callback failure for " + toLoggableString(), e);
        } else {
          responseCallback.onFailure(RealCall.this, e);
        }
      } finally {
        client.dispatcher().finished(this);
      }
    }
异步请求里面也是通过getResponseWithInterceptorChain来获取响应结果的,然后通过responseCallback的回调将onFailure和onResponse返回出去。
在发起请求时,整个框架主要通过Call来封装每一次的请求。同时Call持有OkHttpClient和HttpEngine。而每一次的同步或者异步请求都会有Dispatcher的参与。
3,总结
通过前两部分的学习分析,我们大概知道了一下OKHttp的使用流程。接下来我们通过一个流程图来总结一下OKHttp的使用流程。
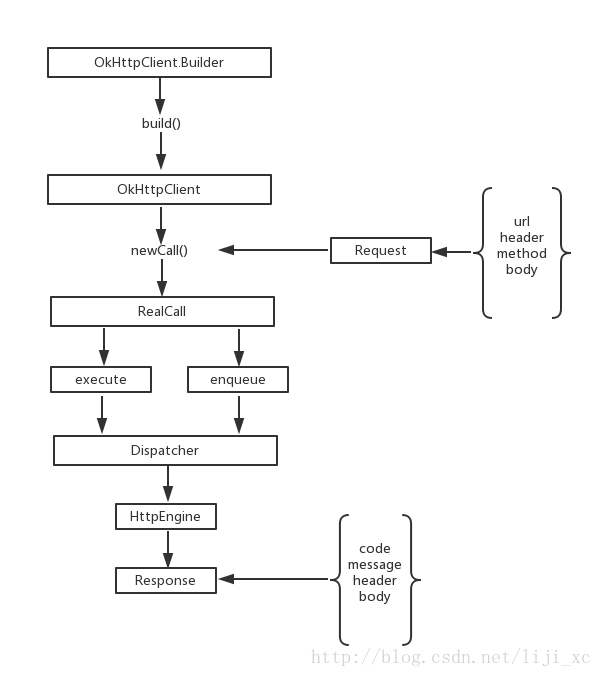
后面的部分将针对每个环节进行详细的分析。
