市面上有两种常见的安全框架,Shiro和SpringSecurity。功能都很强大,用户数量也都很多。SpringSecurity优势在于能和Spring无缝衔接。
Shiro系列教程:https://blog.csdn.net/j080624/article/category/7006814
Shiro官网地址:https://shiro.apache.org/
Spring Security是针对Spring项目的安全框架,也是Spring Boot底层安全模块默认的技术选型。他可以实现强大的web安全控制。对于安全控制,我们仅需引入spring-boot-starter-security模块,进行少量的配置,即可实现强大的安全管理。
【1】认证和授权
应用程序的两个主要区域是“认证”和“授权”(或者访问控制)。这两个主要区域是Spring Security 的两个目标。
“认证”(Authentication),是建立一个他声明的主体的过程(一个“主体”一般是指用户,设备或一些可以在你的应用程序中执行动作的其他系统)。
“授权”(Authorization)指确定一个主体是否允许在你的应用程序执行一个动作的过程。为了抵达需要授权的店,主体的身份已经有认证过程建立。
这个概念是通用的而不只在Spring Security中。
【2】Spring Security
使用注解@EnableWebSecurity开启WebSecurity模式。
该注解源码如下:
/**
* Add this annotation to an {@code @Configuration} class to have the Spring Security
* configuration defined in any {@link WebSecurityConfigurer} or more likely by extending
* the {@link WebSecurityConfigurerAdapter} base class and overriding individual methods:
*在配置类上添加该注解使其获得Spring Security配置,该配置被定义在任何
WebSecurityConfigurer中或继承自WebSecurityConfigurerAdapter并重写方法的
类中,后者如下所示:
* <pre class="code">
* @Configuration
* @EnableWebSecurity
* public class MyWebSecurityConfiguration extends WebSecurityConfigurerAdapter {
*
* @Override
* public void configure(WebSecurity web) throws Exception {
* web.ignoring()
* // Spring Security should completely ignore URLs starting with /resources/
* .antMatchers("/resources/**");
* }
*
* @Override
* protected void configure(HttpSecurity http) throws Exception {
* http.authorizeRequests().antMatchers("/public/**").permitAll().anyRequest()
* .hasRole("USER").and()
* // Possibly more configuration ...
* .formLogin() // enable form based log in
* // set permitAll for all URLs associated with Form Login
* .permitAll();
* }
*
* @Override
* protected void configure(AuthenticationManagerBuilder auth) {
* auth
* // enable in memory based authentication with a user named "user" and "admin"
* .inMemoryAuthentication().withUser("user").password("password").roles("USER")
* .and().withUser("admin").password("password").roles("USER", "ADMIN");
* }
*
* // Possibly more overridden methods ...
* }
* </pre>
*
* @see WebSecurityConfigurer
* @see WebSecurityConfigurerAdapter
*
* @author Rob Winch
* @since 3.2
*/
@Retention(value = java.lang.annotation.RetentionPolicy.RUNTIME)
@Target(value = { java.lang.annotation.ElementType.TYPE })
@Documented
@Import({ WebSecurityConfiguration.class,
SpringWebMvcImportSelector.class })
@EnableGlobalAuthentication//开启全局权限配置
@Configuration// 这里引用了@Configuration该注解
public @interface EnableWebSecurity {
/**
* Controls debugging support for Spring Security. Default is false.
* @return if true, enables debug support with Spring Security
*/
boolean debug() default false;
}两个重要的类:
WebSecurityConfigurerAdapter:自定义Security策略
AuthenticationManagerBuilder:自定义认证策略
【3】源码与测试
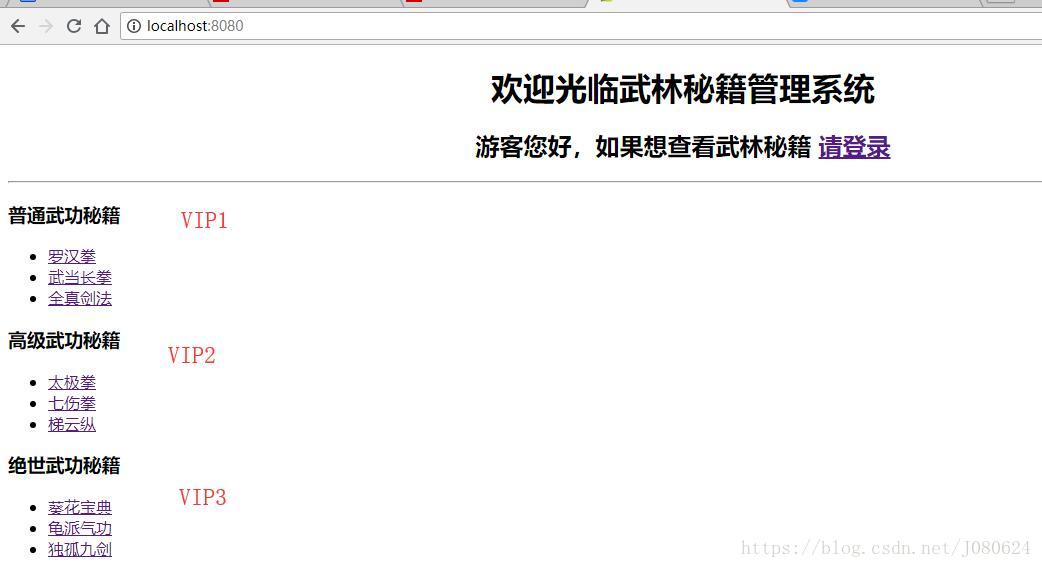
① 基础环境
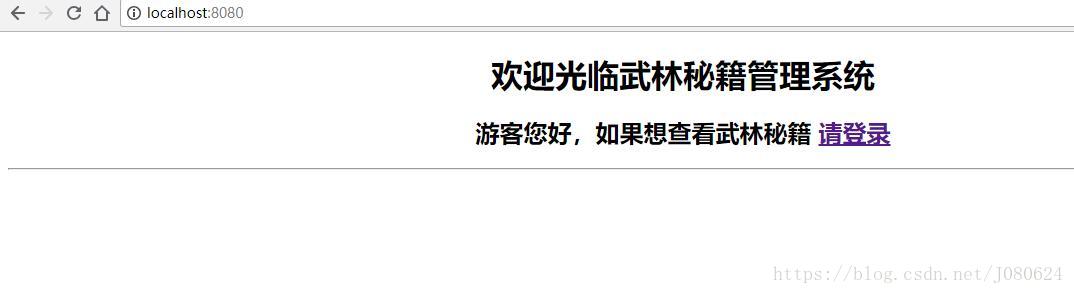
默认欢迎页面如下(未登录状态),不同权限可以查看不同武功秘籍:
② 引入SpringSecurity
Starter如下:
<dependency>
<groupId>org.springframework.boot</groupId>
<artifactId>spring-boot-starter-security</artifactId>
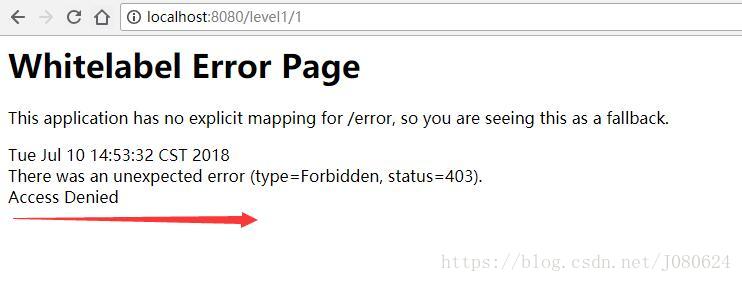
</dependency>自定义Security配置类初始如下:
@EnableWebSecurity
public class MySecurityConfig extends WebSecurityConfigurerAdapter {

    @Override
    protected void configure(HttpSecurity http) throws Exception {
    // 如下,定制请求的授权规则
        http.authorizeRequests()
            .antMatchers("/css/**", "/").permitAll()
            .antMatchers("/level1/**").hasRole("VIP1")
            .antMatchers("/level2/**").hasRole("VIP2")
            .antMatchers("/level3/**").hasRole("VIP3")
    }
}
此时再访问任意武林秘籍,则会提示访问被拒绝如下图:
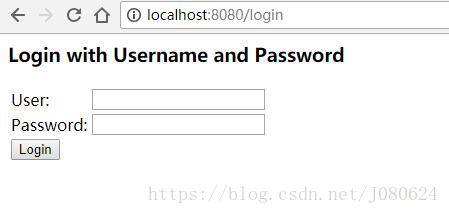
③ 开启自动配置的登录功能
http.formLogin();方法会自动创建默认登录页。默认/login请求就会来到登录页,如果登录失败则会重定向到/login?error。也可以自定义登录页,查看HttpSecurity.formLogin()源码示例如下:
/**
* Specifies to support form based authentication.
* //指定支持基于表单的身份验证。
* If
* {@link FormLoginConfigurer#loginPage(String)} is not specified a default login page
* will be generated.
*// 如果登录页没有指定,则会创建一个默认登录页
* <h2>Example Configurations</h2>
*
* The most basic configuration defaults to automatically generating a login page at
* the URL "/login", redirecting to "/login?error" for authentication failure. The
* details of the login page can be found on
* {@link FormLoginConfigurer#loginPage(String)}
*
* <pre>
* @Configuration
* @EnableWebSecurity
* public class FormLoginSecurityConfig extends WebSecurityConfigurerAdapter {
*
* @Override
* protected void configure(HttpSecurity http) throws Exception {
* http.authorizeRequests().antMatchers("/**").hasRole("USER").and().formLogin();
* }
*
* @Override
* protected void configure(AuthenticationManagerBuilder auth) throws Exception {
* auth.inMemoryAuthentication().withUser("user").password("password").roles("USER");
* }
* }
* </pre>
*
* The configuration below demonstrates customizing the defaults.
*
* <pre>
* @Configuration
* @EnableWebSecurity
* public class FormLoginSecurityConfig extends WebSecurityConfigurerAdapter {
*// 着重观察如下配置示例 !!!
* @Override
* protected void configure(HttpSecurity http) throws Exception {
* http.authorizeRequests().antMatchers("/**").hasRole("USER").and().formLogin()
* .usernameParameter("username") // default is username
* .passwordParameter("password") // default is password
* .loginPage("/authentication/login") // default is /login with an HTTP get
* .failureUrl("/authentication/login?failed") // default is /login?error
* .loginProcessingUrl("/authentication/login/process"); // default is /login
* // with an HTTP
* // post
* }
*
* @Override
* protected void configure(AuthenticationManagerBuilder auth) throws Exception {
* auth.inMemoryAuthentication().withUser("user").password("password").roles("USER");
* }
* }
* </pre>
*
* @see FormLoginConfigurer#loginPage(String)
*
* @return
* @throws Exception
*/
public FormLoginConfigurer<HttpSecurity> formLogin() throws Exception {
return getOrApply(new FormLoginConfigurer<HttpSecurity>());
}此时还配置任何用户,没有登录没有权限,访问Level1,会跳向默认的登录页:
④ 为系统添加用户、密码和角色
配置类中添加方法:
@Override
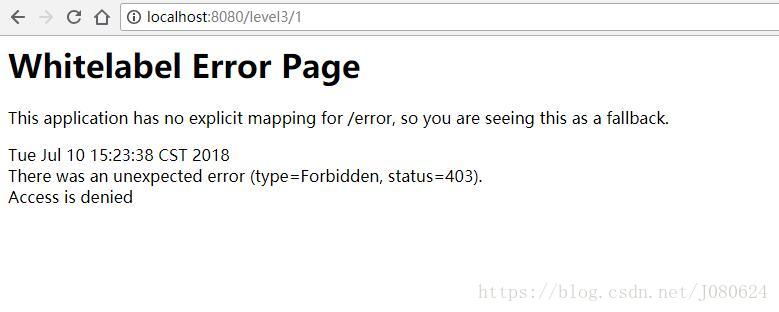
protected void configure(AuthenticationManagerBuilder auth) throws Exception {
auth.inMemoryAuthentication()
.withUser("zhangsan").password("123456").roles("VIP1","VIP2")
.and()
.withUser("lisi").password("123456").roles("VIP3","VIP2")
.and()
.withUser("wangwu").password("123456").roles("VIP3","VIP1");
}该种方法是将用户保存在内存中,项目中应该使用数据库,如下:
@Override
protected void configure(AuthenticationManagerBuilder auth) throws Exception {
auth.jdbcAuthentication().dataSource(dataSource)
.usersByUsernameQuery("select username,password, enabled from users where username = ?")
.authoritiesByUsernameQuery("select username, role from user_roles where username = ?");
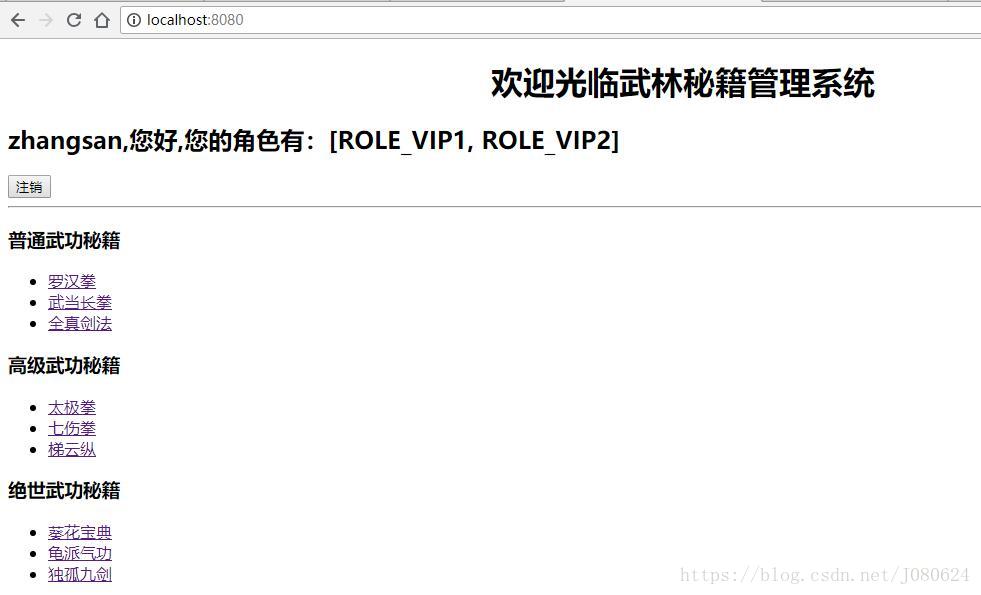
}此时不同用户就拥有了不同权限,如zhangsan只能访问普通和高级武功秘籍,访问绝世武功秘籍就会提示访问被拒绝:
⑤ 开启自动注销功能http.formLogout()
看源码注释:
/**
* Provides logout support. This is automatically applied when using
* {@link WebSecurityConfigurerAdapter}.
* // 提供了注销支持。这种能力是自动被应用的当使用了WebSecurityConfigurerAdapter。
* The default is that accessing the URL
* "/logout" will log the user out by invalidating the HTTP Session, cleaning up any
* {@link #rememberMe()} authentication that was configured, clearing the
* {@link SecurityContextHolder}, and then redirect to "/login?success".
*// 默认应用于/logout请求,删除会话session,清除rememberMe权限配置并重定向到/login?success请求。
* <h2>Example Custom Configuration</h2>
*
* The following customization to log out when the URL "/custom-logout" is invoked.
* Log out will remove the cookie named "remove", not invalidate the HttpSession,
* clear the SecurityContextHolder, and upon completion redirect to "/logout-success".
*
* <pre>
* @Configuration
* @EnableWebSecurity
* public class LogoutSecurityConfig extends WebSecurityConfigurerAdapter {
*
* @Override
* protected void configure(HttpSecurity http) throws Exception {
* http.authorizeRequests().antMatchers("/**").hasRole("USER").and().formLogin()
* .and()
* // sample logout customization
* .logout().deleteCookies("remove").invalidateHttpSession(false)
* .logoutUrl("/custom-logout").logoutSuccessUrl("/logout-success");
* }
*
* @Override
* protected void configure(AuthenticationManagerBuilder auth) throws Exception {
* auth.inMemoryAuthentication().withUser("user").password("password").roles("USER");
* }
* }
* </pre>
*
* @return
* @throws Exception
*/
public LogoutConfigurer<HttpSecurity> logout() throws Exception {
return getOrApply(new LogoutConfigurer<HttpSecurity>());
}修改请求访问规则配置方法如下:
    @Override
    protected void configure(HttpSecurity http) throws Exception {
        // 定制请求的授权规则
        http.authorizeRequests()
            .antMatchers("/css/**", "/").permitAll()
            .antMatchers("/level1/**").hasRole("VIP1")
            .antMatchers("/level2/**").hasRole("VIP2")
            .antMatchers("/level3/**").hasRole("VIP3");
        // 开启自动配置的登录功能
        http.formLogin();

        // 开启自动配置的注销功能
        http.logout();
    }
在欢迎页面添加注销表单:
点击注销效果如下(重定向到了/login?logout):
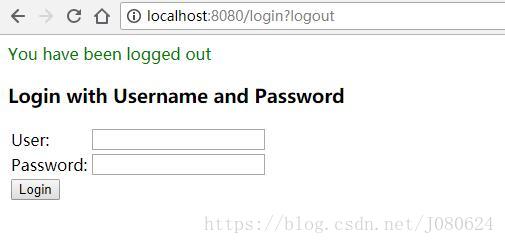
修改默认退出重定向页面:
// 开启自动配置的注销功能,默认重定向到/logout?success,修改为"/"
http.logout().logoutSuccessUrl("/");
此时退出返回到主页面!
【4】Thymeleaf提供的SpringSecurity标签支持
需要引入thymeleaf-extras-springsecurity4,修改默认引入的Thymeleaf版本:
<properties>
        <project.build.sourceEncoding>UTF-8</project.build.sourceEncoding>
        <project.reporting.outputEncoding>UTF-8</project.reporting.outputEncoding>
        <java.version>1.8</java.version>
        <thymeleaf.version>3.0.9.RELEASE</thymeleaf.version>
        <thymeleaf-layout-dialect.version>2.3.0</thymeleaf-layout-dialect.version>
        <thymeleaf-extras-springsecurity4.version>3.0.2.RELEASE</thymeleaf-extras-springsecurity4.version>
    </properties>

dependency>
    <groupId>org.thymeleaf.extras</groupId>
    <artifactId>thymeleaf-extras-springsecurity</artifactId>
</dependency>
页面引入security的名称空间:
<html xmlns:th="http://www.thymeleaf.org"
      xmlns:sec="http://www.thymeleaf.org/thymeleaf-extras-springsecurity4">
① 测试一,修改默认访问页面提示
修改默认访问页面如下:
<!DOCTYPE html>
<html xmlns:th="http://www.thymeleaf.org"
xmlns:sec="http://www.thymeleaf.org/thymeleaf-extras-springsecurity4">
<head>
<meta http-equiv="Content-Type" content="text/html; charset=UTF-8">
<title>Insert title here</title>
</head>
<body>
<h1 align="center">欢迎光临武林秘籍管理系统</h1>
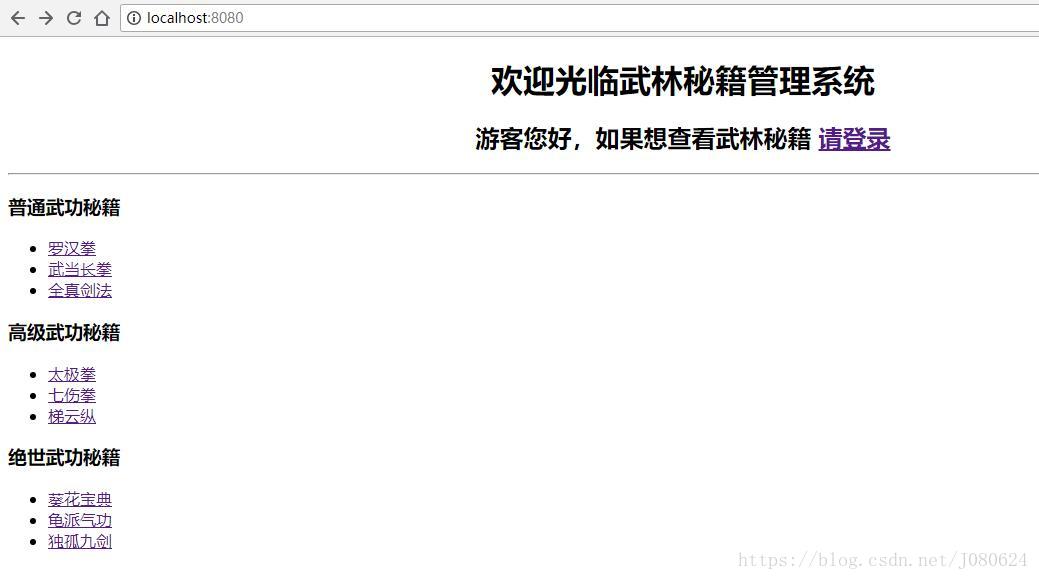
<!--如果没有认证,则显示如下-->
<div sec:authorize="!isAuthenticated()">
<h2 align="center">游客您好,如果想查看武林秘籍 <a th:href="@{/login}">请登录</a></h2>
</div>
<!--如果认证了,则显示如下-->
<div sec:authorize="isAuthenticated()">
<h2><span sec:authentication="name"></span>,您好,您的角色有:<span sec:authentication="principal.authorities"></span></h2>
<form th:action="@{/logout}" method="post">
<input type="submit" value="注销"/>
</form>
</div>没有认证时访问首页如下:
登录成功后,首页显示如下:
② 测试二,不同权限显示不同武林秘籍
修改页面如下:
<!DOCTYPE html>
<html xmlns:th="http://www.thymeleaf.org"
xmlns:sec="http://www.thymeleaf.org/thymeleaf-extras-springsecurity4">
<head>
<meta http-equiv="Content-Type" content="text/html; charset=UTF-8">
<title>Insert title here</title>
</head>
<body>
<h1 align="center">欢迎光临武林秘籍管理系统</h1>
<!--如果没有认证,则显示如下-->
<div sec:authorize="!isAuthenticated()">
<h2 align="center">游客您好,如果想查看武林秘籍 <a th:href="@{/login}">请登录</a></h2>
</div>
<!--如果认证了,则显示如下-->
<div sec:authorize="isAuthenticated()">
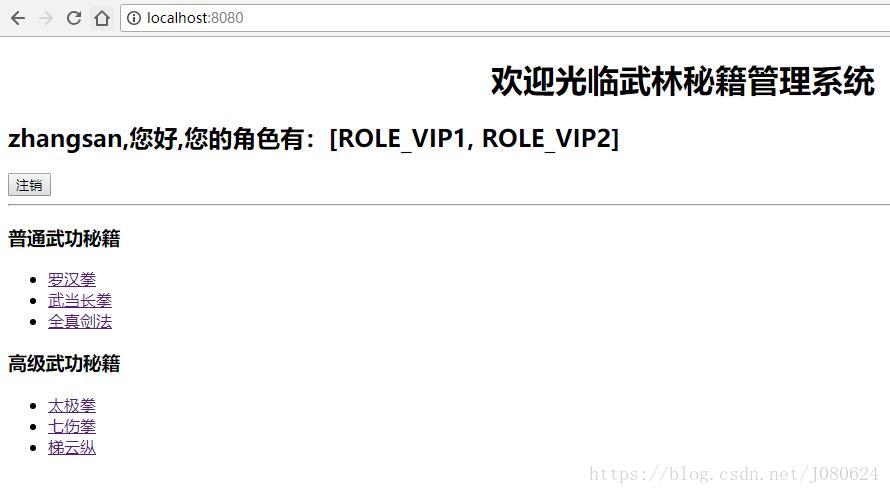
<h2><span sec:authentication="name"></span>,您好,您的角色有:<span sec:authentication="principal.authorities"></span></h2>
<form th:action="@{/logout}" method="post">
<input type="submit" value="注销"/>
</form>
</div>
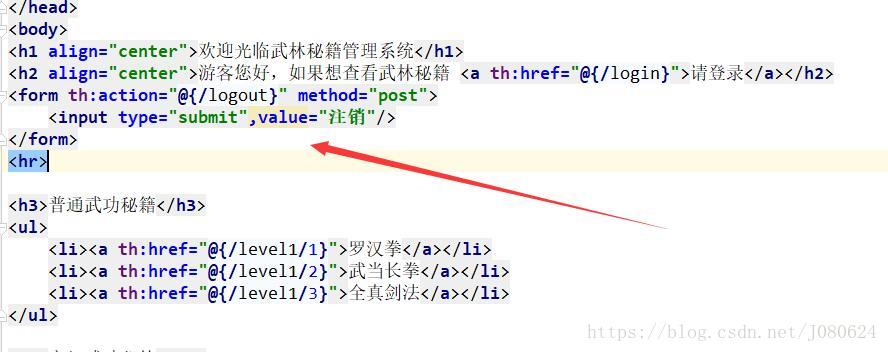
<hr>
<div sec:authorize="hasRole('VIP1')">
<h3>普通武功秘籍</h3>
<ul>
<li><a th:href="@{/level1/1}">罗汉拳</a></li>
<li><a th:href="@{/level1/2}">武当长拳</a></li>
<li><a th:href="@{/level1/3}">全真剑法</a></li>
</ul>
</div>
<div sec:authorize="hasRole('VIP2')">
<h3>高级武功秘籍</h3>
<ul>
<li><a th:href="@{/level2/1}">太极拳</a></li>
<li><a th:href="@{/level2/2}">七伤拳</a></li>
<li><a th:href="@{/level2/3}">梯云纵</a></li>
</ul>
</div>
<div sec:authorize="hasRole('VIP3')">
<h3>绝世武功秘籍</h3>
<ul>
<li><a th:href="@{/level3/1}">葵花宝典</a></li>
<li><a th:href="@{/level3/2}">龟派气功</a></li>
<li><a th:href="@{/level3/3}">独孤九剑</a></li>
</ul>
</div>
</body>
</html>没有登录时,显示效果如下:
登录后显示效果如下:
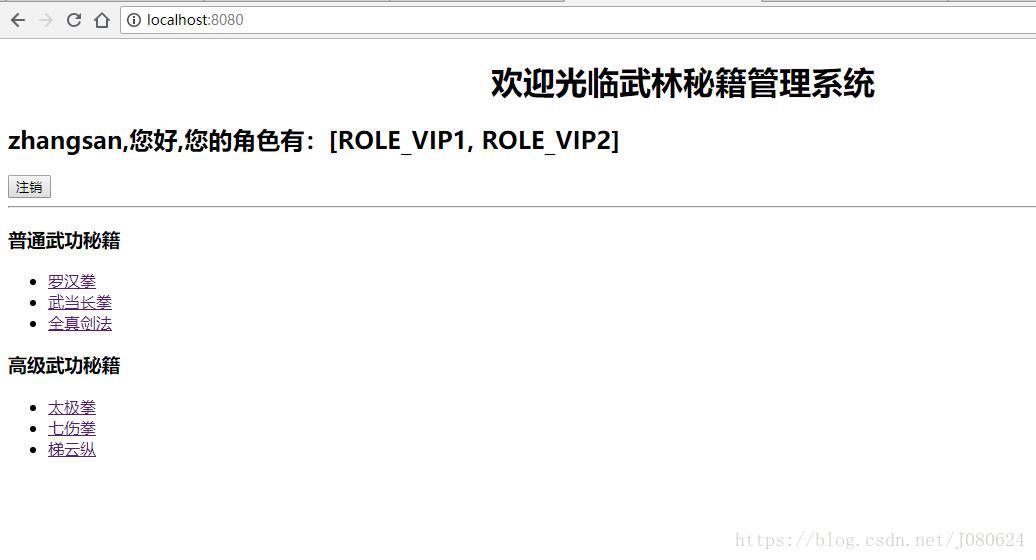
只显示拥有的权限目录!
【5】常见功能-Remeber me
配置启用remember-me功能
    @Override
    protected void configure(HttpSecurity http) throws Exception {
        // 定制请求的授权规则
        http.authorizeRequests()
            .antMatchers("/css/**", "/").permitAll()
            .antMatchers("/level1/**").hasRole("VIP1")
            .antMatchers("/level2/**").hasRole("VIP2")
            .antMatchers("/level3/**").hasRole("VIP3");
        // 开启自动配置的登录功能
        http.formLogin();

        // 开启自动配置的注销功能,默认重定向到/logout?success,修改为"/"
        http.logout().logoutSuccessUrl("/");

        //开启自动配置的Remember me
        http.rememberMe();
    }
此时登录页显示如下:
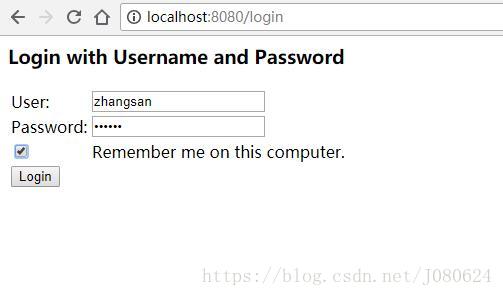
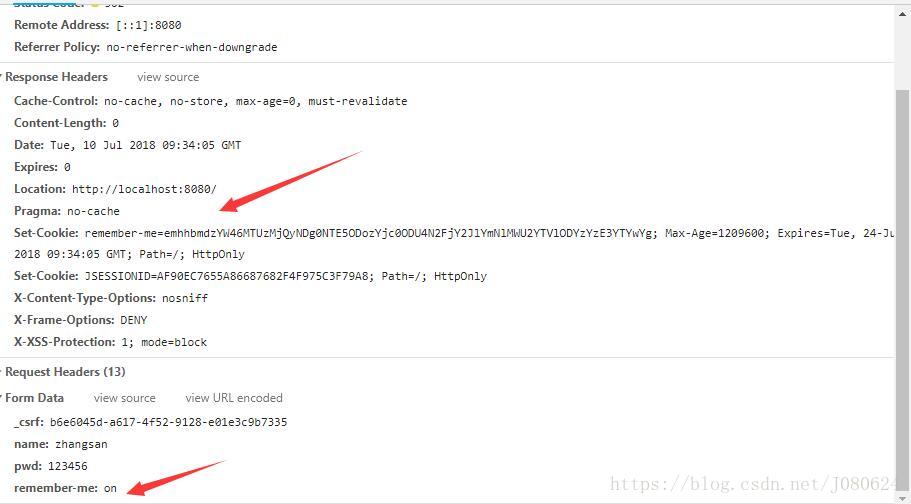
点击登录,查看network :
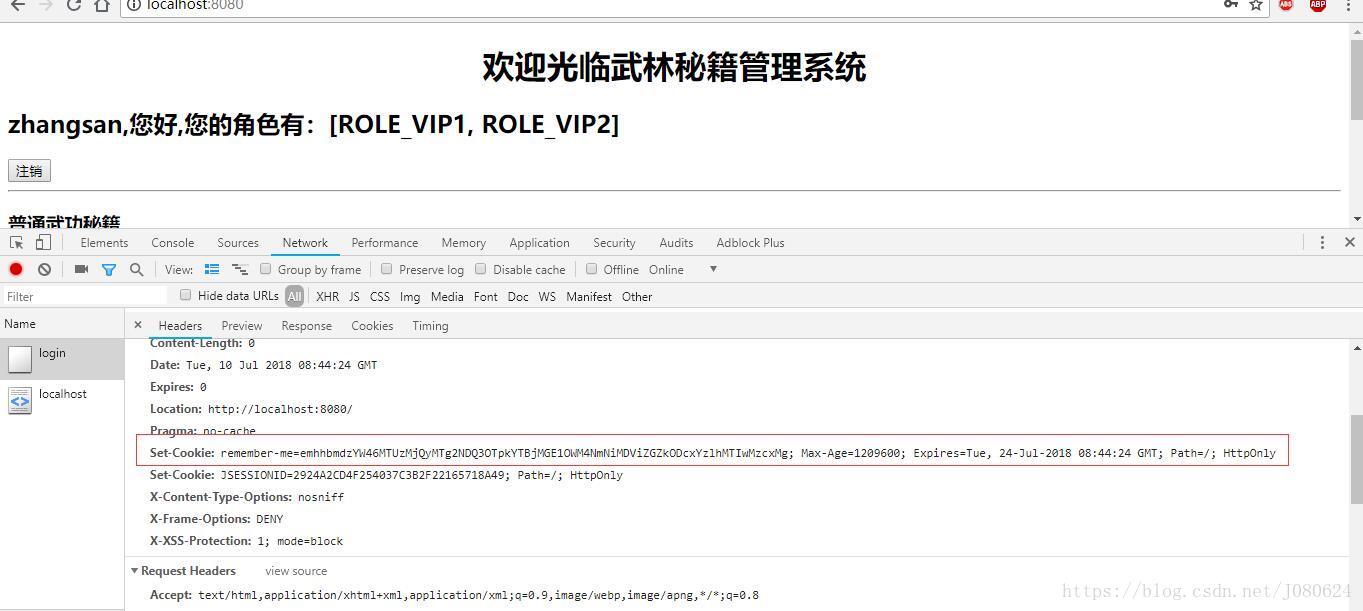
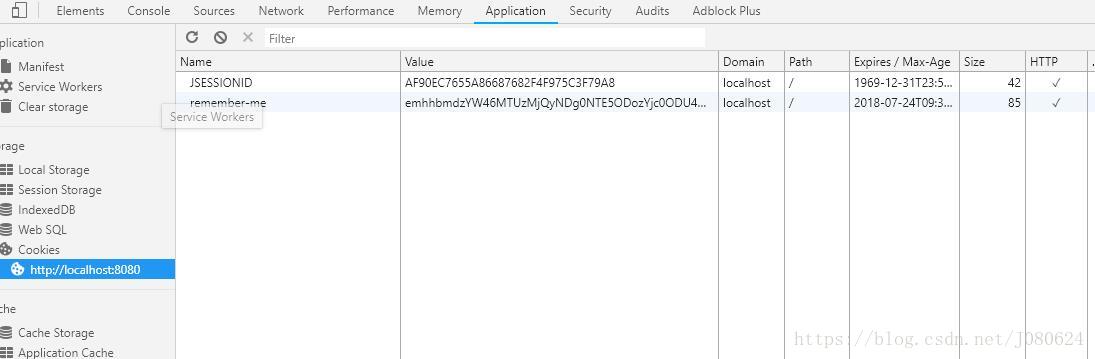
此时关闭浏览器,再次打开,直接进入登录后的页面:
点击注销,将会从浏览器删除该Cookie!
【6】自定义登录页与Remember-me
① 自定义登录页面
修改配置如下:
    @Override
    protected void configure(HttpSecurity http) throws Exception {
        // 定制请求的授权规则
        http.authorizeRequests()
            .antMatchers("/css/**", "/").permitAll()
            .antMatchers("/level1/**").hasRole("VIP1")
            .antMatchers("/level2/**").hasRole("VIP2")
            .antMatchers("/level3/**").hasRole("VIP3");
        // 开启自动配置的登录功能
        http.formLogin().loginPage("/userlogin");

        // 开启自动配置的注销功能,默认重定向到/logout?success,修改为"/"
        http.logout().logoutSuccessUrl("/");

        //开启自动配置的Remember me
        http.rememberMe();
    }
修改自定义登录页面如下:
<!DOCTYPE html>
<html xmlns:th="http://www.thymeleaf.org">
<head>
<meta charset="UTF-8">
<title>Insert title here</title>
</head>
<body>
<h1 align="center">欢迎登陆武林秘籍管理系统</h1>
<hr>
<div align="center">
<form th:action="@{/userlogin}" method="post">
用户名:<input name="username"/><br>
密 码:<input name="password"><br/>
<input type="submit" value="登陆">
</form>
</div>
</body>
</html>访问受保护的页面或者点击登录时,会来到我们自定义的登录页面:
FormLoginConfigurer.loginPage方法源码与注释如下:
/**
* <p>
* Specifies the URL to send users to if login is required.
* 发送给用户的登录请求
* If used with
* {@link WebSecurityConfigurerAdapter} a default login page will be generated when
* this attribute is not specified.
* 如果没有被指定则使用默认的登录页面
* </p>
*
* <p>
* If a URL is specified or this is not being used in conjuction with
* {@link WebSecurityConfigurerAdapter}, users are required to process the specified
* URL to generate a login page.
* 如果url被指定或没有使用默认的登录页面,用户需要处理登录请求跳转到登录页面
* In general, the login page should create a form that
* submits a request with the following requirements to work with
* {@link UsernamePasswordAuthenticationFilter}:
* // 一般来说,登录页面需要创建一个表单提交如下所需的参数属性:
* </p>
*
* <ul>
* <li>It must be an HTTP POST</li>
* <li>It must be submitted to {@link #loginProcessingUrl(String)}</li>
* <li>It should include the username as an HTTP parameter by the name of
* {@link #usernameParameter(String)}</li>
* <li>It should include the password as an HTTP parameter by the name of
* {@link #passwordParameter(String)}</li>
* </ul>
*
* <h2>Example login.jsp</h2>
*
* Login pages can be rendered with any technology you choose so long as the rules
* above are followed. Below is an example login.jsp that can be used as a quick start
* when using JSP's or as a baseline to translate into another view technology.
*下面是一个JSP例子,可以被用来快速创建登录页。
* <pre>
* <!-- loginProcessingUrl should correspond to FormLoginConfigurer#loginProcessingUrl. Don't forget to perform a POST -->
* <c:url value="/login" var="loginProcessingUrl"/>
* <form action="${loginProcessingUrl}" method="post">
* <fieldset>
* <legend>Please Login</legend>
* <!-- use param.error assuming FormLoginConfigurer#failureUrl contains the query parameter error -->
* <c:if test="${param.error != null}">
* <div>
* Failed to login.
* <c:if test="${SPRING_SECURITY_LAST_EXCEPTION != null}">
* Reason: <c:out value="${SPRING_SECURITY_LAST_EXCEPTION.message}" />
* </c:if>
* </div>
* </c:if>
* <!-- the configured LogoutConfigurer#logoutSuccessUrl is /login?logout and contains the query param logout -->
* <c:if test="${param.logout != null}">
* <div>
* You have been logged out.
* </div>
* </c:if>
* <p>
* <label for="username">Username</label>
* <input type="text" id="username" name="username"/>
* </p>
* <p>
* <label for="password">Password</label>
* <input type="password" id="password" name="password"/>
* </p>
* <!-- if using RememberMeConfigurer make sure remember-me matches RememberMeConfigurer#rememberMeParameter -->
* <p>
* <label for="remember-me">Remember Me?</label>
* <input type="checkbox" id="remember-me" name="remember-me"/>
* </p>
* <div>
* <button type="submit" class="btn">Log in</button>
* </div>
* </fieldset>
* </form>
* </pre>
*
* <h2>Impact on other defaults</h2>
*
* Updating this value, also impacts a number of other default values.
* // 更新默认值,将会影响其他默认值
* For example,
* the following are the default values when only formLogin() was specified.
*// 下面是当formLogin被开启时一系列默认值
* <ul>
* <li>/login GET - the login form</li>
* <li>/login POST - process the credentials and if valid authenticate the user</li>
* <li>/login?error GET - redirect here for failed authentication attempts</li>
* <li>/login?logout GET - redirect here after successfully logging out</li>
* </ul>
*
* If "/authenticate" was passed to this method it update the defaults as shown below:
*
* <ul>
* <li>/authenticate GET - the login form</li>
* <li>/authenticate POST - process the credentials and if valid authenticate the user
* </li>
* <li>/authenticate?error GET - redirect here for failed authentication attempts</li>
* <li>/authenticate?logout GET - redirect here after successfully logging out</li>
* </ul>
*
*
* @param loginPage the login page to redirect to if authentication is required (i.e.
* "/login")
* @return the {@link FormLoginConfigurer} for additional customization
*/
@Override
public FormLoginConfigurer<H> loginPage(String loginPage) {
return super.loginPage(loginPage);
}通过阅读上述源码,我们尝试修改用户名、密码默认参数名如下:
- 修改配置类
@Override
    protected void configure(HttpSecurity http) throws Exception {
        // 定制请求的授权规则
        http.authorizeRequests()
            .antMatchers("/css/**", "/").permitAll()
            .antMatchers("/level1/**").hasRole("VIP1")
            .antMatchers("/level2/**").hasRole("VIP2")
            .antMatchers("/level3/**").hasRole("VIP3");
        // 开启自动配置的登录功能
        http.formLogin().usernameParameter("name").passwordParameter("pwd").loginPage("/userlogin");

        // 开启自动配置的注销功能,默认重定向到/logout?success,修改为"/"
        http.logout().logoutSuccessUrl("/");

        //开启自动配置的Remember me
        http.rememberMe();
}- 修改表单
<!DOCTYPE html>
<html xmlns:th="http://www.thymeleaf.org">
<head>
<meta charset="UTF-8">
<title>Insert title here</title>
</head>
<body>
<h1 align="center">欢迎登陆武林秘籍管理系统</h1>
<hr>
<div align="center">
<form th:action="@{/userlogin}" method="post">
用户名:<input name="name"/><br>
密 码:<input name="pwd"><br/>
<input type="submit" value="登陆">
</form>
</div>
</body>
</html>再次测试登录:
成功登录!
② 为自定义登录页面添加Remember-me
首先查看使用默认登录页面时remember-me的源码:
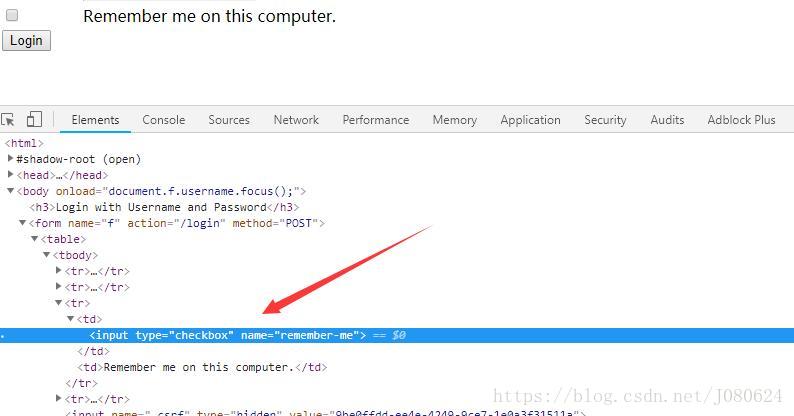
可以看到,添加了一个复选框,name为”remember-me”。
同样,在我们的登录表单中,也添加该复选框即可!
修改表单如下:
<form th:action="@{/userlogin}" method="post">
用户名:<input name="name"/><br>
密 码:<input name="pwd"><br/>
<input type="submit" value="登陆">
<input type="checkbox" name="remember-me"/> Remember-me
</form>登录测试如下图:
同样可以查看RememberMeConfigurer源码获取记住我的默认name:
public final class RememberMeConfigurer<H extends HttpSecurityBuilder<H>>
        extends AbstractHttpConfigurer<RememberMeConfigurer<H>, H> {
    /**
     * The default name for remember me parameter name and remember me cookie name
     */
    private static final String DEFAULT_REMEMBER_ME_NAME = "remember-me";
    private AuthenticationSuccessHandler authenticationSuccessHandler;
    private String key;
    private RememberMeServices rememberMeServices;
    private LogoutHandler logoutHandler;
    private String rememberMeParameter = DEFAULT_REMEMBER_ME_NAME;
    private String rememberMeCookieName = DEFAULT_REMEMBER_ME_NAME;
    private String rememberMeCookieDomain;
    private PersistentTokenRepository tokenRepository;
    private UserDetailsService userDetailsService;
    private Integer tokenValiditySeconds;
    private Boolean useSecureCookie;
    private Boolean alwaysRemember;
    //...
}
也可以使用自定义记住我name:
- 配置方法修改
  //开启自动配置的Remember me,并修改记住我的参数name
http.rememberMe().rememberMeParameter("remember");- 表单修改
<form th:action="@{/userlogin}" method="post">
用户名:<input name="name"/><br>
密 码:<input name="pwd"><br/>
<input type="checkbox" name="remember"/> Remember-me<br/>
<input type="submit" value="登陆">
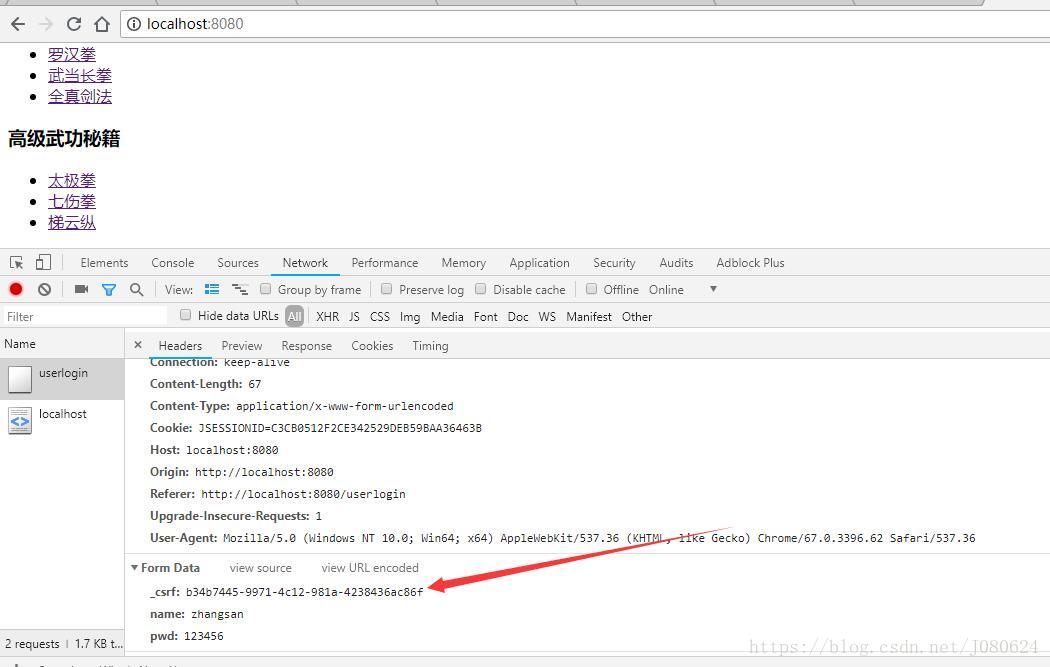
</form>【7】CSRF
CSRF(Cross-site request forgery)跨站请求伪造。
HttpSecurity默认启用csrf功能,会为表单添加_csrf的值,提交携带来预防CSRF。
如点击登录,查看network:
本篇博文项目地址:https://github.com/JanusJ/SpringBoot/tree/master/security