SpringBoot---使用Mybatis配置文件实现数据的增删查改
1、新建一个Maven项目,在pom.xml中添加必要的依赖:
<project xmlns="http://maven.apache.org/POM/4.0.0" xmlns:xsi="http://www.w3.org/2001/XMLSchema-instance"
	xsi:schemaLocation="http://maven.apache.org/POM/4.0.0 http://maven.apache.org/xsd/maven-4.0.0.xsd">
	<modelVersion>4.0.0</modelVersion>

	<groupId>com.etc</groupId>
	<artifactId>springboot</artifactId>
	<version>0.0.1-SNAPSHOT</version>
	<packaging>jar</packaging>

	<name>springboot</name>
	<url>http://maven.apache.org</url>

	<parent>
        <groupId>org.springframework.boot</groupId>
        <artifactId>spring-boot-starter-parent</artifactId>
        <version>1.4.7.RELEASE</version>
        <relativePath /> <!-- lookup parent from repository -->
    </parent>

	<properties>
		<project.build.sourceEncoding>UTF-8</project.build.sourceEncoding>
		 <project.reporting.outputEncoding>UTF-8</project.reporting.outputEncoding>
        <java.version>1.7</java.version>
	</properties>

	<dependencies>
		<!-- SpringBoot导入的jar包 -->
		<dependency>
			<groupId>org.springframework.boot</groupId>
			<artifactId>spring-boot-starter-web</artifactId>
		</dependency>
		 <!-- freemarker模版 -->
        <dependency>
            <groupId>org.springframework.boot</groupId>
            <artifactId>spring-boot-starter-freemarker</artifactId>
        </dependency>
        <!-- jdbc -->
        <dependency>
            <groupId>org.springframework.boot</groupId>
            <artifactId>spring-boot-starter-jdbc</artifactId>
        </dependency>
        <!-- mybatis -->
        <dependency>
            <groupId>org.mybatis.spring.boot</groupId>
            <artifactId>mybatis-spring-boot-starter</artifactId>
            <version>1.3.0</version>
        </dependency>
        <dependency>
            <groupId>mysql</groupId>
            <artifactId>mysql-connector-java</artifactId>
            <version>5.1.35</version>
        </dependency>
   		 <dependency>
            <groupId>com.alibaba</groupId>
            <artifactId>druid-spring-boot-starter</artifactId>
            <version>1.1.0</version>
        </dependency>
		<dependency>
			<groupId>junit</groupId>
			<artifactId>junit</artifactId>
			<version>3.8.1</version>
			<scope>test</scope>
		</dependency>
	</dependencies>

	 <build>
        <plugins>
            <plugin>
                <groupId>org.springframework.boot</groupId>
                <artifactId>spring-boot-maven-plugin</artifactId>
                <configuration>-Xdebug -Xrunjdwp:transport=dt_socket,server=y,suspend=y,address=8080</configuration>
            </plugin>

            <!-- mybatis generator 自动生成代码插件 -->
            <plugin>
                <groupId>org.mybatis.generator</groupId>
                <artifactId>mybatis-generator-maven-plugin</artifactId>
                <version>1.3.2</version>
                <configuration>
                    <configurationFile>${basedir}/src/main/resources/generator/generatorConfig.xml</configurationFile>
                    <overwrite>true</overwrite>
                    <verbose>true</verbose>
                </configuration>
            </plugin>
        </plugins>
    </build>

</project>
2、新建一个SpringBootBaseApplication.java启动类
package com.etc.springboot;

import org.mybatis.spring.annotation.MapperScan;
import org.springframework.boot.SpringApplication;
import org.springframework.boot.autoconfigure.SpringBootApplication;
import org.springframework.context.annotation.ComponentScan;

@SpringBootApplication
@ComponentScan(basePackages="com.etc.*")
@MapperScan(value = "com.etc.mapper")//这样才能找到mapper文件
public class SpringBootBaseApplication {
	 public static void main(String[] args) {
	        SpringApplication.run(SpringBootBaseApplication.class,args);
	        System.out.println("启动完成");
	    }
}
3、在数据库中新建一个表t_student,添加一些简单的数据,如下图所示:
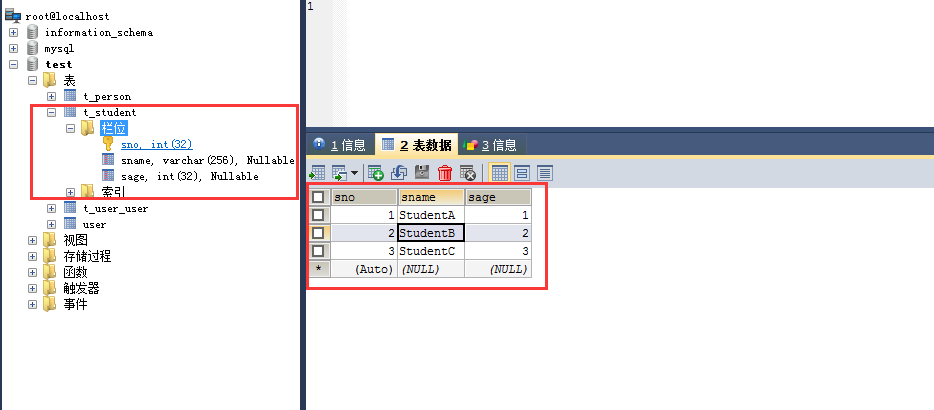
4、新建src/main/resource源文件夹,在该文件夹下新建application.properties文件,配置一些参数如下:
spring.datasource.name=test
spring.datasource.url=jdbc:mysql://localhost:3306/test?characterEncoding=UTF-8
spring.datasource.username=root
spring.datasource.password=root
spring.datasource.type=com.alibaba.druid.pool.DruidDataSource
spring.datasource.driverClassName=com.mysql.jdbc.Driver

###########################mybatis配置###############################
#全局映射器启用缓存
mybatis.configuration.cache-enabled=true
#查询时,关闭关联对象及时加载以提高性能
mybatis.configuration.lazy-loading-enabled=false
#按需加载字段(加载字段由SQL指定),不会加载关联表的所有字段,以提高性能
mybatis.configuration.aggressive-lazy-loading=false
#允许返回不同的结果集以达到通用的效果
mybatis.configuration.multiple-result-sets-enabled=true
#对于批量更新操作缓存SQL以提高性能
mybatis.configuration.default-executor-type=REUSE
#数据库执行超时时间
mybatis.configuration.default-statement-timeout=25000
mybatis.mapper-locations=classpath:mapping/*.xml
mybatis.type-aliases-package=com.etc.po
5、在com.etc.po包下新建一个Student.java类:
package com.etc.po;
/**
 * @Description:学生实体类
 * @author zoey
 * @date:2018年3月6日
 */
public class Student {
	private int sno;
	private String sname;
	private int sage;

	public int getSno() {
		return sno;
	}
	public void setSno(int sno) {
		this.sno = sno;
	}
	public String getSname() {
		return sname;
	}
	public void setSname(String sname) {
		this.sname = sname;
	}
	public int getSage() {
		return sage;
	}
	public void setSage(int sage) {
		this.sage = sage;
	}
	@Override
	public String toString() {
		return "Student [sno=" + sno + ", sname=" + sname + ", sage=" + sage + "]";
	}

	public Student(String sname, int sage) {
		super();
		this.sname = sname;
		this.sage = sage;
	}
	public Student() {
		super();
	}
}
6、在src/main/resources下新建一个mapping文件夹,然后新建StudentMapper.xml文件如下:
<?xml version="1.0" encoding="UTF-8"?>
<!DOCTYPE mapper PUBLIC "-//mybatis.org//DTD Mapper 3.0//EN"
"http://mybatis.org/dtd/mybatis-3-mapper.dtd">
<mapper namespace="com.etc.mapper.StudentMapper">
<!-- 结果集 -->
<resultMap id="studentMap" type="com.etc.po.Student">
		<id column="sno" property="sno" />
        <result column="sname" property="sname" />
        <result column="sage" property="sage" />
</resultMap>

<select id="findAll" resultMap="studentMap" parameterType="com.etc.po.Student">
	select
		sno,
		sname,
		sage
	from
		t_student
</select>

<insert id="insertStudent" parameterType="com.etc.po.Student" useGeneratedKeys="true" keyProperty="sno">
	insert into
		t_student(sname,sage)
	values
		(#{sname},#{sage})
</insert>

<select id="findById" resultMap="studentMap" parameterType="java.lang.Integer">
	select
		sno,
		sname,
		sage
	from
		t_student
	where
		sno = #{sno}

</select>
<!--
报错:Result Maps collection does not contain value for com.etc.po.Student
解决方法:将findById查询方法的  resultMap="com.etc.po.Student" 改为 resultMap="studentMap"
 -->

<update id="updateStudent" parameterType="com.etc.po.Student">
	update
		t_student
	set
		sname = #{sname},sage=#{sage}
	where
		sno = #{sno}
</update>

<delete id="deleteStudent" parameterType="java.lang.Integer">
	delete from
		t_student
	where
		sno = #{sno}
</delete>

<delete id="delteStudent2" parameterType="com.etc.po.Student">
	delete from
		t_student
	where
		sno = #{sno}
</delete>

</mapper>
7、在com.etc.mapper包下新建一个StudentMapper.java类:
package com.etc.mapper;

import java.util.List;

import org.apache.ibatis.annotations.Mapper;

import com.etc.po.Student;
/**
 * @Description:一个接口,方法名称和
 * @author zoey
 * @date:2018年3月6日
 */
public interface StudentMapper {
	List<Student> findAll();

	int insertStudent(Student student);

	Student findById(int i);

	int updateStudent(Student student);

	int deleteStudent(int i);

	int delteStudent2(Student student);
}
8、在com.etc.service包下新建一个StudentService.java类:
package com.etc.service;
import java.util.List;
import org.springframework.beans.factory.annotation.Autowired;
import org.springframework.stereotype.Service;
import com.etc.mapper.StudentMapper;
import com.etc.po.Student;
/**
 * @Description:Service层,调用mapper层的方法
 * @author zoey
 * @date:2018年3月6日
 */
@Service(value="studentService")
public class StudentService {
	@Autowired
	private StudentMapper studentMapper;

	public List<Student> findAll(){
		return studentMapper.findAll();
	}

	public int insertStudent(Student student) {
		return studentMapper.insertStudent(student);
	}

	public Student findById(int i) {
		return studentMapper.findById(i);
	}

	public int updateStudent(Student student) {
		return studentMapper.updateStudent(student);
	}

	public int deleteStudent(int i) {
		return studentMapper.deleteStudent(i);
	}

	public int deleteStudent2(Student student) {
		return studentMapper.delteStudent2(student);
	}
}
9、在com.etc.controller包下新建一个StudentController.java类:
package com.etc.controller;

import java.util.List;

import org.springframework.beans.factory.annotation.Autowired;
import org.springframework.stereotype.Controller;
import org.springframework.web.bind.annotation.PathVariable;
import org.springframework.web.bind.annotation.RequestMapping;
import org.springframework.web.bind.annotation.RequestMethod;
import org.springframework.web.bind.annotation.RequestParam;
import org.springframework.web.bind.annotation.ResponseBody;

import com.etc.po.Student;
import com.etc.service.StudentService;
/**
 * @Description:Controller层,调用Service层的方法,返回执行结果
 * @author zoey
 * @date:2018年3月6日
 */
@Controller
@RequestMapping("/student")
public class StudentController {
	@Autowired
	private StudentService studentService;

	/**
	 * @Description:查询所有的学生信息
	 * 访问地址:http://localhost:8080/student/findAll
	 * @return 返回字符串信息,直接显示在页面
	 * @author zoey
	 * @date:2018年3月6日
	 */
	@RequestMapping("/findAll")
	@ResponseBody //使得返回结果为字符串,而不是进入某一个指定的页面
	public String findAll() {
		System.out.println("进入查询方法");
		List<Student> list = studentService.findAll();
		for(int i=0;i<list.size();i++) {
			System.out.println("学生:"+list.get(i));
		}
		return "findAll";
	}
	/**
	 * @Description:根据学生id查询学生信息(使用@PathVariable注解接收传入的参数)
	 * 访问地址:http://localhost:8080/student/findById/3
	 * @return
	 * @author:zoey
	 * @date:2018年3月6日
	 */
	@RequestMapping(value="/findById/{sno}",method=RequestMethod.GET)
	@ResponseBody
	public String findById(@PathVariable("sno") Integer sno) {
		System.out.println("进入根据id查询学生信息方法");
		Student student = studentService.findById(sno);
		System.out.println(student);
		return "findById";
	}
	/**
	 * @Description:根据学生id查询学生信息(使用@RequestParam注解接收传入的参数)
	 * 访问地址:http://localhost:8080/student/findById?sno=3
	 * @param sno
	 * @return
	 * @author:zoey
	 * @date:2018年3月6日
	 */
	@RequestMapping(value="/findById")
	@ResponseBody
	public String findById2(@RequestParam("sno") Integer sno) {
		System.out.println("进入根据id查询学生信息方法");
		Student student = studentService.findById(sno);
		System.out.println(student);
		return "findById";
	}
	/**
	 * @Description:新增学生信息
	 * 访问地址:http://localhost:8080/student/insertStudent(数据写死)
	 * 		 http://localhost:8080/student/insertStudent?sname=zoey&sage=18(传递参数)
	 * @return 返回字符串信息,直接显示在页面
	 * @author:zoey
	 * @date:2018年3月6日
	 */
	@RequestMapping("/insertStudent")
	@ResponseBody
	public String insertStudent(Student student) {
		System.out.println("进入新增方法");
		//Student student = new Student("lan",20);//数据写死
		int result = studentService.insertStudent(student);
		if(result==1) {
			System.out.println("新增学生成功!");
		}else {
			System.out.println("新增学生失败!");
		}
		return "insert";
	}
	/**
	 * @Description:修改学生信息
	 * 访问地址:http://localhost:8080/student/updateStudent?sno=1&sname=change
	 * @param student
	 * @return
	 * @author:zoey
	 * @date:2018年3月6日
	 */
	@RequestMapping("/updateStudent")
	@ResponseBody
	public String updateStudent(Student student) {
		System.out.println("进入更新方法");
		int result = studentService.updateStudent(student);
		if(result==1) {
			System.out.println("修改学生成功!");
		}else {
			System.out.println("修改学生失败!");
		}
		return "update";
	}
	/**
	 * @Description:删除学生信息(数据写死)
	 * 访问地址:http://localhost:8080/student/deleteStudent
	 * 		 http://localhost:8080/student/deleteStudent?sno=2(报错)
	 * 报错如下:
	 * 	Optional int parameter 'i' is present but cannot be translated into a null value
	 * 	due to being declared as a primitive type.
	 * 	Consider declaring it as object wrapper for the corresponding primitive type.
	 * @return
	 * @author:zoey
	 * @date:2018年3月6日
	 */
	@RequestMapping("/deleteStudent")
	@ResponseBody
	public String deleteStudent() {
		System.out.println("进入删除方法");
		int result = studentService.deleteStudent(1);//传入的参数是一个整型,不能从地址栏的参数中传递过去
		if(result==1) {
			System.out.println("删除学生成功!");
		}else {
			System.out.println("删除学生失败!");
		}
		return "delete";
	}
	/**
	 * @Description:根据学生id删除学生信息
	 * 访问地址:http://localhost:8080/student/deleteStudent?sno=2
	 * @param student
	 * @return
	 * @author:zoey
	 * @date:2018年3月6日
	 */
	@RequestMapping("/deleteStudent2")
	@ResponseBody
	public String delelteStudent2(Student student) {
		int result = studentService.deleteStudent2(student);//传递的参数是一个对象,可以从地址栏的参数中传递过去
		if(result==1) {
			System.out.println("删除学生成功!");
		}else {
			System.out.println("删除学生失败!");
		}
		return "delete2";
	}
}
项目结构图如下:
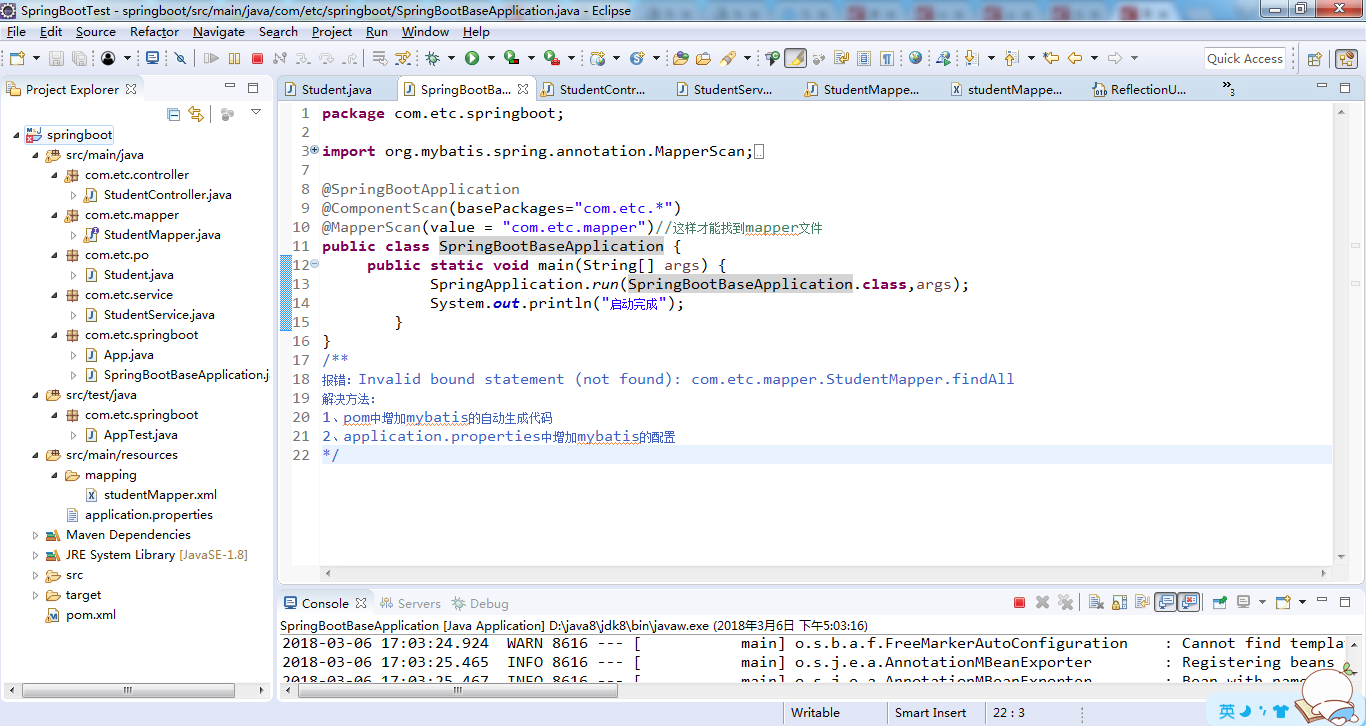
错误总结:
1、启动SpringBootBaseApplication.java类失败,报错如下:
Description:

Field studentService in com.etc.controller.StudentController required a bean of type 'com.etc.service.StudentService' that could not be found.


Action:

Consider defining a bean of type 'com.etc.service.StudentService' in your configuration.
找不到Service类,解决方法如下:
在StudentService类上面增加注解如下:
@Service(value="studentService")2、启动SpringBootBaseApplication.java类失败,报错如下:
Description:

Field studentMapper in com.etc.service.StudentService required a bean of type 'com.etc.mapper.StudentMapper' that could not be found.


Action:

Consider defining a bean of type 'com.etc.mapper.StudentMapper' in your configuration.
找不到mapper类,解决方法如下:
在SpringBootBaseApplication启动类的上面增加注解如下:
@MapperScan(value = "com.etc.mapper")//这样才能找到mapper文件3、启动成功,报错如下:
Invalid bound statement (not found): com.etc.mapper.StudentMapper.findAll找不到StudentMapper.java类
解决方法,步骤如下:
(1)pom.xml中增加mybatis的依赖如下:
<!-- mybatis -->
<dependency>
      <groupId>org.mybatis.spring.boot</groupId>
      <artifactId>mybatis-spring-boot-starter</artifactId>
      <version>1.3.0</version>
</dependency>
(2)pom.xml中增加mybatis的自动生成代码如下:
<build>
        <plugins>
            <plugin>
                <groupId>org.springframework.boot</groupId>
                <artifactId>spring-boot-maven-plugin</artifactId>
                <configuration>-Xdebug -Xrunjdwp:transport=dt_socket,server=y,suspend=y,address=8080</configuration>
            </plugin>

            <!-- mybatis generator 自动生成代码插件 -->
            <plugin>
                <groupId>org.mybatis.generator</groupId>
                <artifactId>mybatis-generator-maven-plugin</artifactId>
                <version>1.3.2</version>
                <configuration>
                    <configurationFile>${basedir}/src/main/resources/generator/generatorConfig.xml</configurationFile>
                    <overwrite>true</overwrite>
                    <verbose>true</verbose>
                </configuration>
            </plugin>
        </plugins>
    </build>
(3)application.properties中增加mybatis的配置如下:
###########################mybatis配置###############################
#全局映射器启用缓存
mybatis.configuration.cache-enabled=true
#查询时,关闭关联对象及时加载以提高性能
mybatis.configuration.lazy-loading-enabled=false
#按需加载字段(加载字段由SQL指定),不会加载关联表的所有字段,以提高性能
mybatis.configuration.aggressive-lazy-loading=false
#允许返回不同的结果集以达到通用的效果
mybatis.configuration.multiple-result-sets-enabled=true
#对于批量更新操作缓存SQL以提高性能
mybatis.configuration.default-executor-type=REUSE
#数据库执行超时时间
mybatis.configuration.default-statement-timeout=25000
mybatis.mapper-locations=classpath:mapping/*.xml
mybatis.type-aliases-package=com.etc.po
经验总结:
1、要读取数据库中的数据,需要进行如下操作:
(1)pom.xml中引入数据库相关的依赖包:
  <!-- jdbc -->
  <dependency>
        <groupId>org.springframework.boot</groupId>
        <artifactId>spring-boot-starter-jdbc</artifactId>
  </dependency>
  <!-- mysql -->
  <dependency>
        <groupId>mysql</groupId>
        <artifactId>mysql-connector-java</artifactId>
        <version>5.1.35</version>
 </dependency>
 <dependency>
        <groupId>com.alibaba</groupId>
        <artifactId>druid-spring-boot-starter</artifactId>
        <version>1.1.0</version>
 </dependency>
(2)application.properties文件中需要配置数据库相关的信息:
###############################数据库配置:连接本地数据库###############################
spring.datasource.name=test
spring.datasource.url=jdbc:mysql://localhost:3306/test?characterEncoding=UTF-8
spring.datasource.username=root
spring.datasource.password=root
spring.datasource.type=com.alibaba.druid.pool.DruidDataSource
spring.datasource.driverClassName=com.mysql.jdbc.Driver
2、进行增删查改操作,结构如下:
Controller类--->Service类--->Mapper类--->Mapper.xml配置文件
(1)Controller类中需要访问Service类的方法,则在Controller类中添加@Autowired注解,自动注入Service类:
@Autowired
private StudentService studentService;
(2)Service类中需要访问Mapper类的方法,则在Service类中添加@Autowired注解,自动注入Mapper类:
@Autowired
private StudentMapper studentMapper;
(3)Mapper类中需要访问Mapper.xml中的方法,需要保持Mapper类中方法的名称和Mapper.xml中的id保持一致:
List<Student> findAll();<select id="findAll" resultMap="studentMap" parameterType="com.etc.po.Student">
select
sno,
sname,
sage
from
t_student
</select>3、StudentMapper.xml文件的编写细节:
(1)查询标签:<select>、新增标签:<insert>、更新标签:<update>、删除标签:<delete>
(2)resultMap标签,结果与数据库中的字段相对应
<!-- 结果集 -->
<resultMap id="studentMap" type="com.etc.po.Student">
		<id column="sno" property="sno" />
        <result column="sname" property="sname" />
        <result column="sage" property="sage" />
</resultMap>
(3)parameterType需要指定详细的类型,比如 传递的参数类型是int,那么parameterType的值不能是int或者Integer,而必须是java.lang.Integer
<select id="findById" resultMap="studentMap" parameterType="java.lang.Integer">
	select
		sno,
		sname,
		sage
	from
		t_student
	where
		sno = #{sno}
</select>
其中,动态值,需要传入的参数sno,使用#{sno}来获取
4、通过url传递参数的几种方式:
(1)第一种方法:传递一个Student对象:
(a)StudentMapper.xml中定义如下:
<update id="updateStudent" parameterType="com.etc.po.Student">
	update
		t_student
	set
		sname = #{sname},sage=#{sage}
	where
		sno = #{sno}
</update>
(2)StudentController.java类中编写如下:
/**
* @Description:修改学生信息
* 访问地址:http://localhost:8080/student/updateStudent?sno=1&sname=change
* @param student
* @return
* @author:zoey
* @date:2018年3月6日
 */
@RequestMapping("/updateStudent")
@ResponseBody
public String updateStudent(Student student) {
	System.out.println("进入更新方法");
	int result = studentService.updateStudent(student);
	if(result==1) {
		System.out.println("修改学生成功!");
	}else {
		System.out.println("修改学生失败!");
	}
	return "update";
}http://localhost:8080/student/updateStudent?sno=1&sname=change传入一个学生对象,进行更改。
运行结果:
修改学生成功!这种方式,不能直接传入一个sno,也就是参数类型改为java.lang.Integer,无法实现,报错如下:
Optional int parameter 'i' is present but cannot be translated into a null value
due to being declared as a primitive type.
Consider declaring it as object wrapper for the corresponding primitive type.
那么,如果我们想要直接传入一个sno,然后进行操作,就使用第二种方法或者第三种方法。
(2)第二种方法:传递一个Integer类型,使用@PathVariable注解
(a)StudentMapper.xml中定义如下:
<select id="findById" resultMap="studentMap" parameterType="java.lang.Integer">
	select
		sno,
		sname,
		sage
	from
		t_student
	where
		sno = #{sno}

</select>
(b)StudentController.java类中编写如下:
/**
* @Description:根据学生id查询学生信息
* 访问地址:http://localhost:8080/student/findById/3
* @return
* @author:zoey
* @date:2018年3月6日
 */
@RequestMapping(value="/findById/{sno}",method=RequestMethod.GET)
@ResponseBody
public String findById(@PathVariable("sno") Integer sno) {
	System.out.println("进入根据id查询学生信息方法");
	Student student = studentService.findById(sno);
	System.out.println(student);
	return "findById";
}http://localhost:8080/student/findById/3运行结果如下:
进入根据id查询学生信息方法
Student [sno=3, sname=StudentC, sage=3](a)StudentMapper.xml中定义如下:
<select id="findById" resultMap="studentMap" parameterType="java.lang.Integer">
	select
		sno,
		sname,
		sage
	from
		t_student
	where
		sno = #{sno}

</select>
(b)StudentController.java类中编写如下:
/**
* @Description:根据学生id查询学生信息
* 访问地址:http://localhost:8080/student/findById?sno=3
* @param sno
* @return
* @author:zoey
* @date:2018年3月6日
 */
@RequestMapping(value="/findById")
@ResponseBody
public String findById(@RequestParam("sno") Integer sno) {
	System.out.println("进入根据id查询学生信息方法");
	Student student = studentService.findById(sno);
	System.out.println(student);
	return "findById";
}http://localhost:8080/student/findById?sno=3运行结果如下:
进入根据id查询学生信息方法
Student [sno=3, sname=StudentC, sage=3]