相信使用过Spring的众多开发者都知道Spring提供了非常好用的JavaMailSender接口实现邮件发送。在Spring Boot的Starter模块中也为此提供了自动化配置。下面通过实例看看如何在Spring Boot中使用JavaMailSender发送邮件。
快速入门
在Spring Boot的工程中的pom.xml中引入spring-boot-starter-mail依赖:
<?xml version="1.0" encoding="UTF-8"?>
<project xmlns="http://maven.apache.org/POM/4.0.0" xmlns:xsi="http://www.w3.org/2001/XMLSchema-instance"
	xsi:schemaLocation="http://maven.apache.org/POM/4.0.0 http://maven.apache.org/xsd/maven-4.0.0.xsd">
	<modelVersion>4.0.0</modelVersion>

	<groupId>com.cicoding</groupId>
	<artifactId>cicoding-mail</artifactId>
	<version>1.0.0</version>
	<packaging>jar</packaging>

	<name>cicoding-mail</name>
	<description>Spring Boot project</description>

	<parent>
		<groupId>org.springframework.boot</groupId>
		<artifactId>spring-boot-starter-parent</artifactId>
		<version>1.3.2.RELEASE</version>
		<relativePath/> <!-- lookup parent from repository -->
	</parent>

	<properties>
		<project.build.sourceEncoding>UTF-8</project.build.sourceEncoding>
		<java.version>1.8</java.version>
	</properties>

	<dependencies>
		<dependency>
			<groupId>org.springframework.boot</groupId>
			<artifactId>spring-boot-starter</artifactId>
		</dependency>

		<dependency>
			<groupId>org.springframework.boot</groupId>
			<artifactId>spring-boot-starter-mail</artifactId>
		</dependency>

		<dependency>
			<groupId>org.springframework.boot</groupId>
			<artifactId>spring-boot-starter-velocity</artifactId>
		</dependency>

		<dependency>
			<groupId>org.springframework.boot</groupId>
			<artifactId>spring-boot-starter-test</artifactId>
			<scope>test</scope>
		</dependency>

	</dependencies>

	<build>
		<plugins>
			<plugin>
				<groupId>org.springframework.boot</groupId>
				<artifactId>spring-boot-maven-plugin</artifactId>
			</plugin>
		</plugins>
	</build>

</project>
如其他自动化配置模块一样,在完成了依赖引入之后,只需要在application.properties中配置相应的属性内容。
下面我们以QQ邮箱为例,在application.properties中加入如下配置(注意替换自己的用户名和密码):
一种模版配置;
spring.mail.host=smtp.qq.com
spring.mail.username=用户名
spring.mail.password=这里填邮箱的授权码
spring.mail.properties.mail.smtp.auth=true
spring.mail.properties.mail.smtp.starttls.enable=true
spring.mail.properties.mail.smtp.starttls.required=true
另一种模版配置;
spring.mail.host=smtp.qq.com
spring.mail.username=邮箱名
spring.mail.password=这里填邮箱的授权码
spring.mail.default-encoding=UTF-8
spring.mail.port=465
spring.mail.properties.mail.smtp.socketFactory.class=javax.net.ssl.SSLSocketFactory
spring.mail.properties.mail.debug=true
- 注意:
PO3/SMTP服务必须开启
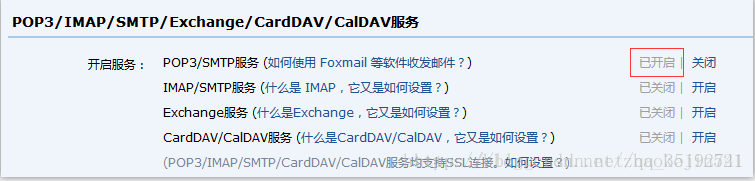
QQ邮箱发送邮件服务器主机名为:smtp.qq.com,必须使用使用SSL(spring.mail.properties.mail.smtp.socketFactory.class=javax.net.ssl.SSLSocketFactory),端口号465或587(spring.mail.port=465)
通过单元测试来实现一封简单邮件的发送:
@RunWith(SpringJUnit4ClassRunner.class)
@SpringApplicationConfiguration(classes = Application.class)
public class ApplicationTests {

	@Autowired
	private JavaMailSender mailSender;
	@Autowired
	private VelocityEngine velocityEngine;
	@Test
	public void sendSimpleMail() throws Exception {

		SimpleMailMessage message = new SimpleMailMessage();
		message.setFrom("[email protected]");
		message.setTo("[email protected]");
		message.setSubject("主题:简单邮件");
		message.setText("测试邮件内容");

		mailSender.send(message);
	}
}
好,我们到这里,一个简单的邮件发送就完成了,运行一下该单元测试,看看效果如何?
注:由于Spring Boot的starter模块提供了自动化配置,所以在引入了spring-boot-starter-mail依赖之后,会根据配置文件中的内容去创建JavaMailSender实例,因此我们可以直接在需要使用的地方直接@Autowired来引入邮件发送对象。
进阶使用
在上例中,我们通过使用SimpleMailMessage实现了简单的邮件发送,但是实际使用过程中,我们还可能会带上附件、或是使用邮件模块等。这个时候我们就需要使用MimeMessage来设置复杂一些的邮件内容,下面我们就来依次实现一下。
发送附件
在上面单元测试中加入如下测试用例(通过MimeMessageHelper来发送一封带有附件的邮件):
@Autowired
	private JavaMailSender mailSender;

	@Test
	public void sendAttachmentsMail() throws Exception {

		MimeMessage mimeMessage = mailSender.createMimeMessage();

		MimeMessageHelper helper = new MimeMessageHelper(mimeMessage, true);
		helper.setFrom("[email protected]");
		helper.setTo("[email protected]");
		helper.setSubject("主题:有附件");
		helper.setText("有附件的邮件");

		FileSystemResource file = new FileSystemResource(new File("weixin.jpg"));
		helper.addAttachment("附件-1.jpg", file);
		helper.addAttachment("附件-2.jpg", file);

		mailSender.send(mimeMessage);
	}
嵌入静态资源
除了发送附件之外,我们在邮件内容中可能希望通过嵌入图片等静态资源,让邮件获得更好的阅读体验,而不是从附件中查看具体图片,下面的测试用例演示了如何通过MimeMessageHelper实现在邮件正文中嵌入静态资源。
@Test
	public void sendInlineMail() throws Exception {

		MimeMessage mimeMessage = mailSender.createMimeMessage();

		MimeMessageHelper helper = new MimeMessageHelper(mimeMessage, true);
		helper.setFrom("[email protected]");
		helper.setTo("[email protected]");
		helper.setSubject("主题:嵌入静态资源");
		helper.setText("<html><body><img src=\"cid:weixin\" ></body></html>", true);

		FileSystemResource file = new FileSystemResource(new File("weixin.jpg"));
		helper.addInline("weixin", file);

		mailSender.send(mimeMessage);
	}
这里需要注意的是addInline函数中资源名称weixin需要与正文中cid:weixin对应起来
模板邮件
通常我们使用邮件发送服务的时候,都会有一些固定的场景,比如重置密码、注册确认等,给每个用户发送的内容可能只有小部分是变化的。所以,很多时候我们会使用模板引擎来为各类邮件设置成模板,这样我们只需要在发送时去替换变化部分的参数即可。
在Spring Boot中使用模板引擎来实现模板化的邮件发送也是非常容易的,下面我们以velocity为例实现一下。
引入velocity模块的依赖:(在pom文件已经一如依赖)
@Test
	public void sendTemplateMail() throws Exception {

		MimeMessage mimeMessage = mailSender.createMimeMessage();

		MimeMessageHelper helper = new MimeMessageHelper(mimeMessage, true);
		helper.setFrom("[email protected]");
		helper.setTo("[email protected]");
		helper.setSubject("主题:模板邮件");

		Map<String, Object> model = new HashedMap();
		model.put("username", "cicoding");
		String text = VelocityEngineUtils.mergeTemplateIntoString(
				velocityEngine, "template.vm", "UTF-8", model);
		helper.setText(text, true);

		mailSender.send(mimeMessage);
	}
在resources/templates/下,创建一个模板页面template.vm:
<html>
<body>
<h3>你好, ${username}, 这是一封模板邮件!</h3>
</body>
</html>
尝试运行一下,就可以收到内容为你好, cicoding, 这是一封模板邮件!的邮件。这里,我们通过传入username的参数,在邮件内容中替换了模板中的${username}变量。
https://blog.csdn.net/zhaokejin521/article/details/80859834 原文地址