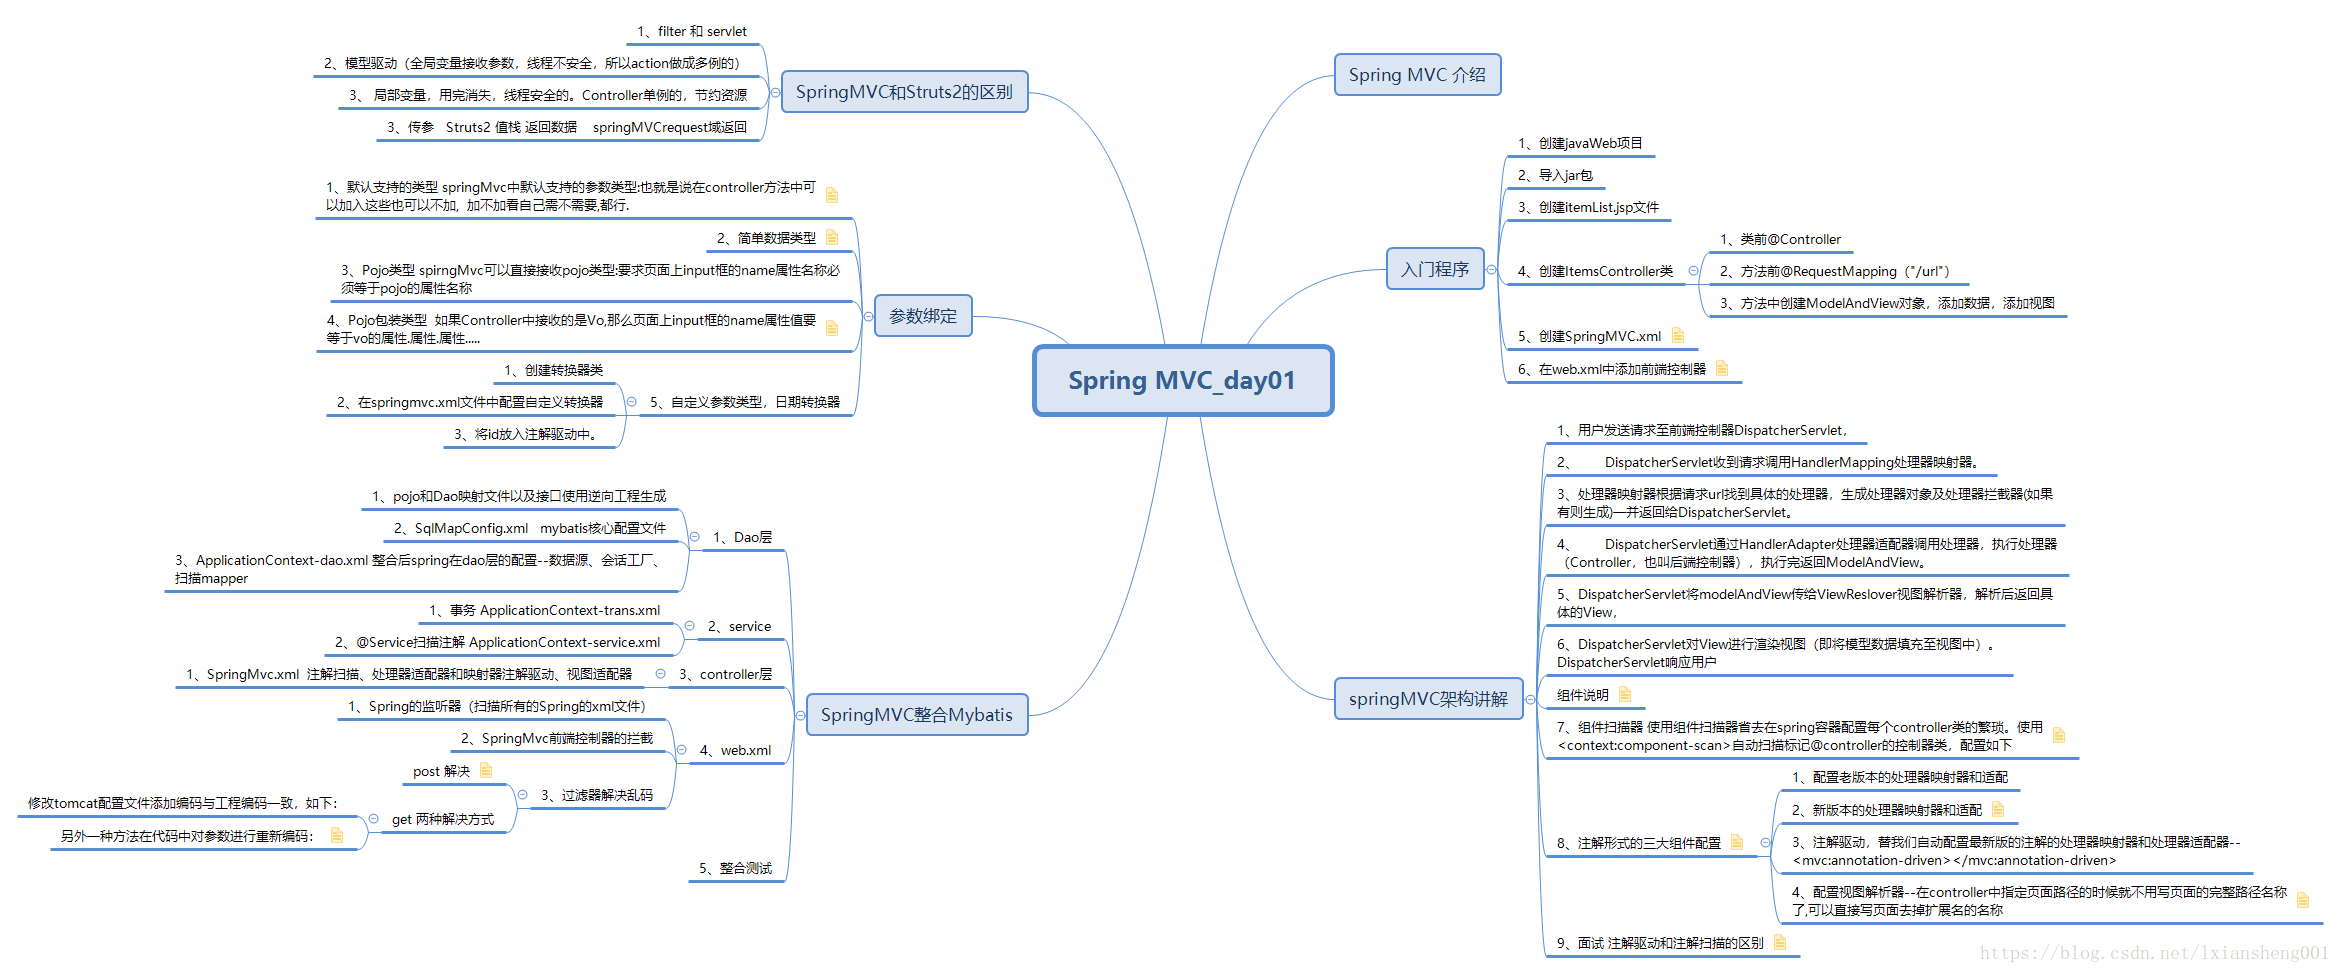
1、思维导图:
2、入门程序
2.1创建java工程
2.2 导入jar包
2.3创建前端itemsList.jsp文件
2.4 创建ItemsController.java
@Controller
public class InputDoor {

	@RequestMapping("/list")
	public ModelAndView itemList() throws Exception{
		List<Item> list = new ArrayList<Item>();
		Item item1 =new Item();
		item1.setName("大宝");
		item1.setDetail("护肤用品");
		Item item2 =new Item();
		item2.setName("SKII");
		item2.setDetail("护肤用品");
		list.add(item2);
		list.add(item1);

		ModelAndView model = new ModelAndView();

		model.addObject("itemList", list);

		model.setViewName("/itemList.jsp");
		return model;

	}


}
2.5创建SpringMVC.xml核心文件 三大组件
注解扫描
注解驱动(处理器映射器+处理器适配器)
配置视图解析器
<?xml version="1.0" encoding="UTF-8"?>
<beans xmlns="http://www.springframework.org/schema/beans"
xmlns:xsi="http://www.w3.org/2001/XMLSchema-instance"
xmlns:p="http://www.springframework.org/schema/p"
xmlns:context="http://www.springframework.org/schema/context"
xmlns:dubbo="http://code.alibabatech.com/schema/dubbo"
xmlns:mvc="http://www.springframework.org/schema/mvc"
xsi:schemaLocation="http://www.springframework.org/schema/beans
http://www.springframework.org/schema/beans/spring-beans-4.0.xsd
http://www.springframework.org/schema/mvc
http://www.springframework.org/schema/mvc/spring-mvc-4.0.xsd
http://code.alibabatech.com/schema/dubbo
http://code.alibabatech.com/schema/dubbo/dubbo.xsd
http://www.springframework.org/schema/context
http://www.springframework.org/schema/context/spring-context-4.0.xsd">
<!-- 配置@Controller注解扫描 -->
<context:component-scan base-package="cn.chuangtao.demo"></context:component-scan>
<!-- 如果没有显示的配置处理器映射器和处理器适配那么springMvc会去默认的dispatcherServlet.properties中查找,
对应的处理器映射器和处理器适配器去使用,这样每个请求都要扫描一次他的默认配置文件,效率非常低,会降低访问速度,所以要显示的配置处理器映射器和
处理器适配器 -->
<!-- 注解形式的处理器映射器 -->
<!-- <bean class="org.springframework.web.servlet.mvc.annotation.DefaultAnnotationHandlerMapping"></bean> -->
<!-- 注解形式的处理器适配器 -->
<!-- <bean class="org.springframework.web.servlet.mvc.annotation.AnnotationMethodHandlerAdapter"></bean> -->
<!-- 配置最新版的注解的处理器映射器 -->
<!-- <bean class="org.springframework.web.servlet.mvc.method.annotation.RequestMappingHandlerMapping"></bean> -->
<!-- 配置最新版的注解的处理器适配器 -->
<!-- <bean class="org.springframework.web.servlet.mvc.method.annotation.RequestMappingHandlerAdapter"></bean> -->
<!-- 注解驱动:
作用:替我们自动配置最新版的注解的处理器映射器和处理器适配器
-->
<!-- <mvc:annotation-driven></mvc:annotation-driven> -->
<!-- 配置视图解析器
作用:在controller中指定页面路径的时候就不用写页面的完整路径名称了,可以直接写页面去掉扩展名的名称
-->
<!-- <bean class="org.springframework.web.servlet.view.InternalResourceViewResolver"> -->
<!-- 真正的页面路径 = 前缀 + 去掉后缀名的页面名称 + 后缀 -->
<!-- 前缀 -->
<!-- <property name="prefix" value="/WEB-INF/jsp/"></property> -->
<!-- 后缀 -->
<!-- <property name="suffix" value=".jsp"></property> -->
<!-- </bean> -->
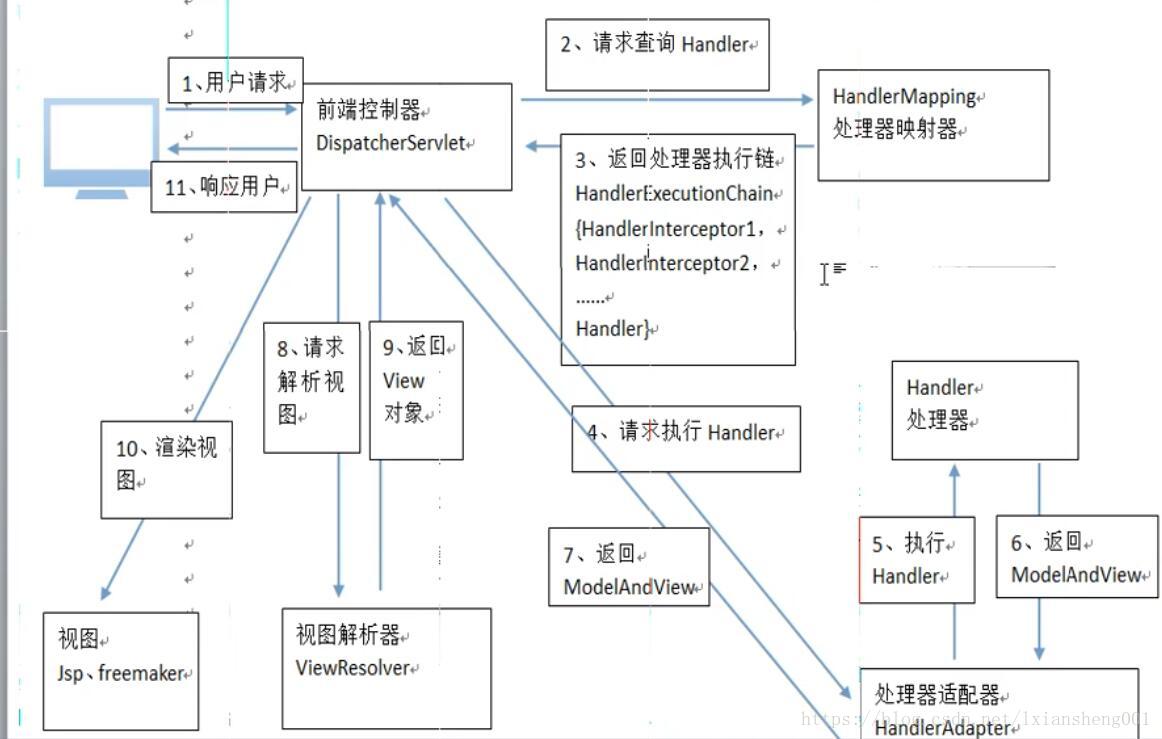
</beans>2.6 在web.xml中创建前端控制器
和Struts2不同的是 springMvc是DispatcherServlet 所以配置的是servlet
  <!-- spirngMvc前端控制器 -->
  <servlet>
  	<servlet-name>springMvc</servlet-name>
  	<servlet-class>org.springframework.web.servlet.DispatcherServlet</servlet-class>
  	<!-- 如果没有指定springMvc核心配置文件那么默认会去找/WEB-INF/+<servlet-name>中的内容 +   -servlet.xml配置文件 -->
  	<!-- 指定springMvc核心配置文件位置 -->
  	<init-param>
  		<param-name>contextConfigLocation</param-name>
  		<param-value>classpath:SpringMVC.xml</param-value>
  	</init-param>
  		<!-- tomcat启动的时候就加载这个servlet -->
  	<load-on-startup>1</load-on-startup>
  </servlet>


  <servlet-mapping>
  	<servlet-name>springMvc</servlet-name>
  	<url-pattern>*.action</url-pattern>
  </servlet-mapping>